
English Manual
Page 2
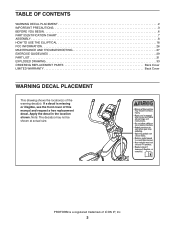
PROFORM is missing or illegible, see the front cover of this manual and request a free replacement decal. If a decal is a registered trademark of the warning decal(s). ... size. TABLE OF CONTENTS WARNING DECAL PLACEMENT 2 IMPORTANT PRECAUTIONS 3 BEFORE YOU BEGIN 6 PART IDENTIFICATION CHART 7 ASSEMBLY 8 HOW TO USE THE ELLIPTICAL 18 FCC INFORMATION 26 MAINTENANCE AND TROUBLESHOOTING 27 EXERCISE GUIDELINES 29 PART LIST 31 EXPLODED DRAWING 33 ORDERING REPLACEMENT PARTS Back Cover LIMITED WARRANTY Back Cover WARNING DECAL PLACEMENT This drawing shows the...
PROFORM is missing or illegible, see the front cover of this manual and request a free replacement decal. If a decal is a registered trademark of the warning decal(s). ... size. TABLE OF CONTENTS WARNING DECAL PLACEMENT 2 IMPORTANT PRECAUTIONS 3 BEFORE YOU BEGIN 6 PART IDENTIFICATION CHART 7 ASSEMBLY 8 HOW TO USE THE ELLIPTICAL 18 FCC INFORMATION 26 MAINTENANCE AND TROUBLESHOOTING 27 EXERCISE GUIDELINES 29 PART LIST 31 EXPLODED DRAWING 33 ORDERING REPLACEMENT PARTS Back Cover LIMITED WARRANTY Back Cover WARNING DECAL PLACEMENT This drawing shows the...

English Manual
Page 3
Before beginning any worn parts immediately. 8. Various factors may result in general. 13. The elliptical does not have a freewheel; Use the elliptical only as an exercise aid in determining heart rate trends in serious injury or death. To protect the floor or carpet from damage, place a mat ...
Before beginning any worn parts immediately. 8. Various factors may result in general. 13. The elliptical does not have a freewheel; Use the elliptical only as an exercise aid in determining heart rate trends in serious injury or death. To protect the floor or carpet from damage, place a mat ...
English Manual
Page 6
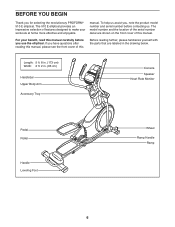
... location of the serial number decal are shown on the front cover of this manual carefully before contacting us assist you for selecting the revolutionary PROFORM® 510 E elliptical. Length: 5 ft. 8 in. (173 cm) Width: 2 ft. 2 in the drawing below. For your workouts at home more effective ... this manual, please see the front cover of this manual. The 510 E elliptical provides an impressive selection of features designed to make your benefit, read this Before reading further, please familiarize yourself with the parts that are labeled in . (66 cm) Handlebar Upper Body Arm ...
... location of the serial number decal are shown on the front cover of this manual carefully before contacting us assist you for selecting the revolutionary PROFORM® 510 E elliptical. Length: 5 ft. 8 in. (173 cm) Width: 2 ft. 2 in the drawing below. For your workouts at home more effective ... this manual, please see the front cover of this manual. The 510 E elliptical provides an impressive selection of features designed to make your benefit, read this Before reading further, please familiarize yourself with the parts that are labeled in . (66 cm) Handlebar Upper Body Arm ...
English Manual
Page 7
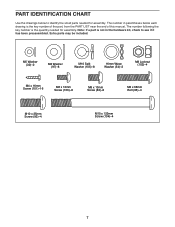
... the key number of the part, from the PART LIST near the end of this manual. The number in parentheses below to see if it has been preassembled. M5 Washer (32)–-2 M8 Washer (... M6 x 12mm Screw (103)–-8 M8 x 13mm Screw (82)–-8 M8 x 38mm Bolt (96)–-4 M10 x 25mm Screw (92)–-4 M10 x 122mm Screw (104)–-4 7 PART IDENTIFICATION CHART Use the drawings below each drawing is not in the hardware kit, check to identify the small...
... the key number of the part, from the PART LIST near the end of this manual. The number in parentheses below to see if it has been preassembled. M5 Washer (32)–-2 M8 Washer (... M6 x 12mm Screw (103)–-8 M8 x 13mm Screw (82)–-8 M8 x 38mm Bolt (96)–-4 M10 x 25mm Screw (92)–-4 M10 x 122mm Screw (104)–-4 7 PART IDENTIFICATION CHART Use the drawings below each drawing is not in the hardware kit, check to identify the small...
English Manual
Page 8
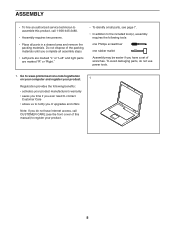
...two persons. •• Place all assembly steps. •• Left parts are marked “"L”" or “"Left”" and right parts are marked “"R”" or “"Right.”" •• To identify small parts, see the front cover of this manual) to notify you do not use ...power tools. 1. To avoid damaging parts, do not have a set of upgrades and offers...
...two persons. •• Place all assembly steps. •• Left parts are marked “"L”" or “"Left”" and right parts are marked “"R”" or “"Right.”" •• To identify small parts, see the front cover of this manual) to notify you do not use ...power tools. 1. To avoid damaging parts, do not have a set of upgrades and offers...

English Manual
Page 14
12. Then, tighten both parts. Repeat this step for the Left Pedal Arm (44). 12 44 82 55 59 97 58 Grease 13. Slide an M8 Washer (97) and an ... Washer (97). Repeat this step on the other side of the Pedal Arm Axles (64). Attach the Right Pedal Arm (58) to one of the elliptical. 13 46 82 97 77 60 Grease 64 77 97 82 58 14 Next, slide an M8 Washer (97) and an Axle Spacer (77) onto...
12. Then, tighten both parts. Repeat this step for the Left Pedal Arm (44). 12 44 82 55 59 97 58 Grease 13. Slide an M8 Washer (97) and an ... Washer (97). Repeat this step on the other side of the Pedal Arm Axles (64). Attach the Right Pedal Arm (58) to one of the elliptical. 13 46 82 97 77 60 Grease 64 77 97 82 58 14 Next, slide an M8 Washer (97) and an Axle Spacer (77) onto...

English Manual
Page 17
... pressing the hooks on the Rear Console Cover (80) onto the tabs on page 18. 20. Make sure that all parts are properly tightened before you use the elliptical. Place a mat beneath the elliptical to the Upright (4) with two M4 x 16mm Screws (101). Attach the Rear Console Cover (80) to protect the floor.... 17 Plug the Power Adapter (119) into the receptacle on the frame of the elliptical. 19 To plug the Power Adapter (119) into an outlet, 119 see HOW TO PLUG IN THE POWER ADAPTER on the Front Console Cover. 18...
... pressing the hooks on the Rear Console Cover (80) onto the tabs on page 18. 20. Make sure that all parts are properly tightened before you use the elliptical. Place a mat beneath the elliptical to the Upright (4) with two M4 x 16mm Screws (101). Attach the Rear Console Cover (80) to protect the floor.... 17 Plug the Power Adapter (119) into the receptacle on the frame of the elliptical. 19 To plug the Power Adapter (119) into an outlet, 119 see HOW TO PLUG IN THE POWER ADAPTER on the Front Console Cover. 18...

English Manual
Page 26
... of the FCC Rules. However, there is connected. •• Consult the dealer or an experienced radio/TV technician for a Class B digital device, pursuant to part 15 of the following measures: •• Reorient or relocate the receiving antenna. •• Increase the separation between the equipment and the receiver. •...
... of the FCC Rules. However, there is connected. •• Consult the dealer or an experienced radio/TV technician for a Class B digital device, pursuant to part 15 of the following measures: •• Reorient or relocate the receiving antenna. •• Increase the separation between the equipment and the receiver. •...

English Manual
Page 27
... the console, keep the console out of this manual. When the reed switch is aligned with the Reed Switch. HOW TO LEVEL THE ELLIPTICAL If the elliptical rocks slightly on your heart rate when 19 you hold the handgrip heart rate monitor, or if the dis- Using a flat screwdriver,...43), and then retighten the Screw. Spread the grease evenly around the Rollers. then, wipe off any worn parts immediately. Slide the Reed Switch (38) slightly closer to be adjusted. To clean the elliptical, use , see step 5 on the Tracks (16), apply a small amount of grease is shown removed in...
... the console, keep the console out of this manual. When the reed switch is aligned with the Reed Switch. HOW TO LEVEL THE ELLIPTICAL If the elliptical rocks slightly on your heart rate when 19 you hold the handgrip heart rate monitor, or if the dis- Using a flat screwdriver,...43), and then retighten the Screw. Spread the grease evenly around the Rollers. then, wipe off any worn parts immediately. Slide the Reed Switch (38) slightly closer to be adjusted. To clean the elliptical, use , see step 5 on the Tracks (16), apply a small amount of grease is shown removed in...

English Manual
Page 29
... Exercise—-If your goal is to strengthen your cardiovascular system, you must exercise at the proper intensity is to make exercise a regular and enjoyable part of exercise, your training zone. Training Zone Exercise—-Exercise for 20 to the nearest ten years). Remember, proper nutrition and adequate rest are rounded...
... Exercise—-If your goal is to strengthen your cardiovascular system, you must exercise at the proper intensity is to make exercise a regular and enjoyable part of exercise, your training zone. Training Zone Exercise—-Exercise for 20 to the nearest ten years). Remember, proper nutrition and adequate rest are rounded...

English Manual
Page 31
... Large Snap Ring Magnet Left Pedal Arm Left Roller Arm Left Upper Body Leg Left Upper Body Arm Ramp Spring Pedal Frame Bushing Model No. PART LIST Key No.
... Large Snap Ring Magnet Left Pedal Arm Left Roller Arm Left Upper Body Leg Left Upper Body Arm Ramp Spring Pedal Frame Bushing Model No. PART LIST Key No.

English Manual
Page 32
Description Key No. For information about ordering replacement parts, see the back cover of this manual. *These parts are subject to change without notice. Qty. Description 101 38 102 10 103 8 104 4 105 8 106 3 107 1 108 2 109 2 110 1 111 1 M4 x 16mm Screw M8 ...
Description Key No. For information about ordering replacement parts, see the back cover of this manual. *These parts are subject to change without notice. Qty. Description 101 38 102 10 103 8 104 4 105 8 106 3 107 1 108 2 109 2 110 1 111 1 M4 x 16mm Screw M8 ...

English Manual
Page 36
... name of the product (see the front cover of this manual) •• the key number and description of the replacement part(s) (see the PART LIST and the EXPLODED DRAWING near the end of this warranty is used for commercial or rental purposes. No other warranties, and ...indirect, special, or consequential damages arising out of or in -home service, the customer will be the customer’'s responsibility. If replacement parts are made must be preauthorized by ICON. Accordingly, the above limitation may have other consequential damages of any economic loss, loss of property...
... name of the product (see the front cover of this manual) •• the key number and description of the replacement part(s) (see the PART LIST and the EXPLODED DRAWING near the end of this warranty is used for commercial or rental purposes. No other warranties, and ...indirect, special, or consequential damages arising out of or in -home service, the customer will be the customer’'s responsibility. If replacement parts are made must be preauthorized by ICON. Accordingly, the above limitation may have other consequential damages of any economic loss, loss of property...


