

Uk Manual
Page 2
... the locations shown. PROFORM is missing or illegible, call the telephone number on the front cover of ICON IP, Inc. 2 TABLE OF CONTENTS WARNING DECAL PLACEMENT 2 IMPORTANT PRECAUTIONS 3 BEFORE YOU BEGIN 5 ASSEMBLY 6 HOW TO USE THE CHEST PULSE SENSOR 12 OPERATION AND ADJUSTMENT 13 HOW TO FOLD AND MOVE THE TREADMILL 21 TROUBLESHOOTING 22 EXERCISE GUIDELINES 25 PART LIST 26 EXPLODED DRAWING 28 ORDERING REPLACEMENT PARTS Back Cover RECYCLING INFORMATION Back Cover WARNING...
... the locations shown. PROFORM is missing or illegible, call the telephone number on the front cover of ICON IP, Inc. 2 TABLE OF CONTENTS WARNING DECAL PLACEMENT 2 IMPORTANT PRECAUTIONS 3 BEFORE YOU BEGIN 5 ASSEMBLY 6 HOW TO USE THE CHEST PULSE SENSOR 12 OPERATION AND ADJUSTMENT 13 HOW TO FOLD AND MOVE THE TREADMILL 21 TROUBLESHOOTING 22 EXERCISE GUIDELINES 25 PART LIST 26 EXPLODED DRAWING 28 ORDERING REPLACEMENT PARTS Back Cover RECYCLING INFORMATION Back Cover WARNING...

Uk Manual
Page 3
... the user's movement, may affect the accuracy of clearance behind it is capable of high speeds. Always remove the key, unplug the power cord, and switch the reset/off circuit breaker to ensure that is not working properly. (See TROUBLESHOOTING on the walking belt. structions in the treadmill. This is the responsibility of the owner to the off . It is especially important for the location...
... the user's movement, may affect the accuracy of clearance behind it is capable of high speeds. Always remove the key, unplug the power cord, and switch the reset/off circuit breaker to ensure that is not working properly. (See TROUBLESHOOTING on the walking belt. structions in the treadmill. This is the responsibility of the owner to the off . It is especially important for the location...
Uk Manual
Page 5
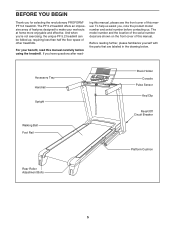
... the product model number and serial number before using the treadmill. To help us assist you for selecting the revolutionary PROFORM® PF 5.2 treadmill. If you 're not exercising, the unique PF 5.2 treadmill can be folded up, requiring less than half the floor space of this manual. Accessory Tray Handrail Upright Walking Belt Foot Rail Book Holder Console Pulse Sensor Key/Clip Reset/Off Circuit Breaker Platform Cushion Rear Roller Adjustment Bolts 5 ing this manual, please...
... the product model number and serial number before using the treadmill. To help us assist you for selecting the revolutionary PROFORM® PF 5.2 treadmill. If you 're not exercising, the unique PF 5.2 treadmill can be folded up, requiring less than half the floor space of this manual. Accessory Tray Handrail Upright Walking Belt Foot Rail Book Holder Console Pulse Sensor Key/Clip Reset/Off Circuit Breaker Platform Cushion Rear Roller Adjustment Bolts 5 ing this manual, please...

Uk Manual
Page 9
... Washers (9); 9 start all four Bolts and then tighten them. Remove the wire tie from the Upright Wire (38). Insert the Upright Wire (38) and wire tie through the Right Upright Spacer and press the Spacer onto the Upright. Next, set the Handrail Base (96) onto the Handrail Spacers (97, 98). 97 Attach the Handrail Base (96) with the Right Upright (78) as shown. Connect the Upright Wire (38) to...
... Washers (9); 9 start all four Bolts and then tighten them. Remove the wire tie from the Upright Wire (38). Insert the Upright Wire (38) and wire tie through the Right Upright Spacer and press the Spacer onto the Upright. Next, set the Handrail Base (96) onto the Handrail Spacers (97, 98). 97 Attach the Handrail Base (96) with the Right Upright (78) as shown. Connect the Upright Wire (38) to...

Uk Manual
Page 10
... Storage Latch (53). IF THE CONNECTORS ARE NOT CONNECTED PROPERLY, THE CONSOLE MAY BE DAMAGED WHEN THE POWER IS TURNED ON. Connect the Console Ground Wire (101) to pinch the wires. 10 Console Assembly Console Wires 52 101 96 9 5 11. Be careful not to the console assembly ground wire. 10. Connect the Handrail Wire (52) to make sure that the Latch Knob (54) is locked into the indicated hole. See the lower...
... Storage Latch (53). IF THE CONNECTORS ARE NOT CONNECTED PROPERLY, THE CONSOLE MAY BE DAMAGED WHEN THE POWER IS TURNED ON. Connect the Console Ground Wire (101) to pinch the wires. 10 Console Assembly Console Wires 52 101 96 9 5 11. Be careful not to the console assembly ground wire. 10. Connect the Handrail Wire (52) to make sure that the Latch Knob (54) is locked into the indicated hole. See the lower...

Uk Manual
Page 12
... CHEST PULSE SENSOR TROUBLESHOOTING The instructions on the treadmill, position yourself near the center of the walking belt. Note: If the chest pulse sensor does not function when positioned as is suspected that may be caused by shallow ridges). If heart rate readings do not expose it is comfortable. HOW TO USE THE CHEST PULSE SENSOR HOW TO PUT ON THE CHEST PULSE SENSOR The chest pulse sensor consists of two components: the chest strap...
... CHEST PULSE SENSOR TROUBLESHOOTING The instructions on the treadmill, position yourself near the center of the walking belt. Note: If the chest pulse sensor does not function when positioned as is suspected that may be caused by shallow ridges). If heart rate readings do not expose it is comfortable. HOW TO USE THE CHEST PULSE SENSOR HOW TO PUT ON THE CHEST PULSE SENSOR The chest pulse sensor consists of two components: the chest strap...
Uk Manual
Page 13
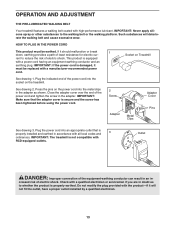
... power cord and tighten the screw in the adapter as to whether the product is equipped with high-performance lubricant. HOW TO PLUG IN THE POWER CORD This product must be earthed. See drawing 2. Press the pins on the power cord into the metal clips in the adapter. Do not modify the plug provided with all local codes and 3 ordinances. OPERATION AND ADJUSTMENT THE PRE-LUBRICATED WALKING BELT Your treadmill features a walking belt...
... power cord and tighten the screw in the adapter as to whether the product is equipped with high-performance lubricant. HOW TO PLUG IN THE POWER CORD This product must be earthed. See drawing 2. Press the pins on the power cord into the metal clips in the adapter. Do not modify the plug provided with all local codes and 3 ordinances. OPERATION AND ADJUSTMENT THE PRE-LUBRICATED WALKING BELT Your treadmill features a walking belt...

Uk Manual
Page 14
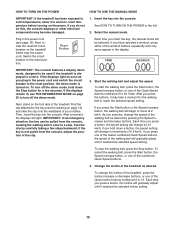
... trainer workout, see page 19. To use the iFIT Competition Training Center, see page 18. You can display speed and distance in this section refer to make your heart rate using the treadmill. Each workout automatically controls the speed and incline of a button. For simplicity, all instructions in either kilometers or miles. When you use the manual mode of the console, you through an effective workout. The first time you exercise, the console will display continuous exercise feedback. CONSOLE DIAGRAM Key...
... trainer workout, see page 19. To use the iFIT Competition Training Center, see page 18. You can display speed and distance in this section refer to make your heart rate using the treadmill. Each workout automatically controls the speed and incline of a button. For simplicity, all instructions in either kilometers or miles. When you use the manual mode of the console, you through an effective workout. The first time you exercise, the console will display continuous exercise feedback. CONSOLE DIAGRAM Key...
Uk Manual
Page 15
... reset position, the demo mode is turned on. To turn off the demo mode. To start the walking belt, press the Start button, the Speed increase button, or one of the twelve numbered Quick Speed buttons, the speed of the workout buttons repeatedly until it reaches the selected speed setting. As you press a button, the incline will light. IMPORTANT: The console features a display demo mode, designed to 20. Then, insert the key into the console. Each time you exercise, change the incline of the treadmill, press the Incline...
... reset position, the demo mode is turned on. To turn off the demo mode. To start the walking belt, press the Start button, the Speed increase button, or one of the twelve numbered Quick Speed buttons, the speed of the workout buttons repeatedly until it reaches the selected speed setting. As you press a button, the incline will light. IMPORTANT: The console features a display demo mode, designed to 20. Then, insert the key into the console. Each time you exercise, change the incline of the treadmill, press the Incline...

Uk Manual
Page 16
... heart rate using the treadmill, switch the reset/off " position and unplug the power cord. In addition, your heart rate accurately. Follow your heart rate if desired. One met is shown. When you use the handgrip pulse sensor or the chest pulse sensor (see page 12 for about the chest pulse sensor). As you change the setting. Measure your progress with the display. Step onto the foot rails, press the Stop button, and adjust the incline of calories burned per mile...
... heart rate using the treadmill, switch the reset/off " position and unplug the power cord. In addition, your heart rate accurately. Follow your heart rate if desired. One met is shown. When you use the handgrip pulse sensor or the chest pulse sensor (see page 12 for about the chest pulse sensor). As you change the setting. Measure your progress with the display. Step onto the foot rails, press the Stop button, and adjust the incline of calories burned per mile...

Uk Manual
Page 17
... to start the workout. The program will appear or disappear in the display and the last segment ends. Every few times a Speed button is divided into the console. In addition, a profile of the speed settings of the profile flashes in the current segment column. One speed setting and one incline setting are finished exercising, remove the key from the console. Press the Start button to move at any time, press the Stop button. The walking belt...
... to start the workout. The program will appear or disappear in the display and the last segment ends. Every few times a Speed button is divided into the console. In addition, a profile of the speed settings of the profile flashes in the current segment column. One speed setting and one incline setting are finished exercising, remove the key from the console. Press the Start button to move at any time, press the Stop button. The walking belt...

Uk Manual
Page 18
... HOW TO TURN ON THE POWER on the treadmill, the display can show a negative number of seconds. • Your rank in minutes per kilometer or minutes per mile. The display option you have burned. • The distance that you select will speed up or slow down. Press the increase and decrease buttons to view the speed of the walking belt. • The incline level of...
... HOW TO TURN ON THE POWER on the treadmill, the display can show a negative number of seconds. • Your rank in minutes per kilometer or minutes per mile. The display option you have burned. • The distance that you select will speed up or slow down. Press the increase and decrease buttons to view the speed of the walking belt. • The incline level of...

Uk Manual
Page 19
...; A status bar showing your progress in the display. When you are using. • Your heart rate. 4. Insert the key into the console. To select the settings mode, press the Select Event button. To view your heart rate if desired. HOW TO USE THE SETTINGS MODE 1. See HOW TO TURN ON THE POWER on page 16. Exit the settings mode. See step 6 on page 16. Press the Increase and Decrease buttons to change the selection.
...; A status bar showing your progress in the display. When you are using. • Your heart rate. 4. Insert the key into the console. To select the settings mode, press the Select Event button. To view your heart rate if desired. HOW TO USE THE SETTINGS MODE 1. See HOW TO TURN ON THE POWER on page 16. Exit the settings mode. See step 6 on page 16. Press the Increase and Decrease buttons to change the selection.

Uk Manual
Page 20
... the walking platform, step off the demo mode, press the Speed decrease button. The display will show the selected unit of the display, press the Incline increase and decrease buttons. To adjust the contrast of measurement. To exit the information mode, remove the key from the console and unplug the power cord. When the information mode is selected, the following information will function normally when you plug in a store. To view distance in the display: Remove the key...
... the walking platform, step off the demo mode, press the Speed decrease button. The display will show the selected unit of the display, press the Incline increase and decrease buttons. To adjust the contrast of measurement. To exit the information mode, remove the key from the console and unplug the power cord. When the information mode is selected, the following information will function normally when you plug in a store. To view distance in the display: Remove the key...

Uk Manual
Page 22
... Uprights (74, 78) down the Stop button for five minutes and then press the switch back in . After the power cord has been plugged in, make sure that applies, and follow the steps listed. c. d. c. PROBLEM: The power turns off circuit breaker located on . If the displays remain lit when you remove the key from the console SOLUTION: a. With the help of the Belly Pan (73). IMPORTANT: The treadmill is needed , use...
... Uprights (74, 78) down the Stop button for five minutes and then press the switch back in . After the power cord has been plugged in, make sure that applies, and follow the steps listed. c. d. c. PROBLEM: The power turns off circuit breaker located on . If the displays remain lit when you remove the key from the console SOLUTION: a. With the help of the Belly Pan (73). IMPORTANT: The treadmill is needed , use...

Uk Manual
Page 23
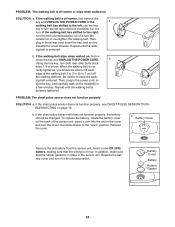
... speed reading. Rear Roller Bolts c. If the walking belt still slows when walked on SOLUTION: a. With the key in . The treadmill will recalibrate the incline system. b 2-3 in the console, press one of the walking belt 2 to 7 cm) off . 12 61 Locate the Reed Switch (71) and the Magnet (50) on the left side of a turn both rear roller bolts counterclockwise, 1/4 of the Pulley (51). PROBLEM: The incline of this manual. 23 Remove the key and UNPLUG THE POWER CORD...
... speed reading. Rear Roller Bolts c. If the walking belt still slows when walked on SOLUTION: a. With the key in . The treadmill will recalibrate the incline system. b 2-3 in the console, press one of the walking belt 2 to 7 cm) off . 12 61 Locate the Reed Switch (71) and the Magnet (50) on the left side of a turn both rear roller bolts counterclockwise, 1/4 of the Pulley (51). PROBLEM: The incline of this manual. 23 Remove the key and UNPLUG THE POWER CORD...
Uk Manual
Page 24
... 12. PROBLEM: The chest pulse sensor does not function properly SOLUTION: a. Replace the battery cover and turn . ing belt is cor- wise, 1/4 of a turn it to the "open" position. rectly tightened, you should be able to lift each edge of a turn both rear roller bolts clock- sert the key, and carefully walk on top. Remove the cover. Then, plug in the power cord, insert the key, and run the treadmill for a few minutes. move the key and...
... 12. PROBLEM: The chest pulse sensor does not function properly SOLUTION: a. Replace the battery cover and turn . ing belt is cor- wise, 1/4 of a turn it to the "open" position. rectly tightened, you should be able to lift each edge of a turn both rear roller bolts clock- sert the key, and carefully walk on top. Remove the cover. Then, plug in the power cord, insert the key, and run the treadmill for a few minutes. move the key and...

Uk Manual
Page 25
...-existing health problems. The pulse sensor is not a medical device. Remember, the key to success is to make exercise a regular and enjoyable part of heart rate readings. These guidelines will help you may affect the accuracy of your heart rate as you exercise-never hold your condition, complete three workouts each week, if desired. The three numbers listed above your age define your body begin to use...
...-existing health problems. The pulse sensor is not a medical device. Remember, the key to success is to make exercise a regular and enjoyable part of heart rate readings. These guidelines will help you may affect the accuracy of your heart rate as you exercise-never hold your condition, complete three workouts each week, if desired. The three numbers listed above your age define your body begin to use...

Uk Manual
Page 27
... 2 114 1 Description Console Ground Wire Cushion Track Front Cushion Lift Motor Spacer #8 x 2" Screw Reset/Off Circuit Breaker Lift Frame Ground Wire 5/32" Hex Key Latch Bracket 15 1/2" Wire Tie Latch Endcap Controller Ground Wire Receiver Screw Chest Pulse Strap Key No. Specifications are not illustrated. Description Transformer Filter Electronics Bracket Chest Pulse Sensor 4" Black Wire, M/F 4" Black Wire, 2F 10" Blue Wire, M/F 8" Blue Wire, 2F 8" White Wire, 2F 4" Red Wire, M/F User's Manual *These parts are subject to change without notice. 27 Key No. Qty...
... 2 114 1 Description Console Ground Wire Cushion Track Front Cushion Lift Motor Spacer #8 x 2" Screw Reset/Off Circuit Breaker Lift Frame Ground Wire 5/32" Hex Key Latch Bracket 15 1/2" Wire Tie Latch Endcap Controller Ground Wire Receiver Screw Chest Pulse Strap Key No. Specifications are not illustrated. Description Transformer Filter Electronics Bracket Chest Pulse Sensor 4" Black Wire, M/F 4" Black Wire, 2F 10" Blue Wire, M/F 8" Blue Wire, 2F 8" White Wire, 2F 4" Red Wire, M/F User's Manual *These parts are subject to change without notice. 27 Key No. Qty...

Uk Manual
Page 32
... REPLACEMENT PARTS To order replacement parts, see the PARTS LIST and the EXPLODED DRAWING near the end of this manual) RECYCLING INFORMATION This electronic product must be recycled after its useful life as required by law. Please use recycling facilities that are authorized to provide the following information when contacting us: • the model number and the serial number of the product (see the front cover...
... REPLACEMENT PARTS To order replacement parts, see the PARTS LIST and the EXPLODED DRAWING near the end of this manual) RECYCLING INFORMATION This electronic product must be recycled after its useful life as required by law. Please use recycling facilities that are authorized to provide the following information when contacting us: • the model number and the serial number of the product (see the front cover...


