

English Manual
Page 1
Visit our website at www.proform.com new products, prizes, fitness tips, and much more! Model No. 831.299412 Serial No. Save this equipment. HOFFMAN ESTATES, IL 60179 CAUTION Read all precautions and instructions in this manual before using this manual for future reference. The serial number is found in the space above for future reference. Serial Number Decal ¨ USER'S MANUAL SEARS, ROEBUCK AND CO. Write the serial number in the location shown below.
Visit our website at www.proform.com new products, prizes, fitness tips, and much more! Model No. 831.299412 Serial No. Save this equipment. HOFFMAN ESTATES, IL 60179 CAUTION Read all precautions and instructions in this manual before using this manual for future reference. The serial number is found in the space above for future reference. Serial Number Decal ¨ USER'S MANUAL SEARS, ROEBUCK AND CO. Write the serial number in the location shown below.

English Manual
Page 2
... PRECAUTIONS 2 BEFORE YOU BEGIN 4 ASSEMBLY 5 OPERATION AND ADJUSTMENT 7 HOW TO FOLD AND MOVE THE TREADMILL 10 TROUBLE-SHOOTING 12 CONDITIONING GUIDELINES 14 ORDERING REPLACEMENT PARTS Back Cover FULL 90 DAY WARRANTY Back Cover Note: An EXPLODED DRAWING and a PART LIST are attached in the center of all warnings and precautions. 2. Use the treadmill only as a transient voltage surge suppressor (TVSS). Keep the treadmill indoors, away from heated...
... PRECAUTIONS 2 BEFORE YOU BEGIN 4 ASSEMBLY 5 OPERATION AND ADJUSTMENT 7 HOW TO FOLD AND MOVE THE TREADMILL 10 TROUBLE-SHOOTING 12 CONDITIONING GUIDELINES 14 ORDERING REPLACEMENT PARTS Back Cover FULL 90 DAY WARRANTY Back Cover Note: An EXPLODED DRAWING and a PART LIST are attached in the center of all warnings and precautions. 2. Use the treadmill only as a transient voltage surge suppressor (TVSS). Keep the treadmill indoors, away from heated...

English Manual
Page 3
... power cord immediately after use of high speeds. Never remove the motor hood unless instructed to order a free replacement decal (see the back cover of 35 or persons with pre-existing health problems. Read all parts of actual size. 3 This treadmill is intended for persons over the age of this manual should be able to safely lift 45 pounds (20 kg) to raise, lower, or move the walking belt while the power...
... power cord immediately after use of high speeds. Never remove the motor hood unless instructed to order a free replacement decal (see the back cover of 35 or persons with pre-existing health problems. Read all parts of actual size. 3 This treadmill is intended for persons over the age of this manual should be able to safely lift 45 pounds (20 kg) to raise, lower, or move the walking belt while the power...
English Manual
Page 4
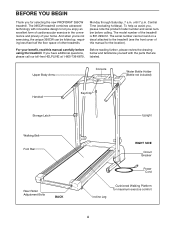
For your home. until 7 p.m. Upper Body Arms Console Water Bottle Holder (Bottle not included) Handrail Key/Clip Storage Latch Upright Walking Belt Foot Rail Rear Roller Adjustment Bolts BACK RIGHT SIDE Circuit Breaker Power Cord Incline Leg Cushioned Walking Platform for the location). To help us assist you enjoy an excellent form of cardiovascular exercise in the convenience and privacy of your benefit, read this manual for maximum exercise comfort 4 Monday through Saturday, 7 a.m. Central Time...
For your home. until 7 p.m. Upper Body Arms Console Water Bottle Holder (Bottle not included) Handrail Key/Clip Storage Latch Upright Walking Belt Foot Rail Rear Roller Adjustment Bolts BACK RIGHT SIDE Circuit Breaker Power Cord Incline Leg Cushioned Walking Platform for the location). To help us assist you enjoy an excellent form of cardiovascular exercise in the convenience and privacy of your benefit, read this manual for maximum exercise comfort 4 Monday through Saturday, 7 a.m. Central Time...
English Manual
Page 5
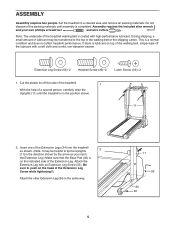
... wrench and your own phillips screwdriver and wire cutters . ASSEMBLY Assembly requires two people. Set the treadmill in the same way. 5 11 53 34 40 Do not dispose of the Extension Leg. Cut the plastic tie off the lubricant with an Extension Leg Screw (53). Note: The underside of the treadmill walking belt is in the direction shown by the arrow as shown...
... wrench and your own phillips screwdriver and wire cutters . ASSEMBLY Assembly requires two people. Set the treadmill in the same way. 5 11 53 34 40 Do not dispose of the Extension Leg. Cut the plastic tie off the lubricant with an Extension Leg Screw (53). Note: The underside of the treadmill walking belt is in the direction shown by the arrow as shown...
English Manual
Page 6
Make sure that all parts are tightened before you thread the Handrail Screw. 4b 1 33 Attach the other Handrail to adjust the walking belt (see page 13). Insert one of the Handrails (1) into the 4a Upright and the Handrail at the upper 3 end of the right Upright (11). 11 1 4. The allen wrench is used to the left Upright (11) with the indicated...
Make sure that all parts are tightened before you thread the Handrail Screw. 4b 1 33 Attach the other Handrail to adjust the walking belt (see page 13). Insert one of the Handrails (1) into the 4a Upright and the Handrail at the upper 3 end of the right Upright (11). 11 1 4. The allen wrench is used to the left Upright (11) with the indicated...
English Manual
Page 7
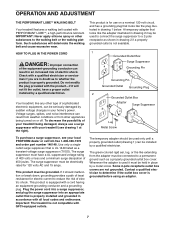
... used to connect the surge suppressor to the walking belt or the walking platform. Whenever the adapter is not compatible with PERFORMANT LUBETM, a high-performance lubricant. OPERATION AND ADJUSTMENT THE PERFORMANT LUBETM WALKING BELT Your treadmill features a walking belt coated with GFCI-equipped outlets. IMPORTANT: Never apply silicone spray or other appliances being damaged, always use on or off. Some 2-pole receptacle outlet box covers...
... used to connect the surge suppressor to the walking belt or the walking platform. Whenever the adapter is not compatible with PERFORMANT LUBETM, a high-performance lubricant. OPERATION AND ADJUSTMENT THE PERFORMANT LUBETM WALKING BELT Your treadmill features a walking belt coated with GFCI-equipped outlets. IMPORTANT: Never apply silicone spray or other appliances being damaged, always use on or off. Some 2-pole receptacle outlet box covers...
English Manual
Page 8
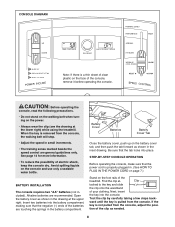
... drawing at - ward until the key is removed from the console. Insert two batteries into the battery compartment, making sure that the power cord is properly plugged in small increments. ¥ The training zones marked beside the speed control are recommended. When the key is pulled from the console, the walking belt will stop. ¥ Adjust the speed in . (See HOW TO PLUG IN THE POWER CORD on page 7.) Stand on...
... drawing at - ward until the key is removed from the console. Insert two batteries into the battery compartment, making sure that the power cord is properly plugged in small increments. ¥ The training zones marked beside the speed control are recommended. When the key is pulled from the console, the walking belt will stop. ¥ Adjust the speed in . (See HOW TO PLUG IN THE POWER CORD on page 7.) Stand on...
English Manual
Page 9
... console. 1 Insert the key into the power switch. Change the speed of calories and fat calories you have burned. (See FAT BURNING on . 2 Reset the speed control. Every seven sec- proximate numbers of the walking belt as desired. To reset the displays at slow speed. TIME/DISTANCE displayÑThis display Arrow shows the elapsed time and distance that the walking belt is stopped and the ON/RESET button is removed. To change the incline of the treadmill, press...
... console. 1 Insert the key into the power switch. Change the speed of calories and fat calories you have burned. (See FAT BURNING on . 2 Reset the speed control. Every seven sec- proximate numbers of the walking belt as desired. To reset the displays at slow speed. TIME/DISTANCE displayÑThis display Arrow shows the elapsed time and distance that the walking belt is stopped and the ON/RESET button is removed. To change the incline of the treadmill, press...

English Manual
Page 10
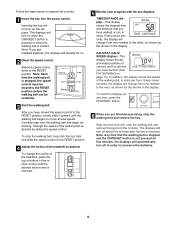
... above 85¡ Fahrenheit. 10 Storage Latch Catch Engaged Do not leave the treadmill in the storage position in order to the vertical position. 2. Upper Body Arms Resistance Knobs HOW TO FOLD AND MOVE THE TREADMILL HOW TO FOLD THE TREADMILL FOR STORAGE Before folding the treadmill, unplug the power cord. To vary the intensity of direct sunlight. HOW TO USE THE UPPER BODY ARMS As you exercise on the treadmill, you walk on the...
... above 85¡ Fahrenheit. 10 Storage Latch Catch Engaged Do not leave the treadmill in the storage position in order to the vertical position. 2. Upper Body Arms Resistance Knobs HOW TO FOLD AND MOVE THE TREADMILL HOW TO FOLD THE TREADMILL FOR STORAGE Before folding the treadmill, unplug the power cord. To vary the intensity of direct sunlight. HOW TO USE THE UPPER BODY ARMS As you exercise on the treadmill, you walk on the...

English Manual
Page 11
... and carefully lower the treadmill until the frame and foot rail are past the storage latch. 2. Do not move the treadmill to the floor. Using your right hand as shown. Carefully move the treadmill over the catch. 1. To reduce the risk of injury, bend your legs and keep ...treadmill with both hands, and lower the treadmill to the desired location. HOW TO LOWER THE TREADMILL FOR USE 1. Tilt the treadmill back until it rolls freely on the base as described above. Place one foot on the front wheels. Hold the treadmill firmly with your left thumb, press the storage latch...
... and carefully lower the treadmill until the frame and foot rail are past the storage latch. 2. Do not move the treadmill to the floor. Using your right hand as shown. Carefully move the treadmill over the catch. 1. To reduce the risk of injury, bend your legs and keep ...treadmill with both hands, and lower the treadmill to the desired location. HOW TO LOWER THE TREADMILL FOR USE 1. Tilt the treadmill back until it rolls freely on the base as described above. Place one foot on the front wheels. Hold the treadmill firmly with your left thumb, press the storage latch...
English Manual
Page 12
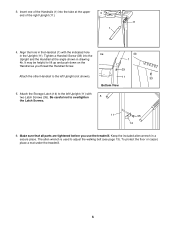
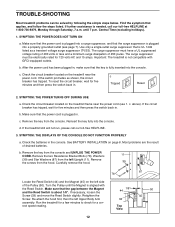
... Reset a. Remove the screws from the left Upper Body Arm assembly. Retighten the Screw. Remove the two Resistance Bracket Bolts (78), Washers 11 (39) and Star Washers (87) from the hood. Carefully remove the hood. 39 Locate the Reed Switch (44) and the Magnet (45) on the treadmill frame near the power cord. Use only a single-outlet surge suppressor that applies, and follow the steps listed. Most problems are the result of drained batteries...
... Reset a. Remove the screws from the left Upper Body Arm assembly. Retighten the Screw. Remove the two Resistance Bracket Bolts (78), Washers 11 (39) and Star Washers (87) from the hood. Carefully remove the hood. 39 Locate the Reed Switch (44) and the Magnet (45) on the treadmill frame near the power cord. Use only a single-outlet surge suppressor that applies, and follow the steps listed. Most problems are the result of drained batteries...
English Manual
Page 13
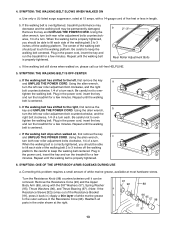
... until the walking belt is properly tightened, you should be permanently damaged. Be careful not to over - b 2ÓÐ3Ó Rear Roller Adjustment Bolts c. Plug in the power cord, insert the key and run the treadmill for a few minutes. Using the allen wrench, turn the left , first remove the key a and UNPLUG THE POWER CORD. Plug in the power cord, insert the key and run the treadmill for a few minutes. Turn the Resistance Knob (98) counterclockwise...
... until the walking belt is properly tightened, you should be permanently damaged. Be careful not to over - b 2ÓÐ3Ó Rear Roller Adjustment Bolts c. Plug in the power cord, insert the key and run the treadmill for a few minutes. Using the allen wrench, turn the left , first remove the key a and UNPLUG THE POWER CORD. Plug in the power cord, insert the key and run the treadmill for a few minutes. Turn the Resistance Knob (98) counterclockwise...
English Manual
Page 14
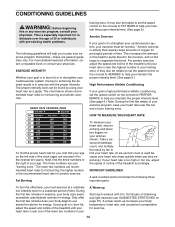
...-existing health problems. The following three important parts: To burn fat effectively, you must be helpful to set the speed control on the console to PERFORMANCE to use stored fat calories for aerobic exercise. Fat Burning To measure your heart rate, stop exercising.) If your heart rate is too high or too low, adjust the speed or incline of the lower two numbers in your A Warm-up increases your body temperature, heart rate...
...-existing health problems. The following three important parts: To burn fat effectively, you must be helpful to set the speed control on the console to PERFORMANCE to use stored fat calories for aerobic exercise. Fat Burning To measure your heart rate, stop exercising.) If your heart rate is too high or too low, adjust the speed or incline of the lower two numbers in your A Warm-up increases your body temperature, heart rate...
English Manual
Page 15
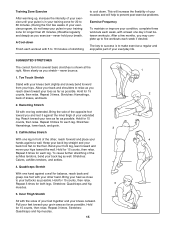
... correct form for each leg. Hold for 15 counts, then relax. Repeat 3 times. Reach toward your groin area as far as possible. Stretches: Hamstrings, lower back, and groin. 3 3. Repeat 3 times for several basic stretches is to make exercise a regular and enjoyable part of your...Move slowly as close to prevent post-exercise problems. Exercise Frequency To maintain or improve your condition, complete three workouts each workout with your other , reach forward and place your training zone for balance, reach back and grasp one day of your exercise program, do not keep your pulse...
... correct form for each leg. Hold for 15 counts, then relax. Repeat 3 times. Reach toward your groin area as far as possible. Stretches: Hamstrings, lower back, and groin. 3 3. Repeat 3 times for several basic stretches is to make exercise a regular and enjoyable part of your...Move slowly as close to prevent post-exercise problems. Exercise Frequency To maintain or improve your condition, complete three workouts each workout with your other , reach forward and place your training zone for balance, reach back and grasp one day of your exercise program, do not keep your pulse...

English Manual
Page 16
...2 53 2 Description Handrail Key/Clip Incline Leg Pivot Bolt Battery Cover Foot Rail Lift Motor Rear Roller Speed Potentiometer Speed Control Knob Console Assembly Upright Base Motor Belt Small Screw Storage Latch Frame Pivot Spacer (Left) 8Ó Cable Tie Incline Leg Pivot Nut Pulley/Flywheel/Fan Motor Motor/Pulley/Flywheel/Fan Wire Harness Belt Guide Screw Motor Hood Hood Shield Small Screw Controller Motor Swivel Bolt Motor Tension Nut Motor Tension Star Washer Motor Tension Washer Motor Tension Bolt Incline Stop Bracket Handrail Screw Extension Leg Latch Screw Wheel Bolt Wheel Wheel Nut...
...2 53 2 Description Handrail Key/Clip Incline Leg Pivot Bolt Battery Cover Foot Rail Lift Motor Rear Roller Speed Potentiometer Speed Control Knob Console Assembly Upright Base Motor Belt Small Screw Storage Latch Frame Pivot Spacer (Left) 8Ó Cable Tie Incline Leg Pivot Nut Pulley/Flywheel/Fan Motor Motor/Pulley/Flywheel/Fan Wire Harness Belt Guide Screw Motor Hood Hood Shield Small Screw Controller Motor Swivel Bolt Motor Tension Nut Motor Tension Star Washer Motor Tension Washer Motor Tension Bolt Incline Stop Bracket Handrail Screw Extension Leg Latch Screw Wheel Bolt Wheel Wheel Nut...
English Manual
Page 18
... Co. Model No. 831.299412 QUESTIONS? All replacement parts are listed on a decal attached to schedule repair service call the toll-free numbers listed at the left. To request service or to state. This warranty does not apply when the TREADMILL EXERCISER is missing ¥ or you visit your PROFORM¨ 395CW treadmill are available for rental purposes. See the front cover of this SEARS TREADMILL EXERCISER, contact the nearest SEARS Service Center...
... Co. Model No. 831.299412 QUESTIONS? All replacement parts are listed on a decal attached to schedule repair service call the toll-free numbers listed at the left. To request service or to state. This warranty does not apply when the TREADMILL EXERCISER is missing ¥ or you visit your PROFORM¨ 395CW treadmill are available for rental purposes. See the front cover of this SEARS TREADMILL EXERCISER, contact the nearest SEARS Service Center...


