
Canadian English Manual
Page 4
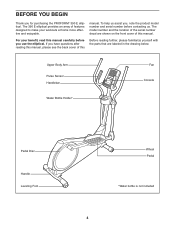
...Console Pedal Disc Handle Leveling Foot Wheel Pedal *Water bottle is not included 4 For your workouts at home more effective and enjoyable. If you have questions after reading this manual, please see the back cover of this manual carefully before contacting us assist you for purchasing the PROFORM® 390 E elliptical.... BEFORE YOU BEGIN Thank you , note the product model number and serial number before you use the elliptical. The model number and the location of the serial...
...Console Pedal Disc Handle Leveling Foot Wheel Pedal *Water bottle is not included 4 For your workouts at home more effective and enjoyable. If you have questions after reading this manual, please see the back cover of this manual carefully before contacting us assist you for purchasing the PROFORM® 390 E elliptical.... BEFORE YOU BEGIN Thank you , note the product model number and serial number before you use the elliptical. The model number and the location of the serial...
Canadian English Manual
Page 8
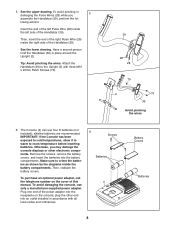
... the Pulse Wires (28) while you may damage the console displays or other end into an outlet installed in place around the Upright (2). The Console (4) can use only a manufacturer-supplied power adapter. To avoid damaging the console, use four D batteries (not included); To purchase an... optional power adapter, call the telephone number on the console; See the upper drawing. Then, reattach the battery covers. See the lower drawing. IMPORTANT: If the Console has been exposed to cold temperatures, allow it to warm to orient the batteries...
... the Pulse Wires (28) while you may damage the console displays or other end into an outlet installed in place around the Upright (2). The Console (4) can use only a manufacturer-supplied power adapter. To avoid damaging the console, use four D batteries (not included); To purchase an... optional power adapter, call the telephone number on the console; See the upper drawing. Then, reattach the battery covers. See the lower drawing. IMPORTANT: If the Console has been exposed to cold temperatures, allow it to warm to orient the batteries...

Canadian English Manual
Page 9
...the left and right sides of the Handlebar (39) and pull them upward out of the Console (4) with four M4 x 16mm Screws (92). 7 4 42 28 2 92 92 39 Avoid pinching the wires 8. 7. Attach the Console (4) to the back of the Upright (2). Tip: Avoid pinching the wires. While a second... person holds the Console (4) near the Upright (2), connect wires on the Console to the Wire Harness (42) and to the Wire Harness (42). Untie and...
...the left and right sides of the Handlebar (39) and pull them upward out of the Console (4) with four M4 x 16mm Screws (92). 7 4 42 28 2 92 92 39 Avoid pinching the wires 8. 7. Attach the Console (4) to the back of the Upright (2). Tip: Avoid pinching the wires. While a second... person holds the Console (4) near the Upright (2), connect wires on the Console to the Wire Harness (42) and to the Wire Harness (42). Untie and...
Canadian English Manual
Page 16
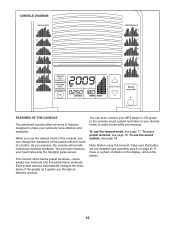
..., remove the plastic. 16 To use the manual mode of the console, you can even connect your MP3 player or CD player to the console sound system and listen to make your heart rate using the console, make sure that batteries are installed (see page 18. You can...sensor. Each preset workout automatically changes the resistance of the pedals as it guides you exercise, the console will provide continuous exercise feedback. CONSOLE DIAGRAM FEATURES OF THE CONSOLE The advanced console offers an array of features designed to your favorite music or audio books while you use a preset ...
..., remove the plastic. 16 To use the manual mode of the console, you can even connect your MP3 player or CD player to the console sound system and listen to make your heart rate using the console, make sure that batteries are installed (see page 18. You can...sensor. Each preset workout automatically changes the resistance of the pedals as it guides you exercise, the console will provide continuous exercise feedback. CONSOLE DIAGRAM FEATURES OF THE CONSOLE The advanced console offers an array of features designed to your favorite music or audio books while you use a preset ...
Canadian English Manual
Page 17
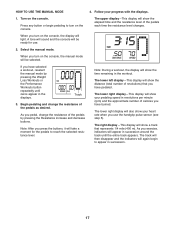
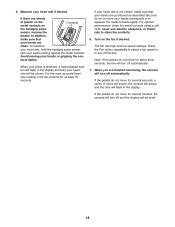
...see step 5). The track will then disappear and the indicators will be selected. A tone will sound and the console will again begin pedaling to turn on the console. Press any button or begin to reach the selected resistance level. Follow your progress with the displays. 1. The ...upper display-This display will show the elapsed time and the resistance level of the pedals as desired. Turn on the console, the manual mode will show your pedaling speed in the workout. Select the manual mode. When you have pedaled. Track 3. Note: During...
...see step 5). The track will then disappear and the indicators will be selected. A tone will sound and the console will again begin pedaling to turn on the console. Press any button or begin to reach the selected resistance level. Follow your progress with the displays. 1. The ...upper display-This display will show the elapsed time and the resistance level of the pedals as desired. Turn on the console, the manual mode will show your pedaling speed in the workout. Select the manual mode. When you have pedaled. Track 3. Note: During...
Canadian English Manual
Page 18
... 15 seconds. When you are positioned as described. When your pulse is not shown, make sure that your hands are finished exercising, the console will be reset. 18 For optimal performance, clean the metal contacts using a soft cloth; Note: If the pedals do not move for ...seconds, a series of plastic on the Contacts metal contacts on the fan if desired. Measure your hands are sheets of tones will sound, the console will pause, and the time will turn off automatically. If your heart rate is detected, a heart-shaped symbol will be shown. tacts tightly....
... 15 seconds. When you are positioned as described. When your pulse is not shown, make sure that your hands are finished exercising, the console will be reset. 18 For optimal performance, clean the metal contacts using a soft cloth; Note: If the pedals do not move for ...seconds, a series of plastic on the Contacts metal contacts on the fan if desired. Measure your hands are sheets of tones will sound, the console will pause, and the time will turn off automatically. If your heart rate is detected, a heart-shaped symbol will be shown. tacts tightly....
Canadian English Manual
Page 19
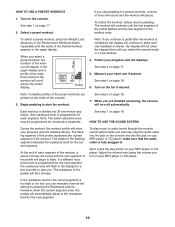
...6 on the fan if desired. The resistance of the pedals will begin to flash. Adjust the volume level using the volume control on the console. Profile Note: If you exercise, plug the audio cable into the jack on your MP3 player or CD player. Follow your heart rate if...or a new workout. 4. however, the display will pause. See step 4 on page 18. Next, press the play music or audio books through the console sound system while you continue to show exercise feedback; To select a preset workout, press the Weight Loss Workouts or the Performance Workouts button repeatedly until...
...6 on the fan if desired. The resistance of the pedals will begin to flash. Adjust the volume level using the volume control on the console. Profile Note: If you exercise, plug the audio cable into the jack on your MP3 player or CD player. Follow your heart rate if...or a new workout. 4. however, the display will pause. See step 4 on page 18. Next, press the play music or audio books through the console sound system while you continue to show exercise feedback; To select a preset workout, press the Weight Loss Workouts or the Performance Workouts button repeatedly until...
Canadian English Manual
Page 20
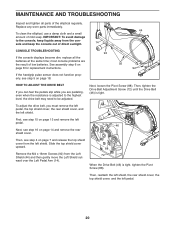
...Next, see step 5 on page 14 and remove the rear shield cover. most console problems are pedaling, even when the resistance is tight. To adjust the drive belt, you are the result of the elliptical regularly. Then, see step 4 on page 7 and release the top shield cover .... 20 Slide the top shield cover upward. Replace any worn parts immediately. 44 To clean the elliptical, use a damp cloth and a small amount of direct sunlight. 14 CONSOLE TROUBLESHOOTING If the console displays become dim, replace all parts of low batteries. Then, tighten the Drive Belt Adjustment Screw ...
...Next, see step 5 on page 14 and remove the rear shield cover. most console problems are pedaling, even when the resistance is tight. To adjust the drive belt, you are the result of the elliptical regularly. Then, see step 4 on page 7 and release the top shield cover .... 20 Slide the top shield cover upward. Replace any worn parts immediately. 44 To clean the elliptical, use a damp cloth and a small amount of direct sunlight. 14 CONSOLE TROUBLESHOOTING If the console displays become dim, replace all parts of low batteries. Then, tighten the Drive Belt Adjustment Screw ...

Canadian English Manual
Page 21
...). 27 81 18 92 24 58 41 Then, remove the M8 x 12mm Screws (81) from the Magnet. Next, rotate the Crank Assembly (24) until the console displays correct feedback. Rotate the Crank Assembly (24) for a moment. When the reed switch is aligned with the Reed Switch (58). Repeat these actions until... from the Right Pedal Disc (27), and gently rotate the Right Pedal Disc out of the way. HOW TO ADJUST THE REED SWITCH If the console does not display correct feedback, the reed switch should be adjusted. Using a flat screwdriver, remove the right Disc Cover (18).
...). 27 81 18 92 24 58 41 Then, remove the M8 x 12mm Screws (81) from the Magnet. Next, rotate the Crank Assembly (24) until the console displays correct feedback. Rotate the Crank Assembly (24) for a moment. When the reed switch is aligned with the Reed Switch (58). Repeat these actions until... from the Right Pedal Disc (27), and gently rotate the Right Pedal Disc out of the way. HOW TO ADJUST THE REED SWITCH If the console does not display correct feedback, the reed switch should be adjusted. Using a flat screwdriver, remove the right Disc Cover (18).
Canadian English Manual
Page 24
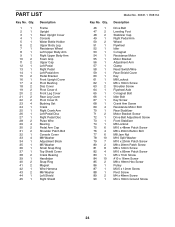
... 2 29 4 30 2 31 2 32 1 33 4 34 1 35 1 36 1 37 1 38 2 39 1 40 2 41 2 42 1 43 2 44 1 45 1 Description Frame Upright Rear Upright Cover Console Water Bottle Holder Upper Body Leg Resistance Wheel Left Upper Body Arm Right Upper Body Arm Foam Grip Upper Cap Left Pedal Right Pedal Left...Pivot Cover B Bushing Set Crank Right Crank Arm Left Pedal Disc Right Pedal Disc Pulse Wire Bearing Pedal Arm Cap Shoulder Patch Bolt Console Cover M8 Washer Adjustment Block M5 Washer Small Snap Ring Top Shield Cover Crank Bearing Handlebar Snap Ring Magnet Wire Harness M6 Washer ...
... 2 29 4 30 2 31 2 32 1 33 4 34 1 35 1 36 1 37 1 38 2 39 1 40 2 41 2 42 1 43 2 44 1 45 1 Description Frame Upright Rear Upright Cover Console Water Bottle Holder Upper Body Leg Resistance Wheel Left Upper Body Arm Right Upper Body Arm Foam Grip Upper Cap Left Pedal Right Pedal Left...Pivot Cover B Bushing Set Crank Right Crank Arm Left Pedal Disc Right Pedal Disc Pulse Wire Bearing Pedal Arm Cap Shoulder Patch Bolt Console Cover M8 Washer Adjustment Block M5 Washer Small Snap Ring Top Shield Cover Crank Bearing Handlebar Snap Ring Magnet Wire Harness M6 Washer ...


