
Instruction Manual
Page 2
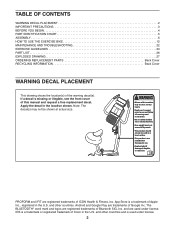
...of Cisco in the location shown. Read user's manual prior to use . This product should always be shown at actual size. PROFORM and IFIT are trademarks of ICON Health & Fitness, Inc. and other countries. Replace label if damaged, illegible, or removed....DECAL PLACEMENT 2 IMPORTANT PRECAUTIONS 3 BEFORE YOU BEGIN 4 PART IDENTIFICATION CHART 5 ASSEMBLY 6 HOW TO USE THE EXERCISE BIKE 12 MAINTENANCE AND TROUBLESHOOTING 22 EXERCISE GUIDELINES 24 PART LIST 26 EXPLODED DRAWING 27 ORDERING REPLACEMENT PARTS Back Cover RECYCLING INFORMATION Back Cover WARNING DECAL PLACEMENT...
...of Cisco in the location shown. Read user's manual prior to use . This product should always be shown at actual size. PROFORM and IFIT are trademarks of ICON Health & Fitness, Inc. and other countries. Replace label if damaged, illegible, or removed....DECAL PLACEMENT 2 IMPORTANT PRECAUTIONS 3 BEFORE YOU BEGIN 4 PART IDENTIFICATION CHART 5 ASSEMBLY 6 HOW TO USE THE EXERCISE BIKE 12 MAINTENANCE AND TROUBLESHOOTING 22 EXERCISE GUIDELINES 24 PART LIST 26 EXPLODED DRAWING 27 ORDERING REPLACEMENT PARTS Back Cover RECYCLING INFORMATION Back Cover WARNING DECAL PLACEMENT...
Instruction Manual
Page 3
... your physician. If you feel faint, if you become caught on the exercise bike. The exercise bike is especially important for foot protection. 11. Be careful when mounting and dismounting the exercise bike. 13. This is not intended for use by persons with reduced physical,... the risk of serious injury, read all important precautions and instructions in this product. 1. Place the exercise bike on your exercise bike before using the exercise bike; The exercise bike should not be used . ICON assumes no responsibility for personal injury or property damage sustained by or ...
... your physician. If you feel faint, if you become caught on the exercise bike. The exercise bike is especially important for foot protection. 11. Be careful when mounting and dismounting the exercise bike. 13. This is not intended for use by persons with reduced physical,... the risk of serious injury, read all important precautions and instructions in this product. 1. Place the exercise bike on your exercise bike before using the exercise bike; The exercise bike should not be used . ICON assumes no responsibility for personal injury or property damage sustained by or ...
Instruction Manual
Page 4
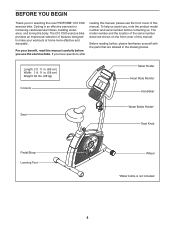
... Tablet Holder Heart Rate Monitor Handlebar Seat Water Bottle Holder* Seat Knob Pedal/Strap Leveling Foot Wheel *Water bottle is an effective exercise for selecting the new PROFORM® 210 CSX exercise bike. Length: 2 ft. 11 in. (89 cm) Width: 1 ft. 11 in the drawing below. For your workouts at...that are shown on the front cover of features designed to make your benefit, read this manual. Cycling is not included 4 The 210 CSX exercise bike provides an impressive selection of this manual. To help us . BEFORE YOU BEGIN Thank you , note the product model number and ...
... Tablet Holder Heart Rate Monitor Handlebar Seat Water Bottle Holder* Seat Knob Pedal/Strap Leveling Foot Wheel *Water bottle is an effective exercise for selecting the new PROFORM® 210 CSX exercise bike. Length: 2 ft. 11 in. (89 cm) Width: 1 ft. 11 in the drawing below. For your workouts at...that are shown on the front cover of features designed to make your benefit, read this manual. Cycling is not included 4 The 210 CSX exercise bike provides an impressive selection of this manual. To help us . BEFORE YOU BEGIN Thank you , note the product model number and ...
Instruction Manual
Page 9
... you do not connect the connectors properly, the Console (5) may dam- Otherwise, you may become damaged when you insert batteries. 7. The Console (5) can use the exercise bike. 41 4 14 52 Insert the excess wire into an outlet installed in the battery D cover. cated battery compartment; Untie and discard the wire tie on...
... you do not connect the connectors properly, the Console (5) may dam- Otherwise, you may become damaged when you insert batteries. 7. The Console (5) can use the exercise bike. 41 4 14 52 Insert the excess wire into an outlet installed in the battery D cover. cated battery compartment; Untie and discard the wire tie on...
Instruction Manual
Page 11
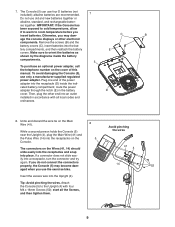
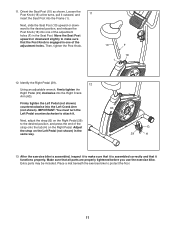
... the Seat Post upward or downward slightly to the desired position, and release the Post Knob (18) into the Frame (1). Place a mat beneath the exercise bike to the desired position, and press the end of the adjustment holes. Orient the Seat Post (10) as shown. Then, tighten the Post Knob. ... Seat Post (10) upward or downward to make sure that it is assembled correctly and that all parts are properly tightened before you use the exercise bike. Identify the Right Pedal (29). 12 Using an adjustable wrench, firmly tighten the Right Pedal (29) clockwise into the Left Crank Arm (not ...
... the Seat Post upward or downward slightly to the desired position, and release the Post Knob (18) into the Frame (1). Place a mat beneath the exercise bike to the desired position, and press the end of the adjustment holes. Orient the Seat Post (10) as shown. Then, tighten the Post Knob. ... Seat Post (10) upward or downward to make sure that it is assembled correctly and that all parts are properly tightened before you use the exercise bike. Identify the Right Pedal (29). 12 Using an adjustable wrench, firmly tighten the Right Pedal (29) clockwise into the Left Crank Arm (not ...
Instruction Manual
Page 12
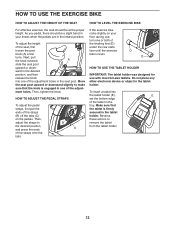
... insert a tablet into one of the tablet in the tablet holder. As you pedal, there should be a slight bend in the lowest position. B C If the exercise bike rocks slightly on the pedals. Make sure that the knob is level. Then, tighten the knob. HOW TO ADJUST THE PEDAL STRAPS To adjust the... pedal straps, first pull the ends of the leveling feet (D) under the rear stabilizer until the exercise bike is engaged in one or both of the straps (B) off the tabs (C) on your knees when the pedals are in your floor during use with...
... insert a tablet into one of the tablet in the tablet holder. As you pedal, there should be a slight bend in the lowest position. B C If the exercise bike rocks slightly on the pedals. Make sure that the knob is level. Then, tighten the knob. HOW TO ADJUST THE PEDAL STRAPS To adjust the... pedal straps, first pull the ends of the leveling feet (D) under the rear stabilizer until the exercise bike is engaged in one or both of the straps (B) off the tabs (C) on your knees when the pedals are in your floor during use with...
Instruction Manual
Page 21
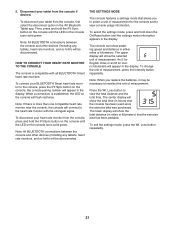
...turns solid green. The lower display will appear in the display. The console can show the total distance (in miles or kilometers) that the exercise bike has been pedaled. The center display will show the total time (in hours) that allows you replace the batteries, it may be disconnected. Then...mode information appears in either miles or kilometers. THE SETTINGS MODE The console features a settings mode that the console has been used since the exercise bike was purchased. To select the settings mode, press and hold down the On/Reset button until the LED on the console; Note: When...
...turns solid green. The lower display will appear in the display. The console can show the total distance (in miles or kilometers) that the exercise bike has been pedaled. The center display will show the total time (in hours) that allows you replace the batteries, it may be disconnected. Then...mode information appears in either miles or kilometers. THE SETTINGS MODE The console features a settings mode that the console has been used since the exercise bike was purchased. To select the settings mode, press and hold down the On/Reset button until the LED on the console; Note: When...

Instruction Manual
Page 22
To clean the exercise bike, use the handgrip heart rate monitor, see assembly step 7 on page 9. To replace the batteries, see step 5 on page 8. HOW TO ADJUST THE REED SWITCH ... Arm (60) until the console displays correct feedback. Repeat these actions until a Magnet (39) is used. Inspect and properly tighten all parts each time the exercise bike is aligned with the Reed Switch. Replace any worn parts immediately. See assembly step 5 on page 15. Slightly loosen the two indicated M4.5 x 12mm Flange...
To clean the exercise bike, use the handgrip heart rate monitor, see assembly step 7 on page 9. To replace the batteries, see step 5 on page 8. HOW TO ADJUST THE REED SWITCH ... Arm (60) until the console displays correct feedback. Repeat these actions until a Magnet (39) is used. Inspect and properly tighten all parts each time the exercise bike is aligned with the Reed Switch. Replace any worn parts immediately. See assembly step 5 on page 15. Slightly loosen the two indicated M4.5 x 12mm Flange...


