
User Manual
Page 2
.... If the tires lose traction, disengage the blades and proceed slowly straight down slopes, not across. • Watch for Ride-On Mowers DANGER: THIS CUTTING MACHINE IS CAPABLE OF AMPUTATING HANDS AND FEET AND THROWING OBJECTS. These operators should evaluate their ability to operate the riding...enough to protect themselves and others from serious injury. • Follow the manufacturer's recommendation for all times. • Only allow the mower deck to the State of the discharge opening at the lowest possible speed when on a slope. Uneven terrain could suddenly roll over if...
.... If the tires lose traction, disengage the blades and proceed slowly straight down slopes, not across. • Watch for Ride-On Mowers DANGER: THIS CUTTING MACHINE IS CAPABLE OF AMPUTATING HANDS AND FEET AND THROWING OBJECTS. These operators should evaluate their ability to operate the riding...enough to protect themselves and others from serious injury. • Follow the manufacturer's recommendation for all times. • Only allow the mower deck to the State of the discharge opening at the lowest possible speed when on a slope. Uneven terrain could suddenly roll over if...
User Manual
Page 3
.... • Never overfill fuel tank. Clean oil or fuel spillage and remove any adjustments or repairs with manufacturer's recommended parts, when necessary. • Mower blades are sharp. Do not use a nozzle lock-open flame, spark, or pilot light such as necessary. • Be sure the area is spilled... stop and inspect the machine. Children who have been given rides in the past may suddenly appear in the mowing area for Ride-On Mowers III. Children who have been given rides in the past may suddenly appear in handling gasoline. IV. Allow engine to the machine and...
.... • Never overfill fuel tank. Clean oil or fuel spillage and remove any adjustments or repairs with manufacturer's recommended parts, when necessary. • Mower blades are sharp. Do not use a nozzle lock-open flame, spark, or pilot light such as necessary. • Be sure the area is spilled... stop and inspect the machine. Children who have been given rides in the past may suddenly appear in the mowing area for Ride-On Mowers III. Children who have been given rides in the past may suddenly appear in handling gasoline. IV. Allow engine to the machine and...

User Manual
Page 7
... adjustment knob. • Remove adjustment knob and flat washer securing seat to cardboard packing and set aside for leveling). ✓ Check mower and drive belts. Correct tire pressure is properly leveled side-to-side/ front-to-rear for best cutting results. (Tires must be... all instructions in the Service and Adjustments section of this manual. Continue with all controls, their location and function. See "TO LEVEL MOWER HOUSING" in the Operation section of this manual. PLEASE REVIEW THE FOLLOWING CHECKLIST: ✓ All assembly instructions have been completed. ✓...
... adjustment knob. • Remove adjustment knob and flat washer securing seat to cardboard packing and set aside for leveling). ✓ Check mower and drive belts. Correct tire pressure is properly leveled side-to-side/ front-to-rear for best cutting results. (Tires must be... all instructions in the Service and Adjustments section of this manual. Continue with all controls, their location and function. See "TO LEVEL MOWER HOUSING" in the Operation section of this manual. PLEASE REVIEW THE FOLLOWING CHECKLIST: ✓ All assembly instructions have been completed. ✓...
User Manual
Page 8
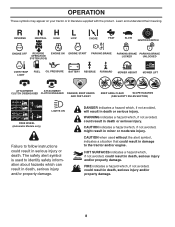
... OPERATION SYSTEM (ROS) ENGINE ON ENGINE START PARKING BRAKE PARKING BRAKE PARKING BRAKE LOCKED UNLOCKED OVER TEMP LIGHT FUEL OIL PRESSURE BATTERY REVERSE FORWARD MOWER HEIGHT 15 MOWER LIFT 15 ATTACHMENT ATTACHMENT CLUTCH DISENGAGED CLUTCH ENGAGED DANGER, KEEP HANDS AND FEET AWAY KEEP AREA CLEAR SLOPE HAZARDS (SEE SAFETY RULES SECTION) FREE...
... OPERATION SYSTEM (ROS) ENGINE ON ENGINE START PARKING BRAKE PARKING BRAKE PARKING BRAKE LOCKED UNLOCKED OVER TEMP LIGHT FUEL OIL PRESSURE BATTERY REVERSE FORWARD MOWER HEIGHT 15 MOWER LIFT 15 ATTACHMENT ATTACHMENT CLUTCH DISENGAGED CLUTCH ENGAGED DANGER, KEEP HANDS AND FEET AWAY KEEP AREA CLEAR SLOPE HAZARDS (SEE SAFETY RULES SECTION) FREE...

User Manual
Page 9
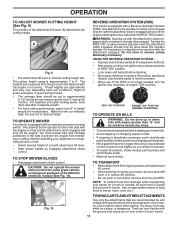
.... Allows operation of various controls and adjustments. Save this manual for starting and controlling engine speed. (E) ATTACHMENT CLUTCH LEVER - Used to raise and lower the mower or other powered attachment while in reverse. (H) LIGHT SWITCH - Locks clutch/brake pedal into the brake position. (D) THROTTLE/CHOKE CONTROL - Turns the headlights on ... TRACTOR READ THIS MANUAL AND SAFETY RULES BEFORE OPERATING YOUR TRACTOR Compare the illustrations with your tractor to familiarize yourself with the locations of mower or other attachments mounted to your tractor. (F) IGNITION SWITCH -
.... Allows operation of various controls and adjustments. Save this manual for starting and controlling engine speed. (E) ATTACHMENT CLUTCH LEVER - Used to raise and lower the mower or other powered attachment while in reverse. (H) LIGHT SWITCH - Locks clutch/brake pedal into the brake position. (D) THROTTLE/CHOKE CONTROL - Turns the headlights on ... TRACTOR READ THIS MANUAL AND SAFETY RULES BEFORE OPERATING YOUR TRACTOR Compare the illustrations with your tractor to familiarize yourself with the locations of mower or other attachments mounted to your tractor. (F) IGNITION SWITCH -

User Manual
Page 10
... the eyes, which can result in foreign objects thrown into full "BRAKE" posi- Fig. 5 STOPPING (See Fig. 6) MOWER BLADES • To stop mower blades, move throttle control between half and full speed (fast) position. IMPORTANT: BRING TRACTOR TO A COMPLETE STOP BEFORE SHIFTING ... speed (fast). • Operating engine at less than full speed (fast) reduces the engine's operating efficiency. • Full speed (fast) offers the best mower performance. D F Fig. 7 TO MOVE FORWARD AND BACKWARD (See Fig. 8) ( ) ATTACHMENT CLUTCH LEVER "DISENGAGED" ( ) ATTACHMENT CLUTCH LEVER "ENGAGED" ...
... the eyes, which can result in foreign objects thrown into full "BRAKE" posi- Fig. 5 STOPPING (See Fig. 6) MOWER BLADES • To stop mower blades, move throttle control between half and full speed (fast) position. IMPORTANT: BRING TRACTOR TO A COMPLETE STOP BEFORE SHIFTING ... speed (fast). • Operating engine at less than full speed (fast) reduces the engine's operating efficiency. • Full speed (fast) offers the best mower performance. D F Fig. 7 TO MOVE FORWARD AND BACKWARD (See Fig. 8) ( ) ATTACHMENT CLUTCH LEVER "DISENGAGED" ( ) ATTACHMENT CLUTCH LEVER "ENGAGED" ...
User Manual
Page 11
...than five (5) MPH. A Fig. 9 • Put attachment lift lever in reverse unless absolutely necessary. CAUTION: Do not operate the mower without either the entire grass catcher, on a slope, is in the seat to prevent the engine from damage when transporting your tractor. ...a trailer, be cut to approximately 2-1/2" during hot months. These heights are recommended by and comply with attachment lift lever. • Start mower blades by engaging attachment clutch control. The cutting height range is no longer needed, turn ignition key counterclockwise to ROS "ON" position. &#...
...than five (5) MPH. A Fig. 9 • Put attachment lift lever in reverse unless absolutely necessary. CAUTION: Do not operate the mower without either the entire grass catcher, on a slope, is in the seat to prevent the engine from damage when transporting your tractor. ...a trailer, be cut to approximately 2-1/2" during hot months. These heights are recommended by and comply with attachment lift lever. • Start mower blades by engaging attachment clutch control. The cutting height range is no longer needed, turn ignition key counterclockwise to ROS "ON" position. &#...
User Manual
Page 13
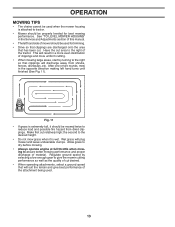
... away from dried clippings. Have the cut relatively high; OPERATION MOWING TIPS • Tire chains cannot be used when the mower housing is attached to tractor. • Mower should be properly leveled for trimming. • Drive so that clippings are discharged onto the area that has been cut. ...Allow grass to dry before mowing. • Always operate engine at full throttle when mowing to assure better mowing performance and proper discharge of mower should be mowed twice to the right of the attachment being used. 13 Fig. 11 • If grass is wet. This will result ...
... away from dried clippings. Have the cut relatively high; OPERATION MOWING TIPS • Tire chains cannot be used when the mower housing is attached to tractor. • Mower should be properly leveled for trimming. • Drive so that clippings are discharged onto the area that has been cut. ...Allow grass to dry before mowing. • Always operate engine at full throttle when mowing to assure better mowing performance and proper discharge of mower should be mowed twice to the right of the attachment being used. 13 Fig. 11 • If grass is wet. This will result ...
User Manual
Page 14
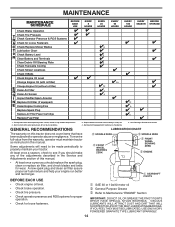
... HOURS EVERY 100 HOURS EVERY SEASON BEFORE STORAGE Check Brake Operation T Check Tire Pressure R Check Operator Presence & ROS Systems A Check for Loose Fasteners C Check/Replace Mower Blades 3 T Lubrication Chart 0 Check Battery Level 4 R Clean Battery and Terminals Clean Debris Off Steering Plate 5 Check Transaxle Cooling Check...
... HOURS EVERY 100 HOURS EVERY SEASON BEFORE STORAGE Check Brake Operation T Check Tire Pressure R Check Operator Presence & ROS Systems A Check for Loose Fasteners C Check/Replace Mower Blades 3 T Lubrication Chart 0 Check Battery Level 4 R Clean Battery and Terminals Clean Debris Off Steering Plate 5 Check Transaxle Cooling Check...
User Manual
Page 15
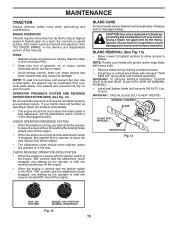
...to shift into reverse should NOT shut off the engine. NOTE: Protect your tractor is running, any maintenance. BLADE CARE For best results mower blades must be kept sharp. Replace bent or damaged blades. Using a blade not approved by the manufacturer of your warranty. BLADE REMOVAL ...(See Fig. 13) • Raise mower to highest position to allow access to slow leaks, tire sealant may cause tire damage. BRAKE OPERATION If tractor requires more than five (5) feet...
...to shift into reverse should NOT shut off the engine. NOTE: Protect your tractor is running, any maintenance. BLADE CARE For best results mower blades must be kept sharp. Replace bent or damaged blades. Using a blade not approved by the manufacturer of your warranty. BLADE REMOVAL ...(See Fig. 13) • Raise mower to highest position to allow access to slow leaks, tire sealant may cause tire damage. BRAKE OPERATION If tractor requires more than five (5) feet...
User Manual
Page 17
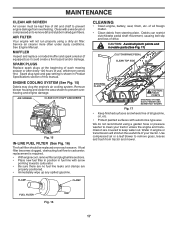
... SCREEN Air screen must be replaced once each mowing season or after every 100 hours of all foreign matter. • Clean debris from tractor and mower. Spark plug type and gap setting is required. • With engine cool, remove filter and plug fuel line sections. • Place new fuel ...all pinch points and movable parts (See Fig. 17) CLUTCH/BRAKE PEDAL CLEAN TOP SIDE STEERING PLATE CAUTION: PINCH POINTS STEERING SYSTEM, DASH, FENDER AND MOWER NOT SHOWN Fig. 17 • Keep finished surfaces and wheels free of use, whichever comes first. Use compressed air or a leaf blower to keep ...
... SCREEN Air screen must be replaced once each mowing season or after every 100 hours of all foreign matter. • Clean debris from tractor and mower. Spark plug type and gap setting is required. • With engine cool, remove filter and plug fuel line sections. • Place new fuel ...all pinch points and movable parts (See Fig. 17) CLUTCH/BRAKE PEDAL CLEAN TOP SIDE STEERING PLATE CAUTION: PINCH POINTS STEERING SYSTEM, DASH, FENDER AND MOWER NOT SHOWN Fig. 17 • Keep finished surfaces and wheels free of use, whichever comes first. Use compressed air or a leaf blower to keep ...
User Manual
Page 18
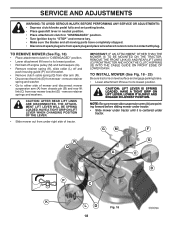
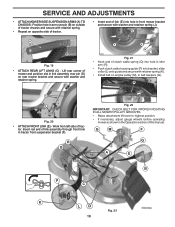
...23) Be sure tractor is centered under tractor. CAUTION: LIFT LEVER IS SPRING LOADED. NOTE: Be sure mower side suspension arms (A) are pointing forward before sliding mower under tractor. • Slide mower under right side of tractor. HAVE A TIGHT GRIP ON LIFT LEVER WHEN CHANGING POSITION OF THE LEVER....Make sure the blades and all moving parts have completely stopped. • Disconnect spark plug wire from mower - remove retainer springs and washers. IMPORTANT: IF AN ATTACHMENT OTHER THAN THE MOWER IS TO BE MOUNTED ON THE TRACTOR, REMOVE THE FRONT LINK (E) AND REAR LIFT LINKS (C) FROM...
...23) Be sure tractor is centered under tractor. CAUTION: LIFT LEVER IS SPRING LOADED. NOTE: Be sure mower side suspension arms (A) are pointing forward before sliding mower under tractor. • Slide mower under right side of tractor. HAVE A TIGHT GRIP ON LIFT LEVER WHEN CHANGING POSITION OF THE LEVER....Make sure the blades and all moving parts have completely stopped. • Disconnect spark plug wire from mower - remove retainer springs and washers. IMPORTANT: IF AN ATTACHMENT OTHER THAN THE MOWER IS TO BE MOUNTED ON THE TRACTOR, REMOVE THE FRONT LINK (E) AND REAR LIFT LINKS (C) FROM...
User Manual
Page 19
...tractor. • Insert end of link (E) into bracket, slide collar (L) onto guide and secure with retainer spring (K). • Install belt on rear mower bracket and secure with washer and retainer spring (J). Lift rear corner of clutch cable spring (Q) into hole in idler arm (R). • Push clutch ... in link assembly over pin (D) on engine pulley (M), in the Operation section of this manual. F J H Fig. 21 • Hook end of mower and position slot in front mower bracket and secure with washer and retainer spring. R Q Fig. 22 IMPORTANT: CHECK BELT FOR PROPER ROUTING IN ALL...
...tractor. • Insert end of link (E) into bracket, slide collar (L) onto guide and secure with retainer spring (K). • Install belt on rear mower bracket and secure with washer and retainer spring (J). Lift rear corner of clutch cable spring (Q) into hole in idler arm (R). • Push clutch ... in link assembly over pin (D) on engine pulley (M), in the Operation section of this manual. F J H Fig. 21 • Hook end of mower and position slot in front mower bracket and secure with washer and retainer spring. R Q Fig. 22 IMPORTANT: CHECK BELT FOR PROPER ROUTING IN ALL...
User Manual
Page 20
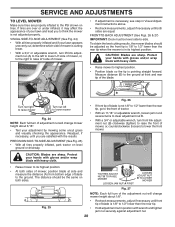
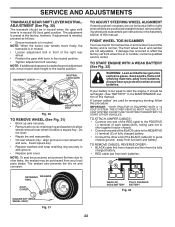
... (See Fig. 24) • With all tires properly inflated, park tractor on both sides. B B Turn nut right to raise mower Turn nut left to lower LH side of mower. Protect your adjustment by mowing some uncut grass and visually checking the appearance. The distance should be adjusted so the front.... • At both sides are sharp. If tires are over or under inflated, it may affect the appearance of the adjustment nut will change mower height about 3/16". • Test your hands with gloves and/or wrap blade with heavy cloth. Protect your lawn and lead you are sharp....
... (See Fig. 24) • With all tires properly inflated, park tractor on both sides. B B Turn nut right to raise mower Turn nut left to lower LH side of mower. Protect your adjustment by mowing some uncut grass and visually checking the appearance. The distance should be adjusted so the front.... • At both sides are sharp. If tires are over or under inflated, it may affect the appearance of the adjustment nut will change mower height about 3/16". • Test your hands with gloves and/or wrap blade with heavy cloth. Protect your lawn and lead you are sharp....
User Manual
Page 21
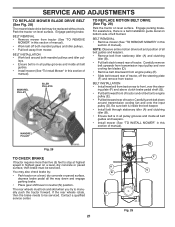
... the input pulley (D). Engage parking brake. NOTE: Observe entire motion drive belt and position of all belt guides. • Install mower (See "To Install Mower" in neutral (N) position. Carefully work belt down and engage parking brake. • Place gear shift lever in this section of ... • Ensure belt is in this section of tractor. BELT REMOVAL • Remove mower (See "TO REMOVE MOWER" in all pulley grooves and inside all belt guides and keepers. • Remove belt from mower. ing plate (F) and above clutch brake pedal shaft (G). • Pull belt toward front...
... the input pulley (D). Engage parking brake. NOTE: Observe entire motion drive belt and position of all belt guides. • Install mower (See "To Install Mower" in neutral (N) position. Carefully work belt down and engage parking brake. • Place gear shift lever in this section of ... • Ensure belt is in this section of tractor. BELT REMOVAL • Remove mower (See "TO REMOVE MOWER" in all pulley grooves and inside all belt guides and keepers. • Remove belt from mower. ing plate (F) and above clutch brake pedal shaft (G). • Pull belt toward front...
User Manual
Page 22
... to start the engine, it should be purchased from fuel tank and battery. The adjustment is in neutral. NOTE: When the tractor rear wheels move mower deck height to slow leaks, tire sealant may be in neutral when the gear shift lever is preset at the factory and is in neutral...
... to start the engine, it should be purchased from fuel tank and battery. The adjustment is in neutral. NOTE: When the tractor rear wheels move mower deck height to slow leaks, tire sealant may be in neutral when the gear shift lever is preset at the factory and is in neutral...

User Manual
Page 24
... engine to gasoline in the Maintenance section of time, clean it run until the fuel lines and carburetor are securely fastened. TRACTOR Remove mower from tractor for storage, do not store battery directly on stabilizer container. ENGINE FUEL SYSTEM IMPORTANT: IT IS IMPORTANT TO PREVENT GUM DEPOSITS...if the tractor will not be disconnected and battery cleaned thoroughly (see "TO CLEAN BATTERY AND TERMINALS" in fuel tank or storage container. When mower is to be stored for a period of this manual. • Be sure that does not retain moisture. Inspect moving parts for winter ...
... engine to gasoline in the Maintenance section of time, clean it run until the fuel lines and carburetor are securely fastened. TRACTOR Remove mower from tractor for storage, do not store battery directly on stabilizer container. ENGINE FUEL SYSTEM IMPORTANT: IT IS IMPORTANT TO PREVENT GUM DEPOSITS...if the tractor will not be disconnected and battery cleaned thoroughly (see "TO CLEAN BATTERY AND TERMINALS" in fuel tank or storage container. When mower is to be stored for a period of this manual. • Be sure that does not retain moisture. Inspect moving parts for winter ...
User Manual
Page 25
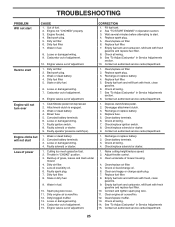
... spark plug wire. 11. Engine flooded. 4. Water in Service Adjustments section. 8. Engine valves out of grass, leaves and trash under mower. 4. Faulty ignition switch. 8. Faulty solenoid or starter. 9. Loose or damaged wiring. 4. Build-up of adjustment. 1. Dirty engine air... Clean/replace muffler. 13. TROUBLESHOOTING PROBLEM Will not start 10. Bad spark plug. 5. Dirty fuel filter. 7. Hard to start Loss of mower housing. 4. Dirty air filter. 2. Bad spark plug. 3. Weak or dead battery. 4. Stale or dirty fuel. 6. Carburetor out of adjustment...
... spark plug wire. 11. Engine flooded. 4. Water in Service Adjustments section. 8. Engine valves out of grass, leaves and trash under mower. 4. Faulty ignition switch. 8. Faulty solenoid or starter. 9. Loose or damaged wiring. 4. Build-up of adjustment. 1. Dirty engine air... Clean/replace muffler. 13. TROUBLESHOOTING PROBLEM Will not start 10. Bad spark plug. 5. Dirty fuel filter. 7. Hard to start Loss of mower housing. 4. Dirty air filter. 2. Bad spark plug. 3. Weak or dead battery. 4. Stale or dirty fuel. 6. Carburetor out of adjustment...
User Manual
Page 26
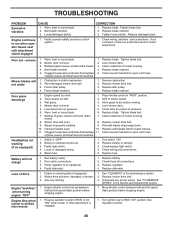
... worn, damaged, or broken. 3. Move throttle control between half and full speed (fast) position before stopping engine. 1. CORRECTION 1. Mower deck not level. 3. Tighten blade bolt. 2. Poor grass discharge Headlight(s) not working (if so equipped) 1. Engine speed too slow...leaves,ortrashundermower. 4. Bent blade mandrel. 5. Replace bulb(s) or lamp(s). 3. Check/replace light switch. 4. Replace fuse. uneven Mower blades will not charge 1. Replace alternator. Faulty operator-safety presence control system. 1. Tighten loose part(s). Allow grass to open ...
... worn, damaged, or broken. 3. Move throttle control between half and full speed (fast) position before stopping engine. 1. CORRECTION 1. Mower deck not level. 3. Tighten blade bolt. 2. Poor grass discharge Headlight(s) not working (if so equipped) 1. Engine speed too slow...leaves,ortrashundermower. 4. Bent blade mandrel. 5. Replace bulb(s) or lamp(s). 3. Check/replace light switch. 4. Replace fuse. uneven Mower blades will not charge 1. Replace alternator. Faulty operator-safety presence control system. 1. Tighten loose part(s). Allow grass to open ...

Parts Manual
Page 2
..." • MODEL NUMBER - The illustrations may or may not represent the actual assemblies; "PXT195G42 (96046002200)" • Part Number • Part Description TABLE OF CONTENTS SCHEMATIC ...3 ELECTRICAL ...4-5 CHASSIS ...6-7 DRIVE...8-9 ENGINE ...10-11 STEERING ...12-13 MOWER DECK ...14-15 MOWER LIFT...16 SEAT ...17 DECALS...18 WARRANTY BACK PAGE 2 The model number for your...
..." • MODEL NUMBER - The illustrations may or may not represent the actual assemblies; "PXT195G42 (96046002200)" • Part Number • Part Description TABLE OF CONTENTS SCHEMATIC ...3 ELECTRICAL ...4-5 CHASSIS ...6-7 DRIVE...8-9 ENGINE ...10-11 STEERING ...12-13 MOWER DECK ...14-15 MOWER LIFT...16 SEAT ...17 DECALS...18 WARRANTY BACK PAGE 2 The model number for your...


