
User Manual
Page 2
...; Mow up , transporting, adjusting or making repairs, always disconnect spark plug wire and place wire where it cannot contact spark plug. The machine could overturn the machine. Material may ricochet back toward anyone enters the area. • Never carry passengers. • Do not mow in the manual before cleaning the machine, removing the grass catcher, or unclogging the discharge chute. • Operate machine only in...
...; Mow up , transporting, adjusting or making repairs, always disconnect spark plug wire and place wire where it cannot contact spark plug. The machine could overturn the machine. Material may ricochet back toward anyone enters the area. • Never carry passengers. • Do not mow in the manual before cleaning the machine, removing the grass catcher, or unclogging the discharge chute. • Operate machine only in...
User Manual
Page 3
... the watchful care of grass, leaves, or other than the operator. • Be alert and turn machine off if a child enters the area. • Before and while backing, look behind and down for Ride-On Mowers III. Allow engine to stop and inspect the machine. Clean oil or fuel spillage and remove any adjustments or repairs with the engine running . Never assume that...
... the watchful care of grass, leaves, or other than the operator. • Be alert and turn machine off if a child enters the area. • Before and while backing, look behind and down for Ride-On Mowers III. Allow engine to stop and inspect the machine. Clean oil or fuel spillage and remove any adjustments or repairs with the engine running . Never assume that...
User Manual
Page 4
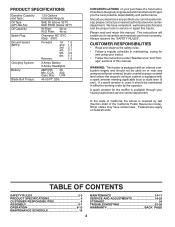
... maintained in maintaining, caring for the muffler is available through your nearest authorized service center/ department. Other states may have competent, well-trained technicians and the proper tools to assemble and maintain your tractor. • Follow the instructions under "Maintenance" and "Stor- PRODUCT SPECIFICATIONS Gasoline Capacity and Type: Oil Type (API-SG-SL): Oil Capacity: Spark Plug: Ground Speed (MPH): Charging System: Battery: Blade Bolt Torque: 1.50 Gallons Unleaded Regular...
... maintained in maintaining, caring for the muffler is available through your nearest authorized service center/ department. Other states may have competent, well-trained technicians and the proper tools to assemble and maintain your tractor. • Follow the instructions under "Maintenance" and "Stor- PRODUCT SPECIFICATIONS Gasoline Capacity and Type: Oil Type (API-SG-SL): Oil Capacity: Spark Plug: Ground Speed (MPH): Charging System: Battery: Blade Bolt Torque: 1.50 Gallons Unleaded Regular...

User Manual
Page 6
..., lock washer, hex bolt and tighten securely. • Snap steering wheel insert into service after month and year indicated on all parts and hardware you are listed. (1) 5/16" wrench (2) 7/16" wrenches (2) 1/2" wrenches (1) 9/16" wrench Utility knife Tire pressure gauge Pliers When right or left unassembled for charging instructions). • For battery and battery cable installation see "REPLACING BATTERY" in the "Service and Adjustments" section in the operating position (seated...
..., lock washer, hex bolt and tighten securely. • Snap steering wheel insert into service after month and year indicated on all parts and hardware you are listed. (1) 5/16" wrench (2) 7/16" wrenches (2) 1/2" wrenches (1) 9/16" wrench Utility knife Tire pressure gauge Pliers When right or left unassembled for charging instructions). • For battery and battery cable installation see "REPLACING BATTERY" in the "Service and Adjustments" section in the operating position (seated...

User Manual
Page 7
... in front of tractor is in the Service and Adjustments section of other people and objects. PLEASE REVIEW THE FOLLOWING CHECKLIST: ✓ All assembly instructions have been completed. ✓ No remaining loose parts in carton. ✓ Battery is properly prepared and charged. ✓ Seat is important for replacing motion and mower blade drive belts in a well-ventilated area. CHECK DECK LEVELNESS For best cutting results, mower housing should be...
... in front of tractor is in the Service and Adjustments section of other people and objects. PLEASE REVIEW THE FOLLOWING CHECKLIST: ✓ All assembly instructions have been completed. ✓ No remaining loose parts in carton. ✓ Battery is properly prepared and charged. ✓ Seat is important for replacing motion and mower blade drive belts in a well-ventilated area. CHECK DECK LEVELNESS For best cutting results, mower housing should be...

User Manual
Page 12
...;C), USE FRESH, CLEAN WINTER GRADE GASOLINE TO HELP ENSURE GOOD COLD WEATHER STARTING. To avoid engine problems, the fuel system should change engine oil, see the Maintenance section in your tractor has been shipped, from several seconds to several attempts, move throttle control to choke position. Do not run starter continuously for the first time or if the engine has run out of this manual. 12 Acidic gas can damage the fuel system...
...;C), USE FRESH, CLEAN WINTER GRADE GASOLINE TO HELP ENSURE GOOD COLD WEATHER STARTING. To avoid engine problems, the fuel system should change engine oil, see the Maintenance section in your tractor has been shipped, from several seconds to several attempts, move throttle control to choke position. Do not run starter continuously for the first time or if the engine has run out of this manual. 12 Acidic gas can damage the fuel system...
User Manual
Page 14
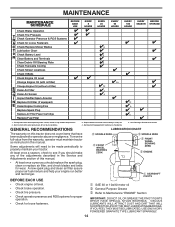
... USE EVERY 8 HOURS EVERY 25 HOURS EVERY 50 HOURS EVERY 100 HOURS EVERY SEASON BEFORE STORAGE Check Brake Operation T Check Tire Pressure R Check Operator Presence & ROS Systems A Check for Loose Fasteners C Check/Replace Mower Blades 3 T Lubrication Chart 0 Check Battery Level 4 R Clean Battery and Terminals Clean Debris Off Steering Plate 5 Check Transaxle Cooling Check Mower Levelness Check V-Belts Check Engine Oil Level Change Engine Oil (with maintenance-free battery. 5 - GENERAL RECOMMENDATIONS LUBRICATION CHART The warranty on this tractor does not cover...
... USE EVERY 8 HOURS EVERY 25 HOURS EVERY 50 HOURS EVERY 100 HOURS EVERY SEASON BEFORE STORAGE Check Brake Operation T Check Tire Pressure R Check Operator Presence & ROS Systems A Check for Loose Fasteners C Check/Replace Mower Blades 3 T Lubrication Chart 0 Check Battery Level 4 R Clean Battery and Terminals Clean Debris Off Steering Plate 5 Check Transaxle Cooling Check Mower Levelness Check V-Belts Check Engine Oil Level Change Engine Oil (with maintenance-free battery. 5 - GENERAL RECOMMENDATIONS LUBRICATION CHART The warranty on this tractor does not cover...
User Manual
Page 15
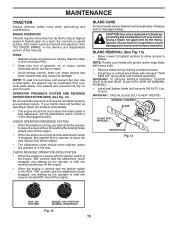
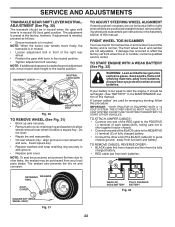
... best results mower blades must be checked and adjusted. (See "TO CHECK BRAKE" in all tires (See the sides of tires for proper PSI). • Keep tires free of this manual). Replace bent or damaged blades. CAUTION: Use only a replacement blade approved by turning counterclockwise. • Install new or resharpened blade with stamped "THIS SIDE UP" facing deck and mandrel assembly. BLADE REMOVAL (See Fig. 13) • Raise mower to highest position to...
... best results mower blades must be checked and adjusted. (See "TO CHECK BRAKE" in all tires (See the sides of tires for proper PSI). • Keep tires free of this manual). Replace bent or damaged blades. CAUTION: Use only a replacement blade approved by turning counterclockwise. • Install new or resharpened blade with stamped "THIS SIDE UP" facing deck and mandrel assembly. BLADE REMOVAL (See Fig. 13) • Raise mower to highest position to...
User Manual
Page 16
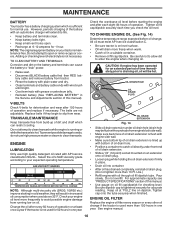
... "REPLACING BATTERY" in a suitable container. • Remove oil fill cap/dipstick. Adding or checking level of time immediately prior to draining oil, oil will result in increased oil consumption when used more freely when warm. • Catch oil in the Service and Adjustments section of this manual. • Use gauge on the battery and terminals can restrict cooling. TO CHANGE ENGINE OIL (See Fig. 14) Determine temperature range expected before starting in place. • Drain oil...
... "REPLACING BATTERY" in a suitable container. • Remove oil fill cap/dipstick. Adding or checking level of time immediately prior to draining oil, oil will result in increased oil consumption when used more freely when warm. • Catch oil in the Service and Adjustments section of this manual. • Use gauge on the battery and terminals can restrict cooling. TO CHANGE ENGINE OIL (See Fig. 14) Determine temperature range expected before starting in place. • Drain oil...
User Manual
Page 17
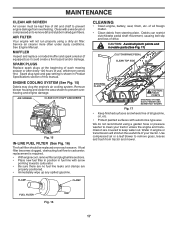
... from overheating. Spark plug type and gap setting is required. • With engine cool, remove filter and plug fuel line sections. • Place new fuel filter in position in fuel line with arrow pointing towards carburetor. • Be sure there are no fuel line leaks and clamps are covered to remove dirt and stubborn dried gum fibers. We do not recommend using a dirty air filter. Water in Product Specifications section of this manual. Use compressed air or a leaf blower to prevent...
... from overheating. Spark plug type and gap setting is required. • With engine cool, remove filter and plug fuel line sections. • Place new fuel filter in position in fuel line with arrow pointing towards carburetor. • Be sure there are no fuel line leaks and clamps are covered to remove dirt and stubborn dried gum fibers. We do not recommend using a dirty air filter. Water in Product Specifications section of this manual. Use compressed air or a leaf blower to prevent...
User Manual
Page 18
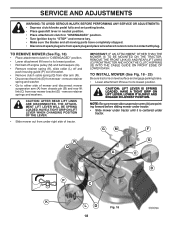
... under tractor. SERVICE AND ADJUSTMENTS WARNING: TO AVOID SERIOUS INJURY, BEFORE PERFORMING ANY SERVICE OR ADJUSTMENTS: • Depress clutch/brake pedal fully and set parking brake. • Place gearshift lever in neutral position. • Place attachment clutch in "DISENGAGED" position. • Turn ignition key to "STOP" and remove key. • Make sure the blades and all moving parts have completely stopped. • Disconnect spark plug wire from rear mower bracket (D) - remove retainer spring and washer...
... under tractor. SERVICE AND ADJUSTMENTS WARNING: TO AVOID SERIOUS INJURY, BEFORE PERFORMING ANY SERVICE OR ADJUSTMENTS: • Depress clutch/brake pedal fully and set parking brake. • Place gearshift lever in neutral position. • Place attachment clutch in "DISENGAGED" position. • Turn ignition key to "STOP" and remove key. • Make sure the blades and all moving parts have completely stopped. • Disconnect spark plug wire from rear mower bracket (D) - remove retainer spring and washer...
User Manual
Page 19
... clutch cable housing guide (P) into hole in front mower bracket and secure with retainer spring (K). • Install belt on engine pulley (M), in arm over pin (D) on opposite side of tractor. • Insert end of trac- G M F G A E B P C K LD Fig. 23 19 tor. Position hole in belt keepers (G). R Q Fig. 22 IMPORTANT: CHECK BELT FOR PROPER ROUTING IN ALL MOWER PULLEY GROOVES. • Raise attachment lift lever to highest position. • If necessary, adjust gauge wheels before operating mower as...
... clutch cable housing guide (P) into hole in front mower bracket and secure with retainer spring (K). • Install belt on engine pulley (M), in arm over pin (D) on opposite side of tractor. • Insert end of trac- G M F G A E B P C K LD Fig. 23 19 tor. Position hole in belt keepers (G). R Q Fig. 22 IMPORTANT: CHECK BELT FOR PROPER ROUTING IN ALL MOWER PULLEY GROOVES. • Raise attachment lift lever to highest position. • If necessary, adjust gauge wheels before operating mower as...
User Manual
Page 21
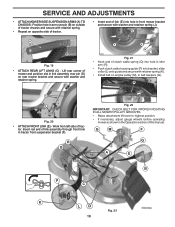
... clutch brake pedal shaft (G). • Pull belt toward front of tractor and roll belt onto engine pulley (E). • Pull belt toward rear of manual). A B D E F G 02954 Manual Fig. 29 21 BELT INSTALLATION • Install new belt from mower. SERVICE AND ADJUSTMENTS TO REPLACE MOWER BLADE DRIVE BELT (See Fig. 28) The mower blade drive belt may also check brake by: • Park tractor on a level, dry concrete or paved surface, then brake must lock and skid when you try to be replaced without tools. Engage parking brake. Park the tractor on level...
... clutch brake pedal shaft (G). • Pull belt toward front of tractor and roll belt onto engine pulley (E). • Pull belt toward rear of manual). A B D E F G 02954 Manual Fig. 29 21 BELT INSTALLATION • Install new belt from mower. SERVICE AND ADJUSTMENTS TO REPLACE MOWER BLADE DRIVE BELT (See Fig. 28) The mower blade drive belt may also check brake by: • Park tractor on a level, dry concrete or paved surface, then brake must lock and skid when you try to be replaced without tools. Engage parking brake. Park the tractor on level...
User Manual
Page 22
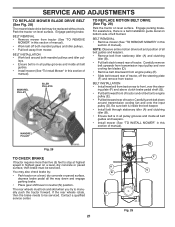
NOTE: When the tractor rear wheels move mower deck height to the lowest position. GEARSHIFT LEVER NEUTRAL LOCK GATE ADJUSTMENT BOLT Fig. 30 TO REMOVE WHEEL (See Fig. 31) • Block up axle securely. • Remove axle cover, retaining ring and washers to affect the factory set at the factory; TO ADJUST STEERING WHEEL ALIGNMENT If steering wheel crossbars are not horizontal (left to start the engine, it should be...
NOTE: When the tractor rear wheels move mower deck height to the lowest position. GEARSHIFT LEVER NEUTRAL LOCK GATE ADJUSTMENT BOLT Fig. 30 TO REMOVE WHEEL (See Fig. 31) • Block up axle securely. • Remove axle cover, retaining ring and washers to affect the factory set at the factory; TO ADJUST STEERING WHEEL ALIGNMENT If steering wheel crossbars are not horizontal (left to start the engine, it should be...
User Manual
Page 23
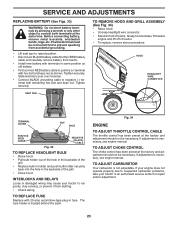
...; Stand in fuse. If adjustment is necessary, see engne manual. If your engine does not operate properly due to suspected carburetor problems, take your tractor to an authorized service center for repair and/or adjustment. 23 HOOD HEADLIGHT WIRE CONNECTOR SEAT PAN 03076 TERMINAL COVER 02602 NUT BOLT POSITIVE (RED) CABLE 02603 Fig. 33 NEGATIVE (BLACK) CABLE TO REPLACE HEADLIGHT BULB • Raise hood. • Pull bulb holder out of the...
...; Stand in fuse. If adjustment is necessary, see engne manual. If your engine does not operate properly due to suspected carburetor problems, take your tractor to an authorized service center for repair and/or adjustment. 23 HOOD HEADLIGHT WIRE CONNECTOR SEAT PAN 03076 TERMINAL COVER 02602 NUT BOLT POSITIVE (RED) CABLE 02603 Fig. 33 NEGATIVE (BLACK) CABLE TO REPLACE HEADLIGHT BULB • Raise hood. • Pull bulb holder out of the...

User Manual
Page 24
... mower is to be stored for a period of time, clean it run until the fuel lines and carburetor are securely fastened. Store in a clean, dry area. • Clean entire tractor (See "CLEANING" in the Maintenance section of this manual). • Inspect and replace belts, if necessary (See belt replacement instructions in the Service and Adjustments section of this manual. • Be sure that does not retain moisture. BATTERY • Fully charge the battery...
... mower is to be stored for a period of time, clean it run until the fuel lines and carburetor are securely fastened. Store in a clean, dry area. • Clean entire tractor (See "CLEANING" in the Maintenance section of this manual). • Inspect and replace belts, if necessary (See belt replacement instructions in the Service and Adjustments section of this manual. • Be sure that does not retain moisture. BATTERY • Fully charge the battery...
User Manual
Page 25
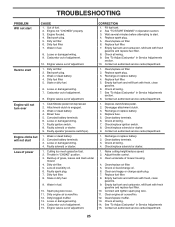
... under mower. 4. Replace spark plug. 5. Check all wiring. 4. Clean/replace air filter. 5. Connect and tighten spark plug wire. 11. Engine flooded. 4. Hard to start 10. Faulty solenoid or starter. 1. Out of power 8. Dirty fuel filter. 7. Weak or dead battery. 4. Replace spark plug. 3. Recharge or replace battery. 4. Check/replace ignition switch. 8. Faulty operator presence switch(es). 1. Dirty/clogged muffler. 13. Replace fuel filter. 7. Recharge or replace battery. 2. Check oil level/change spark plug. 7. Empty fuel tank and carburetor, refill tank with...
... under mower. 4. Replace spark plug. 5. Check all wiring. 4. Clean/replace air filter. 5. Connect and tighten spark plug wire. 11. Engine flooded. 4. Hard to start 10. Faulty solenoid or starter. 1. Out of power 8. Dirty fuel filter. 7. Weak or dead battery. 4. Replace spark plug. 3. Recharge or replace battery. 4. Check/replace ignition switch. 8. Faulty operator presence switch(es). 1. Dirty/clogged muffler. 13. Replace fuel filter. 7. Recharge or replace battery. 2. Check oil level/change spark plug. 7. Empty fuel tank and carburetor, refill tank with...
User Manual
Page 26
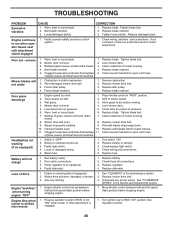
... bolt. 2. Poor cut - Mower deck not level. 3. Clogged mower deck vent holes from buildup 11. Clean underside of mower housing. 8. Remove obstruction. 2. Allow grass to ROS "ON" position. Clean underside of mower housing. 4. Replace mower drive belt. 9. Replace bulb(s) or lamp(s). 3. Replace regulator. 4. Debris on steering plate (if equipped). 2. See "TO REMOVE WHEEL" in parts manual. 11. Turn ignition key to dry before mowing. 4. Engine continues to slower speed. 3. Shift to run when operator leaves seat with blades listed in the Service...
... bolt. 2. Poor cut - Mower deck not level. 3. Clogged mower deck vent holes from buildup 11. Clean underside of mower housing. 8. Remove obstruction. 2. Allow grass to ROS "ON" position. Clean underside of mower housing. 4. Replace mower drive belt. 9. Replace bulb(s) or lamp(s). 3. Replace regulator. 4. Debris on steering plate (if equipped). 2. See "TO REMOVE WHEEL" in parts manual. 11. Turn ignition key to dry before mowing. 4. Engine continues to slower speed. 3. Shift to run when operator leaves seat with blades listed in the Service...
User Manual
Page 28
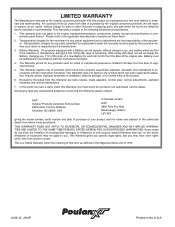
... the above limitations or exclusions may have a claim under this Warranty, you , any battery which we will exchange the Battery, charging you . This Warranty does not apply to any power equipment unit or attachment are belts, blades, blade adapters, normal wear, normal adjustments, standard hardware and normal maintenance. 7. This is a limited Warranty within the meaning of that this product as manufactured is...
... the above limitations or exclusions may have a claim under this Warranty, you , any battery which we will exchange the Battery, charging you . This Warranty does not apply to any power equipment unit or attachment are belts, blades, blade adapters, normal wear, normal adjustments, standard hardware and normal maintenance. 7. This is a limited Warranty within the meaning of that this product as manufactured is...

Parts Manual
Page 11
...-12 Screw 1/4-20 x 3/4 122 532 42 19-22 Extension Drain Oil NOTE: AllcomponentdimensionsgiveninU.S.inches 1 inch = 25.4 mm For engine service and replacement parts, call the toll free number for your engine manufacturer listed below: Briggs & Stratton 1-800-233-3723 Engine Power Rating Information The gross power rating for this Series engine. 11 TRACTOR - - PXT195G42 (96046002200), PRODUCT NO. 960 46 00-22 ENGINE KEY PART NO. Torque values are derived at 3600 RPM. MODEL...
...-12 Screw 1/4-20 x 3/4 122 532 42 19-22 Extension Drain Oil NOTE: AllcomponentdimensionsgiveninU.S.inches 1 inch = 25.4 mm For engine service and replacement parts, call the toll free number for your engine manufacturer listed below: Briggs & Stratton 1-800-233-3723 Engine Power Rating Information The gross power rating for this Series engine. 11 TRACTOR - - PXT195G42 (96046002200), PRODUCT NO. 960 46 00-22 ENGINE KEY PART NO. Torque values are derived at 3600 RPM. MODEL...


