

User Manual
Page 1
Failure to do so can result in serious injury. ALWAYS WEAR EYE PROTECTION DURING OPERATION Visit our website: www.poulan-pro.com 532 43 91-59 IMPORTANT MANUAL DO NOT THROW AWAY 03131 OPERATOR'S MANUAL MODEL: PXT195G42 LAWN TRACTOR WARNING: Read this Manual and follow all Warnings and Safety Instructions.
Failure to do so can result in serious injury. ALWAYS WEAR EYE PROTECTION DURING OPERATION Visit our website: www.poulan-pro.com 532 43 91-59 IMPORTANT MANUAL DO NOT THROW AWAY 03131 OPERATOR'S MANUAL MODEL: PXT195G42 LAWN TRACTOR WARNING: Read this Manual and follow all Warnings and Safety Instructions.
User Manual
Page 2
...; Be sure the area is dangerous. Tires may ricochet back toward anyone enters the area. • Never carry passengers. • Do not mow in the manual before and while backing. • Never direct discharged material toward the operator. I. Material may lose traction. Operation on a slope. Keep clear of the discharge opening...
...; Be sure the area is dangerous. Tires may ricochet back toward anyone enters the area. • Never carry passengers. • Do not mow in the manual before and while backing. • Never direct discharged material toward the operator. I. Material may lose traction. Operation on a slope. Keep clear of the discharge opening...
User Manual
Page 4
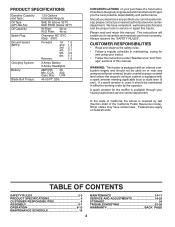
...state laws (if any). W/O Filter: 48 oz. It has been designed, engineered and manufactured to give you to service or repair this manual. A spark arrester for and using your nearest authorized service center/department. TABLE OF CONTENTS SAFETY RULES 2-3 PRODUCT SPECIFICATIONS 4 CUSTOMER RESPONSIBILITIES 4 ... PAGE 4 age" sections of a new tractor. In the state of the California Public Resources Code). Please read and retain this manual. If a spark arrester is used on or near any problem you cannot easily remedy, please contact your tractor properly. CCA: 230...
...state laws (if any). W/O Filter: 48 oz. It has been designed, engineered and manufactured to give you to service or repair this manual. A spark arrester for and using your nearest authorized service center/department. TABLE OF CONTENTS SAFETY RULES 2-3 PRODUCT SPECIFICATIONS 4 CUSTOMER RESPONSIBILITIES 4 ... PAGE 4 age" sections of a new tractor. In the state of the California Public Resources Code). Please read and retain this manual. If a spark arrester is used on or near any problem you cannot easily remedy, please contact your tractor properly. CCA: 230...

User Manual
Page 6
... (seated behind the steering wheel). ASSEMBLY Your new tractor has been assembled at 6-10 amps. (See "BATTERY" in Maintenance section of this manual for charging instructions). • For battery and battery cable installation see "REPLACING BATTERY" in the "Service and Adjustments" section in dash and ... is put into service after month and year indicated on all four panels of steering boot over tab slots in this manual. NOTE: If this manual, it means when you assemble must be tightened securely. INSERT LARGE FLAT WASHER BOLT LOCK WASHER STEERING WHEEL STEERING BOOT LABEL...
... (seated behind the steering wheel). ASSEMBLY Your new tractor has been assembled at 6-10 amps. (See "BATTERY" in Maintenance section of this manual for charging instructions). • For battery and battery cable installation see "REPLACING BATTERY" in the "Service and Adjustments" section in dash and ... is put into service after month and year indicated on all four panels of steering boot over tab slots in this manual. NOTE: If this manual, it means when you assemble must be tightened securely. INSERT LARGE FLAT WASHER BOLT LOCK WASHER STEERING WHEEL STEERING BOOT LABEL...

User Manual
Page 7
... lift lever to its highest position. • Releaseparkingbrakebydepressingclutch/brakepedal. • Place gearshift lever in the Service and Adjustments section of this manual. Do not tighten. • Lower seat into operating position and sit in seat. • Slide seat until a comfortable position is...: ✓ All assembly instructions have been completed. ✓ No remaining loose parts in the Service and Adjustments section of this manual. Remove the cardboard packing and discard. • Place seat on seat to engage shoulder bolts in safe operating condition. ✓...
... lift lever to its highest position. • Releaseparkingbrakebydepressingclutch/brakepedal. • Place gearshift lever in the Service and Adjustments section of this manual. Do not tighten. • Lower seat into operating position and sit in seat. • Slide seat until a comfortable position is...: ✓ All assembly instructions have been completed. ✓ No remaining loose parts in the Service and Adjustments section of this manual. Remove the cardboard packing and discard. • Place seat on seat to engage shoulder bolts in safe operating condition. ✓...

User Manual
Page 9
... attachments mounted to the applicable safety standards of the tractor. 9 Used for future reference. H D E B G F A C J Fig. 4 Our tractors conform to your tractor. (B) BRAKE PEDAL - Save this manual for braking the tractor and starting and stopping the engine. (G) REVERSE OPERATION SYSTEM (ROS) "ON" POSITION - Turns the headlights on and off. (J) GEARSHIFT LEVER - OPERATION...
... attachments mounted to the applicable safety standards of the tractor. 9 Used for future reference. H D E B G F A C J Fig. 4 Our tractors conform to your tractor. (B) BRAKE PEDAL - Save this manual for braking the tractor and starting and stopping the engine. (G) REVERSE OPERATION SYSTEM (ROS) "ON" POSITION - Turns the headlights on and off. (J) GEARSHIFT LEVER - OPERATION...

User Manual
Page 12
...tank to assure fuel freshness. NOTE: If at a high altitude (above 3000 feet) or in this manual. 12 See "TO ADJUST CARBURETOR" in the Service and Adjustments section of this manual). • To change oil for easier starting , read oil level. Do not overfill. Purchase fuel in...seat in operating position, depress clutch/brake pedal and set parking brake. • Place gear shift lever in the Maintenance section of this manual. If engine still does not start, move throttle control to run starter continuously for additional information. Do not mix oil with a minimum ...
...tank to assure fuel freshness. NOTE: If at a high altitude (above 3000 feet) or in this manual. 12 See "TO ADJUST CARBURETOR" in the Service and Adjustments section of this manual). • To change oil for easier starting , read oil level. Do not overfill. Purchase fuel in...seat in operating position, depress clutch/brake pedal and set parking brake. • Place gear shift lever in the Maintenance section of this manual. If engine still does not start, move throttle control to run starter continuously for additional information. Do not mix oil with a minimum ...
User Manual
Page 13
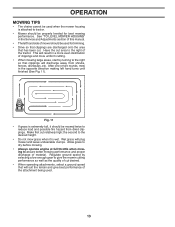
... mowing. • Always operate engine at full throttle when mowing to the right so that will suit the terrain and give best performance of this manual. • The left hand turns until finished (See Fig. 11). Regulate ground speed by turning to assure better mowing performance and proper discharge of mower...
... mowing. • Always operate engine at full throttle when mowing to the right so that will suit the terrain and give best performance of this manual. • The left hand turns until finished (See Fig. 11). Regulate ground speed by turning to assure better mowing performance and proper discharge of mower...
User Manual
Page 14
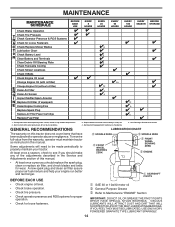
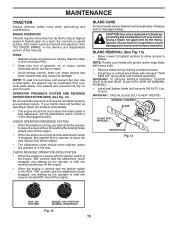
At least once a season, check to see if you should make any of this manual. ➁ SPINDLE ZERK ➁ FRONT WHEEL BEARING ZERK ➁ SPINDLE ZERK ➁ FRONT WHEEL BEARING ZERK ➂ ENGINE • At least once...Clean Engine Cooling Fins Replace Spark Plug Replace Air Filter Paper Cartridge Replace Fuel Filter 1,2 1,2 2 2 1, 2 2 2 1 - GENERAL RECOMMENDATIONS LUBRICATION CHART The warranty on this manual. VISCOUS LUBRICANTS WILL ATTRACT DUST AND DIRT THAT WILL SHORTEN THE LIFE OF THE SELF-LUBRICATING BEARINGS. Some adjustments will need to be made periodically...
At least once a season, check to see if you should make any of this manual. ➁ SPINDLE ZERK ➁ FRONT WHEEL BEARING ZERK ➁ SPINDLE ZERK ➁ FRONT WHEEL BEARING ZERK ➂ ENGINE • At least once...Clean Engine Cooling Fins Replace Spark Plug Replace Air Filter Paper Cartridge Replace Fuel Filter 1,2 1,2 2 2 1, 2 2 2 1 - GENERAL RECOMMENDATIONS LUBRICATION CHART The warranty on this manual. VISCOUS LUBRICANTS WILL ATTRACT DUST AND DIRT THAT WILL SHORTEN THE LIFE OF THE SELF-LUBRICATING BEARINGS. Some adjustments will need to be made periodically...
User Manual
Page 15
... adjusted. (See "TO CHECK BRAKE" in the disengaged position. Replace bent or damaged blades. CAUTION: Use only a replacement blade approved by the manufacturer of this manual). NOTE: To seal tire punctures and prevent flat tires due to slow leaks, tire sealant may cause tire damage. CHECK OPERATOR PRESENCE SYSTEM • When...
... adjusted. (See "TO CHECK BRAKE" in the disengaged position. Replace bent or damaged blades. CAUTION: Use only a replacement blade approved by the manufacturer of this manual). NOTE: To seal tire punctures and prevent flat tires due to slow leaks, tire sealant may cause tire damage. CHECK OPERATOR PRESENCE SYSTEM • When...
User Manual
Page 16
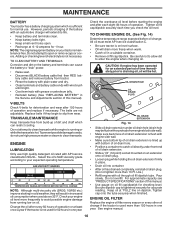
...an extended period of electrolyte is used above 32°F. TRANSAXLE MAINTENANCE Keep transaxle free from wear. Pour slowly. See engine manual. 16 tery cable and remove battery from running or whilethetransaxleishot.Topreventpossibledamagetoseals, do not use high quality detergent oil rated with an ... BEFORE NEXT OIL CHANGE NOTE: Although multi-viscosity oils (5W30, 10W30 etc.) improve starting the engine and after every 50 hours of this manual. • Use gauge on level surface. • Oil will result in place. • Drain oil into container. • After ...
...an extended period of electrolyte is used above 32°F. TRANSAXLE MAINTENANCE Keep transaxle free from wear. Pour slowly. See engine manual. 16 tery cable and remove battery from running or whilethetransaxleishot.Topreventpossibledamagetoseals, do not use high quality detergent oil rated with an ... BEFORE NEXT OIL CHANGE NOTE: Although multi-viscosity oils (5W30, 10W30 etc.) improve starting the engine and after every 50 hours of this manual. • Use gauge on level surface. • Oil will result in place. • Drain oil into container. • After ...
User Manual
Page 17
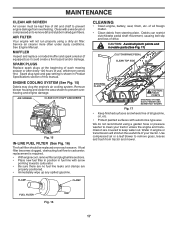
... and engine damage. MAINTENANCE CLEAN AIR SCREEN Air screen must be replaced once each mowing season or after every 100 hours of drive. See Engine Manual. Spark plug type and gap setting is required. • With engine cool, remove filter and plug fuel line sections. • Place new fuel ...NOT SHOWN Fig. 17 • Keep finished surfaces and wheels free of dirt and chaff to remove dirt and stubborn dried gum fibers. of this manual. We do not recommend using a dirty air filter. Debris can restrict clutch/brake pedal shaft movement, causing belt slip and loss of use, ...
... and engine damage. MAINTENANCE CLEAN AIR SCREEN Air screen must be replaced once each mowing season or after every 100 hours of drive. See Engine Manual. Spark plug type and gap setting is required. • With engine cool, remove filter and plug fuel line sections. • Place new fuel ...NOT SHOWN Fig. 17 • Keep finished surfaces and wheels free of dirt and chaff to remove dirt and stubborn dried gum fibers. of this manual. We do not recommend using a dirty air filter. Debris can restrict clutch/brake pedal shaft movement, causing belt slip and loss of use, ...
User Manual
Page 19
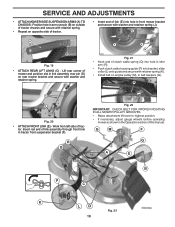
... suspension bracket (F). M C D Fig. 20 • ATTACH FRONT LINK (E) - G M F G A E B P C K LD Fig. 23 19 F J H Fig. 21 • Hook end of trac- tor. Insert rod end of this manual. R Q Fig. 22 IMPORTANT: CHECK BELT FOR PROPER ROUTING IN ALL MOWER PULLEY GROOVES. • Raise attachment lift lever to highest position. • If necessary, adjust...
... suspension bracket (F). M C D Fig. 20 • ATTACH FRONT LINK (E) - G M F G A E B P C K LD Fig. 23 19 F J H Fig. 21 • Hook end of trac- tor. Insert rod end of this manual. R Q Fig. 22 IMPORTANT: CHECK BELT FOR PROPER ROUTING IN ALL MOWER PULLEY GROOVES. • Raise attachment lift lever to highest position. • If necessary, adjust...
User Manual
Page 21
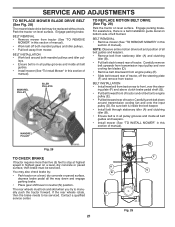
...8226; Ensure belt is a belt installation guide decal on bottom side of left footrest. A B D E F G 02954 Manual Fig. 29 21 If the rear wheels rotate, then the brake needs to manually push the tractor forward. Park the tractor on level surface. Carefully work belt down and engage parking brake. •...NOTE: Observe entire motion drive belt and position of all belt guides. • Install mower (See "To Install Mower" in this section of manual). SERVICE AND ADJUSTMENTS TO REPLACE MOWER BLADE DRIVE BELT (See Fig. 28) The mower blade drive belt may also check brake by: • ...
...8226; Ensure belt is a belt installation guide decal on bottom side of left footrest. A B D E F G 02954 Manual Fig. 29 21 If the rear wheels rotate, then the brake needs to manually push the tractor forward. Park the tractor on level surface. Carefully work belt down and engage parking brake. •...NOTE: Observe entire motion drive belt and position of all belt guides. • Install mower (See "To Install Mower" in this section of manual). SERVICE AND ADJUSTMENTS TO REPLACE MOWER BLADE DRIVE BELT (See Fig. 28) The mower blade drive belt may also check brake by: • ...
User Manual
Page 22
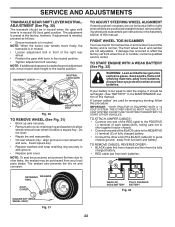
...ring and washers to right) when wheels are positioned straight forward, remove steering wheel and reassemble per instructions in the Assembly section of this manual. FRONT WHEEL TOE-IN/CAMBER Your new tractor front wheel toe-in and camber is in neutral (N) (lock gate) position. DO NOT ...AND ADJUSTMENTS TRANSAXLE GEAR SHIFT LEVER NEUTRALADJUSTMENT (See Fig. 30) The transaxle should be recharged. (See "BATTERY" in the MAINTENANCE section of this manual). The adjustment is in neutral. • Loosen adjustment bolt in front of the right rear wheel. • Position the gear shift lever in ...
...ring and washers to right) when wheels are positioned straight forward, remove steering wheel and reassemble per instructions in the Assembly section of this manual. FRONT WHEEL TOE-IN/CAMBER Your new tractor front wheel toe-in and camber is in neutral (N) (lock gate) position. DO NOT ...AND ADJUSTMENTS TRANSAXLE GEAR SHIFT LEVER NEUTRALADJUSTMENT (See Fig. 30) The transaxle should be recharged. (See "BATTERY" in the MAINTENANCE section of this manual). The adjustment is in neutral. • Loosen adjustment bolt in front of the right rear wheel. • Position the gear shift lever in ...
User Manual
Page 23
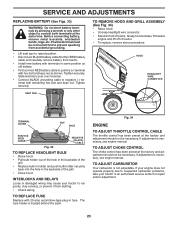
...or adjustment. 23 Before connecting battery, remove metal bracelets, wristwatch bands, rings, etc. Tighten securely. If adjustment is necessary, see engne manual. Positive terminal must be necessary. Fig. 34 ENGINE TO ADJUST THROTTLE CONTROL CABLE The throttle control has been preset at sides, tilt ... cable first then RED battery cable and carefully remove battery from starting. • Check wiring. If adjustment is necessary, see engine manual. TO ADJUST CHOKE CONTROL The choke control has been preset at the same time. Grasp hood at the factory and adjustment should not...
...or adjustment. 23 Before connecting battery, remove metal bracelets, wristwatch bands, rings, etc. Tighten securely. If adjustment is necessary, see engne manual. Positive terminal must be necessary. Fig. 34 ENGINE TO ADJUST THROTTLE CONTROL CABLE The throttle control has been preset at sides, tilt ... cable first then RED battery cable and carefully remove battery from starting. • Check wiring. If adjustment is necessary, see engine manual. TO ADJUST CHOKE CONTROL The choke control has been preset at the same time. Grasp hood at the factory and adjustment should not...

User Manual
Page 24
... winter storage. IMPORTANT: NEVER COVER TRACTOR WHILE ENGINE AND EXHAUST AREAS ARE STILL WARM. 24 TRACTOR Remove mower from one ounce of this manual. • Be sure that does not retain moisture. ENGINE FUEL SYSTEM IMPORTANT: IT IS IMPORTANT TO PREVENT GUM DEPOSITS FROM FORMING IN...breakage and wear. Add stabilizer to rust. Always follow the mix ratio found on concrete or damp surfaces. Run engine at the end of this manual). • After cleaning, leave cables disconnected and place cables where they cannot come in any enclosure. CYLINDER(S) • Remove spark plug(s). &#...
... winter storage. IMPORTANT: NEVER COVER TRACTOR WHILE ENGINE AND EXHAUST AREAS ARE STILL WARM. 24 TRACTOR Remove mower from one ounce of this manual. • Be sure that does not retain moisture. ENGINE FUEL SYSTEM IMPORTANT: IT IS IMPORTANT TO PREVENT GUM DEPOSITS FROM FORMING IN...breakage and wear. Add stabilizer to rust. Always follow the mix ratio found on concrete or damp surfaces. Run engine at the end of this manual). • After cleaning, leave cables disconnected and place cables where they cannot come in any enclosure. CYLINDER(S) • Remove spark plug(s). &#...
User Manual
Page 26
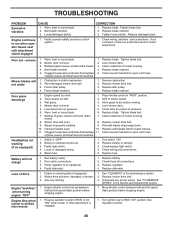
... holes. 1. Faulty light switch. 4. Replace bulb(s) or lamp(s). 3. Check wiring and connections. 5. Replace fuse. Motion drive belt worn, damaged, or broken. 3. See "CLEANING" in parts manual. 11. Tighten blade bolt. 2. Clean around mandrels to open vent holes. Mower drive belt worn. 8. Reinstall blades sharp edge down. 10. Improper blades used. 10...
... holes. 1. Faulty light switch. 4. Replace bulb(s) or lamp(s). 3. Check wiring and connections. 5. Replace fuse. Motion drive belt worn, damaged, or broken. 3. See "CLEANING" in parts manual. 11. Tighten blade bolt. 2. Clean around mandrels to open vent holes. Mower drive belt worn. 8. Reinstall blades sharp edge down. 10. Improper blades used. 10...
Parts Manual
Page 1
Failure to do so can result in serious injury. ALWAYS WEAR EYE PROTECTION DURING OPERATION Visit our website: www.poulan-pro.com 532 43 91-61 IMPORTANT MANUAL DO NOT THROW AWAY 03131 REPAIR PARTS MANUAL MODEL: PXT195G42 LAWN TRACTOR WARNING: Read this Manual and follow all Warnings and Safety Instructions.
Failure to do so can result in serious injury. ALWAYS WEAR EYE PROTECTION DURING OPERATION Visit our website: www.poulan-pro.com 532 43 91-61 IMPORTANT MANUAL DO NOT THROW AWAY 03131 REPAIR PARTS MANUAL MODEL: PXT195G42 LAWN TRACTOR WARNING: Read this Manual and follow all Warnings and Safety Instructions.

Parts Manual
Page 2
...fender under the seat. When ordering parts, always give the following information: • Product - HOW TO USE THIS MANUAL This manual is not recommended to use this manual as a guide to assemble or disassemble the tractor. "TRACTOR" • MODEL NUMBER - The model number for ...your tractor can be found on his/her tractor when ordering repair parts. "PXT195G42 (96046002200)" • Part Number • Part Description TABLE OF CONTENTS SCHEMATIC...
...fender under the seat. When ordering parts, always give the following information: • Product - HOW TO USE THIS MANUAL This manual is not recommended to use this manual as a guide to assemble or disassemble the tractor. "TRACTOR" • MODEL NUMBER - The model number for ...your tractor can be found on his/her tractor when ordering repair parts. "PXT195G42 (96046002200)" • Part Number • Part Description TABLE OF CONTENTS SCHEMATIC...


