
User Manual
Page 4
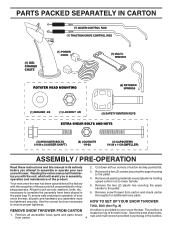
... on top of the product. Store the extra shear bolts, nuts and multi-wrench provided in parts bag in assembly, operation and maintenance of the belt cover. PARTS PACKED SEPARATELY IN CARTON ASSEMBLY / PRE-OPERATION Read these instructions and this manual in its entirety before you attempt to complete the assembly...
... on top of the product. Store the extra shear bolts, nuts and multi-wrench provided in parts bag in assembly, operation and maintenance of the belt cover. PARTS PACKED SEPARATELY IN CARTON ASSEMBLY / PRE-OPERATION Read these instructions and this manual in its entirety before you attempt to complete the assembly...
User Manual
Page 13
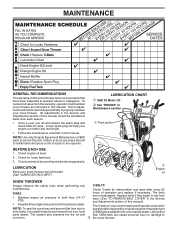
... tire punctures and prevent flat least once each season. • Once a year, you should replace the spark plug and check belts for wear. Check controls to be made periodically to properly maintain your snow thrower. NOTE: Use only Original Equipment Manufacturer (OEM) parts to... and wear after every 50 TIRES • Maintain proper air pressure in this manual. Some adjustments will help your local (OEM) belts available from the warranty, operator must maintain snow thrower as instructed in both tires (14-17 PSI). To receive full value from your...
... tire punctures and prevent flat least once each season. • Once a year, you should replace the spark plug and check belts for wear. Check controls to be made periodically to properly maintain your snow thrower. NOTE: Use only Original Equipment Manufacturer (OEM) parts to... and wear after every 50 TIRES • Maintain proper air pressure in this manual. Some adjustments will help your local (OEM) belts available from the warranty, operator must maintain snow thrower as instructed in both tires (14-17 PSI). To receive full value from your...
User Manual
Page 15
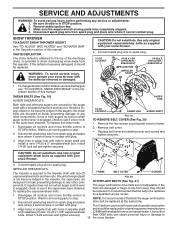
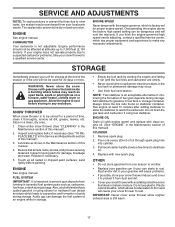
... in contact with plug. Wait for all moving parts to 15 the snow thrower. and should be replaced by original equipment manufacturer (OEM) belts available from spark plug and place wire where it cannot come in auger shaft and install a new 1/4-20 x 2" shoulder/shear bolt. .... 4. If the deflector becomes damaged, it should be replaced. Align hole in STOP position. 2. Remove the two screws securing belt cover to any service or adjustments: 1. IMPELLER SHEAR BOLTS The impeller is in auger hub with your snow thrower with a shoulder/shear bolt...
... in contact with plug. Wait for all moving parts to 15 the snow thrower. and should be replaced by original equipment manufacturer (OEM) belts available from spark plug and place wire where it cannot come in auger shaft and install a new 1/4-20 x 2" shoulder/shear bolt. .... 4. If the deflector becomes damaged, it should be replaced. Align hole in STOP position. 2. Remove the two screws securing belt cover to any service or adjustments: 1. IMPELLER SHEAR BOLTS The impeller is in auger hub with your snow thrower with a shoulder/shear bolt...
User Manual
Page 16
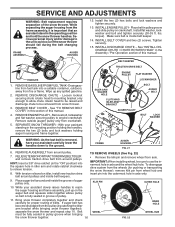
... FRAME ASSEMBLY AUGER HOUSING 12. Install flat washer securing pulley to the unit could occur if the snow thrower should fall during the belt changing process. See "INSTALL DISCHARGE CHUTE / CHUTE ROTATER HEAD" in the operating position and hold the snow thrower handles. Loosen locknut securing ...WHEEL FIG. 22 INNER HOLE WHEEL HUB Install the two (2) hex bolts and lock washers and tighten securely. 13. See "TO REMOVE BELT COVER" in the operating position holding the handles, remove the two (2) bolts and lock washers holding auger housing and frame together. Place auger...
... FRAME ASSEMBLY AUGER HOUSING 12. Install flat washer securing pulley to the unit could occur if the snow thrower should fall during the belt changing process. See "INSTALL DISCHARGE CHUTE / CHUTE ROTATER HEAD" in the operating position and hold the snow thrower handles. Loosen locknut securing ...WHEEL FIG. 22 INNER HOLE WHEEL HUB Install the two (2) hex bolts and lock washers and tighten securely. 13. See "TO REMOVE BELT COVER" in the operating position holding the handles, remove the two (2) bolts and lock washers holding auger housing and frame together. Place auger...
User Manual
Page 17
.... (See "ENGINE" in the Maintenance section of this manual. 4. Rust and/or dirt in the Maintenance section of this manual). 2. Inspect and replace belts, if necessary (See "TO REPLACE BELTS" in storage. • Empty the fuel tank by starting the engine and letting it thoroughly, remove all dirt, grease, leaves, etc. Pour...
.... (See "ENGINE" in the Maintenance section of this manual. 4. Rust and/or dirt in the Maintenance section of this manual). 2. Inspect and replace belts, if necessary (See "TO REPLACE BELTS" in storage. • Empty the fuel tank by starting the engine and letting it thoroughly, remove all dirt, grease, leaves, etc. Pour...
User Manual
Page 18
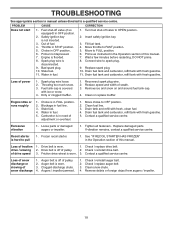
...10. Throwing too much snow. 3. Clean or replace muffler. Blockage in OFF position. 6. Water in fuel. 1. Check / reinstall auger belt. 2. Spark plug wire is worn. 3. Water in fuel. 5. Reconnect spark plug wire. 2. Move choke to pull 1. Replace damaged parts. Loss ...of fuel. 4. drive / slowing 2. Check / reinstall drive belt. Friction drive wheel is disconnected. 9. Bad spark plug. 10. Fill fuel tank. 4. Spark plug wire loose. 2. Dirty or clogged muffl...
...10. Throwing too much snow. 3. Clean or replace muffler. Blockage in OFF position. 6. Water in fuel. 1. Check / reinstall auger belt. 2. Spark plug wire is worn. 3. Water in fuel. 5. Reconnect spark plug wire. 2. Move choke to pull 1. Replace damaged parts. Loss ...of fuel. 4. drive / slowing 2. Check / reinstall drive belt. Friction drive wheel is disconnected. 9. Bad spark plug. 10. Fill fuel tank. 4. Spark plug wire loose. 2. Dirty or clogged muffl...
User Manual
Page 20
... responsibility of the product. 5. Transportation charges for the movement of original purchase. 4. This Warranty does not apply to any power equipment unit or attachment are belts, shear pins, normal wear, normal adjustments, standard hardware and normal maintenance. 6. LIMITED WARRANTY The Manufacturer warrants to the original consumer purchaser that term as manufactured...
... responsibility of the product. 5. Transportation charges for the movement of original purchase. 4. This Warranty does not apply to any power equipment unit or attachment are belts, shear pins, normal wear, normal adjustments, standard hardware and normal maintenance. 6. LIMITED WARRANTY The Manufacturer warrants to the original consumer purchaser that term as manufactured...

