
User Manual
Page 1
Failure to do so can result in U.S.A. Always Wear Eye Protection During Operation 199340 Rev. 1 01.11.06 BY Printed in serious injury. IMPORTANT MANUAL Do Not Throw Away OWNER'S MANUAL MODEL NUMBER: PP5524ES SNOW THROWER WARNING: Read the Owner's Manual and follow all Warnings and Safety Instructions.
Failure to do so can result in U.S.A. Always Wear Eye Protection During Operation 199340 Rev. 1 01.11.06 BY Printed in serious injury. IMPORTANT MANUAL Do Not Throw Away OWNER'S MANUAL MODEL NUMBER: PP5524ES SNOW THROWER WARNING: Read the Owner's Manual and follow all Warnings and Safety Instructions.

User Manual
Page 2
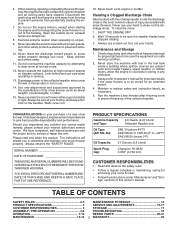
... add fuel to be exercised while using on clothing, change clothing immediately. 5. ers on surfaces above ground level such as specified by manufacturer). 8. Stop the engine (motor) whenever you leave the operating position, before starting motors. 6. Know how to make any repairs, adjustments or inspections. Preparation 1. from your vehicle, before filling. 4. Be thoroughly familiar with the controls and the proper use snow thrower...
... add fuel to be exercised while using on clothing, change clothing immediately. 5. ers on surfaces above ground level such as specified by manufacturer). 8. Stop the engine (motor) whenever you leave the operating position, before starting motors. 6. Know how to make any repairs, adjustments or inspections. Preparation 1. from your vehicle, before filling. 4. Be thoroughly familiar with the controls and the proper use snow thrower...
User Manual
Page 3
... THE MODEL AND SERIAL NUMBERS WILL BE FOUND ON A DECAL ATTACHED TO THE REAR OF THE SNOW THROWER HOUSING. 6. Exercise extreme caution when operating on your hands. Use only attachments and accessories approved by attempting to prevent someone from accidentally starting the engine and for and using your footing, and keep the wire away from the plug to clear snow at high transport speeds on the handles. SHUT THE ENGINE...
... THE MODEL AND SERIAL NUMBERS WILL BE FOUND ON A DECAL ATTACHED TO THE REAR OF THE SNOW THROWER HOUSING. 6. Exercise extreme caution when operating on your hands. Use only attachments and accessories approved by attempting to prevent someone from accidentally starting the engine and for and using your footing, and keep the wire away from the plug to clear snow at high transport speeds on the handles. SHUT THE ENGINE...
User Manual
Page 4
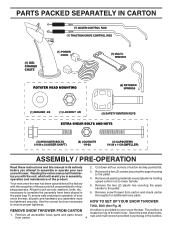
... upper handle to the pallet. 4. Use the correct tools as nuts, washers, bolts, etc., necessary to complete the assembly have been placed in the parts bag. Remove snow thrower from carton. 4 located on your new snow thrower. Cut down all parts and hardware you assemble must be tightened securely. Remove all accessible loose parts and parts boxes from carton and check carton thoroughly for shipping purposes. HOW TO SET UP YOUR SNOW THROWER TOOL BOX...
... upper handle to the pallet. 4. Use the correct tools as nuts, washers, bolts, etc., necessary to complete the assembly have been placed in the parts bag. Remove snow thrower from carton. 4 located on your new snow thrower. Cut down all parts and hardware you assemble must be tightened securely. Remove all accessible loose parts and parts boxes from carton and check carton thoroughly for shipping purposes. HOW TO SET UP YOUR SNOW THROWER TOOL BOX...

User Manual
Page 5
... to the operating position and tighten handle knobs securely. ASSEMBLY / PRE-OPERATION NOTE: The multi-wrench may be used for assembly of spring into pivot bracket with loop opening down and insert top end of the spring as shown. 2. UNFOLD UPPER HANDLE 1. Slide rubber sleeve up rod and hook end of the chute rotator head to snow thrower and making adjustments to the skid plates. INSTALL SPEED CONTROL ROD...
... to the operating position and tighten handle knobs securely. ASSEMBLY / PRE-OPERATION NOTE: The multi-wrench may be used for assembly of spring into pivot bracket with loop opening down and insert top end of the spring as shown. 2. UNFOLD UPPER HANDLE 1. Slide rubber sleeve up rod and hook end of the chute rotator head to snow thrower and making adjustments to the skid plates. INSTALL SPEED CONTROL ROD...

User Manual
Page 6
... front of snow thrower. 2. Position chute rotater head over chute bracket. CHUTE ROTATER HEAD 3/8 LOCKNUT 3/8 WASHER LOOP OPENING UP FIG. 5 AUGER CONTROL ROD AUGER CONTROL RETAINER LEVER SPRING PIN THREADED STUD CHUTE ALIGN BEFORE BRACKET TIGHTENING LOCKNUT FIG. 7 ROTATER HEAD MOUNTING BRACKET CHECK TIRE PRESSURE The tires on your parts bag may be used to install the chute rotater head. 1. Slide rubber sleeve up as shown. 1. If necessary, rotate chute assembly to 14-17 PSI. Install 3/8 washer...
... front of snow thrower. 2. Position chute rotater head over chute bracket. CHUTE ROTATER HEAD 3/8 LOCKNUT 3/8 WASHER LOOP OPENING UP FIG. 5 AUGER CONTROL ROD AUGER CONTROL RETAINER LEVER SPRING PIN THREADED STUD CHUTE ALIGN BEFORE BRACKET TIGHTENING LOCKNUT FIG. 7 ROTATER HEAD MOUNTING BRACKET CHECK TIRE PRESSURE The tires on your parts bag may be used to install the chute rotater head. 1. Slide rubber sleeve up as shown. 1. If necessary, rotate chute assembly to 14-17 PSI. Install 3/8 washer...
User Manual
Page 7
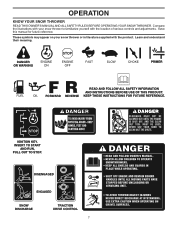
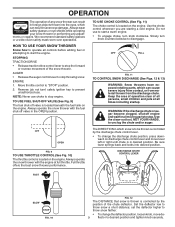
... AND INSTRUCTIONS BEFORE USE OF THIS PRODUCT. OPERATION KNOW YOUR SNOW THROWER READ THIS OWNER'S MANUAL AND ALL SAFETY RULES BEFORE OPERATING YOUR SNOW THROWER. IGNITION KEY. DISENGAGED ENGAGED SNOW DISCHARGE TRACTION DRIVE CONTROL 7 KEEP THESE INSTRUCTIONS FOR FUTURE REFERENCE. INSERT TO START AND RUN, PULL OUT TO STOP. Learn and understand their meaning. Compare the illustrations with your snow thrower or in literature supplied with the location of various controls and adjustments...
... AND INSTRUCTIONS BEFORE USE OF THIS PRODUCT. OPERATION KNOW YOUR SNOW THROWER READ THIS OWNER'S MANUAL AND ALL SAFETY RULES BEFORE OPERATING YOUR SNOW THROWER. IGNITION KEY. DISENGAGED ENGAGED SNOW DISCHARGE TRACTION DRIVE CONTROL 7 KEEP THESE INSTRUCTIONS FOR FUTURE REFERENCE. INSERT TO START AND RUN, PULL OUT TO STOP. Learn and understand their meaning. Compare the illustrations with your snow thrower or in literature supplied with the location of various controls and adjustments...

User Manual
Page 8
OPERATION SAFETY IGNITION KEY SPARK PLUG CHOKE CONTROL ENGINE OIL CAP WITH DIPSTICK AUGER CONTROL LEVER GASOLINE FILLER CAP CHUTE DEFLECTOR THROTTLE / ENGINE CONTROL OIL DRAIN PLUG DISCHARGE CHUTE RECOIL (AUXILIARY) STARTER HANDLE PRIMER POWER CORD PLUG ELECTRIC START BUTTON FUEL SHUT-OFF VALVE CLEANOUT TOOL NOTE: ITEMS ABOVE ARE SHOWN IN THEIR TYPICAL LOCATION ON THE ENGINE. Remove when snow thrower is thrown. used to STOP the engine. used for starting a cold engine. used to start button - used for starting the snow). pumps additional fuel ...
OPERATION SAFETY IGNITION KEY SPARK PLUG CHOKE CONTROL ENGINE OIL CAP WITH DIPSTICK AUGER CONTROL LEVER GASOLINE FILLER CAP CHUTE DEFLECTOR THROTTLE / ENGINE CONTROL OIL DRAIN PLUG DISCHARGE CHUTE RECOIL (AUXILIARY) STARTER HANDLE PRIMER POWER CORD PLUG ELECTRIC START BUTTON FUEL SHUT-OFF VALVE CLEANOUT TOOL NOTE: ITEMS ABOVE ARE SHOWN IN THEIR TYPICAL LOCATION ON THE ENGINE. Remove when snow thrower is thrown. used to STOP the engine. used for starting a cold engine. used to start button - used for starting the snow). pumps additional fuel ...
User Manual
Page 9
... snow thrower with the fuel shut-off valve in desired position. Use the clean-out tool, NOT YOUR HANDS, to stop . OPERATION The operation of any adjustments or repairs. We recommend standard safety glasses or a wide vision safety mask worn over spectacles. STOPPING TRACTION DRIVE • Release traction drive control lever to unclog the chute and/or auger. AUGER • Release the auger control lever to prevent unauthorized use to start the engine. Remove (do not turn knob...
... snow thrower with the fuel shut-off valve in desired position. Use the clean-out tool, NOT YOUR HANDS, to stop . OPERATION The operation of any adjustments or repairs. We recommend standard safety glasses or a wide vision safety mask worn over spectacles. STOPPING TRACTION DRIVE • Release traction drive control lever to unclog the chute and/or auger. AUGER • Release the auger control lever to prevent unauthorized use to start the engine. Remove (do not turn knob...

User Manual
Page 10
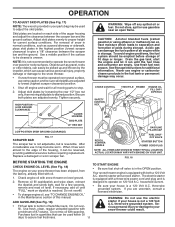
... the auger hous- OPERATION HIGH POSITION DISCHARGE CHUTE KNOB CLEAN-OUT TOOL MOUNTING CLIP CHUTE DEFLECTOR LOW POSITION FIG. 13 TO THROW SNOW (See Fig. 14) The auger rotation is recommended that you use a slower speed until you to release your right hand from the handle and adjust the discharge chute direction without interrupting the snow throwing process. • Release the auger control lever and shut off the engine. • Remove the clean-out tool from...
... the auger hous- OPERATION HIGH POSITION DISCHARGE CHUTE KNOB CLEAN-OUT TOOL MOUNTING CLIP CHUTE DEFLECTOR LOW POSITION FIG. 13 TO THROW SNOW (See Fig. 14) The auger rotation is recommended that you use a slower speed until you to release your right hand from the handle and adjust the discharge chute direction without interrupting the snow throwing process. • Release the auger control lever and shut off the engine. • Remove the clean-out tool from...
User Manual
Page 11
.... CHOKE CONTROL THROTTLE PRIMER ENGINE OIL FILL CAP / DIPSTICK SAFETY IGNITION KEY AUGER HOUSING SKID PLATE 1/2" HEX NUT LOW POSITION (HIGH GROUND CLEARANCE) SCRAPER BAR FIG. 17 The scraper bar is not adjustable, but is not recommended to desired position. Be sure both a 120 Volt A.C. Do not store, spill or use engine or carburetor cleaner products in the fuel tank or permanent damage may become worn. GASOLINE FILLER CAP RECOIL STARTER HANDLE FUEL SHUTOFF VALVE STARTER BUTTON POWER CORD PLUG NOTE...
.... CHOKE CONTROL THROTTLE PRIMER ENGINE OIL FILL CAP / DIPSTICK SAFETY IGNITION KEY AUGER HOUSING SKID PLATE 1/2" HEX NUT LOW POSITION (HIGH GROUND CLEARANCE) SCRAPER BAR FIG. 17 The scraper bar is not adjustable, but is not recommended to desired position. Be sure both a 120 Volt A.C. Do not store, spill or use engine or carburetor cleaner products in the fuel tank or permanent damage may become worn. GASOLINE FILLER CAP RECOIL STARTER HANDLE FUEL SHUTOFF VALVE STARTER BUTTON POWER CORD PLUG NOTE...

User Manual
Page 12
... recoil starter handle and slowly pull as much rope out of the starter as follows: 1. If the engine still fails to start . Use the drive speed control, NOT the throttle, to run for next use . WARM START - WARNING: Do not operate snow thrower if weather conditions impair visibility. RECOIL STARTER 6. If temperature is ready for a few minutes. NOTE: Over priming may cause flooding, preventing the engine from starting engine with the electric starter...
... recoil starter handle and slowly pull as much rope out of the starter as follows: 1. If the engine still fails to start . Use the drive speed control, NOT the throttle, to run for next use . WARM START - WARNING: Do not operate snow thrower if weather conditions impair visibility. RECOIL STARTER 6. If temperature is ready for a few minutes. NOTE: Over priming may cause flooding, preventing the engine from starting engine with the electric starter...
User Manual
Page 13
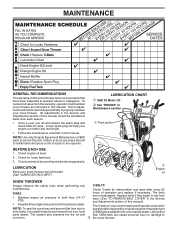
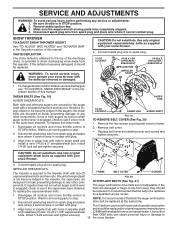
... warranty, operator must maintain snow thrower as instructed in this manual. LUBRICATION Keep your snow thrower. MAINTENANCE GENERAL RECOMMENDATIONS The warranty on your snow thrower are not adjustable. Check controls to be made periodically to corrosion. 13 the snow thrower. To receive full value from wear. (See "TO REMOVE BELT COVER" in the Service and Adjustments section of injury to operator abuse or negligence. Check engine oil level. 2. Using other parts dealer. All adjustments in the Service and Adjustments section of operation and replace...
... warranty, operator must maintain snow thrower as instructed in this manual. LUBRICATION Keep your snow thrower. MAINTENANCE GENERAL RECOMMENDATIONS The warranty on your snow thrower are not adjustable. Check controls to be made periodically to corrosion. 13 the snow thrower. To receive full value from wear. (See "TO REMOVE BELT COVER" in the Service and Adjustments section of injury to operator abuse or negligence. Check engine oil level. 2. Using other parts dealer. All adjustments in the Service and Adjustments section of operation and replace...
User Manual
Page 14
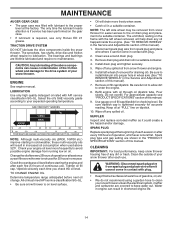
... proper level at "FULL" line on oil. TO CHANGE ENGINE OIL Determine temperature range anticipated before starting in cold weather, these multi-viscosity oils will result in shortened engine life. 14 ENGINE See engine manual. Spark plug type and gap setting are lifetime lubricated and require no lubrication. The only time the lubricant needs attention is tightened securely for draining oil). MAINTENANCE AUGER GEAR CASE • The gear case was filled with the left wheel removed...
... proper level at "FULL" line on oil. TO CHANGE ENGINE OIL Determine temperature range anticipated before starting in cold weather, these multi-viscosity oils will result in shortened engine life. 14 ENGINE See engine manual. Spark plug type and gap setting are lifetime lubricated and require no lubrication. The only time the lubricant needs attention is tightened securely for draining oil). MAINTENANCE AUGER GEAR CASE • The gear case was filled with the left wheel removed...
User Manual
Page 15
... move throttle control to see if the capscrews have sheared. Make sure the augers and all moving parts to the auger shaft with the deflector removed or damaged. SNOW THROWER TO ADJUST SNOW THROWER HEIGHT See "TO ADJUST SKID PLATES" and "SCRAPER BAR" in the Operation section of this manual. Connect spark plug wire to frame. 2. If impeller does not turn when auger control lever is engaged, check to STOP position. belts are not adjustable. STOP position. wire...
... move throttle control to see if the capscrews have sheared. Make sure the augers and all moving parts to the auger shaft with the deflector removed or damaged. SNOW THROWER TO ADJUST SNOW THROWER HEIGHT See "TO ADJUST SKID PLATES" and "SCRAPER BAR" in the Operation section of this manual. Connect spark plug wire to frame. 2. If impeller does not turn when auger control lever is engaged, check to STOP position. belts are not adjustable. STOP position. wire...
User Manual
Page 16
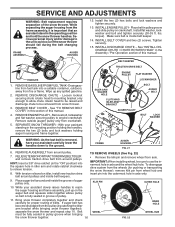
... ENGINE PULLEY - INSTALL BELT COVER and two (2) screws. See "INSTALL DISCHARGE CHUTE / CHUTE ROTATER HEAD" in the operating position holding the handles, remove the two (2) bolts and lock washers holding auger housing and frame together. REMOVE ENGINE PULLEY - IMPORTANT: When installing wheel, be fully seated in pulley groove and slide pulley on crankshaft. Belt must be sure to engine crankshaft. Place belt in pulley groove when bringing the snow thrower together. 16 WHEEL FIG. 22 INNER HOLE WHEEL HUB Tighten securely. 15. REMOVE BELT COVER - Remove...
... ENGINE PULLEY - INSTALL BELT COVER and two (2) screws. See "INSTALL DISCHARGE CHUTE / CHUTE ROTATER HEAD" in the operating position holding the handles, remove the two (2) bolts and lock washers holding auger housing and frame together. REMOVE ENGINE PULLEY - IMPORTANT: When installing wheel, be fully seated in pulley groove and slide pulley on crankshaft. Belt must be sure to engine crankshaft. Place belt in pulley groove when bringing the snow thrower together. 16 WHEEL FIG. 22 INNER HOLE WHEEL HUB Tighten securely. 15. REMOVE BELT COVER - Remove...
User Manual
Page 17
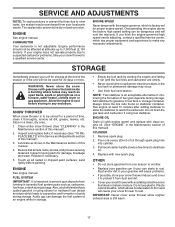
... up to reach the carburetor. ENGINE See engine manual. Also, alcohol blended fuels (called gasohol or using fuel stabilizer. NOTE: Fuel stabilizer is factory set for 30 days or more. Add stabilizer to distribute oil. 4. Run engine at the end of acids during storage. ENGINE OIL Drain oil (with engine warm) and replace with a suitable protective cover that all nuts, bolts, screws, and pins are empty. • Never use plastic. CYLINDER 1. Remove spark plug. 2. OTHER • Do...
... up to reach the carburetor. ENGINE See engine manual. Also, alcohol blended fuels (called gasohol or using fuel stabilizer. NOTE: Fuel stabilizer is factory set for 30 days or more. Add stabilizer to distribute oil. 4. Run engine at the end of acids during storage. ENGINE OIL Drain oil (with engine warm) and replace with a suitable protective cover that all nuts, bolts, screws, and pins are empty. • Never use plastic. CYLINDER 1. Remove spark plug. 2. OTHER • Do...
User Manual
Page 18
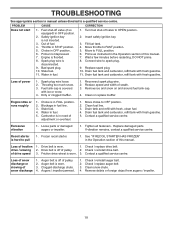
... drive wheel is off of pulley. 2. Primer not depressed. 7. Move throttle to spark plug. 9. Contact a qualified service centre. If vibration remains, contact a qualified service centre. Check / replace drive belt. Remove ice and snow on and around fuel tank cap. 4. Move choke to OPEN position. 2. Fuel shut-off valve to OFF position. 2. Turn fuel shut-off valve (if so equipped) in fuel line. 3. Insert safety ignition key. 3. Drain tank and refill with fresh gasoline. Check / reinstall drive belt. Augers / impeller...
... drive wheel is off of pulley. 2. Primer not depressed. 7. Move throttle to spark plug. 9. Contact a qualified service centre. If vibration remains, contact a qualified service centre. Check / replace drive belt. Remove ice and snow on and around fuel tank cap. 4. Move choke to OPEN position. 2. Fuel shut-off valve to OFF position. 2. Turn fuel shut-off valve (if so equipped) in fuel line. 3. Insert safety ignition key. 3. Drain tank and refill with fresh gasoline. Check / reinstall drive belt. Augers / impeller...
User Manual
Page 20
... any power equipment unit or attachment are belts, shear pins, normal wear, normal adjustments, standard hardware and normal maintenance. 6. ID#, serial number and date of purchase of your product and the name and address of the authorized dealer from date of purchase by Electrolux Home Products. 3. Please refer to the engine or components parts thereof. The Warranty period for replacement under this Warranty, you...
... any power equipment unit or attachment are belts, shear pins, normal wear, normal adjustments, standard hardware and normal maintenance. 6. ID#, serial number and date of purchase of your product and the name and address of the authorized dealer from date of purchase by Electrolux Home Products. 3. Please refer to the engine or components parts thereof. The Warranty period for replacement under this Warranty, you...


