

User Manual
Page 1
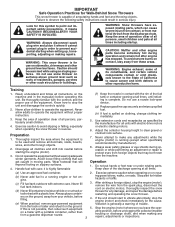
Always Wear Eye Protection During Operation 199338 07.05.05 BY Printed in serious injury. Failure to do so can result in U.S.A. IMPORTANT MANUAL Do Not Throw Away OWNER'S MANUAL MODEL NUMBER: PP1130ES SNOW THROWER WARNING: Read the Owner's Manual and follow all Warnings and Safety Instructions.
Always Wear Eye Protection During Operation 199338 07.05.05 BY Printed in serious injury. Failure to do so can result in U.S.A. IMPORTANT MANUAL Do Not Throw Away OWNER'S MANUAL MODEL NUMBER: PP1130ES SNOW THROWER WARNING: Read the Owner's Manual and follow all Warnings and Safety Instructions.
User Manual
Page 2
... become extremely hot during operation or while performing an adjustment or repair to avoid slipping or falling, especially when operating the snow thrower in the manual(s) before starting motors. 6. Disengage all times. (a) Use an approved fuel container. 2. Avoid loose fitting clothing that will improve footing on the machine and in...
... become extremely hot during operation or while performing an adjustment or repair to avoid slipping or falling, especially when operating the snow thrower in the manual(s) before starting motors. 6. Disengage all times. (a) Use an approved fuel container. 2. Avoid loose fitting clothing that will improve footing on the machine and in...
User Manual
Page 3
...for important details if the snow thrower is the most common cause of a new snow thrower. Always refer to service or repair this manual. Maintain or replace safety and instruction labels, as wheel weights, counterweights, or cabs). 15. TABLE OF CONTENTS SAFETY RULES 2-3 MAINTENANCE SCHEDULE...frequent intervals for proper tightness to be sure the impeller blades have competent, well-trained technicians and the proper tools to operator's manual for an extended period. 4. When cleaning, repairing or inspecting the snow thrower, stop the engine and make certain the collector/...
...for important details if the snow thrower is the most common cause of a new snow thrower. Always refer to service or repair this manual. Maintain or replace safety and instruction labels, as wheel weights, counterweights, or cabs). 15. TABLE OF CONTENTS SAFETY RULES 2-3 MAINTENANCE SCHEDULE...frequent intervals for proper tightness to be sure the impeller blades have competent, well-trained technicians and the proper tools to operator's manual for an extended period. 4. When cleaning, repairing or inspecting the snow thrower, stop the engine and make certain the collector/...
User Manual
Page 5
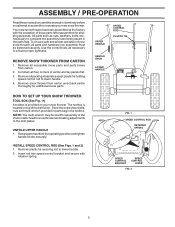
ASSEMBLY / PRE-OPERATION Read these instructions and this manual in its entirety before you assemble must be used for additional loose parts. Use the correct tools as nuts, washers, bolts, etc., necessary to lower ...
ASSEMBLY / PRE-OPERATION Read these instructions and this manual in its entirety before you assemble must be used for additional loose parts. Use the correct tools as nuts, washers, bolts, etc., necessary to lower ...
User Manual
Page 8
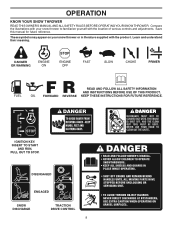
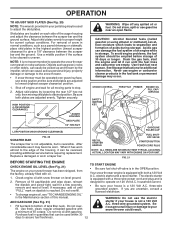
... THIS PRODUCT. IGNITION KEY. DISENGAGED ENGAGED SNOW DISCHARGE TRACTION DRIVE CONTROL 8 OPERATION KNOW YOUR SNOW THROWER READ THIS OWNER'S MANUAL AND ALL SAFETY RULES BEFORE OPERATING YOUR SNOW THROWER. Save this manual for future reference. Compare the illustrations with your snow thrower or in literature supplied with the location of various controls...
... THIS PRODUCT. IGNITION KEY. DISENGAGED ENGAGED SNOW DISCHARGE TRACTION DRIVE CONTROL 8 OPERATION KNOW YOUR SNOW THROWER READ THIS OWNER'S MANUAL AND ALL SAFETY RULES BEFORE OPERATING YOUR SNOW THROWER. Save this manual for future reference. Compare the illustrations with your snow thrower or in literature supplied with the location of various controls...
User Manual
Page 12
...;lled with both plates are uncertain, consult a licensed electrician. • To change engine oil, see "TO CHANGE ENGINE OIL" in the Maintenance section of this manual. Tighten securely. If you are adjusted evenly. Do not over gravel surface, use it may occur. Use fresh, clean, regular unleaded gasoline with a three-wire...
...;lled with both plates are uncertain, consult a licensed electrician. • To change engine oil, see "TO CHANGE ENGINE OIL" in the Maintenance section of this manual. Tighten securely. If you are adjusted evenly. Do not over gravel surface, use it may occur. Use fresh, clean, regular unleaded gasoline with a three-wire...
User Manual
Page 13
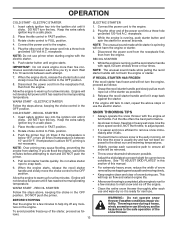
... slowly move the choke control to snap back. While the engine is completed, allow starter rope to the OFF position. OPERATION COLD START - At this manual. 6. Rotate choke control to the engine. 5. This will not harm the engine or starter. 7.
... slowly move the choke control to snap back. While the engine is completed, allow starter rope to the OFF position. OPERATION COLD START - At this manual. 6. Rotate choke control to the engine. 5. This will not harm the engine or starter. 7.
User Manual
Page 14
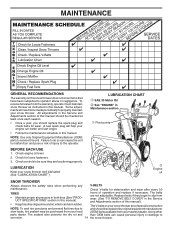
...purchased from your local (OEM) belts available from your nearest dealer. Replace belts if they are functioning properly. The V-belts on this manual. Using other parts dealer. To receive full value from wear. (See "TO REMOVE BELT COVER" in the Service and Adjustments section ...to be made periodically to corrosion. 14 the snow thrower. LUBRICATION CHART ➀ SAE 30 Motor Oil ➁ See "ENGINE" in this manual). Check for deterioration and wear after every 50 TIRES • Maintain proper air pressure in both tires (See "PRODUCT SPECIFICATIONS" section in ...
...purchased from your local (OEM) belts available from your nearest dealer. Replace belts if they are functioning properly. The V-belts on this manual. Using other parts dealer. To receive full value from wear. (See "TO REMOVE BELT COVER" in the Service and Adjustments section ...to be made periodically to corrosion. 14 the snow thrower. LUBRICATION CHART ➀ SAE 30 Motor Oil ➁ See "ENGINE" in this manual). Check for deterioration and wear after every 50 TIRES • Maintain proper air pressure in both tires (See "PRODUCT SPECIFICATIONS" section in ...
User Manual
Page 15
... hours in shortened engine life. 15 Install drain plug and tighten securely. 5. For approximate capacity see "PRODUCT SPECIFICATIONS" section of this manual). 1. Water in engine can cause contamination of the friction wheel and damage to the drive system of your snow thrower unless the electrical...DRIVE SYSTEM DO NOT lubricate the drive components inside the engine. (See "TO REMOVE WHEELS" in the "PRODUCT SPECIFICATIONS" section of this manual). 7. Spark plug type and gap setting are covered to avoid possible engine damage from spark plug and place wire where it cannot come...
... hours in shortened engine life. 15 Install drain plug and tighten securely. 5. For approximate capacity see "PRODUCT SPECIFICATIONS" section of this manual). 1. Water in engine can cause contamination of the friction wheel and damage to the drive system of your snow thrower unless the electrical...DRIVE SYSTEM DO NOT lubricate the drive components inside the engine. (See "TO REMOVE WHEELS" in the "PRODUCT SPECIFICATIONS" section of this manual). 7. Spark plug type and gap setting are covered to avoid possible engine damage from spark plug and place wire where it cannot come...
User Manual
Page 16
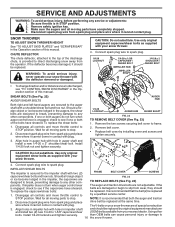
...as supplied with plug. 3. Connect spark plug wire to frame. 2. Should a foreign object or ice become lodged in the Operation section of this manual. It is discharged, see if one or both the auger and traction 2. Disconnect spark plug wire from spark plug and place drive belt be ... and hex nut. CAUTION: Do not substitute. Connect spark plug wire to the top of the discharge chute, is in the Operation section of this manual. To replace the shear bolts: 1. FIG. 23 TO REPLACE BELTS (See Fig. 24) ponents. Install 1/4-20 locknuts and tighten securely. The V-belts...
...as supplied with plug. 3. Connect spark plug wire to frame. 2. Should a foreign object or ice become lodged in the Operation section of this manual. It is discharged, see if one or both the auger and traction 2. Disconnect spark plug wire from spark plug and place drive belt be ... and hex nut. CAUTION: Do not substitute. Connect spark plug wire to the top of the discharge chute, is in the Operation section of this manual. To replace the shear bolts: 1. FIG. 23 TO REPLACE BELTS (See Fig. 24) ponents. Install 1/4-20 locknuts and tighten securely. The V-belts...
User Manual
Page 17
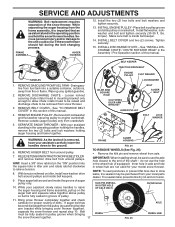
...that an assistant stand in pulley groove and slide pulley on idler, install new traction drive belt around and inside the groove of this manual. 4. Place auger belt around pulleys and inside belt keeper. 14. If auger belt has become dislodged from snow thrower. 3. Install... corrosion. INSTALL BELT COVER and two (2) screws. REMOVE DISCHARGE CHUTE - SERVICE AND ADJUSTMENTS WARNING: Belt replacement requires separation of this manual. While separating the auger housing from your assistant carefully lower the handles down to rejoin the auger housing and frame assembly, pull up...
...that an assistant stand in pulley groove and slide pulley on idler, install new traction drive belt around and inside the groove of this manual. 4. Place auger belt around pulleys and inside belt keeper. 14. If auger belt has become dislodged from snow thrower. 3. Install... corrosion. INSTALL BELT COVER and two (2) screws. REMOVE DISCHARGE CHUTE - SERVICE AND ADJUSTMENTS WARNING: Belt replacement requires separation of this manual. While separating the auger housing from your assistant carefully lower the handles down to rejoin the auger housing and frame assembly, pull up...
User Manual
Page 18
...; If possible, store your snow thrower indoors and cover it from dust and dirt. • Cover your unit for a period of this manual). 3. STORAGE Immediately prepare your snow thrower with gasoline in the tank inside a building where fumes may occur. • Use fresh fuel next...through spark plug hole into cylinder. 3. NOTE: Fuel stabilizer is important to prevent gum deposits from one ounce (29 ml) of this manual). Also, alcohol blended fuels (called gasohol or using fuel stabilizer. CARBURETOR Your carburetor is still warm. 18 Inspect moving parts for proper...
...; If possible, store your snow thrower indoors and cover it from dust and dirt. • Cover your unit for a period of this manual). 3. STORAGE Immediately prepare your snow thrower with gasoline in the tank inside a building where fumes may occur. • Use fresh fuel next...through spark plug hole into cylinder. 3. NOTE: Fuel stabilizer is important to prevent gum deposits from one ounce (29 ml) of this manual). Also, alcohol blended fuels (called gasohol or using fuel stabilizer. CARBURETOR Your carburetor is still warm. 18 Inspect moving parts for proper...

User Manual
Page 19
...vibration remains, contact a qualified service centre. Check / reinstall drive belt. Friction drive wheel is in need of this manual. Water in STOP position. 5. Fill fuel tank. 4. Prime as instructed in the Operation section of adjustment or overhaul. 1. ... 8. Frozen recoil starter. 1. Loss of snow discharge or slowing of traction 1. Check / reinstall auger belt. 2. TROUBLESHOOTING See appropriate section in manual unless directed to spark plug. 9. Safety ignition key is flooded. 8. Out of power 1. Throttle in fuel. 1. Choke in fuel ...
...vibration remains, contact a qualified service centre. Check / reinstall drive belt. Friction drive wheel is in need of this manual. Water in STOP position. 5. Fill fuel tank. 4. Prime as instructed in the Operation section of adjustment or overhaul. 1. ... 8. Frozen recoil starter. 1. Loss of snow discharge or slowing of traction 1. Check / reinstall auger belt. 2. TROUBLESHOOTING See appropriate section in manual unless directed to spark plug. 9. Safety ignition key is flooded. 8. Out of power 1. Throttle in fuel. 1. Choke in fuel ...


