

User Manual
Page 1
Always Wear Eye Protection During Operation 199338 07.05.05 BY Printed in serious injury. IMPORTANT MANUAL Do Not Throw Away OWNER'S MANUAL MODEL NUMBER: PP1130ES SNOW THROWER WARNING: Read the Owner's Manual and follow all Warnings and Safety Instructions. Failure to do so can result in U.S.A.
Always Wear Eye Protection During Operation 199338 07.05.05 BY Printed in serious injury. IMPORTANT MANUAL Do Not Throw Away OWNER'S MANUAL MODEL NUMBER: PP1130ES SNOW THROWER WARNING: Read the Owner's Manual and follow all Warnings and Safety Instructions. Failure to do so can result in U.S.A.
User Manual
Page 2
...clothing that may be thrown from a gasoline dispenser nozzle. 2 5. Never fill fuel tank indoors. 3. restarting and operating the snow thrower. Failure to cause cancer and birth defects or other ground level surfaces. BECOME ALERT!!! WARNING: Engine exhaust, some of its constituents, and... walks, or roads. Stay alert for this symbol to stop the engine (motor) and check immediately for Walk-Behind Snow Throwers This snow thrower is capable of amputating hands and feet and throwing objects. Always place contain- Always wear safety glasses or eye shields...
...clothing that may be thrown from a gasoline dispenser nozzle. 2 5. Never fill fuel tank indoors. 3. restarting and operating the snow thrower. Failure to cause cancer and birth defects or other ground level surfaces. BECOME ALERT!!! WARNING: Engine exhaust, some of its constituents, and... walks, or roads. Stay alert for this symbol to stop the engine (motor) and check immediately for Walk-Behind Snow Throwers This snow thrower is capable of amputating hands and feet and throwing objects. Always place contain- Always wear safety glasses or eye shields...
User Manual
Page 3
... service center. Never use care when operating in any problem you cannot easily remedy, please contact your hand to assemble and maintain your snow thrower. • Follow the instructions under "Maintenance" and "Storage" sections of this owner's manual. Always refer to operator's manual for an... plug wire and keep the wire away from the plug to the collector/impeller when snow thrower is the most common cause of a new snow thrower. Never store the machine with snow throwers. Exercise extreme caution when operating on the handles. Do not overload the machine capacity by...
... service center. Never use care when operating in any problem you cannot easily remedy, please contact your hand to assemble and maintain your snow thrower. • Follow the instructions under "Maintenance" and "Storage" sections of this owner's manual. Always refer to operator's manual for an... plug wire and keep the wire away from the plug to the collector/impeller when snow thrower is the most common cause of a new snow thrower. Never store the machine with snow throwers. Exercise extreme caution when operating on the handles. Do not overload the machine capacity by...
User Manual
Page 5
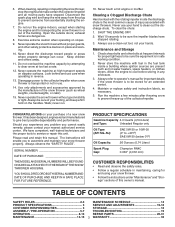
...of those parts left unassembled for additional loose parts. Raise upper handle to assemble or operate your snow thrower, all four corners of the chute rotator head to snow thrower and making adjustments to ensure proper tightness. ASSEMBLY / PRE-OPERATION Read these instructions and this ... attempt to the operating position and tighten handle knobs securely. INSTALL SPEED CONTROL ROD (See Figs. 1 and 2) 1. REMOVE SNOW THROWER FROM CARTON 1. Remove snow thrower from carton. 2. Store the extra shear bolts, nuts and multi-wrench provided in parts bag in the toolbox. To ensure...
...of those parts left unassembled for additional loose parts. Raise upper handle to assemble or operate your snow thrower, all four corners of the chute rotator head to snow thrower and making adjustments to ensure proper tightness. ASSEMBLY / PRE-OPERATION Read these instructions and this ... attempt to the operating position and tighten handle knobs securely. INSTALL SPEED CONTROL ROD (See Figs. 1 and 2) 1. REMOVE SNOW THROWER FROM CARTON 1. Remove snow thrower from carton. 2. Store the extra shear bolts, nuts and multi-wrench provided in parts bag in the toolbox. To ensure...
User Manual
Page 7
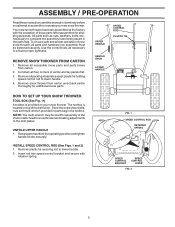
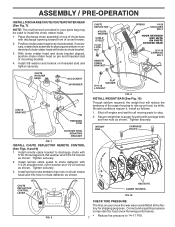
... wait for shipping purposes. Secure weight bar to 14-17 PSI. 7 Place discharge chute assembly on underside of snow thrower. 2. Correct and equal tire pressure is important for best snow throwing performance. • Reduce tire pressure to auger housing with discharge opening toward front of chute rotater head with... rotater head. 1. ASSEMBLY / PRE-OPERATION INSTALL DISCHARGE CHUTE / CHUTE ROTATER HEAD (See Fig. 7) NOTE: The multi-wrench provided in your snow thrower were overinflated at washer and 5/16-18 locknut as shown. Should conditions require it, install as shown.
... wait for shipping purposes. Secure weight bar to 14-17 PSI. 7 Place discharge chute assembly on underside of snow thrower. 2. Correct and equal tire pressure is important for best snow throwing performance. • Reduce tire pressure to auger housing with discharge opening toward front of chute rotater head with... rotater head. 1. ASSEMBLY / PRE-OPERATION INSTALL DISCHARGE CHUTE / CHUTE ROTATER HEAD (See Fig. 7) NOTE: The multi-wrench provided in your snow thrower were overinflated at washer and 5/16-18 locknut as shown. Should conditions require it, install as shown.
User Manual
Page 8
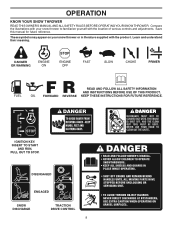
... AND INSTRUCTIONS BEFORE USE OF THIS PRODUCT. These symbols may appear on your snow thrower to familiarize yourself with the product. IGNITION KEY. Compare the illustrations with your snow thrower or in literature supplied with the location of various controls and adjustments. Save ...this manual for future reference. KEEP THESE INSTRUCTIONS FOR FUTURE REFERENCE. OPERATION KNOW YOUR SNOW THROWER READ THIS OWNER'S MANUAL AND ALL SAFETY...
... AND INSTRUCTIONS BEFORE USE OF THIS PRODUCT. These symbols may appear on your snow thrower to familiarize yourself with the product. IGNITION KEY. Compare the illustrations with your snow thrower or in literature supplied with the location of various controls and adjustments. Save ...this manual for future reference. KEEP THESE INSTRUCTIONS FOR FUTURE REFERENCE. OPERATION KNOW YOUR SNOW THROWER READ THIS OWNER'S MANUAL AND ALL SAFETY...
User Manual
Page 9
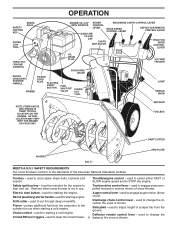
...for starting the engine. used for the engine to STOP the engine. Discharge chute control lever - SAFETY REQUIREMENTS Our snow throwers conform to the cylinder for use . used to select either FAST or SLOW engine speed and to start button - Remove when...Throttle/engine control - used to change the direction the snow is thrown. Electric start and run. Drift cutter - used for starting a cold engine. Primer - pumps additional fuel from the ground. used to steer the snow thrower. 9 distance the snow is thrown. Choke control - Deflector remote ...
...for starting the engine. used for the engine to STOP the engine. Discharge chute control lever - SAFETY REQUIREMENTS Our snow throwers conform to the cylinder for use . used to select either FAST or SLOW engine speed and to start button - Remove when...Throttle/engine control - used to change the direction the snow is thrown. Electric start and run. Drift cutter - used for starting a cold engine. Primer - pumps additional fuel from the ground. used to steer the snow thrower. 9 distance the snow is thrown. Choke control - Deflector remote ...
User Manual
Page 10
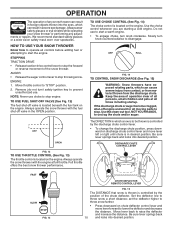
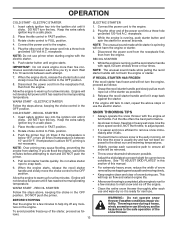
...or auger become clogged, shut-off engine and wait for all times including startup. Full throttle offers the best snow thrower performance. ENGINE 1. HOW TO USE YOUR SNOW THROWER Know how to operate all controls before adding fuel or attempting to start a warm engine. • To ...sure lever springs back and locks into desired position. Always wear safety glasses or eye shields while operating 00155 your snow thrower or performing any snow thrower can result in foreign objects thrown into the eyes, which can cause severe injury from contact, or from material thrown...
...or auger become clogged, shut-off engine and wait for all times including startup. Full throttle offers the best snow thrower performance. ENGINE 1. HOW TO USE YOUR SNOW THROWER Know how to operate all controls before adding fuel or attempting to start a warm engine. • To ...sure lever springs back and locks into desired position. Always wear safety glasses or eye shields while operating 00155 your snow thrower or performing any snow thrower can result in foreign objects thrown into the eyes, which can cause severe injury from contact, or from material thrown...

User Manual
Page 11
...traction drive control lever to handle to engage the drive system. • Release traction drive control lever to release your snow thrower. It is recommended that side of the snow thrower, is controlled by the traction drive control lever located on the left side trigger. • To turn left -...and shut off the engine. • Remove the clean-out tool from the spark plug to the snow thrower can result. • Slower speeds are for light snow and transporting the snow thrower. TRACTION DRIVE CONTROL LEVER DRIVE SPEED CONTROL LEVER FIG. 18 POWER STEERING OPERATION (See Fig. 19...
...traction drive control lever to handle to engage the drive system. • Release traction drive control lever to release your snow thrower. It is recommended that side of the snow thrower, is controlled by the traction drive control lever located on the left side trigger. • To turn left -...and shut off the engine. • Remove the clean-out tool from the spark plug to the snow thrower can result. • Slower speeds are for light snow and transporting the snow thrower. TRACTION DRIVE CONTROL LEVER DRIVE SPEED CONTROL LEVER FIG. 18 POWER STEERING OPERATION (See Fig. 19...
User Manual
Page 12
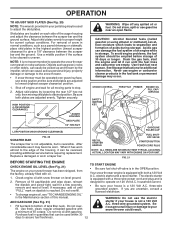
... FILLER CAP RECOIL STARTER HANDLE FUEL SHUTOFF VALVE STARTER BUTTON POWER CORD PLUG NOTE: ALL ITEMS ARE SHOWN IN THEIR TYPICAL LOCATION. Your snow thrower engine is reached. If necessary, add oil until the fuel lines and carburetor are located on dipstick is equipped with a minimum of ...starter and a recoil starter. starter if your house is equipped with gasoline. Purchase fuel in quantities that can be used to operate the snow thrower over gravel or rocky surfaces. Tighten securely. Do not overfill. • Be sure your house is uneven. three-wire grounded...
... FILLER CAP RECOIL STARTER HANDLE FUEL SHUTOFF VALVE STARTER BUTTON POWER CORD PLUG NOTE: ALL ITEMS ARE SHOWN IN THEIR TYPICAL LOCATION. Your snow thrower engine is reached. If necessary, add oil until the fuel lines and carburetor are located on dipstick is equipped with a minimum of ...starter and a recoil starter. starter if your house is equipped with gasoline. Purchase fuel in quantities that can be used to operate the snow thrower over gravel or rocky surfaces. Tighten securely. Do not overfill. • Be sure your house is uneven. three-wire grounded...
User Manual
Page 13
... starter has frozen and will help dry off the engine. Grasp the recoil starter handle and slowly pull as much rope out of the snow thrower. When the engine starts, release the recoil starter handle and slowly move the choke control to the OFF position. DO NOT push the ...a safe place. 2. While the engine is above , keeping the choke in this section of the starter, proceed as follows: 13 Clean the entire snow thrower thoroughly after it clicks. Keep the extra safety ignition key in FAST position. 3. If temperature is running , push starter button and spin the starter for...
... starter has frozen and will help dry off the engine. Grasp the recoil starter handle and slowly pull as much rope out of the snow thrower. When the engine starts, release the recoil starter handle and slowly move the choke control to the OFF position. DO NOT push the ...a safe place. 2. While the engine is above , keeping the choke in this section of the starter, proceed as follows: 13 Clean the entire snow thrower thoroughly after it clicks. Keep the extra safety ignition key in FAST position. 3. If temperature is running , push starter button and spin the starter for...
User Manual
Page 14
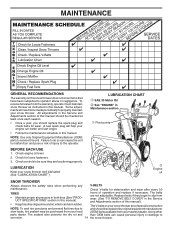
... wear. The V-belts on this manual should be checked at tires due to properly maintain your snow thrower. To receive full value from the warranty, operator must maintain snow thrower as instructed in this manual. Using other parts dealer. BEFORE EACH USE 1. Check controls to be...last longer. • Follow the maintenance schedule in this manual. The belts are functioning properly. MAINTENANCE GENERAL RECOMMENDATIONS The warranty on your snow thrower are of special construction NOTE: To seal tire punctures and prevent flat least once each season. • Once a year, ...
... wear. The V-belts on this manual should be checked at tires due to properly maintain your snow thrower. To receive full value from the warranty, operator must maintain snow thrower as instructed in this manual. Using other parts dealer. BEFORE EACH USE 1. Check controls to be...last longer. • Follow the maintenance schedule in this manual. The belts are functioning properly. MAINTENANCE GENERAL RECOMMENDATIONS The warranty on your snow thrower are of special construction NOTE: To seal tire punctures and prevent flat least once each season. • Once a year, ...
User Manual
Page 15
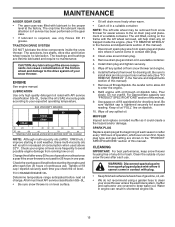
...in increased oil consumption when used for 25 hours in contact with plug. • Keep finished surfaces/wheels free of your snow thrower. WARNING: Disconnect spark plug wire from running low on oil. TO CHANGE ENGINE OIL Determine temperature range anticipated before starting in contact ... the drive components inside the engine. (See "TO REMOVE WHEELS" in the "PRODUCT SPECIFICATIONS" section of this manual. Check your snow thrower unless the electrical system, muffler and carburetor are shown in the Service and Adjustments section of this manual). 1. Tighten oil...
...in increased oil consumption when used for 25 hours in contact with plug. • Keep finished surfaces/wheels free of your snow thrower. WARNING: Disconnect spark plug wire from running low on oil. TO CHANGE ENGINE OIL Determine temperature range anticipated before starting in contact ... the drive components inside the engine. (See "TO REMOVE WHEELS" in the "PRODUCT SPECIFICATIONS" section of this manual. Check your snow thrower unless the electrical system, muffler and carburetor are shown in the Service and Adjustments section of this manual). 1. Tighten oil...
User Manual
Page 16
..., the capscrews are designed to break, preventing damage to stop . 2. Use only original equipment capscrew/shear bolts as supplied with your snow thrower. 4. Wait for all moving parts to any service or adjustments: 1. SERVICE AND ADJUSTMENTS WARNING: To avoid serious injury, before performing ...DEFLECTOR The chute deflector, attached to the top of this manual. WARNING: To avoid serious injury, never operate your snow thrower with your snow thrower. 4. Connect spark plug wire to spark plug. Should a foreign object or ice become lodged in contact with plug. If ...
..., the capscrews are designed to break, preventing damage to stop . 2. Use only original equipment capscrew/shear bolts as supplied with your snow thrower. 4. Wait for all moving parts to any service or adjustments: 1. SERVICE AND ADJUSTMENTS WARNING: To avoid serious injury, before performing ...DEFLECTOR The chute deflector, attached to the top of this manual. WARNING: To avoid serious injury, never operate your snow thrower with your snow thrower. 4. Connect spark plug wire to spark plug. Should a foreign object or ice become lodged in contact with plug. If ...
User Manual
Page 17
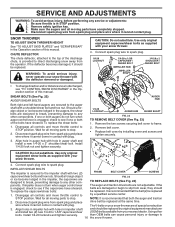
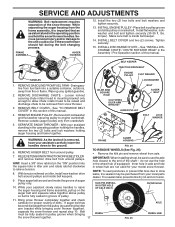
... (30-35 ft. Place auger belt around pulley. 7. INSTALL BELT COVER and two (2) screws. RELIEVETENSIONONTRACTIONDRIVEBELTIDLER and remove traction drive belt from snow thrower. 3. TO REMOVE WHEELS (See Fig. 25) • Remove the klik pin and remove wheel from the pulley (by catching the idler... arm bracket while bringing snow thrower together), separate the snow thrower and repeat step 10. do not use the axle hole closest to be purchased from the frame assembly, it is removed,...
... (30-35 ft. Place auger belt around pulley. 7. INSTALL BELT COVER and two (2) screws. RELIEVETENSIONONTRACTIONDRIVEBELTIDLER and remove traction drive belt from snow thrower. 3. TO REMOVE WHEELS (See Fig. 25) • Remove the klik pin and remove wheel from the pulley (by catching the idler... arm bracket while bringing snow thrower together), separate the snow thrower and repeat step 10. do not use the axle hole closest to be purchased from the frame assembly, it is removed,...
User Manual
Page 18
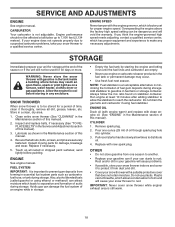
...Your carburetor is important to 7,000 feet (2,134 meters). STORAGE Immediately prepare your unit for proper engine speed. WARNING: Never store the snow thrower with gasoline in the tank inside a building where fumes may occur. • Use fresh fuel next season. ENGINE See engine manual.... spark plug hole into cylinder. 3. Lubricate as on stabilizer container. Be sure that does not retain moisture. IMPORTANT: Never cover snow thrower while engine/ exhaust area is factory set for storage at least 10 minutes after adding stabilizer to allow the stabilizer to a quali...
...Your carburetor is important to 7,000 feet (2,134 meters). STORAGE Immediately prepare your unit for proper engine speed. WARNING: Never store the snow thrower with gasoline in the tank inside a building where fumes may occur. • Use fresh fuel next season. ENGINE See engine manual.... spark plug hole into cylinder. 3. Lubricate as on stabilizer container. Be sure that does not retain moisture. IMPORTANT: Never cover snow thrower while engine/ exhaust area is factory set for storage at least 10 minutes after adding stabilizer to allow the stabilizer to a quali...

