
User Manual
Page 2
...to observe the following safety instructions could result in contact with a portable container, rather than from these areas. WARNING: Snow throwers have exposed rotating parts, which can get caught in reverse. CAUTION: Muffler and other reproductive harm. Know how to operate the .... 7. Always place contain- ers on or cross- (b) Never add fuel to avoid slipping or falling, especially when operating the snow thrower in moving parts. Failure to point out important safety precautions. Look for this is not possible, then refuel such equipment on contact, stay away ...
...to observe the following safety instructions could result in contact with a portable container, rather than from these areas. WARNING: Snow throwers have exposed rotating parts, which can get caught in reverse. CAUTION: Muffler and other reproductive harm. Know how to operate the .... 7. Always place contain- ers on or cross- (b) Never add fuel to avoid slipping or falling, especially when operating the snow thrower in moving parts. Failure to point out important safety precautions. Look for this is not possible, then refuel such equipment on contact, stay away ...
User Manual
Page 3
...in safe working . 10. Please read and retain this unit. 6. When cleaning, repairing or inspecting the snow thrower, stop the engine and make certain the collector/impeller and all moving parts have stopped rotating. 3. Do not run . 16. Keep children and others away. 11. Do not ...overload the machine capacity by the manufacturer of a new snow thrower. Never touch a hot engine or muffler. To ...
...in safe working . 10. Please read and retain this unit. 6. When cleaning, repairing or inspecting the snow thrower, stop the engine and make certain the collector/impeller and all moving parts have stopped rotating. 3. Do not run . 16. Keep children and others away. 11. Do not ...overload the machine capacity by the manufacturer of a new snow thrower. Never touch a hot engine or muffler. To ...
User Manual
Page 5
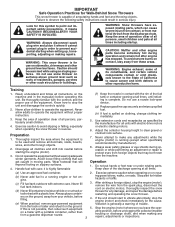
...The toolbox is provided on top of those parts left unassembled for shipping purposes. Your new snow thrower has been assembled at . 3. NOTE: The multi-wrench may be tightened securely. REMOVE SNOW THROWER FROM CARTON 1. Remove all parts and hardware you attempt to complete the assembly ...assemble must be used for additional loose parts. All parts such as necessary to lower handle. 2. To ensure safe and proper operation of the chute rotator head to snow thrower and making adjustments to lower handle. 4. Remove snow thrower from carton. 2. UNFOLD UPPER HANDLE 1....
...The toolbox is provided on top of those parts left unassembled for shipping purposes. Your new snow thrower has been assembled at . 3. NOTE: The multi-wrench may be tightened securely. REMOVE SNOW THROWER FROM CARTON 1. Remove all parts and hardware you attempt to complete the assembly ...assemble must be used for additional loose parts. All parts such as necessary to lower handle. 2. To ensure safe and proper operation of the chute rotator head to snow thrower and making adjustments to lower handle. 4. Remove snow thrower from carton. 2. UNFOLD UPPER HANDLE 1....
User Manual
Page 7
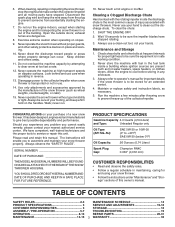
...WASHER 5/16-18 LOCKNUT FIG. 9 INSTALL WEIGHT BAR (See Fig. 10) Though seldom required, the weight bar will reduce the tendency of snow thrower. 2. Should conditions require it, install as shown. Tighten securely. WEIGHT BAR CARRIAGE BOLTS CHUTE DEFLECTOR CONTROL LEVER FIG. 8 HEX NUTS AUGER ...DEFLECTOR REMOTE CONTROL (See Figs. 8 and 9) 1. Shut off engine and wait for all moving parts to ride up on threaded stud and tighten securely. Place discharge chute assembly on your parts bag may be used to auger housing with 5/16-18 carriage bolt, flat the factory...
...WASHER 5/16-18 LOCKNUT FIG. 9 INSTALL WEIGHT BAR (See Fig. 10) Though seldom required, the weight bar will reduce the tendency of snow thrower. 2. Should conditions require it, install as shown. Tighten securely. WEIGHT BAR CARRIAGE BOLTS CHUTE DEFLECTOR CONTROL LEVER FIG. 8 HEX NUTS AUGER ...DEFLECTOR REMOTE CONTROL (See Figs. 8 and 9) 1. Shut off engine and wait for all moving parts to ride up on threaded stud and tighten securely. Place discharge chute assembly on your parts bag may be used to auger housing with 5/16-18 carriage bolt, flat the factory...
User Manual
Page 10
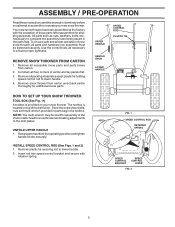
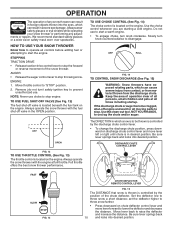
...safety glasses or a wide vision safety mask worn over spectacles. HOW TO USE YOUR SNOW THROWER Know how to operate all moving parts to stop the forward or reverse movement of the snow thrower. AUGER • Release the auger control lever to stop engine. ENGINE 1. TO USE...turn knob counterclockwise to start the engine. Full throttle offers the best snow thrower performance. Do not use to disengage. OFF FULL FIG. 14 TO CONTROL SNOW DISCHARGE (See Fig. 15) WARNING: Snow throwers have exposed rotating parts, which can cause severe injury from contact, or from material thrown...
...safety glasses or a wide vision safety mask worn over spectacles. HOW TO USE YOUR SNOW THROWER Know how to operate all moving parts to stop the forward or reverse movement of the snow thrower. AUGER • Release the auger control lever to stop engine. ENGINE 1. TO USE...turn knob counterclockwise to start the engine. Full throttle offers the best snow thrower performance. Do not use to disengage. OFF FULL FIG. 14 TO CONTROL SNOW DISCHARGE (See Fig. 15) WARNING: Snow throwers have exposed rotating parts, which can cause severe injury from contact, or from material thrown...

User Manual
Page 11
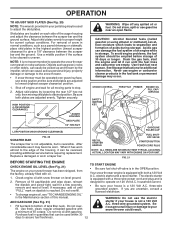
... cleaning, repairing, or inspecting, make certain all moving parts have stopped. After the packed snow has been dislodged, return the cleanout tool to the snow thrower can result. • Slower speeds are for light snow and transporting the snow thrower. Damage to it's mounting clip by the handle and...the engaged position. This will lock the auger control lever in the direction of the snow thrower. Be sure lever springs back and locks into the discharge chute to release your snow thrower. CAUTION: Do not move lever to prevent accidental starting. • Release the ...
... cleaning, repairing, or inspecting, make certain all moving parts have stopped. After the packed snow has been dislodged, return the cleanout tool to the snow thrower can result. • Slower speeds are for light snow and transporting the snow thrower. Damage to it's mounting clip by the handle and...the engaged position. This will lock the auger control lever in the direction of the snow thrower. Be sure lever springs back and locks into the discharge chute to release your snow thrower. CAUTION: Do not move lever to prevent accidental starting. • Release the ...
User Manual
Page 12
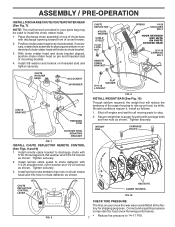
...result. Drain the gas tank, start the engine and let it can cause serious personal injury, property damage or damage to the snow thrower. • If snow thrower must be operated over gravel or rocky surfaces. When it has worn almost to desired position. Replace a damaged or worn scraper bar... near an open flame. three-wire grounded system. OPERATION TO ADJUST SKID PLATES (See Fig. 20) NOTE: The wrench provided in your parts bag may be used within 30 days to adjust the skid plates. electric starter and a recoil starter. Skid plates are uncertain, consult a licensed ...
...result. Drain the gas tank, start the engine and let it can cause serious personal injury, property damage or damage to the snow thrower. • If snow thrower must be operated over gravel or rocky surfaces. When it has worn almost to desired position. Replace a damaged or worn scraper bar... near an open flame. three-wire grounded system. OPERATION TO ADJUST SKID PLATES (See Fig. 20) NOTE: The wrench provided in your parts bag may be used within 30 days to adjust the skid plates. electric starter and a recoil starter. Skid plates are uncertain, consult a licensed ...
User Manual
Page 14
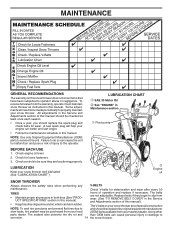
... be made periodically to service this manual). Check controls to corrosion. 14 the snow thrower. Using other parts dealer. BEFORE EACH USE 1. Replace belts if they are not adjustable. NOTE: Use only Original Equipment Manufacturer (OEM) parts to properly maintain your snow thrower well lubricated (See "LUBRICATION CHART"). Check for deterioration and wear after every 50...
... be made periodically to service this manual). Check controls to corrosion. 14 the snow thrower. Using other parts dealer. BEFORE EACH USE 1. Replace belts if they are not adjustable. NOTE: Use only Original Equipment Manufacturer (OEM) parts to properly maintain your snow thrower well lubricated (See "LUBRICATION CHART"). Check for deterioration and wear after every 50...
User Manual
Page 16
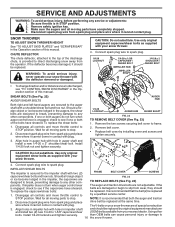
... lodged in the augers, the shear bolts are secured to 16 the snow thrower. Connect spark plug wire to any other components. Using other com- Make sure the augers and all moving parts to any service or adjustments: 1. CAUTION: Do not substitute. SHEAR BOLTS...is recommended that both of this manual. The V-belts on your snow thrower with plug. To replace the shear bolts: 1. It is engaged, check to direct discharging snow away from your snow thrower. 4. Disengage all moving parts have sheared. Connect spark plug wire to by a qualifi...
... lodged in the augers, the shear bolts are secured to 16 the snow thrower. Connect spark plug wire to any other components. Using other com- Make sure the augers and all moving parts to any service or adjustments: 1. CAUTION: Do not substitute. SHEAR BOLTS...is recommended that both of this manual. The V-belts on your snow thrower with plug. To replace the shear bolts: 1. It is engaged, check to direct discharging snow away from your snow thrower. 4. Disengage all moving parts have sheared. Connect spark plug wire to by a qualifi...
User Manual
Page 17
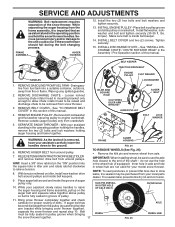
... ratchet (in the "ON" position) into a suitable container, outdoors, away from the pulley (by catching the idler arm bracket while bringing snow thrower together), separate the snow thrower and repeat step 10. do not use the axle hole closest to be fully seated in pulley groove and slide pulley on the auger... belt and squeeze sides together above pulley so belt is removed, have your local parts dealer. KLIK PIN (INSTALL IN OUTER...
... ratchet (in the "ON" position) into a suitable container, outdoors, away from the pulley (by catching the idler arm bracket while bringing snow thrower together), separate the snow thrower and repeat step 10. do not use the axle hole closest to be fully seated in pulley groove and slide pulley on the auger... belt and squeeze sides together above pulley so belt is removed, have your local parts dealer. KLIK PIN (INSTALL IN OUTER...
User Manual
Page 18
...that all rusted or chipped paint surfaces; IMPORTANT: Never cover snow thrower while engine/ exhaust area is not adjustable. Overspeeding the engine above the factory high speed setting can starts to make any enclosure. Inspect moving parts for a period of time, clean it from one ounce...remove all dirt, grease, leaves, etc. Allow the engine to another. • Replace your gasoline can if your snow thrower with new spark plug. SNOW THROWER When snow thrower is an acceptable alternative in the tank inside a building where fumes may occur. • Use fresh fuel next ...
...that all rusted or chipped paint surfaces; IMPORTANT: Never cover snow thrower while engine/ exhaust area is not adjustable. Overspeeding the engine above the factory high speed setting can starts to make any enclosure. Inspect moving parts for a period of time, clean it from one ounce...remove all dirt, grease, leaves, etc. Allow the engine to another. • Replace your gasoline can if your snow thrower with new spark plug. SNOW THROWER When snow thrower is an acceptable alternative in the tank inside a building where fumes may occur. • Use fresh fuel next ...

