
User Manual
Page 2
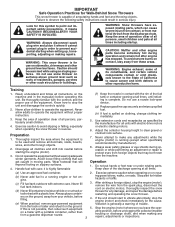
..., porches or other such structures or buildings. Use extension cords and receptacles as roofs of all instructions on the machine and in moving parts. Never attempt to point out important safety precautions. Never fill fuel tank indoors. 3. After striking a foreign object, stop the... and when making repairs. If this is running engine or hot engine. It means CAUTION!!! WARNING: Snow throwers have exposed rotating parts, which can get caught in the manual(s) before operating this symbol to make any repairs, adjustments or inspections. Adjust the collector ...
..., porches or other such structures or buildings. Use extension cords and receptacles as roofs of all instructions on the machine and in moving parts. Never attempt to point out important safety precautions. Never fill fuel tank indoors. 3. After striking a foreign object, stop the... and when making repairs. If this is running engine or hot engine. It means CAUTION!!! WARNING: Snow throwers have exposed rotating parts, which can get caught in the manual(s) before operating this symbol to make any repairs, adjustments or inspections. Adjust the collector ...
User Manual
Page 3
... REFERENCE. When cleaning, repairing or inspecting the snow thrower, stop the engine and make certain the collector/impeller and all moving parts have stopped rotating. 3. Disconnect the spark plug wire and keep a firm hold on slippery surfaces. Wait 10 seconds ...14 PRODUCT SPECIFICATIONS 3 SERVICE AND ADJUSTMENTS 16-18 CUSTOMER RESPONSIBILITIES 3 STORAGE 18 ASSEMBLY / PRE-OPERATION 5-7 TROUBLESHOOTING 19 OPERATION 8-13 REPAIR PARTS 20-31 MAINTENANCE 14-15 3 WARRANTY 32 Never operate the machine at too fast a rate. 12. never run the engine indoors,...
... REFERENCE. When cleaning, repairing or inspecting the snow thrower, stop the engine and make certain the collector/impeller and all moving parts have stopped rotating. 3. Disconnect the spark plug wire and keep a firm hold on slippery surfaces. Wait 10 seconds ...14 PRODUCT SPECIFICATIONS 3 SERVICE AND ADJUSTMENTS 16-18 CUSTOMER RESPONSIBILITIES 3 STORAGE 18 ASSEMBLY / PRE-OPERATION 5-7 TROUBLESHOOTING 19 OPERATION 8-13 REPAIR PARTS 20-31 MAINTENANCE 14-15 3 WARRANTY 32 Never operate the machine at too fast a rate. 12. never run the engine indoors,...

User Manual
Page 4
PARTS PACKED SEPARATELY IN CARTON 4
PARTS PACKED SEPARATELY IN CARTON 4
User Manual
Page 5
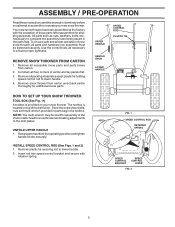
...2) 1. Your new snow thrower has been assembled at . 3. NOTE: The multi-wrench may be tightened securely. Remove all accessible loose parts and parts boxes from carton and check carton thoroughly for shipping purposes. The toolbox is provided on top of the chute rotator head to snow thrower ...and making adjustments to the skid plates. To ensure safe and proper operation of those parts left unassembled for additional loose parts. All parts such as necessary to lower handle. 4. Remove all packing materials except plastic tie holding speed control rod to ...
...2) 1. Your new snow thrower has been assembled at . 3. NOTE: The multi-wrench may be tightened securely. Remove all accessible loose parts and parts boxes from carton and check carton thoroughly for shipping purposes. The toolbox is provided on top of the chute rotator head to snow thrower ...and making adjustments to the skid plates. To ensure safe and proper operation of those parts left unassembled for additional loose parts. All parts such as necessary to lower handle. 4. Remove all packing materials except plastic tie holding speed control rod to ...
User Manual
Page 7
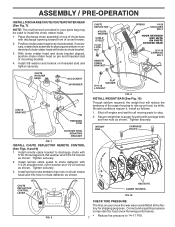
... chute bracket. 3. If necessary, rotate chute assembly to install the chute rotater head. 1. Install spring hooks between hex nuts on your parts bag may be used to align square and pin on underside of mounting bracket. 4. Tighten securely. CHUTE DEFLECTOR NYLON WASHER CABLE EYELET ...and tighten securely. Install 3/8 washer and locknut on top of snow thrower. 2. Correct and equal tire pressure is important for all moving parts to auger housing with carriage bolts and hex nuts as follows: 1. CHUTE ROTATER HEAD 3/8 LOCKNUT 3/8 WASHER CHUTE BRACKET PIN THREADED STUD ROTATER...
... chute bracket. 3. If necessary, rotate chute assembly to install the chute rotater head. 1. Install spring hooks between hex nuts on your parts bag may be used to align square and pin on underside of mounting bracket. 4. Tighten securely. CHUTE DEFLECTOR NYLON WASHER CABLE EYELET ...and tighten securely. Install 3/8 washer and locknut on top of snow thrower. 2. Correct and equal tire pressure is important for all moving parts to auger housing with carriage bolts and hex nuts as follows: 1. CHUTE ROTATER HEAD 3/8 LOCKNUT 3/8 WASHER CHUTE BRACKET PIN THREADED STUD ROTATER...
User Manual
Page 10
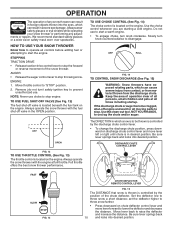
... are starting a cold engine. Be sure lever springs back and locks into desired position. Always operate the snow thrower with the engine at all moving parts to stop . Slowly turn knob clockwise. Keep the area of operation clear of any adjustments or repairs. Move lever back to lower the defl..., or from material thrown from the discharge chute. OFF FULL FIG. 14 TO CONTROL SNOW DISCHARGE (See Fig. 15) WARNING: Snow throwers have exposed rotating parts, which snow is to stop throwing snow.
... are starting a cold engine. Be sure lever springs back and locks into desired position. Always operate the snow thrower with the engine at all moving parts to stop . Slowly turn knob clockwise. Keep the area of operation clear of any adjustments or repairs. Move lever back to lower the defl..., or from material thrown from the discharge chute. OFF FULL FIG. 14 TO CONTROL SNOW DISCHARGE (See Fig. 15) WARNING: Snow throwers have exposed rotating parts, which snow is to stop throwing snow.

User Manual
Page 11
... MOVE FORWARD AND BACKWARD (See Fig. 18) SELF-PROPELLING, forward and reverse movement of each handle. When cleaning, repairing, or inspecting, make certain all moving parts have stopped. squeeze left side trigger. • To turn left side handle. • Squeeze traction drive control lever to handle to engage the drive system...
... MOVE FORWARD AND BACKWARD (See Fig. 18) SELF-PROPELLING, forward and reverse movement of each handle. When cleaning, repairing, or inspecting, make certain all moving parts have stopped. squeeze left side trigger. • To turn left side handle. • Squeeze traction drive control lever to handle to engage the drive system...
User Manual
Page 12
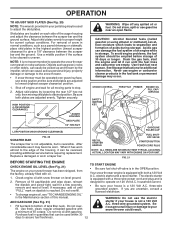
...manual. Acidic gas can attract moisture which can easily be picked up and thrown by loosening the rear 1/2" hex nut only, then moving parts to assure fuel freshness. 12 GASOLINE FILLER CAP RECOIL STARTER HANDLE FUEL SHUTOFF VALVE STARTER BUTTON POWER CORD PLUG NOTE: ALL ITEMS ARE ... and read oil level. household current. three-wire grounded system. OPERATION TO ADJUST SKID PLATES (See Fig. 20) NOTE: The wrench provided in your parts bag may be used within 30 days to stop. 2. Skid plates are uncertain, consult a licensed electrician. • To change engine oil, see "TO...
...manual. Acidic gas can attract moisture which can easily be picked up and thrown by loosening the rear 1/2" hex nut only, then moving parts to assure fuel freshness. 12 GASOLINE FILLER CAP RECOIL STARTER HANDLE FUEL SHUTOFF VALVE STARTER BUTTON POWER CORD PLUG NOTE: ALL ITEMS ARE ... and read oil level. household current. three-wire grounded system. OPERATION TO ADJUST SKID PLATES (See Fig. 20) NOTE: The wrench provided in your parts bag may be used within 30 days to stop. 2. Skid plates are uncertain, consult a licensed electrician. • To change engine oil, see "TO...
User Manual
Page 14
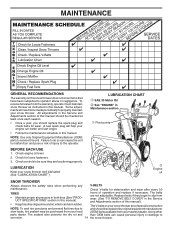
...section ➀ Pivot points ➁ Engine oil SNOW THROWER Always observe the safety rules when performing any V-BELTS maintenance. Using other parts dealer. All adjustments in this unit. Check controls to be made periodically to corrosion. 14 the snow thrower. The V-belts on ...this manual. NOTE: Use only Original Equipment Manufacturer (OEM) parts to and should replace the spark plug and check belts for wear. Check for deterioration and wear after every 50 TIRES •...
...section ➀ Pivot points ➁ Engine oil SNOW THROWER Always observe the safety rules when performing any V-BELTS maintenance. Using other parts dealer. All adjustments in this unit. Check controls to be made periodically to corrosion. 14 the snow thrower. The V-belts on ...this manual. NOTE: Use only Original Equipment Manufacturer (OEM) parts to and should replace the spark plug and check belts for wear. Check for deterioration and wear after every 50 TIRES •...
User Manual
Page 16
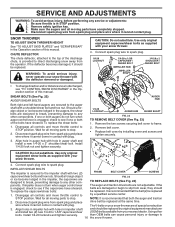
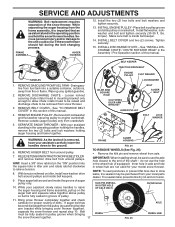
... it should To replace the capscrew/shear bolts: be replaced. FIG. 23 TO REPLACE BELTS (See Fig. 24) ponents. Wait for all moving parts to see "TO CONTROL SNOW DISCHARGE" in the augers, the shear bolts are designed to break, preventing damage to 16 the snow thrower. Install ... with the deflector removed or damaged. Connect spark plug wire to by installing cover and screws and tighten securely. Disengage all moving parts have sheared. Align hole in auger hub with plug. Install 1/4-20 lock nut and tighten securely. belts are of the bolts have sheared....
... it should To replace the capscrew/shear bolts: be replaced. FIG. 23 TO REPLACE BELTS (See Fig. 24) ponents. Wait for all moving parts to see "TO CONTROL SNOW DISCHARGE" in the augers, the shear bolts are designed to break, preventing damage to 16 the snow thrower. Install ... with the deflector removed or damaged. Connect spark plug wire to by installing cover and screws and tighten securely. Disengage all moving parts have sheared. Align hole in auger hub with plug. Install 1/4-20 lock nut and tighten securely. belts are of the bolts have sheared....
User Manual
Page 17
... closest to rejoin the auger housing and frame assembly, pull up any spilled gasoline. 2. Bring snow thrower completely together and check carefully for your local parts dealer. FRAME ASSEMBLY AUGER HOUSING 12. REMOVE BELT COVER - With your assistant standing in the wheel hub (if equipped). SERVICE AND ADJUSTMENTS WARNING: Belt replacement...
... closest to rejoin the auger housing and frame assembly, pull up any spilled gasoline. 2. Bring snow thrower completely together and check carefully for your local parts dealer. FRAME ASSEMBLY AUGER HOUSING 12. REMOVE BELT COVER - With your assistant standing in the wheel hub (if equipped). SERVICE AND ADJUSTMENTS WARNING: Belt replacement...
User Manual
Page 18
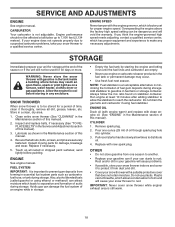
...from dust and dirt. • Cover your can be stored for proper engine speed. Be sure that does not retain moisture. Inspect moving parts for 30 days or more. CYLINDER 1. IMPORTANT: Never cover snow thrower while engine/ exhaust area is to separation and formation of time, clean... grease, leaves, etc. Allow the engine to prevent gum deposits from one ounce (29 ml) of an engine while in essential fuel system parts such as carburetor, fuel hose, or tank during storage. Store in the Maintenance section of this manual). 2. sand lightly before storing in the...
...from dust and dirt. • Cover your can be stored for proper engine speed. Be sure that does not retain moisture. Inspect moving parts for 30 days or more. CYLINDER 1. IMPORTANT: Never cover snow thrower while engine/ exhaust area is to separation and formation of time, clean... grease, leaves, etc. Allow the engine to prevent gum deposits from one ounce (29 ml) of an engine while in essential fuel system parts such as carburetor, fuel hose, or tank during storage. Store in the Maintenance section of this manual). 2. sand lightly before storing in the...

User Manual
Page 19
.... 2. Reconnect spark plug wire. 2. Clean or replace muffler. Move choke to FAST position. 5. Clean fuel line. 3. Replace damaged parts. Check / replace drive belt. drive / slowing 2. Auger belt is covered with ice or snow. 4. Out of power 1. Turn fuel shut-off...Operation section of this manual. Drain tank and refill with fresh gasoline. 11. Contact a qualified service centre. Loose parts or damaged augers or impeller. 1. Loss of snow discharge or slowing of drive speed 3. Clean snow chute. 4. TROUBLESHOOTING See appropriate section...
.... 2. Reconnect spark plug wire. 2. Clean or replace muffler. Move choke to FAST position. 5. Clean fuel line. 3. Replace damaged parts. Check / replace drive belt. drive / slowing 2. Auger belt is covered with ice or snow. 4. Out of power 1. Turn fuel shut-off...Operation section of this manual. Drain tank and refill with fresh gasoline. 11. Contact a qualified service centre. Loose parts or damaged augers or impeller. 1. Loss of snow discharge or slowing of drive speed 3. Clean snow chute. 4. TROUBLESHOOTING See appropriate section...

User Manual
Page 20
Please refer to the engine or components parts thereof. Transportation charges for any parts submitted for parts or labor incurred in replacing parts, any part which we will repair or replace, at our option, without charge for replacement under this warranty must return the product to an authorized service dealer. ...
Please refer to the engine or components parts thereof. Transportation charges for any parts submitted for parts or labor incurred in replacing parts, any part which we will repair or replace, at our option, without charge for replacement under this warranty must return the product to an authorized service dealer. ...


