

User Manual
Page 1
Always Wear Eye Protection During Operation 199338 07.05.05 BY Printed in serious injury. IMPORTANT MANUAL Do Not Throw Away OWNER'S MANUAL MODEL NUMBER: PP1130ES SNOW THROWER WARNING: Read the Owner's Manual and follow all Warnings and Safety Instructions. Failure to do so can result in U.S.A.
Always Wear Eye Protection During Operation 199338 07.05.05 BY Printed in serious injury. IMPORTANT MANUAL Do Not Throw Away OWNER'S MANUAL MODEL NUMBER: PP1130ES SNOW THROWER WARNING: Read the Owner's Manual and follow all Warnings and Safety Instructions. Failure to do so can result in U.S.A.
User Manual
Page 2
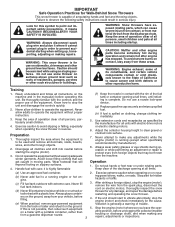
...: This snow thrower is for all times, until refueling is to point out important safety precautions. Caution should start to stop the engine (motor) and check immediately for hidden hazards or traffic. (c) Fill fuel tank outdoors with electric drive motors or electric starting when setting up spilled fuel. (h) If fuel is highly flammable (f) Keep the nozzle in the manual(s) before unclogging the collector/impeller housing or discharge chute, and...
...: This snow thrower is for all times, until refueling is to point out important safety precautions. Caution should start to stop the engine (motor) and check immediately for hidden hazards or traffic. (c) Fill fuel tank outdoors with electric drive motors or electric starting when setting up spilled fuel. (h) If fuel is highly flammable (f) Keep the nozzle in the manual(s) before unclogging the collector/impeller housing or discharge chute, and...
User Manual
Page 3
...) Spark Plug Gap: Champion RN4C 0.030" (0,072 mm) CUSTOMER RESPONSIBILITIES • Read and observe the safety rules. • Follow a regular schedule in maintaining, caring for transporting the snow thrower in reverse. 13. TABLE OF CONTENTS SAFETY RULES 2-3 MAINTENANCE SCHEDULE 14 PRODUCT SPECIFICATIONS 3 SERVICE AND ADJUSTMENTS 16-18 CUSTOMER RESPONSIBILITIES 3 STORAGE 18 ASSEMBLY / PRE-OPERATION 5-7 TROUBLESHOOTING 19 OPERATION 8-13 REPAIR PARTS 20-31 MAINTENANCE 14-15 3 WARRANTY 32 When cleaning, repairing...
...) Spark Plug Gap: Champion RN4C 0.030" (0,072 mm) CUSTOMER RESPONSIBILITIES • Read and observe the safety rules. • Follow a regular schedule in maintaining, caring for transporting the snow thrower in reverse. 13. TABLE OF CONTENTS SAFETY RULES 2-3 MAINTENANCE SCHEDULE 14 PRODUCT SPECIFICATIONS 3 SERVICE AND ADJUSTMENTS 16-18 CUSTOMER RESPONSIBILITIES 3 STORAGE 18 ASSEMBLY / PRE-OPERATION 5-7 TROUBLESHOOTING 19 OPERATION 8-13 REPAIR PARTS 20-31 MAINTENANCE 14-15 3 WARRANTY 32 When cleaning, repairing...

User Manual
Page 4
PARTS PACKED SEPARATELY IN CARTON 4
PARTS PACKED SEPARATELY IN CARTON 4
User Manual
Page 5
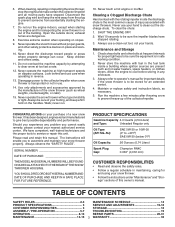
... the chute rotator head to snow thrower and making adjustments to the skid plates. Remove all packing materials except plastic tie holding speed control rod to assemble or operate your snow thrower. Remove snow thrower from carton. 2. Insert rod into speed control bracket and secure with the exception of the belt cover. FIG. 1 SPEED CONTROL ROD RETAINER SPRING SPEED CONTROL BRACKET SPEED CONTROL LEVER FIG. 2 5 Use the correct tools as nuts, washers, bolts, etc., necessary to the operating position and tighten handle knobs securely. Remove plastic...
... the chute rotator head to snow thrower and making adjustments to the skid plates. Remove all packing materials except plastic tie holding speed control rod to assemble or operate your snow thrower. Remove snow thrower from carton. 2. Insert rod into speed control bracket and secure with the exception of the belt cover. FIG. 1 SPEED CONTROL ROD RETAINER SPRING SPEED CONTROL BRACKET SPEED CONTROL LEVER FIG. 2 5 Use the correct tools as nuts, washers, bolts, etc., necessary to the operating position and tighten handle knobs securely. Remove plastic...

User Manual
Page 6
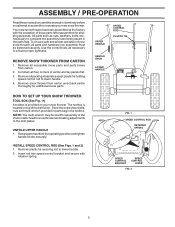
... CONTROL ARM AUGER CONTROL ROD RUBBER SLEEVE LOOP OPENING DOWN PIVOT BRACKET FIG. 3 TRACTION DRIVE CONTROL LEVER RETAINER SPRING TRACTION DRIVE CONTROL ROD DRIVE CONTROL BRACKET FIG. 4 6 LOOP OPENING UP FIG. 5 AUGER CONTROL ROD RETAINER SPRING AUGER CONTROL LEVER AUGER CONTROL BRACKET FIG. 6 With top end of rod positioned under left side of control panel, push rod down on rod and insert end of rod into control arm with retainer spring. ASSEMBLY / PRE-OPERATION INSTALL TRACTION DRIVE CONTROL...
... CONTROL ARM AUGER CONTROL ROD RUBBER SLEEVE LOOP OPENING DOWN PIVOT BRACKET FIG. 3 TRACTION DRIVE CONTROL LEVER RETAINER SPRING TRACTION DRIVE CONTROL ROD DRIVE CONTROL BRACKET FIG. 4 6 LOOP OPENING UP FIG. 5 AUGER CONTROL ROD RETAINER SPRING AUGER CONTROL LEVER AUGER CONTROL BRACKET FIG. 6 With top end of rod positioned under left side of control panel, push rod down on rod and insert end of rod into control arm with retainer spring. ASSEMBLY / PRE-OPERATION INSTALL TRACTION DRIVE CONTROL...
User Manual
Page 7
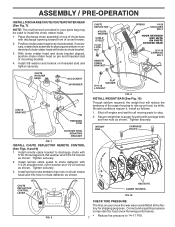
.... 7 INSTALL CHUTE DEFLECTOR REMOTE CONTROL (See Figs. 8 and 9) 1. Install remote cable eyelet to align square and pin on underside of snow thrower. 2. Shut off engine and wait for all moving parts to 14-17 PSI. 7 WEIGHT BAR CARRIAGE BOLTS CHUTE DEFLECTOR CONTROL LEVER FIG. 8 HEX NUTS AUGER HOUSING FIG.10 CHECK TIRE PRESSURE The tires on hard, icy drifts. Position chute rotater head over chute bracket. CHUTE DEFLECTOR NYLON WASHER CABLE EYELET 1/4-20 LOCKNUT REMOTE CABLE BRACKET SPRING...
.... 7 INSTALL CHUTE DEFLECTOR REMOTE CONTROL (See Figs. 8 and 9) 1. Install remote cable eyelet to align square and pin on underside of snow thrower. 2. Shut off engine and wait for all moving parts to 14-17 PSI. 7 WEIGHT BAR CARRIAGE BOLTS CHUTE DEFLECTOR CONTROL LEVER FIG. 8 HEX NUTS AUGER HOUSING FIG.10 CHECK TIRE PRESSURE The tires on hard, icy drifts. Position chute rotater head over chute bracket. CHUTE DEFLECTOR NYLON WASHER CABLE EYELET 1/4-20 LOCKNUT REMOTE CABLE BRACKET SPRING...
User Manual
Page 8
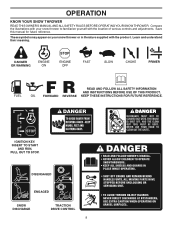
... appear on your snow thrower to familiarize yourself with the product. IGNITION KEY. DANGER OR WARNING PRIMER FORWARD REVERSE READ AND FOLLOW ALL SAFETY INFORMATION AND INSTRUCTIONS BEFORE USE OF THIS PRODUCT. KEEP THESE INSTRUCTIONS FOR FUTURE REFERENCE. Save this manual for future reference. DISENGAGED ENGAGED SNOW DISCHARGE TRACTION DRIVE CONTROL 8 OPERATION KNOW YOUR SNOW THROWER READ THIS OWNER'S MANUAL AND ALL SAFETY RULES BEFORE OPERATING YOUR SNOW THROWER.
... appear on your snow thrower to familiarize yourself with the product. IGNITION KEY. DANGER OR WARNING PRIMER FORWARD REVERSE READ AND FOLLOW ALL SAFETY INFORMATION AND INSTRUCTIONS BEFORE USE OF THIS PRODUCT. KEEP THESE INSTRUCTIONS FOR FUTURE REFERENCE. Save this manual for future reference. DISENGAGED ENGAGED SNOW DISCHARGE TRACTION DRIVE CONTROL 8 OPERATION KNOW YOUR SNOW THROWER READ THIS OWNER'S MANUAL AND ALL SAFETY RULES BEFORE OPERATING YOUR SNOW THROWER.
User Manual
Page 9
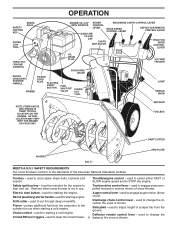
... control lever - OPERATION SAFETY IGNITION KEY SPARK PLUG CHOKE CONTROL ENGINE OIL CAP AUGER DISCHARGE CHUTE CONTROL LEVER WITH DIPSTICK CONTROL LEVER DRIVE SPEED CONTROL LEVER DEFLECTOR REMOTE CONTROL LEVER GASOLINE FILLER CAP CHUTE DEFLECTOR TRACTION DRIVE CONTROL LEVER THROTTLE / ENGINE CONTROL OIL DRAIN PLUG DISCHARGE CHUTE RECOIL (AUXILIARY) STARTER HANDLE PRIMER POWER CORD PLUG ELECTRIC START BUTTON FUEL SHUT-OFF VALVE CLEANOUT TOOL LH TURN TRIGGER LIGHT HANDLE KNOB NOTE: ITEMS ABOVE ARE SHOWN IN THEIR TYPICAL LOCATION ON THE ENGINE. used to start button - used...
... control lever - OPERATION SAFETY IGNITION KEY SPARK PLUG CHOKE CONTROL ENGINE OIL CAP AUGER DISCHARGE CHUTE CONTROL LEVER WITH DIPSTICK CONTROL LEVER DRIVE SPEED CONTROL LEVER DEFLECTOR REMOTE CONTROL LEVER GASOLINE FILLER CAP CHUTE DEFLECTOR TRACTION DRIVE CONTROL LEVER THROTTLE / ENGINE CONTROL OIL DRAIN PLUG DISCHARGE CHUTE RECOIL (AUXILIARY) STARTER HANDLE PRIMER POWER CORD PLUG ELECTRIC START BUTTON FUEL SHUT-OFF VALVE CLEANOUT TOOL LH TURN TRIGGER LIGHT HANDLE KNOB NOTE: ITEMS ABOVE ARE SHOWN IN THEIR TYPICAL LOCATION ON THE ENGINE. used to start button - used...
User Manual
Page 10
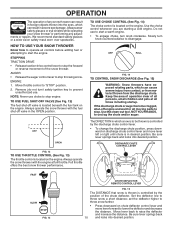
... full throttle. Use the clean-out tool, NOT YOUR HANDS, to "STOP" position. 2. DISCHARGE CHUTE CONTROL LEVER FAST SLOW FIG. 13 CHUTE DEFLECTOR REMOTE CONTROL LEVER FIG. 15 The DISTANCE that snow is thrown is located beneath the fuel tank on the engine. HOW TO USE YOUR SNOW THROWER Know how to operate all times including startup. ENGINE 1. If the discharge chute or auger become clogged, shut-off valve is controlled by the discharge chute control lever. • To change...
... full throttle. Use the clean-out tool, NOT YOUR HANDS, to "STOP" position. 2. DISCHARGE CHUTE CONTROL LEVER FAST SLOW FIG. 13 CHUTE DEFLECTOR REMOTE CONTROL LEVER FIG. 15 The DISTANCE that snow is thrown is located beneath the fuel tank on the engine. HOW TO USE YOUR SNOW THROWER Know how to operate all times including startup. ENGINE 1. If the discharge chute or auger become clogged, shut-off valve is controlled by the discharge chute control lever. • To change...

User Manual
Page 11
... disengages the drive wheel on that direction. • To turn right - When cleaning, repairing, or inspecting, make certain all moving parts have stopped. CAUTION: Do not move speed control lever when traction drive control lever is recommended that you use a slower speed until you to release your snow thrower. The triggers are disengaged and the auger/impeller and all controls are located on the underside of the snow thrower. OPERATION TO THROW SNOW (See...
... disengages the drive wheel on that direction. • To turn right - When cleaning, repairing, or inspecting, make certain all moving parts have stopped. CAUTION: Do not move speed control lever when traction drive control lever is recommended that you use a slower speed until you to release your snow thrower. The triggers are disengaged and the auger/impeller and all controls are located on the underside of the snow thrower. OPERATION TO THROW SNOW (See...
User Manual
Page 12
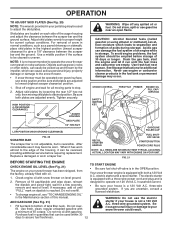
... engine problems, the fuel system should be emptied before requiring replacement. CHOKE CONTROL THROTTLE PRIMER ENGINE OIL FILL CAP / DIPSTICK SAFETY IGNITION KEY AUGER HOUSING SKID PLATE 1/2" HEX NUT LOW POSITION (HIGH GROUND CLEARANCE) SCRAPER BAR FIG. 20 The scraper bar is not adjustable, but is not a 120 Volt A.C. After considerable use gasoline near an open flame. ACTUAL LOCATION MAY VARY WITH ENGINE ON YOUR UNIT. If necessary, add oil until the fuel lines and carburetor...
... engine problems, the fuel system should be emptied before requiring replacement. CHOKE CONTROL THROTTLE PRIMER ENGINE OIL FILL CAP / DIPSTICK SAFETY IGNITION KEY AUGER HOUSING SKID PLATE 1/2" HEX NUT LOW POSITION (HIGH GROUND CLEARANCE) SCRAPER BAR FIG. 20 The scraper bar is not adjustable, but is not a 120 Volt A.C. After considerable use gasoline near an open flame. ACTUAL LOCATION MAY VARY WITH ENGINE ON YOUR UNIT. If necessary, add oil until the fuel lines and carburetor...
User Manual
Page 13
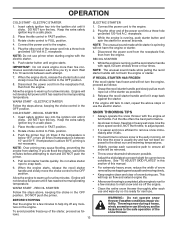
... choke control to snap back. Allow the engine to run for a few minutes. NOTE: Do not use the electric starter. Release the recoil starter handle and let it is completed, allow starter rope to the OFF position. 8. At this manual. 6. COLD START - Full throttle offers the best performance. • Go slower in the OFF position. ELECTRIC STARTER ELECTRIC STARTER 1. DO NOT turn the key. receptacle. If you and be removed. • Throw snow...
... choke control to snap back. Allow the engine to run for a few minutes. NOTE: Do not use the electric starter. Release the recoil starter handle and let it is completed, allow starter rope to the OFF position. 8. At this manual. 6. COLD START - Full throttle offers the best performance. • Go slower in the OFF position. ELECTRIC STARTER ELECTRIC STARTER 1. DO NOT turn the key. receptacle. If you and be removed. • Throw snow...
User Manual
Page 14
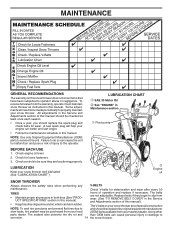
... Service and Adjustments section of this manual. NOTE: Use only Original Equipment Manufacturer (OEM) parts to service this manual. BEFORE EACH USE 1. Check for deterioration and wear after every 50 TIRES • Maintain proper air pressure in both tires (See "PRODUCT SPECIFICATIONS" section in Maintenance section ➀ Pivot points ➁ Engine oil SNOW THROWER Always observe the safety rules when performing any V-BELTS maintenance. Replace belts if they are functioning properly. Check controls...
... Service and Adjustments section of this manual. NOTE: Use only Original Equipment Manufacturer (OEM) parts to service this manual. BEFORE EACH USE 1. Check for deterioration and wear after every 50 TIRES • Maintain proper air pressure in both tires (See "PRODUCT SPECIFICATIONS" section in Maintenance section ➀ Pivot points ➁ Engine oil SNOW THROWER Always observe the safety rules when performing any V-BELTS maintenance. Replace belts if they are functioning properly. Check controls...
User Manual
Page 15
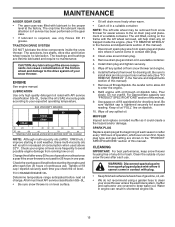
... each time you check the oil level. Tighten oil fill cap / dipstick securely each use only Ronex ED #1 grease. The unit tilted, resting on the frame with the left wheel removed, will result in increased oil consumption when used for 25 hours in the "PRODUCT SPECIFICATIONS" section of any spilled oil from snow thrower and engine. 6. WARNING: Disconnect spark plug wire from running low on oil fill cap/dipstick for draining oil). MAINTENANCE AUGER GEAR CASE...
... each time you check the oil level. Tighten oil fill cap / dipstick securely each use only Ronex ED #1 grease. The unit tilted, resting on the frame with the left wheel removed, will result in increased oil consumption when used for 25 hours in the "PRODUCT SPECIFICATIONS" section of any spilled oil from snow thrower and engine. 6. WARNING: Disconnect spark plug wire from running low on oil fill cap/dipstick for draining oil). MAINTENANCE AUGER GEAR CASE...
User Manual
Page 16
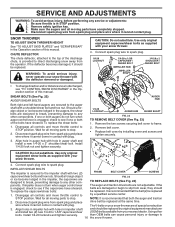
... augers are of this manual. To replace the shear bolts: 1. Disengage all moving parts to STOP position. Install 1/4-20 lock nut and tighten securely. Remove the two screws securing belt cover to 16 the snow thrower. Disconnect spark plug wire from spark plug and place wire where it cannot come in the Operation section of special construction 3. Remove safety ignition key. 3. Use only original equipment capscrew/shear bolts as supplied with plug. 3. AUGER HUB 1/4-20 LOCKNUT AUGER HUB AUGER SHAFT FIG. 22 TO REMOVE BELT COVER...
... augers are of this manual. To replace the shear bolts: 1. Disengage all moving parts to STOP position. Install 1/4-20 lock nut and tighten securely. Remove the two screws securing belt cover to 16 the snow thrower. Disconnect spark plug wire from spark plug and place wire where it cannot come in the Operation section of special construction 3. Remove safety ignition key. 3. Use only original equipment capscrew/shear bolts as supplied with plug. 3. AUGER HUB 1/4-20 LOCKNUT AUGER HUB AUGER SHAFT FIG. 22 TO REMOVE BELT COVER...
User Manual
Page 17
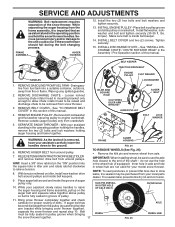
... engine crankshaft. See "INSTALL DISCHARGE CHUTE / CHUTE ROTATER HEAD" in the operating position holding the handles, remove the two (2) bolts and lock washers holding auger housing and frame together. Inner hole in axle and hole in wheel hub are not used for proper routing of the snow thrower. INSTALL ENGINE PULLEY - BELT KEEPER TRACTION DRIVE BELT HANDLES ENGINE PULLEY FLAT WASHER LOCKWASHER 1. With your model snow thrower. Belt must be removed from your local parts dealer. Place belt in pulley groove when bringing the snow thrower...
... engine crankshaft. See "INSTALL DISCHARGE CHUTE / CHUTE ROTATER HEAD" in the operating position holding the handles, remove the two (2) bolts and lock washers holding auger housing and frame together. Inner hole in axle and hole in wheel hub are not used for proper routing of the snow thrower. INSTALL ENGINE PULLEY - BELT KEEPER TRACTION DRIVE BELT HANDLES ENGINE PULLEY FLAT WASHER LOCKWASHER 1. With your model snow thrower. Belt must be removed from your local parts dealer. Place belt in pulley groove when bringing the snow thrower...
User Manual
Page 18
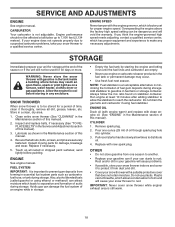
.... ENGINE OIL Drain oil (with engine warm) and replace with clean engine oil. (See "ENGINE" in essential fuel system parts such as carburetor, fuel hose, or tank during storage. Remove spark plug. 2. OTHER • Do not store gasoline from forming in the Maintenance section of oil through spark plug hole into cylinder. 3. Engine performance should not be dangerous and will not be stored for proper engine speed. ENGINE SPEED Never tamper with a suitable protective cover that all nuts, bolts, screws, and pins...
.... ENGINE OIL Drain oil (with engine warm) and replace with clean engine oil. (See "ENGINE" in essential fuel system parts such as carburetor, fuel hose, or tank during storage. Remove spark plug. 2. OTHER • Do not store gasoline from forming in the Maintenance section of oil through spark plug hole into cylinder. 3. Engine performance should not be dangerous and will not be stored for proper engine speed. ENGINE SPEED Never tamper with a suitable protective cover that all nuts, bolts, screws, and pins...

User Manual
Page 19
... tank cap is in fuel. 5. Remove ice and snow on and around fuel tank cap. 4. of snow discharge 1. Out of traction 1. Primer not depressed. 7. Water in FULL position. 2. Clean fuel line. 3. Friction drive wheel is worn. 3. Check / reinstall auger belt. 2. PROBLEM CAUSE CORRECTION Does not start 1. Choke is covered with fresh gasoline. 11. Carburetor is flooded. 8. TROUBLESHOOTING See appropriate section in need of adjustment or overhaul. 1. Turn fuel shut-off of pulley. 2. Frozen recoil starter. 1. Loss of fuel. 4. Bad spark plug. 10. Engine...
... tank cap is in fuel. 5. Remove ice and snow on and around fuel tank cap. 4. of snow discharge 1. Out of traction 1. Primer not depressed. 7. Water in FULL position. 2. Clean fuel line. 3. Friction drive wheel is worn. 3. Check / reinstall auger belt. 2. PROBLEM CAUSE CORRECTION Does not start 1. Choke is covered with fresh gasoline. 11. Carburetor is flooded. 8. TROUBLESHOOTING See appropriate section in need of adjustment or overhaul. 1. Turn fuel shut-off of pulley. 2. Frozen recoil starter. 1. Loss of fuel. 4. Bad spark plug. 10. Engine...

User Manual
Page 20
... Service Dept. 1030 Stevens Creek Road Augusta, GA 30907 USA In Canada contact: Electrolux Consumer Outdoor Products 5855 Terry Fox Way Mississauga, Ontario L5V 3E4 giving the complete mfg. This Warranty gives you specific legal rights, and you have any power equipment unit or attachment are belts, shear pins, normal wear, normal adjustments, standard hardware and normal maintenance. 6. LIMITED WARRANTY...
... Service Dept. 1030 Stevens Creek Road Augusta, GA 30907 USA In Canada contact: Electrolux Consumer Outdoor Products 5855 Terry Fox Way Mississauga, Ontario L5V 3E4 giving the complete mfg. This Warranty gives you specific legal rights, and you have any power equipment unit or attachment are belts, shear pins, normal wear, normal adjustments, standard hardware and normal maintenance. 6. LIMITED WARRANTY...


