
User Manual
Page 2
...absolutely necessary. WARNING: In order to stabilize the machine by and comply with grass catchers or other debris which can touch hot exhaust / engine parts and burn. Operate only at • Do not mow on steep slopes. • Do not try to prevent accidental starting when setting ...movement on the slope. Uneven terrain could suddenly roll over if a wheel is clear of your tractor. SAFETY RULES Safe Operation Practices for all parts to come to cool before starting , stopping, or turning on a slope. Too heavy of the machine. Avoid on the Tall grass can ...
...absolutely necessary. WARNING: In order to stabilize the machine by and comply with grass catchers or other debris which can touch hot exhaust / engine parts and burn. Operate only at • Do not mow on steep slopes. • Do not try to prevent accidental starting when setting ...movement on the slope. Uneven terrain could suddenly roll over if a wheel is clear of your tractor. SAFETY RULES Safe Operation Practices for all parts to come to cool before starting , stopping, or turning on a slope. Too heavy of the machine. Avoid on the Tall grass can ...

User Manual
Page 3
... the truck or trailer and refuel it on slopes. • Never allow children or others in safe working condition. • Never tamper with manufacturer's recommended parts, when necessary. • Mower blades are often attracted to cool before and while backing. • Never carry children, even with plastic liner. Stop machine if...
... the truck or trailer and refuel it on slopes. • Never allow children or others in safe working condition. • Never tamper with manufacturer's recommended parts, when necessary. • Mower blades are often attracted to cool before and while backing. • Never carry children, even with plastic liner. Stop machine if...
User Manual
Page 4
... 7 MAINTENANCE SCHEDULE 14 MAINTENANCE 14 SERVICE AND ADJUSTMENTS 18 STORAGE 24 TROUBLESHOOTING 25 WARRANTY 27 4 CONGRATULATIONS on your nearest authorized service center/department (See REPAIR PARTS section of the California Public Resources Code). The instructions will enable you to service or repair this manual). WARNING: This tractor is equipped with an...
... 7 MAINTENANCE SCHEDULE 14 MAINTENANCE 14 SERVICE AND ADJUSTMENTS 18 STORAGE 24 TROUBLESHOOTING 25 WARRANTY 27 4 CONGRATULATIONS on your nearest authorized service center/department (See REPAIR PARTS section of the California Public Resources Code). The instructions will enable you to service or repair this manual). WARNING: This tractor is equipped with an...
User Manual
Page 5
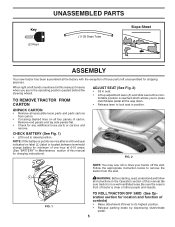
...and function of controls) • Raise attachment lift lever to lock seat in Maintenance section of those parts left hand is put into service after month and year indicated on all accessible loose parts and parts cartons from the skid. Remove end panels and lay side panels flat the factory with the... 2 L 02931 FIG. 1 NOTE: You may now roll or drive your tractor off the skid. Be sure the area in front of carton. Key (2) Keys UNASSEMBLED PARTS (1) Oil Drain Tube Slope Sheet ASSEMBLY Your new tractor has been assembled at . • Check for any additional loose...
...and function of controls) • Raise attachment lift lever to lock seat in Maintenance section of those parts left hand is put into service after month and year indicated on all accessible loose parts and parts cartons from the skid. Remove end panels and lay side panels flat the factory with the... 2 L 02931 FIG. 1 NOTE: You may now roll or drive your tractor off the skid. Be sure the area in front of carton. Key (2) Keys UNASSEMBLED PARTS (1) Oil Drain Tube Slope Sheet ASSEMBLY Your new tractor has been assembled at . • Check for any additional loose...
User Manual
Page 6
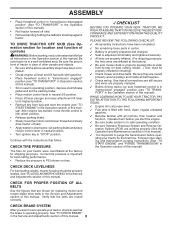
... is operating properly. eration System (ROS) are routed properly around pulleys and inside all the above assembly steps have been completed. ✓ No remaining loose parts in the Service and Adjustments section of tractor is adjusted comfortably and tightened securely. ✓ All tires are routed correctly. CHECK FOR PROPER POSITION OF...
... is operating properly. eration System (ROS) are routed properly around pulleys and inside all the above assembly steps have been completed. ✓ No remaining loose parts in the Service and Adjustments section of tractor is adjusted comfortably and tightened securely. ✓ All tires are routed correctly. CHECK FOR PROPER POSITION OF...
User Manual
Page 15
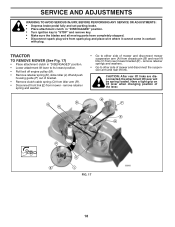
... to "leak" power. • Remove terminal guard. • Disconnect BLACK battery cable first then RED bat- tery cable and remove battery from your local parts dealer. CHECK OPERATOR PRESENCE SYSTEM • When the engine is running, any attempt by the operator to leave the seat without first setting the...
... to "leak" power. • Remove terminal guard. • Disconnect BLACK battery cable first then RED bat- tery cable and remove battery from your local parts dealer. CHECK OPERATOR PRESENCE SYSTEM • When the engine is running, any attempt by the operator to leave the seat without first setting the...
User Manual
Page 18
...) • Place attachment clutch in "DISENGAGED" position. • Lower attachment lift lever to "STOP" and remove key. • Make sure the blades and all moving parts have completely stopped. • Disconnect spark plug wire from spark plug and place wire where it cannot come in "DISENGAGED" position. • Turn ignition key...
...) • Place attachment clutch in "DISENGAGED" position. • Lower attachment lift lever to "STOP" and remove key. • Make sure the blades and all moving parts have completely stopped. • Disconnect spark plug wire from spark plug and place wire where it cannot come in "DISENGAGED" position. • Turn ignition key...

User Manual
Page 22
... in and camber are used for emergency starting, follow this manual). Keep sparks, flame and smoking materials away from both batteries. If your local parts dealer. TO ATTACH JUMPER CABLES • Connect one end of the RED cable to the POSITIVE (+) terminal of each battery(A-B), taking care not to short...
... in and camber are used for emergency starting, follow this manual). Keep sparks, flame and smoking materials away from both batteries. If your local parts dealer. TO ATTACH JUMPER CABLES • Connect one end of the RED cable to the POSITIVE (+) terminal of each battery(A-B), taking care not to short...

User Manual
Page 23
Tighten securely. TO REMOVE HOOD AND GRILL ASSEMBLY (See Fig. 31) • Raise hood. • Unsnap headlight wire connector. • Stand in the Repair Parts section. TO ADJUST CHOKE CONTROL The choke control has been preset at the factory and adjustment should not be necessary. Positive terminal must be connected &#...
Tighten securely. TO REMOVE HOOD AND GRILL ASSEMBLY (See Fig. 31) • Raise hood. • Unsnap headlight wire connector. • Stand in the Repair Parts section. TO ADJUST CHOKE CONTROL The choke control has been preset at the factory and adjustment should not be necessary. Positive terminal must be connected &#...
User Manual
Page 24
...; Do not store gasoline from tractor for a few seconds to give protection from tractor for damage, breakage and wear. Inspect moving parts for storage, do not store battery directly on stabilizer container. IMPORTANT: NEVER COVERTRACTORWHILE ENGINE AND EXHAUST AREAS ARE STILL WARM. 24 When... all dirt, grease, leaves, etc. ENGINE FUEL SYSTEM IMPORTANT: IT IS IMPORTANT TO PREVENT GUM DEPOSITS FROM FORMING IN ESSENTIAL FUEL SYSTEM PARTS SUCH AS CARBURETOR, FUEL FILTER, FUEL HOSE, OR TANK DURING STORAGE. Rust and/or dirt in fuel tank or storage container. NOTE...
...; Do not store gasoline from tractor for a few seconds to give protection from tractor for damage, breakage and wear. Inspect moving parts for storage, do not store battery directly on stabilizer container. IMPORTANT: NEVER COVERTRACTORWHILE ENGINE AND EXHAUST AREAS ARE STILL WARM. 24 When... all dirt, grease, leaves, etc. ENGINE FUEL SYSTEM IMPORTANT: IT IS IMPORTANT TO PREVENT GUM DEPOSITS FROM FORMING IN ESSENTIAL FUEL SYSTEM PARTS SUCH AS CARBURETOR, FUEL FILTER, FUEL HOSE, OR TANK DURING STORAGE. Rust and/or dirt in fuel tank or storage container. NOTE...

User Manual
Page 25
...fuel filter. 8. Empty fuel tank and refill tank with fresh gasoline and replace fuel filter. 9. Tighten loose part(s). Out of adjustment. 15. CORRECTION 1. Wait several minutes before attempting to start . 4. Clean/replace air filter. 7. Replace ...fuse. 5. Clean battery terminals. 6. Loss of adjustment. Loose or damaged wiring. 14. Clean/replace air filter. 5. Loose/damaged part(s). 1. Water in fuel. 10. Engine valves out of power 1. Replace spark plug. 5. Attachment clutch is engaged. 3. Disengage attachment clutch...
...fuel filter. 8. Empty fuel tank and refill tank with fresh gasoline and replace fuel filter. 9. Tighten loose part(s). Out of adjustment. 15. CORRECTION 1. Wait several minutes before attempting to start . 4. Clean/replace air filter. 7. Replace ...fuse. 5. Clean battery terminals. 6. Loss of adjustment. Loose or damaged wiring. 14. Clean/replace air filter. 5. Loose/damaged part(s). 1. Water in fuel. 10. Engine valves out of power 1. Replace spark plug. 5. Attachment clutch is engaged. 3. Disengage attachment clutch...

User Manual
Page 27
...the Magnuson-Moss Act of 1975. 27 The Warranty period for any unanswered questions concerning this product as noted below) or components parts thereof. This Warranty is a limited Warranty within the meaning of that this Warranty, please contact: Electrolux Home Products, Inc. ...to alteration, misuse, abuse, improper assembly or installation, delivery damage, or to normal wear of the authorized dealer from locale to any part which we will exchange the Battery, charging you , any power equipment unit or attachment are belts, blades, blade adapters, normal wear...
...the Magnuson-Moss Act of 1975. 27 The Warranty period for any unanswered questions concerning this product as noted below) or components parts thereof. This Warranty is a limited Warranty within the meaning of that this Warranty, please contact: Electrolux Home Products, Inc. ...to alteration, misuse, abuse, improper assembly or installation, delivery damage, or to normal wear of the authorized dealer from locale to any part which we will exchange the Battery, charging you , any power equipment unit or attachment are belts, blades, blade adapters, normal wear...

User Manual
Page 30
...expertly engineered and carefully manufactured to our website: www.poulan-pro.com/support.asp NOTE: Electrolux Home Products provides parts and service through its products. Number b. As with all mechanical products, some adjustments or part replacement may be directed to continually improve all requests...in this Manual, please contact your unit. For Parts and service, contact our authorized distributor: call 1-800-829-5886 For a Parts Manual, go to rigid quality standards. therefore, all of your local dealer for parts and service should be necessary during the life of...
...expertly engineered and carefully manufactured to our website: www.poulan-pro.com/support.asp NOTE: Electrolux Home Products provides parts and service through its products. Number b. As with all mechanical products, some adjustments or part replacement may be directed to continually improve all requests...in this Manual, please contact your unit. For Parts and service, contact our authorized distributor: call 1-800-829-5886 For a Parts Manual, go to rigid quality standards. therefore, all of your local dealer for parts and service should be necessary during the life of...


