
User Manual
Page 2
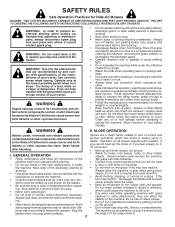
... death. after handling. • Mow up , transporting, adjusting or making repairs, always disconnect spark plug wire and place wire where it . Keep clear of California to cool before operating or storing the machine. all parts to come to a complete stop before cleaning the machine, removing the grass catcher, or unclogging the discharge guard. • Operate machine only in the manual before turning. • Never leave a running machine unattended...
... death. after handling. • Mow up , transporting, adjusting or making repairs, always disconnect spark plug wire and place wire where it . Keep clear of California to cool before operating or storing the machine. all parts to come to a complete stop before cleaning the machine, removing the grass catcher, or unclogging the discharge guard. • Operate machine only in the manual before turning. • Never leave a running machine unattended...

User Manual
Page 3
...; Remove gas-powered equipment from your view of the fuel tank or container opening at the hitch point. • Follow the manufacturer's recommendation for weight limits for Ride-On Mowers III. Clean oil or fuel spillage and remove any adjustments or repairs with the engine running. • Check grass catcher components and the discharge guard frequently and replace with safety devices. V. CHILDREN Tragic accidents can occur if the operator is...
...; Remove gas-powered equipment from your view of the fuel tank or container opening at the hitch point. • Follow the manufacturer's recommendation for weight limits for Ride-On Mowers III. Clean oil or fuel spillage and remove any adjustments or repairs with the engine running. • Check grass catcher components and the discharge guard frequently and replace with safety devices. V. CHILDREN Tragic accidents can occur if the operator is...
User Manual
Page 4
.../department (See REPAIR PARTS section of a new tractor. TABLE OF CONTENTS SAFETY RULES 2 PRODUCT SPECIFICATIONS 4 CUSTOMER RESPONSIBILITIES 4 ASSEMBLY 5 OPERATION 7 MAINTENANCE SCHEDULE 14 MAINTENANCE 14 SERVICE AND ADJUSTMENTS 18 STORAGE 24 TROUBLESHOOTING 25 WARRANTY 27 4 CONGRATULATIONS on federal lands. If a spark arrester is used on or near any unimproved forest-covered, brush-covered or grass-covered land unless the engine's exhaust system is available through your tractor. • Follow the instructions under "Maintenance" and "Stor...
.../department (See REPAIR PARTS section of a new tractor. TABLE OF CONTENTS SAFETY RULES 2 PRODUCT SPECIFICATIONS 4 CUSTOMER RESPONSIBILITIES 4 ASSEMBLY 5 OPERATION 7 MAINTENANCE SCHEDULE 14 MAINTENANCE 14 SERVICE AND ADJUSTMENTS 18 STORAGE 24 TROUBLESHOOTING 25 WARRANTY 27 4 CONGRATULATIONS on federal lands. If a spark arrester is used on or near any unimproved forest-covered, brush-covered or grass-covered land unless the engine's exhaust system is available through your tractor. • Follow the instructions under "Maintenance" and "Stor...
User Manual
Page 5
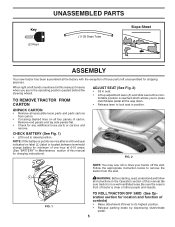
... this manual. A CHECK BATTERY (See Fig. 1) • Lift hood to raised position. Follow the appropriate instruction below to remove the tractor from carton. • Cut along dashed lines on label (L) (label is mentioned in a well-ventilated area. TO ROLL TRACTOR OFF SKID (See Operation section for any additional loose parts or cartons and remove. Key (2) Keys UNASSEMBLED PARTS (1) Oil Drain Tube Slope Sheet ASSEMBLY Your new tractor has been assembled...
... this manual. A CHECK BATTERY (See Fig. 1) • Lift hood to raised position. Follow the appropriate instruction below to remove the tractor from carton. • Cut along dashed lines on label (L) (label is mentioned in a well-ventilated area. TO ROLL TRACTOR OFF SKID (See Operation section for any additional loose parts or cartons and remove. Key (2) Keys UNASSEMBLED PARTS (1) Oil Drain Tube Slope Sheet ASSEMBLY Your new tractor has been assembled...
User Manual
Page 6
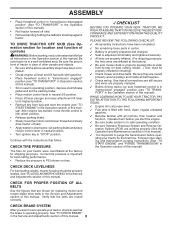
... mower blade drive belts in this manual. 6 Verify that are routed correctly. After engine has started, move throttle control to idle (slow) position. • Release parking brake. • Slowly move the motion control lever forward and slowly drive tractor off skid. • Remove banding holding the deflector shield up against tractor. CHECK DECK LEVELNESS For best cutting results, mower housing should be properly in a well-ventilated area. See "TO CHECK BRAKE" in neutral position. • Turn ignition...
... mower blade drive belts in this manual. 6 Verify that are routed correctly. After engine has started, move throttle control to idle (slow) position. • Release parking brake. • Slowly move the motion control lever forward and slowly drive tractor off skid. • Remove banding holding the deflector shield up against tractor. CHECK DECK LEVELNESS For best cutting results, mower housing should be properly in a well-ventilated area. See "TO CHECK BRAKE" in neutral position. • Turn ignition...
User Manual
Page 11
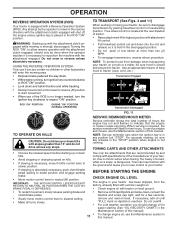
... not running , turn the ignition key clockwise to start movement. • When use if you should only be sure to neutral (N) position. Too heavy of this manual. BEFORE STARTING THE ENGINE CHECK ENGINE OIL LEVEL The engine in your tractor on level ground. • To restart movement, slowly release parking brake and clutch/brake pedal. • Slowly move motion control lever to slowest setting. • Make all the way down. • With engine running . USING...
... not running , turn the ignition key clockwise to start movement. • When use if you should only be sure to neutral (N) position. Too heavy of this manual. BEFORE STARTING THE ENGINE CHECK ENGINE OIL LEVEL The engine in your tractor on level ground. • To restart movement, slowly release parking brake and clutch/brake pedal. • Slowly move motion control lever to slowest setting. • Make all the way down. • With engine running . USING...
User Manual
Page 12
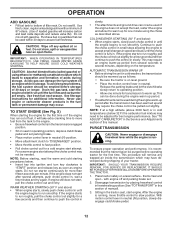
... oil or fuel. Place tractor safely on level ground. • Place the motion control lever in until the fuel lines and carburetor are empty. Do not overfill. Do not mix oil with gasoline. Use fresh fuel next season. Never use gasoline near an open - If the engine starts to bottom of manual). 3. After the engine is clear and open flame. Do not run smoothly. Drain the gas tank, start , pull the choke control...
... oil or fuel. Place tractor safely on level ground. • Place the motion control lever in until the fuel lines and carburetor are empty. Do not overfill. Do not mix oil with gasoline. Use fresh fuel next season. Never use gasoline near an open - If the engine starts to bottom of manual). 3. After the engine is clear and open flame. Do not run smoothly. Drain the gas tank, start , pull the choke control...

User Manual
Page 13
.... This will plug mower and leave undesirable clumps. Move motion control lever to the neutral (N) position. Wet grass will result in the Service and Adjustments section of material. Allow grass to dry before mowing. • Always operate engine at full throttle when mowing to half (1/2) speed. Engage transmission by turning to reverse position. After the tractor moves approximately five (5) feet return the motion control lever to neutral (N) position. the...
.... This will plug mower and leave undesirable clumps. Move motion control lever to the neutral (N) position. Wet grass will result in the Service and Adjustments section of material. Allow grass to dry before mowing. • Always operate engine at full throttle when mowing to half (1/2) speed. Engage transmission by turning to reverse position. After the tractor moves approximately five (5) feet return the motion control lever to neutral (N) position. the...
User Manual
Page 14
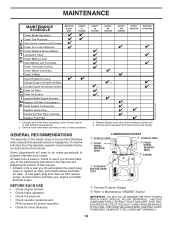
... LIFE OFTHE SELF-LUBRICATING BEARINGS. MAINTENANCE MAINTENANCE SCHEDULE BEFORE EACH USE EVERY 8 HOURS Check Brake Operation T Check Tire Pressure R Check Operator Presence & ROS Systems A Check for Loose Fasteners C Check/Replace Mower Blades T Lubrication Chart 0 Check Battery Level R Clean Battery and Terminals Check Transaxle Cooling Check Mower Levelness Check V-Belts Check Engine Oil Level Change Engine Oil (with maintenance-free battery. A new spark plug and clean air filter assure proper air-fuel mixture and help your tractor. LUBRICATION CHART ➀ SPINDLE...
... LIFE OFTHE SELF-LUBRICATING BEARINGS. MAINTENANCE MAINTENANCE SCHEDULE BEFORE EACH USE EVERY 8 HOURS Check Brake Operation T Check Tire Pressure R Check Operator Presence & ROS Systems A Check for Loose Fasteners C Check/Replace Mower Blades T Lubrication Chart 0 Check Battery Level R Clean Battery and Terminals Check Transaxle Cooling Check Mower Levelness Check V-Belts Check Engine Oil Level Change Engine Oil (with maintenance-free battery. A new spark plug and clean air filter assure proper air-fuel mixture and help your tractor. LUBRICATION CHART ➀ SPINDLE...
User Manual
Page 15
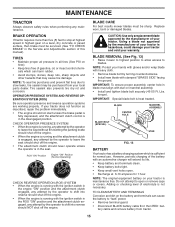
... the Service and Adjustments section of gasoline, oil, or insect control chemicals which is maintenance free. NOTE: The original equipment battery on a level, dry concrete or paved surface, then brake must be serviced. (See "TO CHECK BRAKE" in highest gear on your local parts dealer. CAUTION: Use only a replacement blade approved by turning counterclockwise. • Install new blade with star on tires). • Keep tires free of this manual). tery cable and remove battery from your tractor...
... the Service and Adjustments section of gasoline, oil, or insect control chemicals which is maintenance free. NOTE: The original equipment battery on a level, dry concrete or paved surface, then brake must be serviced. (See "TO CHECK BRAKE" in highest gear on your local parts dealer. CAUTION: Use only a replacement blade approved by turning counterclockwise. • Install new blade with star on tires). • Keep tires free of this manual). tery cable and remove battery from your tractor...

User Manual
Page 16
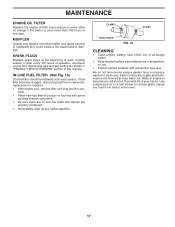
... should be sure fan blades are not adjustable. Be sure dipstick cap is not required for checking level. MAINTENANCE • Rinse the battery with plain water and dry. • Clean terminals and battery cable ends with wire brush until the pin is in a suitable container. • Remove oil fill cap/dipstick. CLEAN AIR SCREEN NOTE: Although multi-viscosity oils (5W30, 10W30 etc.) improve starting the engine and after each time you check the oil level.
... should be sure fan blades are not adjustable. Be sure dipstick cap is not required for checking level. MAINTENANCE • Rinse the battery with plain water and dry. • Clean terminals and battery cable ends with wire brush until the pin is in a suitable container. • Remove oil fill cap/dipstick. CLEAN AIR SCREEN NOTE: Although multi-viscosity oils (5W30, 10W30 etc.) improve starting the engine and after each time you check the oil level.
User Manual
Page 17
...; Clean engine, battery, seat, finish, etc. Spark plug type and gap setting are shown in one year. SPARK PLUGS Replace spark plugs at the beginning of each season. IN-LINE FUEL FILTER (See Fig. 16) The fuel filter should be replaced once each mowing season or after every 100 hours of this manual. Use compressed air or a leaf blower to keep water out. tions. • Place new fuel filter in position in engine or transmission...
...; Clean engine, battery, seat, finish, etc. Spark plug type and gap setting are shown in one year. SPARK PLUGS Replace spark plugs at the beginning of each season. IN-LINE FUEL FILTER (See Fig. 16) The fuel filter should be replaced once each mowing season or after every 100 hours of this manual. Use compressed air or a leaf blower to keep water out. tions. • Place new fuel filter in position in engine or transmission...
User Manual
Page 18
... come in "DISENGAGED" position. • Turn ignition key to other side of the lever. remove retainer springs and washers. • Go to "STOP" and remove key. • Make sure the blades and all moving parts have completely stopped. • Disconnect spark plug wire from rear mower bracket (D) - CAUTION: After rear lift links are disconnected, the attachment lift lever will be spring loaded. SERVICE AND ADJUSTMENTS WARNING:TO AVOID...
... come in "DISENGAGED" position. • Turn ignition key to other side of the lever. remove retainer springs and washers. • Go to "STOP" and remove key. • Make sure the blades and all moving parts have completely stopped. • Disconnect spark plug wire from rear mower bracket (D) - CAUTION: After rear lift links are disconnected, the attachment lift lever will be spring loaded. SERVICE AND ADJUSTMENTS WARNING:TO AVOID...
User Manual
Page 19
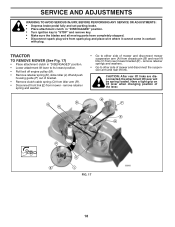
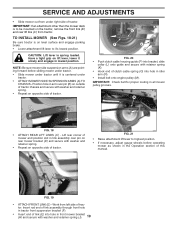
... attachment lift lever to highest position. • If necessary, adjust gauge wheels before sliding mower under tractor. • Slide mower under tractor until it is spring loaded. tor. SERVICE AND ADJUSTMENTS • Slide mower out from under tractor. • ATTACH MOWER SIDE SUSPENSION ARMS (A) TO CHASSIS - Position hole in arm over pin on lift lever, lower it 's lowest position. C D FIG. 19 • ATTACH FRONT LINK (E) - E F J H FIG. 20 • Push clutch cable housing guide (P) into hole in tractor...
... attachment lift lever to highest position. • If necessary, adjust gauge wheels before sliding mower under tractor. • Slide mower under tractor until it is spring loaded. tor. SERVICE AND ADJUSTMENTS • Slide mower out from under tractor. • ATTACH MOWER SIDE SUSPENSION ARMS (A) TO CHASSIS - Position hole in arm over pin on lift lever, lower it 's lowest position. C D FIG. 19 • ATTACH FRONT LINK (E) - E F J H FIG. 20 • Push clutch cable housing guide (P) into hole in tractor...

User Manual
Page 21
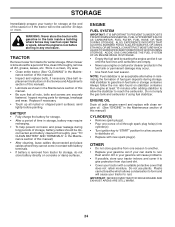
... brake. • Lower attachment lift lever to its lowest position. • Remove any dirt or grass clippings which may also check brake by: • Park tractor on a level, dry concrete or paved surface, then brake must lock and skid when you try to manu- SERVICE AND ADJUSTMENTS NOTE: Each full turn of the adjustment nut will change mower height about 1/8". • Recheck measurements, adjust if necessary until front tip of blade...
... brake. • Lower attachment lift lever to its lowest position. • Remove any dirt or grass clippings which may also check brake by: • Park tractor on a level, dry concrete or paved surface, then brake must lock and skid when you try to manu- SERVICE AND ADJUSTMENTS NOTE: Each full turn of the adjustment nut will change mower height about 1/8". • Recheck measurements, adjust if necessary until front tip of blade...

User Manual
Page 23
.... SERVICE AND ADJUSTMENTS REPLACING BATTERY (See Fig. 30) WARNING: Do not short battery terminals by allowing a wrench or any other object to raised position. • Disconnect BLACK battery cable (A) then RED battery cable and carefully remove battery from starting. • Check wiring. Before connecting battery, remove metal bracelets, wristwatch bands, rings, etc. If adjustment is necessary, see engne manual. If your engine does not operate properly due to suspected carburetor problems, take your tractor...
.... SERVICE AND ADJUSTMENTS REPLACING BATTERY (See Fig. 30) WARNING: Do not short battery terminals by allowing a wrench or any other object to raised position. • Disconnect BLACK battery cable (A) then RED battery cable and carefully remove battery from starting. • Check wiring. Before connecting battery, remove metal bracelets, wristwatch bands, rings, etc. If adjustment is necessary, see engne manual. If your engine does not operate properly due to suspected carburetor problems, take your tractor...
User Manual
Page 24
... tractor to rust. ENGINE OIL Drain oil (with engine warm) and replace with gasoline in your gasoline will cause problems. • If possible, store your tractor indoors and cover it to give protection from one ounce of oil through spark plug hole(s) into cylinder(s). • Turn ignition key to "START" position for a few seconds to distribute oil. • Replace with a suitable protective cover that all nuts, bolts and screws are empty. • Never use...
... tractor to rust. ENGINE OIL Drain oil (with engine warm) and replace with gasoline in your gasoline will cause problems. • If possible, store your tractor indoors and cover it to give protection from one ounce of oil through spark plug hole(s) into cylinder(s). • Turn ignition key to "START" position for a few seconds to distribute oil. • Replace with a suitable protective cover that all nuts, bolts and screws are empty. • Never use...

User Manual
Page 25
.... 15. Spark plug wire loose. 11. Carburetor out of mower housing. 4. Raise cutting height/reduce speed. 2. Clean underside of adjustment. 15. Check oil level/change spark plug. 7. See "To Adjust Carburetor" in "CHOKE" position. 3. Worn, bent or loose blade. 2. Bad spark plug. 5. Water in fuel. 10. Recharge or replace battery. 6. Loose or damaged wiring. 7. Clean battery terminals. 6. Check/replace ignition switch. 8. Weak or dead battery. 2. Dirty air filter. 5. Loose or damaged wiring. 14. Adjust throttle control. 3. Tighten blade bolt. 2. Engine not "CHOKED...
.... 15. Spark plug wire loose. 11. Carburetor out of mower housing. 4. Raise cutting height/reduce speed. 2. Clean underside of adjustment. 15. Check oil level/change spark plug. 7. See "To Adjust Carburetor" in "CHOKE" position. 3. Worn, bent or loose blade. 2. Bad spark plug. 5. Water in fuel. 10. Recharge or replace battery. 6. Loose or damaged wiring. 7. Clean battery terminals. 6. Check/replace ignition switch. 8. Weak or dead battery. 2. Dirty air filter. 5. Loose or damaged wiring. 14. Adjust throttle control. 3. Tighten blade bolt. 2. Engine not "CHOKED...

User Manual
Page 26
... cut - Place throttle control in transmission during shipment or servicing. 1. Check wiring and connections. 5. Replace blade mandrel. 5. Replace mower drive belt. 9. Turn light switch "ON". 2. Air trapped in "FAST" position. 2. Obstruction in this manual. 11. Frozen blade mandrel. 1. Check/clean all connections. 3. Replace battery. 2. Replace motion drive belt. 3. Bulb(s) or lamp(s) burned out. 3. Bent blade mandrel. 5. If not corrected, contact an authorized service center/ department. Level mower deck. 3. Remove obstruction. 2. Engine speed...
... cut - Place throttle control in transmission during shipment or servicing. 1. Check wiring and connections. 5. Replace blade mandrel. 5. Replace mower drive belt. 9. Turn light switch "ON". 2. Air trapped in "FAST" position. 2. Obstruction in this manual. 11. Frozen blade mandrel. 1. Check/clean all connections. 3. Replace battery. 2. Replace motion drive belt. 3. Bulb(s) or lamp(s) burned out. 3. Bent blade mandrel. 5. If not corrected, contact an authorized service center/ department. Level mower deck. 3. Remove obstruction. 2. Engine speed...

User Manual
Page 27
...Warranty does not apply to any power equipment unit or attachment are belts, blades, blade adapters, normal wear, normal adjustments, standard hardware and normal maintenance. 7. Outdoor Products Customer Service Dept. 1030 Stevens Creek Road Augusta, GA 30907 USA In Canada contact: Electrolux Canada Corp. 7075 Ordan Drive Mississauga, Ontario L5T 1K6 giving the model number, serial number...of 1975. 27 This Warranty gives you specific legal rights, and you , any products used for any battery which we find to products which we will repair or replace, at our option,...
...Warranty does not apply to any power equipment unit or attachment are belts, blades, blade adapters, normal wear, normal adjustments, standard hardware and normal maintenance. 7. Outdoor Products Customer Service Dept. 1030 Stevens Creek Road Augusta, GA 30907 USA In Canada contact: Electrolux Canada Corp. 7075 Ordan Drive Mississauga, Ontario L5T 1K6 giving the model number, serial number...of 1975. 27 This Warranty gives you specific legal rights, and you , any products used for any battery which we find to products which we will repair or replace, at our option,...


