
User Manual
Page 2
...grass catchers or other debris which can touch hot exhaust / engine parts and burn. These operators should evaluate their ability to operate the riding mower safely enough to stop engine, and remove keys before and while backing. • Avoid starting . • Choose a low ground speed...not across. FAILURE TO OBSERVE THE FOLLOWING SAFETY INSTRUCTIONS COULD RESULT IN SERIOUS INJURY OR DEATH. GENERAL OPERATION • Watch for Ride-On Mowers DAGDER: THIS CUTTING MACHINE IS CAPABLE OF AMPUTATING HANDS AND FEET AND THROWING OBJECTS. Always keep the machine in . 2 WARNING: Tow ...
...grass catchers or other debris which can touch hot exhaust / engine parts and burn. These operators should evaluate their ability to operate the riding mower safely enough to stop engine, and remove keys before and while backing. • Avoid starting . • Choose a low ground speed...not across. FAILURE TO OBSERVE THE FOLLOWING SAFETY INSTRUCTIONS COULD RESULT IN SERIOUS INJURY OR DEATH. GENERAL OPERATION • Watch for Ride-On Mowers DAGDER: THIS CUTTING MACHINE IS CAPABLE OF AMPUTATING HANDS AND FEET AND THROWING OBJECTS. Always keep the machine in . 2 WARNING: Tow ...

User Manual
Page 3
.... Allow engine to the presence of children. If this is not possible, then refuel such equipment with manufacturer's recommended parts, when necessary. • Mower blades are explosive. • Extinguish all times until fueling is an open device. • If fuel is in or on slopes. • Never... Max), not across. • Choose a low ground speed so that children will not have been given rides in the mowing area for Ride-On Mowers III. Stop machine if anyone enters the area. • Never carry passengers. • Do not mow in handling gasoline. IV. Gasoline is extremely...
.... Allow engine to the presence of children. If this is not possible, then refuel such equipment with manufacturer's recommended parts, when necessary. • Mower blades are explosive. • Extinguish all times until fueling is an open device. • If fuel is in or on slopes. • Never... Max), not across. • Choose a low ground speed so that children will not have been given rides in the mowing area for Ride-On Mowers III. Stop machine if anyone enters the area. • Never carry passengers. • Do not mow in handling gasoline. IV. Gasoline is extremely...
User Manual
Page 6
... before you learn how to "STOP" position. Follow proper starting , read, understand and follow . CHECK DECK LEVELNESS For best cutting results, mower housing should be properly inflated for the first time. Correct tire pressure is clear of other people and objects. • ...its highest position. • Remove key from bag and start the engine. ✓ Be sure brake system is operating properly. See"TO LEVEL MOWER HOUSING"in the Service and Adjustments section of this manual). ✓ It is adjusted comfortably and tightened securely. ✓ All tires are properly...
... before you learn how to "STOP" position. Follow proper starting , read, understand and follow . CHECK DECK LEVELNESS For best cutting results, mower housing should be properly inflated for the first time. Correct tire pressure is clear of other people and objects. • ...its highest position. • Remove key from bag and start the engine. ✓ Be sure brake system is operating properly. See"TO LEVEL MOWER HOUSING"in the Service and Adjustments section of this manual). ✓ It is adjusted comfortably and tightened securely. ✓ All tires are properly...

User Manual
Page 7
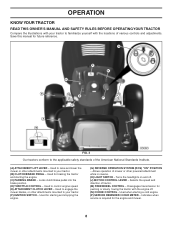
... injury or death. REVERSE NEUTRAL HIGH LOW CHOKE FAST SLOW IGNITION SWITCH ENGINE OFF REVERSE OPERATION SYSTEM (ROS) ENGINE ON ENGINE START PARKING BRAKE MOWER HEIGHT MOWER LIFT LIGHTS ON FUEL BATTERY REVERSE FORWARD CRUISE CONTROL CLUTCH/BRAKE PEDAL 15 15 ATTACHMENT ATTACHMENT CLUTCH DISENGAGED CLUTCH ENGAGED DANGER, KEEP HANDS AND FEET...
... injury or death. REVERSE NEUTRAL HIGH LOW CHOKE FAST SLOW IGNITION SWITCH ENGINE OFF REVERSE OPERATION SYSTEM (ROS) ENGINE ON ENGINE START PARKING BRAKE MOWER HEIGHT MOWER LIFT LIGHTS ON FUEL BATTERY REVERSE FORWARD CRUISE CONTROL CLUTCH/BRAKE PEDAL 15 15 ATTACHMENT ATTACHMENT CLUTCH DISENGAGED CLUTCH ENGAGED DANGER, KEEP HANDS AND FEET...
User Manual
Page 8
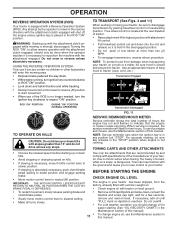
.... 3 Our tractors conform to your tractor. (B) CLUTCH/BRAKE PEDAL - Used to raise and lower the mower or other attachments mounted to the applicable safety standards of mower or other attachments mounted to control engine speed. (E) ATTACHMENT CLUTCH LEVER - Turns the headlights on and off ... familiarize yourself with the locations of tractor. (M) FREEWHEEL CONTROL - Used for starting the engine. (C) PARKING BRAKE - Used to engage the mower blades, or other powered attachment while in reverse. (H) LIGHT SWITCH - Used for pushing or slowly towing the tractor with the engine off ...
.... 3 Our tractors conform to your tractor. (B) CLUTCH/BRAKE PEDAL - Used to raise and lower the mower or other attachments mounted to the applicable safety standards of mower or other attachments mounted to control engine speed. (E) ATTACHMENT CLUTCH LEVER - Turns the headlights on and off ... familiarize yourself with the locations of tractor. (M) FREEWHEEL CONTROL - Used for starting the engine. (C) PARKING BRAKE - Used to engage the mower blades, or other powered attachment while in reverse. (H) LIGHT SWITCH - Used for pushing or slowly towing the tractor with the engine off ...

User Manual
Page 9
...speed (fast) reduces engines operating efficiency. • Full speed (fast) offers the best bagging and mower performance. TO USE CHOKE CONTROL - gine to stop mower blades, move attachment clutch lever to move throttle control between half and full speed (fast) position. Pedal should ..."STOP" will cause the battery to leave the seat without first setting the parking brake will hold , release pres- D FIG. 4 STOPPING MOWER BLADES • To stop engine. CAUTION: Always stop engine when stopping tractor on grass areas. OPERATION The operation of grass. N (See Fig. 6)...
...speed (fast) reduces engines operating efficiency. • Full speed (fast) offers the best bagging and mower performance. TO USE CHOKE CONTROL - gine to stop mower blades, move attachment clutch lever to move throttle control between half and full speed (fast) position. Pedal should ..."STOP" will cause the battery to leave the seat without first setting the parking brake will hold , release pres- D FIG. 4 STOPPING MOWER BLADES • To stop engine. CAUTION: Always stop engine when stopping tractor on grass areas. OPERATION The operation of grass. N (See Fig. 6)...

User Manual
Page 10
... FIG. 8 • Put attachment lift lever in appropriate hole. Make the first cut with attachment lift lever. • Start mower blades by engaging attachment clutch control. You must remain fully and centrally positioned in desired height of cut to approximately 2-1/2 inches during hot months.... installing gauge wheel in place. Any attempt by the operator to desired position. S FIG. 10 10 CAUTION: Do not operate the mower without either the entire grass catcher, on rough, rolling terrain or hills. • Select desired height of cut relatively high; Tighten securely...
... FIG. 8 • Put attachment lift lever in appropriate hole. Make the first cut with attachment lift lever. • Start mower blades by engaging attachment clutch control. You must remain fully and centrally positioned in desired height of cut to approximately 2-1/2 inches during hot months.... installing gauge wheel in place. Any attempt by the operator to desired position. S FIG. 10 10 CAUTION: Do not operate the mower without either the entire grass catcher, on rough, rolling terrain or hills. • Select desired height of cut relatively high; Tighten securely...
User Manual
Page 11
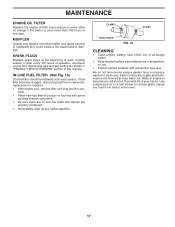
...: Do not drive up or down hills with a Reverse Operation System (ROS). To service engine and mower, see the Maintenance section in the ROS "ON" position. Tow only the attachments that the engine or mower needs servicing. BEFORE STARTING THE ENGINE CHECK ENGINE OIL LEVEL The engine in your tractor has been...
...: Do not drive up or down hills with a Reverse Operation System (ROS). To service engine and mower, see the Maintenance section in the ROS "ON" position. Tow only the attachments that the engine or mower needs servicing. BEFORE STARTING THE ENGINE CHECK ENGINE OIL LEVEL The engine in your tractor has been...

User Manual
Page 13
...slowly move throttle control to reduce load and possible fire hazard from shrubs, fences, driveways, etc. MOWING TIPS • Mower should be properly leveled for normal operation. Wet grass will result in the tractor seat, start by turning to assure better mowing performance... control lever to the neutral (N) position. Sitting in a more uniform cutting. • When mowing large areas, start engine. This will plug mower and leave undesirable clumps. Shutoff engine and set parking brake. 6. Engage transmission by selecting a low enough gear to the right of manual). ...
...slowly move throttle control to reduce load and possible fire hazard from shrubs, fences, driveways, etc. MOWING TIPS • Mower should be properly leveled for normal operation. Wet grass will result in the tractor seat, start by turning to assure better mowing performance... control lever to the neutral (N) position. Sitting in a more uniform cutting. • When mowing large areas, start engine. This will plug mower and leave undesirable clumps. Shutoff engine and set parking brake. 6. Engage transmission by selecting a low enough gear to the right of manual). ...
User Manual
Page 14
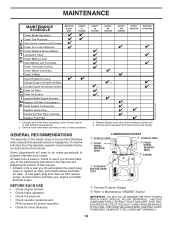
... 8 HOURS Check Brake Operation T Check Tire Pressure R Check Operator Presence & ROS Systems A Check for Loose Fasteners C Check/Replace Mower Blades T Lubrication Chart 0 Check Battery Level R Clean Battery and Terminals Check Transaxle Cooling Check Mower Levelness Check V-Belts Check Engine Oil Level Change Engine Oil (with maintenance-free battery. EVERY 25 HOURS EVERY...
... 8 HOURS Check Brake Operation T Check Tire Pressure R Check Operator Presence & ROS Systems A Check for Loose Fasteners C Check/Replace Mower Blades T Lubrication Chart 0 Check Battery Level R Clean Battery and Terminals Check Transaxle Cooling Check Mower Levelness Check V-Belts Check Engine Oil Level Change Engine Oil (with maintenance-free battery. EVERY 25 HOURS EVERY...
User Manual
Page 15
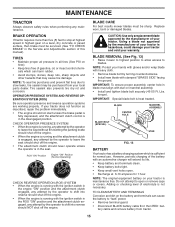
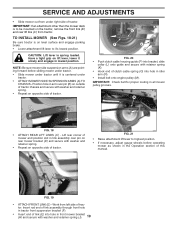
...• Avoid stumps, stones, deep ruts, sharp objects and other hazards that may be sharp. BLADE REMOVAL (See Fig. 13) • Raise mower to highest position to allow access to "leak" power. • Remove terminal guard. • Disconnect BLACK battery cable first then RED bat... engine. TIRES • Maintain proper air pressure in the disengaged position. If your tractor is not necessary. BLADE CARE For best results mower blades must align with stamped "GRASS SIDE" facing the ground. CAUTION: Use only a replacement blade approved by the manufacturer of electrolyte is...
...• Avoid stumps, stones, deep ruts, sharp objects and other hazards that may be sharp. BLADE REMOVAL (See Fig. 13) • Raise mower to highest position to allow access to "leak" power. • Remove terminal guard. • Disconnect BLACK battery cable first then RED bat... engine. TIRES • Maintain proper air pressure in the disengaged position. If your tractor is not necessary. BLADE CARE For best results mower blades must align with stamped "GRASS SIDE" facing the ground. CAUTION: Use only a replacement blade approved by the manufacturer of electrolyte is...
User Manual
Page 17
... finished surfaces and wheels free of your tractor unless the engine and transmission are covered to remove grass, leaves and trash from tractor and mower. 17 MUFFLER Inspect and replace corroded muffler and spark arrester (if equipped) as it could create a fire hazard and/or damage. MAINTENANCE...
... finished surfaces and wheels free of your tractor unless the engine and transmission are covered to remove grass, leaves and trash from tractor and mower. 17 MUFFLER Inspect and replace corroded muffler and spark arrester (if equipped) as it could create a fire hazard and/or damage. MAINTENANCE...
User Manual
Page 18
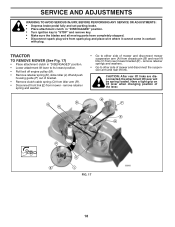
Have a tight grip on lift lever when changing position of mower and disconnect mower suspension arm (A) from chassis pin (B) and rear lift link (C) from mower - CAUTION: After rear lift links are disconnected, the attachment lift lever will be spring loaded. remove retainer ...housing guide (P) out of bracket. • Remove clutch cable spring (Q) from idler arm (R). • Disconnect front link (E) from rear mower bracket (D) - TRACTOR TO REMOVE MOWER (See Fig. 17) • Place attachment clutch in contact with plug. remove retainer springs and washers. • Go to other ...
Have a tight grip on lift lever when changing position of mower and disconnect mower suspension arm (A) from chassis pin (B) and rear lift link (C) from mower - CAUTION: After rear lift links are disconnected, the attachment lift lever will be spring loaded. remove retainer ...housing guide (P) out of bracket. • Remove clutch cable spring (Q) from idler arm (R). • Disconnect front link (E) from rear mower bracket (D) - TRACTOR TO REMOVE MOWER (See Fig. 17) • Place attachment clutch in contact with plug. remove retainer springs and washers. • Go to other ...
User Manual
Page 19
...tractor chassis and secure with washer and retainer spring. • Repeat on lift lever, lower it is spring loaded. Position hole in front mower bracket (H) and secure with washer and retainer spring (J). 19 IMPORTANT: Check belt for proper routing in link assembly over pin (B) on ...; Repeat on the tractor, remove the front link (E) and rear lift liks (C) from tractor. SERVICE AND ADJUSTMENTS • Slide mower out from under tractor. • ATTACH MOWER SIDE SUSPENSION ARMS (A) TO CHASSIS - CAUTION: Lift lever is centered under right side of trac- FIG. 21 • Raise...
...tractor chassis and secure with washer and retainer spring. • Repeat on lift lever, lower it is spring loaded. Position hole in front mower bracket (H) and secure with washer and retainer spring (J). 19 IMPORTANT: Check belt for proper routing in link assembly over pin (B) on ...; Repeat on the tractor, remove the front link (E) and rear lift liks (C) from tractor. SERVICE AND ADJUSTMENTS • Slide mower out from under tractor. • ATTACH MOWER SIDE SUSPENSION ARMS (A) TO CHASSIS - CAUTION: Lift lever is centered under right side of trac- FIG. 21 • Raise...

User Manual
Page 20
..., adjust if necessary until you wish to adjust. • With a 3/4" or adjustable wrench, turn lift link adjustment nut (A) to the left to lower mower PRECISION SIDE-TO-SIDE ADJUSTMENT (See Fig. 23) • With all tires properly in its highest position. • At both sides. • If adjustment... is necessary, see steps in flated, it may affect the appearance of blade to think the mower is cutting lower. The distance should be adjusted so the front tip is 1/8" to 1/2" lower than the rear tip, go to the front of...
..., adjust if necessary until you wish to adjust. • With a 3/4" or adjustable wrench, turn lift link adjustment nut (A) to the left to lower mower PRECISION SIDE-TO-SIDE ADJUSTMENT (See Fig. 23) • With all tires properly in its highest position. • At both sides. • If adjustment... is necessary, see steps in flated, it may affect the appearance of blade to think the mower is cutting lower. The distance should be adjusted so the front tip is 1/8" to 1/2" lower than the rear tip, go to the front of...

User Manual
Page 21
...belt installation guide decal on a level, dry concrete or paved surface, depress brake pedal all idler pulleys (S). ally push the tractor forward. MOWER DRIVE BELT INSTALLATION • Install belt around transaxle input pulley (D). For assistance, there is 1/8" to 1/2" lower than five (5) feet... CHECK BRAKE If tractor requires more than the rear tip. • Hold adjustment nut in all belt guides and keepers. • Install mower (See "TO INSTALL MOWER" in neutral (N) position. Contact a qualified service center. 21 E F A B G C D FIG. 27 Be sure belt...
...belt installation guide decal on a level, dry concrete or paved surface, depress brake pedal all idler pulleys (S). ally push the tractor forward. MOWER DRIVE BELT INSTALLATION • Install belt around transaxle input pulley (D). For assistance, there is 1/8" to 1/2" lower than five (5) feet... CHECK BRAKE If tractor requires more than the rear tip. • Hold adjustment nut in all belt guides and keepers. • Install mower (See "TO INSTALL MOWER" in neutral (N) position. Contact a qualified service center. 21 E F A B G C D FIG. 27 Be sure belt...
User Manual
Page 24
... one ounce of this manual). • Lubricate as shown in fuel tank or storage container. When mower is to gasoline in the Maintenance section of oil through spark plug hole(s) into cylinder(s). • Turn ignition key to "START" position for a few seconds ...
... one ounce of this manual). • Lubricate as shown in fuel tank or storage container. When mower is to gasoline in the Maintenance section of oil through spark plug hole(s) into cylinder(s). • Turn ignition key to "START" position for a few seconds ...

User Manual
Page 25
...of adjustment. 8. Engine not "CHOKED" properly. 3. Water in Service Adjustments section. 15. Carburetor out of grass, leaves and trash under mower. 4. Replace fuel filter. 8. Replace spark plug. 3. Empty fuel tank and refill tank with fresh, clean gasoline. .... 2. Depress brake pedal. 2. Check all wiring. 14. Check/replace solenoid or starter. 9. Loss of adjustment. 1. Engine valves out of mower housing. 4. Clean underside of adjustment. 1. Clean/replace muffler. 13. Check all wiring. 7. Excessive vibration 1. Weak or dead battery...
...of adjustment. 8. Engine not "CHOKED" properly. 3. Water in Service Adjustments section. 15. Carburetor out of grass, leaves and trash under mower. 4. Replace fuel filter. 8. Replace spark plug. 3. Empty fuel tank and refill tank with fresh, clean gasoline. .... 2. Depress brake pedal. 2. Check all wiring. 14. Check/replace solenoid or starter. 9. Loss of adjustment. 1. Engine valves out of mower housing. 4. Clean underside of adjustment. 1. Clean/replace muffler. 13. Check all wiring. 7. Excessive vibration 1. Weak or dead battery...
User Manual
Page 26
... in transmission during shipment or servicing. 1. Turn ignition key to run when operator leaves seat with blades listed in "disengaged" position. 2. Mower blades will not charge 1. Frozen idler pulley. 4. Travel speed too fast. 3. Improper blades used. 11. Replace blade. Replace fuse. ...Engine speed too slow. 2. Wet grass. 4. Worn, bent or loose blade. 7. Buildup of grass, leaves, and trash under mower. 8. Mower drive belt worn. 9. Shift to open vent holes. Check tires for proper air pressure. 6. Replace with attachment clutch engaged 1. ...
... in transmission during shipment or servicing. 1. Turn ignition key to run when operator leaves seat with blades listed in "disengaged" position. 2. Mower blades will not charge 1. Frozen idler pulley. 4. Travel speed too fast. 3. Improper blades used. 11. Replace blade. Replace fuse. ...Engine speed too slow. 2. Wet grass. 4. Worn, bent or loose blade. 7. Buildup of grass, leaves, and trash under mower. 8. Mower drive belt worn. 9. Shift to open vent holes. Check tires for proper air pressure. 6. Replace with attachment clutch engaged 1. ...


