
Owner's Manual
Page 4
...37 Crossover Network 38 Channel Level 38 Speaker Distance 39 THX Audio Setting 39 THX Speaker Setup 40 4 En After you for buying this Pioneer product. Thank you have finished reading the instructions, put them away in a safe place for surround sound (MCACC 8 Problems when using ... the speakers 18 THX speaker system setup 19 Connecting antennas 19 Connecting external antennas 20 Plugging in the receiver 20 AC outlet 20 04 Controls and displays Front panel 21 Operating range of remote control unit 22 Display 23 Remote control 24 05 Listening to your model properly.
...37 Crossover Network 38 Channel Level 38 Speaker Distance 39 THX Audio Setting 39 THX Speaker Setup 40 4 En After you for buying this Pioneer product. Thank you have finished reading the instructions, put them away in a safe place for surround sound (MCACC 8 Problems when using ... the speakers 18 THX speaker system setup 19 Connecting antennas 19 Connecting external antennas 20 Plugging in the receiver 20 AC outlet 20 04 Controls and displays Front panel 21 Operating range of remote control unit 22 Display 23 Remote control 24 05 Listening to your model properly.

Owner's Manual
Page 5
... 41 Using XM HD Surround 42 Saving channel presets 42 Connecting using the 12 volt trigger 48 Using this receiver with a Pioneer plasma display 48 Using the SR+ mode with a Pioneer plasma display 49 09 Other Settings The Input Assign menu 50 The Other Setup menu 51 Dynamic Range Control ... this unit's sensor 61 12 Additional information Troubleshooting 62 Power 62 No sound 62 Other audio problems 63 Video 64 Settings 64 Display 65 Remote control 65 HDMI 66 XM radio messages 66 Surround sound formats 67 Dolby 67 DTS 67 Windows Media® Audio 9 Professional 67 About ...
... 41 Using XM HD Surround 42 Saving channel presets 42 Connecting using the 12 volt trigger 48 Using this receiver with a Pioneer plasma display 48 Using the SR+ mode with a Pioneer plasma display 49 09 Other Settings The Input Assign menu 50 The Other Setup menu 51 Dynamic Range Control ... this unit's sensor 61 12 Additional information Troubleshooting 62 Power 62 No sound 62 Other audio problems 63 Video 64 Settings 64 Display 65 Remote control 65 HDMI 66 XM radio messages 66 Surround sound formats 67 Dolby 67 DTS 67 Windows Media® Audio 9 Professional 67 About ...

Owner's Manual
Page 6
... sound right into this receiver's design provides coherent sound reproduction through the use LCD remote control The remote control gives you not only complete control over after compression. • HDMI compatibility This receiver is as easy as connecting...Pioneer for other components in discrete design unique to -use of phase matching for an optimal sound image at your listening position. • Sound Retriever The Sound Retriever feature employs new DSP technology that you've received the following supplied accessories: • Setup microphone (cable: 16.4 ft.) • Remote...
... sound right into this receiver's design provides coherent sound reproduction through the use LCD remote control The remote control gives you not only complete control over after compression. • HDMI compatibility This receiver is as easy as connecting...Pioneer for other components in discrete design unique to -use of phase matching for an optimal sound image at your listening position. • Sound Retriever The Sound Retriever feature employs new DSP technology that you've received the following supplied accessories: • Setup microphone (cable: 16.4 ft.) • Remote...
Owner's Manual
Page 8
... your subwoofer and the TV. Center (C) Front Right (R) Front Left (L) Subwoofer (SW) Surround Right (SR) 3 Plug in the receiver and switch it isn't, press DVD on the remote control to set the video input on your TV to this . • Set the subwoofer volume to a comfortable level. 4 Use ...the on this . See Listening to the receiver. 2 Connect your speakers and place them for optimal surround sound. Important • ...
... your subwoofer and the TV. Center (C) Front Right (R) Front Left (L) Subwoofer (SW) Surround Right (SR) 3 Plug in the receiver and switch it isn't, press DVD on the remote control to set the video input on your TV to this . • Set the subwoofer volume to a comfortable level. 4 Use ...the on this . See Listening to the receiver. 2 Connect your speakers and place them for optimal surround sound. Important • ...

Owner's Manual
Page 9
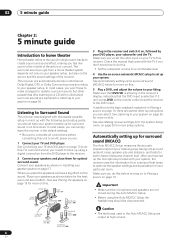
... Speaker YES/NO [ OK ] [ OK ] [ OK ] :Cancel 2.Auto MCACC Check! 5 minute guide 02 RECEIVER INPUT SELECT SYSTEM OFF SOURCE AV PRE-PROGRAMMED AND LEARNING REMOTE CONTROL UNIT DVD CD TV CD-R DVR 2 DVR1 TV CTRL XM RADIO ROOM 2 TUNER RECEIVER DIALOG E PHASE S.RETRIEVER D.ACCESS +10 CLASS DISC ENTER TOP MENU TUNE DTVMENU ST SETUP...
... Speaker YES/NO [ OK ] [ OK ] [ OK ] :Cancel 2.Auto MCACC Check! 5 minute guide 02 RECEIVER INPUT SELECT SYSTEM OFF SOURCE AV PRE-PROGRAMMED AND LEARNING REMOTE CONTROL UNIT DVD CD TV CD-R DVR 2 DVR1 TV CTRL XM RADIO ROOM 2 TUNER RECEIVER DIALOG E PHASE S.RETRIEVER D.ACCESS +10 CLASS DISC ENTER TOP MENU TUNE DTVMENU ST SETUP...
Owner's Manual
Page 10
... the sound (see Listening in the upper section of the diagram above) then the sound will be produced. 10 En RECEIVER INPUT SELECT SYSTEM OFF SOURCE AV PRE-PROGRAMMED AND LEARNING REMOTE CONTROL UNIT GUIDE TV CONTROL TV VOL INPUT SELECT TV CH VOL DTV ON/OFF MPX REC DTVINFO MUTE REC STOP... JUKEBOX DVD CD TV CD-R DVR 2 DVR1 TV CTRL XM RADIO ROOM 2 TUNER RECEIVER AUDIO SUBTITLE HDD DISP CH STATUS SIGNAL ...
... the sound (see Listening in the upper section of the diagram above) then the sound will be produced. 10 En RECEIVER INPUT SELECT SYSTEM OFF SOURCE AV PRE-PROGRAMMED AND LEARNING REMOTE CONTROL UNIT GUIDE TV CONTROL TV VOL INPUT SELECT TV CH VOL DTV ON/OFF MPX REC DTVINFO MUTE REC STOP... JUKEBOX DVD CD TV CD-R DVR 2 DVR1 TV CTRL XM RADIO ROOM 2 TUNER RECEIVER AUDIO SUBTITLE HDD DISP CH STATUS SIGNAL ...

Owner's Manual
Page 11
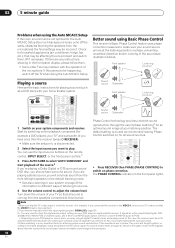
...inputs and one output for high-quality audio/video connection to connect any video source that you can connect to connect other Pioneer components so that has component video output, such as CD players, tape decks, turntables, etc. Connecting your equipment 03 Chapter 3 Connecting... your equipment This receiver provides you with this unit's sensor on page 61. 6 Stereo analog audio source inputs/(outputs) (x3) Use for connection to an external remote control sensor for use in should be difficult. Connecting digital audio sources...
...inputs and one output for high-quality audio/video connection to connect any video source that you can connect to connect other Pioneer components so that has component video output, such as CD players, tape decks, turntables, etc. Connecting your equipment 03 Chapter 3 Connecting... your equipment This receiver provides you with this unit's sensor on page 61. 6 Stereo analog audio source inputs/(outputs) (x3) Use for connection to an external remote control sensor for use in should be difficult. Connecting digital audio sources...
Owner's Manual
Page 16
... IN MCACC SETUP MIC VIDEO OUTPUT DIGITAL OUT TV game, video camera, etc. • Select these inputs by pressing VIDEO/GAME or using INPUT SELECT (remote) to 48 kHz. 16 En Note that WMA9 Pro 96 kHz sources will be able to a WMA9 Pro-compatible player. 03 Connecting your computer system.../OUT Tape deck, etc. • Connect the analog audio outputs of the source component to access the front video connections. Connecting analog audio sources This receiver features two stereo audio-only inputs. You can use with audio recorders.
... IN MCACC SETUP MIC VIDEO OUTPUT DIGITAL OUT TV game, video camera, etc. • Select these inputs by pressing VIDEO/GAME or using INPUT SELECT (remote) to 48 kHz. 16 En Note that WMA9 Pro 96 kHz sources will be able to a WMA9 Pro-compatible player. 03 Connecting your computer system.../OUT Tape deck, etc. • Connect the analog audio outputs of the source component to access the front video connections. Connecting analog audio sources This receiver features two stereo audio-only inputs. You can use with audio recorders.
Owner's Manual
Page 21
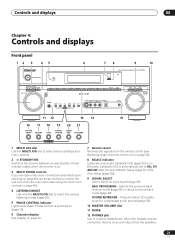
...26). 5 PHASE CONTROL indicator Lights when Basic Phase Control is switched on (page 10). 6 Character display See Display on page 23. 7 Remote sensor Receives the signals from the speakers. 21 En Press to restore CD quality sound to compressed audio sources (page 30). 10 MASTER VOLUME dial 11 ... the MULTI JOG dial to select various settings and menu options. 2 STANDBY/ON Switches the receiver between on (Acoustic Calibration EQ is no sound output from the remote control (see Operating range of remote control unit on page 22). 8 MCACC indicator Lights when Acoustic Calibration EQ (page 35) ...
...26). 5 PHASE CONTROL indicator Lights when Basic Phase Control is switched on (page 10). 6 Character display See Display on page 23. 7 Remote sensor Receives the signals from the speakers. 21 En Press to restore CD quality sound to compressed audio sources (page 30). 10 MASTER VOLUME dial 11 ... the MULTI JOG dial to select various settings and menu options. 2 STANDBY/ON Switches the receiver between on (Acoustic Calibration EQ is no sound output from the remote control (see Operating range of remote control unit on page 22). 8 MCACC indicator Lights when Acoustic Calibration EQ (page 35) ...

Owner's Manual
Page 22
...44). Operating range of remote control unit The remote control may not work properly if: • There are obstacles between the remote control and the receiver's remote sensor. • Direct sunlight or fluorescent light is shining onto the remote sensor. • The receiver is located near a... device that is emitting infrared rays. • The receiver is operated simultaneously with the MULTI...
...44). Operating range of remote control unit The remote control may not work properly if: • There are obstacles between the remote control and the receiver's remote sensor. • Direct sunlight or fluorescent light is shining onto the remote sensor. • The receiver is located near a... device that is emitting infrared rays. • The receiver is operated simultaneously with the MULTI...

Owner's Manual
Page 24
... Press to select control of an analog input signal to select the surround/virtual back channel mode (page 29). 04 Controls and displays Remote control RECEIVER INPUT SELECT 1 2 SYSTEM OFF SOURCE 12 13 DVR 2 DVD TV DVR1 TVCTRL 3 XM RADIO ROOM 2 CD CD-R TUNER... JUKEBOX AUDIO SUBTITLE HDD DVD DISP CH CH THX STANDARD ADV.SURR STEREO MULTI OPE AUTOSURR ACOUSTIC EQ SIGNAL SEL SHIFT EFFECT/CHSEL 16 17 RECEIVER The remote has been conveniently color-coded according to component control using the number buttons (page 31). Tuner/XM Radio controls (page 31) • White ...
... Press to select control of an analog input signal to select the surround/virtual back channel mode (page 29). 04 Controls and displays Remote control RECEIVER INPUT SELECT 1 2 SYSTEM OFF SOURCE 12 13 DVR 2 DVD TV DVR1 TVCTRL 3 XM RADIO ROOM 2 CD CD-R TUNER... JUKEBOX AUDIO SUBTITLE HDD DVD DISP CH CH THX STANDARD ADV.SURR STEREO MULTI OPE AUTOSURR ACOUSTIC EQ SIGNAL SEL SHIFT EFFECT/CHSEL 16 17 RECEIVER The remote has been conveniently color-coded according to component control using the number buttons (page 31). Tuner/XM Radio controls (page 31) • White ...

Owner's Manual
Page 25
... on/off other components (see page 56 for example, INPUT SELECT ), or to display the currently selected input source in the remote control LCD. 12 SOURCE Press to the receiver (see Controlling the rest of a source (page 28). Use to select the TV input signal. TV CH +/- - Use ... Calibration EQ setting (page 28). Indicates the setup mode, from other signal processing for more on your system on page 57. 14 RECEIVER Switches the remote to control the receiver (used to switch between the various 2Pro Logic IIx and Neo:6 options (page 26). ERASE - Controls and displays 04 7 TV...
... on/off other components (see page 56 for example, INPUT SELECT ), or to display the currently selected input source in the remote control LCD. 12 SOURCE Press to the receiver (see Controlling the rest of a source (page 28). Use to select the TV input signal. TV CH +/- - Use ... Calibration EQ setting (page 28). Indicates the setup mode, from other signal processing for more on your system on page 57. 14 RECEIVER Switches the remote to control the receiver (used to switch between the various 2Pro Logic IIx and Neo:6 options (page 26). ERASE - Controls and displays 04 7 TV...

Owner's Manual
Page 31
...(see Saving station presets on page 31 for other stations. RECEIVER INPUT SELECT SYSTEM OFF SOURCE AV PRE-PROGRAMMED AND LEARNING REMOTE CONTROL UNIT DVD CD DVR 2 TV DVR1 TVCTRL CD-R XM RADIO ROOM 2 TUNER RECEIVER DIALOG E PHASE S.RETRIEVER D.ACCESS +10 CLASS DISC ENTER TOP... (TUNER EDIT). Release the button at a time, press TUNE / . RECEIVER INPUT SELECT SYSTEM OFF SOURCE AV PRE-PROGRAMMED AND LEARNING REMOTE CONTROL UNIT DVD CD DVR 2 TV DVR1 TVCTRL CD-R XM RADIO ROOM 2 TUNER RECEIVER DIALOG E PHASE S.RETRIEVER D.ACCESS +10 CLASS DISC ENTER TOP MENU TUNE ...
...(see Saving station presets on page 31 for other stations. RECEIVER INPUT SELECT SYSTEM OFF SOURCE AV PRE-PROGRAMMED AND LEARNING REMOTE CONTROL UNIT DVD CD DVR 2 TV DVR1 TVCTRL CD-R XM RADIO ROOM 2 TUNER RECEIVER DIALOG E PHASE S.RETRIEVER D.ACCESS +10 CLASS DISC ENTER TOP... (TUNER EDIT). Release the button at a time, press TUNE / . RECEIVER INPUT SELECT SYSTEM OFF SOURCE AV PRE-PROGRAMMED AND LEARNING REMOTE CONTROL UNIT DVD CD DVR 2 TV DVR1 TVCTRL CD-R XM RADIO ROOM 2 TUNER RECEIVER DIALOG E PHASE S.RETRIEVER D.ACCESS +10 CLASS DISC ENTER TOP MENU TUNE ...

Owner's Manual
Page 32
ABCDEFGHIJKLMNOPQRSTUVWXYZ abcdefghijklmnopqrstuvwxyz 0123456789 space] • Use the ST / buttons (remote) to select characters. • Press ENTER to confirm a character. Listening to station presets You will need to have named a station preset, you want. If no .... 3 Input the name you can name your station presets. 1 Choose the station preset you want . • You can also use the number buttons on the remote control to recall the station preset. 32 En Tip • To erase a station name, simply repeat steps 1 to 3 and input four spaces instead of a name...
ABCDEFGHIJKLMNOPQRSTUVWXYZ abcdefghijklmnopqrstuvwxyz 0123456789 space] • Use the ST / buttons (remote) to select characters. • Press ENTER to confirm a character. Listening to station presets You will need to have named a station preset, you want. If no .... 3 Input the name you can name your station presets. 1 Choose the station preset you want . • You can also use the number buttons on the remote control to recall the station preset. 32 En Tip • To erase a station name, simply repeat steps 1 to 3 and input four spaces instead of a name...

Owner's Manual
Page 33
... to specify how you're using the receiver (for example, if you want to the digital and component video inputs (see The Input Assign menu on page 50). • Other Setup - RECEIVER INPUT SELECT SYSTEM OFF SOURCE AV PRE-PROGRAMMED AND LEARNING REMOTE CONTROL UNIT DVD CD TV CD-R DVR... 2 DVR1 TV CTRL XM RADIO ROOM 2 TUNER RECEIVER DIALOG E PHASE S.RETRIEVER D.ACCESS +10 CLASS DISC ENTER TOP MENU TUNE DTVMENU...
... to specify how you're using the receiver (for example, if you want to the digital and component video inputs (see The Input Assign menu on page 50). • Other Setup - RECEIVER INPUT SELECT SYSTEM OFF SOURCE AV PRE-PROGRAMMED AND LEARNING REMOTE CONTROL UNIT DVD CD TV CD-R DVR... 2 DVR1 TV CTRL XM RADIO ROOM 2 TUNER RECEIVER DIALOG E PHASE S.RETRIEVER D.ACCESS +10 CLASS DISC ENTER TOP MENU TUNE DTVMENU...
Owner's Manual
Page 39
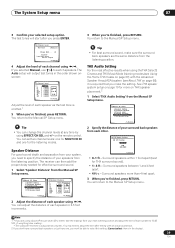
...4c.Channel Level Test Tone [ Manual ] Please Wait . . . 20 Caution! Tip • You can set two channel levels: one for the listening modes. The receiver can adjust the distance of each channel using / . Surround speakers between 1 and 4 feet apart. • 4 ft < - The Auto setup will start after testing ...SP Setup menu. You will be able to select this setting (Cannot select shows in the display). 39 En Surround speakers more on the remote control. Tip • For best surround sound, make the setting. You may need to specify the distance of your main listening position ...
...4c.Channel Level Test Tone [ Manual ] Please Wait . . . 20 Caution! Tip • You can set two channel levels: one for the listening modes. The receiver can adjust the distance of each channel using / . Surround speakers between 1 and 4 feet apart. • 4 ft < - The Auto setup will start after testing ...SP Setup menu. You will be able to select this setting (Cannot select shows in the display). 39 En Surround speakers more on the remote control. Tip • For best surround sound, make the setting. You may need to specify the distance of your main listening position ...
Owner's Manual
Page 42
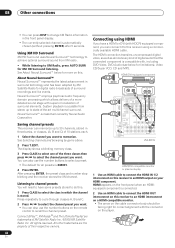
... HDMIequipped component is connected. 2 Use an HDMI cable to connect the HDMI OUT interconnect on this receiver to an HDMI interconnect on a HDMI-compatible monitor. • The arrow on the remote control to recall the channel preset. 08 Other connections • You can press DISP to change... channel is scalable from XM radio. • While listening to do this . All other trademarks are trademarks of a more on this receiver using HDMI If you can also use the number buttons on the cable connector body should be facing right for more detailed sound stage with...
... HDMIequipped component is connected. 2 Use an HDMI cable to connect the HDMI OUT interconnect on this receiver to an HDMI interconnect on a HDMI-compatible monitor. • The arrow on the remote control to recall the channel preset. 08 Other connections • You can press DISP to change... channel is scalable from XM radio. • While listening to do this . All other trademarks are trademarks of a more on this receiver using HDMI If you can also use the number buttons on the cable connector body should be facing right for more detailed sound stage with...

Owner's Manual
Page 46
...XM IN SELECT PHONES SYSTEM SETUP RETURN TONE TUNING/ STATION TUNER EDIT SPEAKERS MULTI JOG S - You should have a pair of this receiver. Surround Back System multi-room setup You must select MR&S in Surround back speaker setting on . MONITOR OUT MULTI-ROOM & SOURCE ... display to indicate the multiroom control has been switched on page 33 to the sub room amplifier as shown below ). There are not using the remote control. SURROUND WOOFER ROUND BACK MULTI CH IN SEE INSTRUCTION MANUAL SELECTABLE SURROUND BACK / B R L (Single) MONITOR OUT MULTI-ROOM & SOURCE...
...XM IN SELECT PHONES SYSTEM SETUP RETURN TONE TUNING/ STATION TUNER EDIT SPEAKERS MULTI JOG S - You should have a pair of this receiver. Surround Back System multi-room setup You must select MR&S in Surround back speaker setting on . MONITOR OUT MULTI-ROOM & SOURCE ... display to indicate the multiroom control has been switched on page 33 to the sub room amplifier as shown below ). There are not using the remote control. SURROUND WOOFER ROUND BACK MULTI CH IN SEE INSTRUCTION MANUAL SELECTABLE SURROUND BACK / B R L (Single) MONITOR OUT MULTI-ROOM & SOURCE...

Owner's Manual
Page 47
... on page 31 if you selected the VARIABLE volume control in Multi-Room and IR receiver setup on page 53. This is shining on the IR receiver remote sensor window. • Note that other Pioneer components with your IR receiver type in the other room. Please be possible if direct light from a strong fluorescent lamp...
... on page 31 if you selected the VARIABLE volume control in Multi-Room and IR receiver setup on page 53. This is shining on the IR receiver remote sensor window. • Note that other Pioneer components with your IR receiver type in the other room. Please be possible if direct light from a strong fluorescent lamp...

Owner's Manual
Page 48
... Y PB PR ASSIGNABLE 1 3 S-VIDEO IN IN OUT IN VIDEO AM LOOP L OUT PRE OUT CENTER L L (Single) IN 3 R R SUB R SUR- Using this receiver with components that have a Pioneer plasma display, you can use an SR+ cable1 to connect it switches on or off using a 12 volt trigger when you select an...settings in 12 Volt Trigger setup on page 53. Note that this will switch on the trigger, you'll be able to control the receiver using the remote control if you switch the plasma display off. • Before you can use a commercially available 3-ringed mini phone plug for the connection)....
... Y PB PR ASSIGNABLE 1 3 S-VIDEO IN IN OUT IN VIDEO AM LOOP L OUT PRE OUT CENTER L L (Single) IN 3 R R SUB R SUR- Using this receiver with components that have a Pioneer plasma display, you can use an SR+ cable1 to connect it switches on or off using a 12 volt trigger when you select an...settings in 12 Volt Trigger setup on page 53. Note that this will switch on the trigger, you'll be able to control the receiver using the remote control if you switch the plasma display off. • Before you can use a commercially available 3-ringed mini phone plug for the connection)....


