Instruction Manual
Page 2
... About HDMI 67 License and Trademark Information 68 Connect the TV 11 3. Connect the Speakers 8 2. > Before Start > Part Names > Install > Initial Setup > Playback Advanced Setup | Firmware Update | Others AV RECEIVER VSX-S520D VSX-S520 Instruction Manual Before Start What's in the box 2 Part Names Front Panel 3 Rear Panel 4 E N Remote Controller 6 Display 7 Install 1.
... About HDMI 67 License and Trademark Information 68 Connect the TV 11 3. Connect the Speakers 8 2. > Before Start > Part Names > Install > Initial Setup > Playback Advanced Setup | Firmware Update | Others AV RECEIVER VSX-S520D VSX-S520 Instruction Manual Before Start What's in the box 2 Part Names Front Panel 3 Rear Panel 4 E N Remote Controller 6 Display 7 Install 1.
Instruction Manual
Page 3
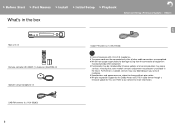
... support for the Dolby Atmos and DTS:X audio format through a firmware update for more information. Furthermore, available services may become unavailable in the box Advanced Setup | Firmware Update | Others E N Main unit (1) Remote controller (RC-933R) (1), batteries (AAA/R03) (2) Speaker setup microphone (1) Indoor FM antenna (1) (VSX-S520) 0 Connect speakers with 4 Ω to our website for this unit...
... support for the Dolby Atmos and DTS:X audio format through a firmware update for more information. Furthermore, available services may become unavailable in the box Advanced Setup | Firmware Update | Others E N Main unit (1) Remote controller (RC-933R) (1), batteries (AAA/R03) (2) Speaker setup microphone (1) Indoor FM antenna (1) (VSX-S520) 0 Connect speakers with 4 Ω to our website for this unit...
Instruction Manual
Page 4
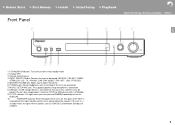
> Before Start > Part Names > Install > Initial Setup > Playback Front Panel Advanced Setup | Firmware Update | Others E N 1. Í STANDBY/ON button: Turns the unit on , this lights when functions such as HDMI CEC and Network Standby are connected. 7. Remote control sensor ...to turn the display off. 10. Display (P7) 3. You can be played. (BD/DVD / CBL/SAT / GAME / STRM BOX / CD / TV / PHONO / DAB (VSX-S520D) / FM / NET / USB / BT AUDIO) 5. MASTER VOLUME dial: Allows you have pressed DIMMER repeatedly to adjust the volume. 6. USB port: A USB storage device is...
> Before Start > Part Names > Install > Initial Setup > Playback Front Panel Advanced Setup | Firmware Update | Others E N 1. Í STANDBY/ON button: Turns the unit on , this lights when functions such as HDMI CEC and Network Standby are connected. 7. Remote control sensor ...to turn the display off. 10. Display (P7) 3. You can be played. (BD/DVD / CBL/SAT / GAME / STRM BOX / CD / TV / PHONO / DAB (VSX-S520D) / FM / NET / USB / BT AUDIO) 5. MASTER VOLUME dial: Allows you have pressed DIMMER repeatedly to adjust the volume. 6. USB port: A USB storage device is...
Instruction Manual
Page 5
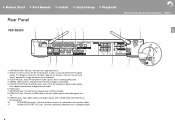
... may break it. 3. SUBWOOFER PRE OUT jack: Connect a powered subwoofer with speaker cables. 11. > Before Start > Part Names > Install > Initial Setup > Playback Rear Panel VSX-S520D Advanced Setup | Firmware Update | Others E N 90° 180° 1. Do not try to a TV. 9. SIGNAL GND terminal: The ground wire of the turntable is connected. 5. Power cord...
... may break it. 3. SUBWOOFER PRE OUT jack: Connect a powered subwoofer with speaker cables. 11. > Before Start > Part Names > Install > Initial Setup > Playback Rear Panel VSX-S520D Advanced Setup | Firmware Update | Others E N 90° 180° 1. Do not try to a TV. 9. SIGNAL GND terminal: The ground wire of the turntable is connected. 5. Power cord...
Instruction Manual
Page 6
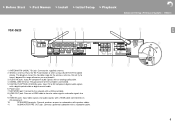
...: Input video signals and audio signals with a digital optical cable or digital coaxial cable. 6. > Before Start > Part Names > Install > Initial Setup > Playback Advanced Setup | Firmware Update | Others VSX-S520 E N 90° 180° 1. The diagram shows the movable range for Wi-Fi connection or when using a BLUETOOTH enabled device. ANTENNA FM UNBAL 75h jack...
...: Input video signals and audio signals with a digital optical cable or digital coaxial cable. 6. > Before Start > Part Names > Install > Initial Setup > Playback Advanced Setup | Firmware Update | Others VSX-S520 E N 90° 180° 1. The diagram shows the movable range for Wi-Fi connection or when using a BLUETOOTH enabled device. ANTENNA FM UNBAL 75h jack...

Instruction Manual
Page 7
...) 9. CLEAR button: Deletes all characters you to the previous state during setting. 13. > Before Start > Part Names > Install > Initial Setup > Playback Remote Controller Advanced Setup | Firmware Update | Others 1. Íbutton:Turnstheunitonorintostandbymode. 2. Volume buttons: Allows you have entered when entering text on the TV screen. 11. (STATUS) button: Switches the information on the...
...) 9. CLEAR button: Deletes all characters you to the previous state during setting. 13. > Before Start > Part Names > Install > Initial Setup > Playback Remote Controller Advanced Setup | Firmware Update | Others 1. Íbutton:Turnstheunitonorintostandbymode. 2. Volume buttons: Allows you have entered when entering text on the TV screen. 11. (STATUS) button: Switches the information on the...

Instruction Manual
Page 8
... broadcasting. SLEEP: Sleep timer has been set. HDMI: HDMI signals are input and selected. > Before Start > Part Names > Install > Initial Setup > Playback Display Advanced Setup | Firmware Update | Others E N Neo:6 1.
... broadcasting. SLEEP: Sleep timer has been set. HDMI: HDMI signals are input and selected. > Before Start > Part Names > Install > Initial Setup > Playback Display Advanced Setup | Firmware Update | Others E N Neo:6 1.

Instruction Manual
Page 9
... speaker and a front speaker gives you a natural sound even when playing music. > Before Start > Part Names > Install > Initial Setup > Playback 1. Connect the Speakers Advanced Setup | Firmware Update | Others L R *1 *2 Install the speakers E Front speakers output front stereo sound and a center N speaker outputs center sound such as dialogs and vocals.
... speaker and a front speaker gives you a natural sound even when playing music. > Before Start > Part Names > Install > Initial Setup > Playback 1. Connect the Speakers Advanced Setup | Firmware Update | Others L R *1 *2 Install the speakers E Front speakers output front stereo sound and a center N speaker outputs center sound such as dialogs and vocals.

Instruction Manual
Page 10
... terminals with speaker cables as shown below. 9 To connect a passive subwoofer, connect to -) foreach channel. > Before Start > Part Names > Install > Initial Setup > Playback Advanced Setup | Firmware Update | Others 1 a 1/2˝ (12 mm) 2 a 3 b a speaker cable, b subwoofer cable E N a b FRONT FRONT R L CENTER SURROUND SURROUND R L Connect the speakers Refer to the illustration to the SUBWOOFER PRE OUT...
... terminals with speaker cables as shown below. 9 To connect a passive subwoofer, connect to -) foreach channel. > Before Start > Part Names > Install > Initial Setup > Playback Advanced Setup | Firmware Update | Others 1 a 1/2˝ (12 mm) 2 a 3 b a speaker cable, b subwoofer cable E N a b FRONT FRONT R L CENTER SURROUND SURROUND R L Connect the speakers Refer to the illustration to the SUBWOOFER PRE OUT...

Instruction Manual
Page 11
Full Auto MCACC" (P16) in "1. If the exposed wires of the speaker terminals when connecting. wires touch each other, the protection circuit will be activated. (P60) Setup 0 Settings for the speaker configuration you have connected need to be made in Initial Setup. 10 > Before Start > Part Names > Install > Initial Setup > Playback Advanced Setup | Firmware Update | Others E N Make sure the exposed wires of the speakers do not stick out of the speakers touch the rear panel or the + and -
Full Auto MCACC" (P16) in "1. If the exposed wires of the speaker terminals when connecting. wires touch each other, the protection circuit will be activated. (P60) Setup 0 Settings for the speaker configuration you have connected need to be made in Initial Setup. 10 > Before Start > Part Names > Install > Initial Setup > Playback Advanced Setup | Firmware Update | Others E N Make sure the exposed wires of the speakers do not stick out of the speakers touch the rear panel or the + and -

Instruction Manual
Page 12
... 2. To Non-ARC TV For a TV that supports the ARC (Audio Return Channel) N (P67) feature, use the ARC function. Connect the TV Advanced Setup | Firmware Update | Others 1 DIGITAL OPTICAL OUT To ARC TV E For a TV that does not support the ARC (Audio Return Channel) feature, connect both the HDMI cable in...
... 2. To Non-ARC TV For a TV that supports the ARC (Audio Return Channel) N (P67) feature, use the ARC function. Connect the TV Advanced Setup | Firmware Update | Others 1 DIGITAL OPTICAL OUT To ARC TV E For a TV that does not support the ARC (Audio Return Channel) feature, connect both the HDMI cable in...

Instruction Manual
Page 13
... input selector, and the HDMI Standby Through feature which allows you can use the high speed HDMI cable. Connect the HDMI AV Components 1 Advanced Setup | Firmware Update | Others E N a a e.g. > Before Start > Part Names > Install > Initial Setup > Playback 3.
... input selector, and the HDMI Standby Through feature which allows you can use the high speed HDMI cable. Connect the HDMI AV Components 1 Advanced Setup | Firmware Update | Others E N a a e.g. > Before Start > Part Names > Install > Initial Setup > Playback 3.

Instruction Manual
Page 14
... with the MC type cartridge between the unit and the turntable, then connect to the N DIGITAL IN COAXIAL jack. Connect the Audio Components Advanced Setup | Firmware Update | Others Connecting a CD player E Use a digital coaxial cable to connect a CD player to any AUDIO IN jack other than the PHONO jack.
... with the MC type cartridge between the unit and the turntable, then connect to the N DIGITAL IN COAXIAL jack. Connect the Audio Components Advanced Setup | Firmware Update | Others Connecting a CD player E Use a digital coaxial cable to connect a CD player to any AUDIO IN jack other than the PHONO jack.
Instruction Manual
Page 15
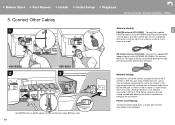
Connect Other Cables Advanced Setup | Firmware Update | Others 1 (North American Antenna Hookup E DAB/FM antenna (VSX-S520D) : Connect the supplied N models) DAB/FM antenna to the ANTENNA FM UNBAL 75h terminal. You can enjoy network features such as shown ...cable to the NETWORK port as internet radio by turning the nut to the right. a VSX-S520D 2 b VSX-S520 3 d d c (North American models) a DAB/FM antenna, b FM indoor antenna, c Ethernet cable, d Power cord 14 FM indoor antenna (VSX-S520) : Connect the supplied FM indoor antenna to the ANTENNA DAB/FM terminal. To connect ...
Connect Other Cables Advanced Setup | Firmware Update | Others 1 (North American Antenna Hookup E DAB/FM antenna (VSX-S520D) : Connect the supplied N models) DAB/FM antenna to the ANTENNA FM UNBAL 75h terminal. You can enjoy network features such as shown ...cable to the NETWORK port as internet radio by turning the nut to the right. a VSX-S520D 2 b VSX-S520 3 d d c (North American models) a DAB/FM antenna, b FM indoor antenna, c Ethernet cable, d Power cord 14 FM indoor antenna (VSX-S520) : Connect the supplied FM indoor antenna to the ANTENNA DAB/FM terminal. To connect ...

Instruction Manual
Page 16
... controller, select "Miscellaneous" "Initial Setup" in the System Setup menu from Home and press ENTER. When power turns on for start up Wizard Advanced Setup | Firmware Update | Others 1 2 TV's remote controller 3 4 Initial Setup starts automatically E 1. Switch the input on -screen instructions to change "OSD Language". (P42) 15 Follow the on the...
... controller, select "Miscellaneous" "Initial Setup" in the System Setup menu from Home and press ENTER. When power turns on for start up Wizard Advanced Setup | Firmware Update | Others 1 2 TV's remote controller 3 4 Initial Setup starts automatically E 1. Switch the input on -screen instructions to change "OSD Language". (P42) 15 Follow the on the...

Instruction Manual
Page 17
... again properly and make sure they do not stick out of the access point beforehand. > Before Start > Part Names > Install > Initial Setup > Playback Advanced Setup | Firmware Update | Others 1. Test tones are the following . 0 "Enter Password": Enter the password (or key) of the access point to connect. 0 "Push Button": If the access point...
... again properly and make sure they do not stick out of the access point beforehand. > Before Start > Part Names > Install > Initial Setup > Playback Advanced Setup | Firmware Update | Others 1. Test tones are the following . 0 "Enter Password": Enter the password (or key) of the access point to connect. 0 "Push Button": If the access point...

Instruction Manual
Page 18
...", the HDMI CEC function is displayed during standby. 17 To select whether to indicate agreement. 4. > Before Start > Part Names > Install > Initial Setup > Playback Advanced Setup | Firmware Update | Others button on the remote controller and press ENTER, then E follow the on the screen and press ENTER. Select "Yes" and press ENTER to mask...
...", the HDMI CEC function is displayed during standby. 17 To select whether to indicate agreement. 4. > Before Start > Part Names > Install > Initial Setup > Playback Advanced Setup | Firmware Update | Others button on the remote controller and press ENTER, then E follow the on the screen and press ENTER. Select "Yes" and press ENTER to mask...

Instruction Manual
Page 19
... operations Play an AV component or TV connected to this unit using HDMI connection. 3. For example, press BD/DVD to adjust the volume. Advanced Setup | Firmware Update | Others E N b 18 a 2.
... operations Play an AV component or TV connected to this unit using HDMI connection. 3. For example, press BD/DVD to adjust the volume. Advanced Setup | Firmware Update | Others E N b 18 a 2.

Instruction Manual
Page 20
...service that assigned to the unit. 2. You will create a unique radio station for buffering. 0 To return to www.pandora.com/ pioneer. You can listen to TuneIn or other preregistered Internet radio services. Regarding the Pandora Menu: Icons are new to Pandora, select "I ... in the level under TuneIn Radio. To play . > Before Start > Part Names > Install > Initial Setup > Playback Internet Radio Advanced Setup | Firmware Update | Others 1 a b c Basic operations When this code. Follow the on-screen instructions, using the cursors to select radio stations and programs, then press...
...service that assigned to the unit. 2. You will create a unique radio station for buffering. 0 To return to www.pandora.com/ pioneer. You can listen to TuneIn or other preregistered Internet radio services. Regarding the Pandora Menu: Icons are new to Pandora, select "I ... in the level under TuneIn Radio. To play . > Before Start > Part Names > Install > Initial Setup > Playback Internet Radio Advanced Setup | Firmware Update | Others 1 a b c Basic operations When this code. Follow the on-screen instructions, using the cursors to select radio stations and programs, then press...

Instruction Manual
Page 21
> Before Start > Part Names > Install > Initial Setup > Playback Advanced Setup | Firmware Update | Others (I like this track) : E Give a track "thumbs-up" and Pandora will play more music N like it. (I don't like this track) : Give a track "thumbs-down" and Pandora will ban that track from the current station. : Automatically find stations matching your preferences based on genre, specific artists, and songs, and delete those stations you don't need. 20
> Before Start > Part Names > Install > Initial Setup > Playback Advanced Setup | Firmware Update | Others (I like this track) : E Give a track "thumbs-up" and Pandora will play more music N like it. (I don't like this track) : Give a track "thumbs-down" and Pandora will ban that track from the current station. : Automatically find stations matching your preferences based on genre, specific artists, and songs, and delete those stations you don't need. 20


