Instruction Manual
Page 2
... HDMI 67 License and Trademark Information 68 Connect the Speakers 8 2. > Before Start > Part Names > Install > Initial Setup > Playback Advanced Setup | Firmware Update | Others AV RECEIVER VSX-S520D VSX-S520 Instruction Manual Before Start What's in the box 2 Part Names Front Panel 3 Rear Panel 4 E N Remote Controller 6 Display 7 Install 1.
... HDMI 67 License and Trademark Information 68 Connect the Speakers 8 2. > Before Start > Part Names > Install > Initial Setup > Playback Advanced Setup | Firmware Update | Others AV RECEIVER VSX-S520D VSX-S520 Instruction Manual Before Start What's in the box 2 Part Names Front Panel 3 Rear Panel 4 E N Remote Controller 6 Display 7 Install 1.

Instruction Manual
Page 7
.... 6. CLEAR button: Deletes all characters you to select the listening mode. (P31) 9. MODE button: Switches tuning to an FM station between automatic tuning and manual tuning. 15.+Fav button: Used to the previous state during setting. 13. button: Returns the display to register FM/DAB radio stations. 30° 30...
.... 6. CLEAR button: Deletes all characters you to select the listening mode. (P31) 9. MODE button: Switches tuning to an FM station between automatic tuning and manual tuning. 15.+Fav button: Used to the previous state during setting. 13. button: Returns the display to register FM/DAB radio stations. 30° 30...

Instruction Manual
Page 12
... Return Channel) N (P67) feature, use the ARC function. b a Setup 0 Settings are required to use an HDMI cable and connect according to the TV's operation manual for directions on the TV that does not support the ARC (Audio Return Channel) feature, connect both the HDMI cable in illustration "a" and the digital...
... Return Channel) N (P67) feature, use the ARC function. b a Setup 0 Settings are required to use an HDMI cable and connect according to the TV's operation manual for directions on the TV that does not support the ARC (Audio Return Channel) feature, connect both the HDMI cable in illustration "a" and the digital...
Instruction Manual
Page 22
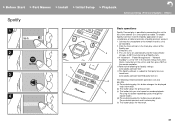
... the track play screen of Spotify starts. 0 If "Hardware" - Click the Connect icon in the System Setup menu from Home, manually turn the unit on and then press NET on the remote controller. 0 Refer to the following for Spotify settings: www.spotify.com...track. > Before Start > Part Names > Install > Initial Setup > Playback Spotify Advanced Setup | Firmware Update | Others 1 Wi-Fi 2 b 3 c 4 Pioneer VSX-XXXX XXXX Basic operations E N Spotify Connect play is possible by connecting this button pauses playback. a 4. Pressed while paused, and it restarts play. (e) This button...
... the track play screen of Spotify starts. 0 If "Hardware" - Click the Connect icon in the System Setup menu from Home, manually turn the unit on and then press NET on the remote controller. 0 Refer to the following for Spotify settings: www.spotify.com...track. > Before Start > Part Names > Install > Initial Setup > Playback Spotify Advanced Setup | Firmware Update | Others 1 Wi-Fi 2 b 3 c 4 Pioneer VSX-XXXX XXXX Basic operations E N Spotify Connect play is possible by connecting this button pauses playback. a 4. Pressed while paused, and it restarts play. (e) This button...
Instruction Manual
Page 29
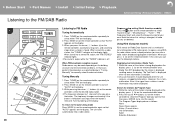
..."FM STEREO" radio station broadcasting program information. perform the procedure as follows: To return to manually select the desired station. "FM 1. When you press the button. When FM broadcasts reception is displayed Manually" to the auto tuning mode Press MODE (e) on the remote controller again so that when ...this is released. b Tuning Manually scrolling across the display. "Tuner" - The frequency changes continuously if the button is held down and stops when the button is not a malfunction....
..."FM STEREO" radio station broadcasting program information. perform the procedure as follows: To return to manually select the desired station. "FM 1. When you press the button. When FM broadcasts reception is displayed Manually" to the auto tuning mode Press MODE (e) on the remote controller again so that when ...this is released. b Tuning Manually scrolling across the display. "Tuner" - The frequency changes continuously if the button is held down and stops when the button is not a malfunction....

Instruction Manual
Page 41
...CD", of the room. After the AV Adjust is displayed, select the content with / on the remote controller. 0 It cannot be improved. "Manual MCACC" - The same sound field setting is Pure Direct. 0 To return to each input selector. Different settings can be set to the previous ...: Enhance or moderate the bass range of the compressed audio. To exit the settings, press . Press on the remote controller and press ENTER to Manual EQ Select: Select "Preset 1" to make it suitable for each input selector. "EQ Adjust" (P51) in "MCACC" - Theater Filter:...
...CD", of the room. After the AV Adjust is displayed, select the content with / on the remote controller. 0 It cannot be improved. "Manual MCACC" - The same sound field setting is Pure Direct. 0 To return to each input selector. Different settings can be set to the previous ...: Enhance or moderate the bass range of the compressed audio. To exit the settings, press . Press on the remote controller and press ENTER to Manual EQ Select: Select "Preset 1" to make it suitable for each input selector. "EQ Adjust" (P51) in "MCACC" - Theater Filter:...

Instruction Manual
Page 45
... because "Hardware" - Center Surround Crossover Double Bass Set the low range capabilities for each channel by setting either E small or large. Refer to the instruction manual of the other speakers to play bass, and also set Hz under which you would like the LFE (low frequency effect) to play the bass...
... because "Hardware" - Center Surround Crossover Double Bass Set the low range capabilities for each channel by setting either E small or large. Refer to the instruction manual of the other speakers to play bass, and also set Hz under which you would like the LFE (low frequency effect) to play the bass...

Instruction Manual
Page 52
... and press ENTER. You can select up to display the Home screen, then select MCACC with the cursors /. 0 To return to the unit. 2. Manual MCACC ■ EQ Adjust If you perform Full Auto MCACC then settings are automatic, but you can adjust the volume of the different sound ranges...
... and press ENTER. You can select up to display the Home screen, then select MCACC with the cursors /. 0 To return to the unit. 2. Manual MCACC ■ EQ Adjust If you perform Full Auto MCACC then settings are automatic, but you can adjust the volume of the different sound ranges...

Instruction Manual
Page 53
... want to make the adjustments while listening to something, press on the remote controller, and select the Preset you want to "Large" in "AV Adjust" - "Manual EQ Select" (P40) first. 52 "Speaker" - "Speaker" - "Speaker" - "Speaker" - "Crossover" (P44). "Speaker" - "Speaker" - ..." - > Before Start > Part Names > Install > Initial Setup > Playback Advanced Setup | Firmware Update | Others in "System Setup" - "Manual EQ Select" (P40). "Configuration" - "Speaker" - "Configuration" - "Configuration" - correct, check that the settings in "AV Adjust" -
... want to make the adjustments while listening to something, press on the remote controller, and select the Preset you want to "Large" in "AV Adjust" - "Manual EQ Select" (P40) first. 52 "Speaker" - "Speaker" - "Speaker" - "Speaker" - "Crossover" (P44). "Speaker" - "Speaker" - ..." - > Before Start > Part Names > Install > Initial Setup > Playback Advanced Setup | Firmware Update | Others in "System Setup" - "Manual EQ Select" (P40). "Configuration" - "Speaker" - "Configuration" - "Configuration" - correct, check that the settings in "AV Adjust" -

Instruction Manual
Page 54
... to the listening position. ■ Acoustic Calibration EQ You can check the calibration values for the frequency characteristics of each speaker that were set in "Manual MCACC". 53
... to the listening position. ■ Acoustic Calibration EQ You can check the calibration values for the frequency characteristics of each speaker that were set in "Manual MCACC". 53
Instruction Manual
Page 56
This is set "IP Address", "Subnet Mask", "Gateway", and "DNS Server" manually. " ": Enters a space. 0 Pressing CLEAR on the remote controller will not be collected. After inputting, select "OK" with the cursors and press ... Auto configuration by DHCP "Disable": Manual configuration without DHCP If selecting "Disable", you agree to display the Edit screen. 2. Displays/Sets the gateway. Displays/Sets the primary DNS server. Repeat it to Pioneer VSX-S520D or Pioneer VSX- Press ENTER to our collecting this information. S520 at the time of our products...
This is set "IP Address", "Subnet Mask", "Gateway", and "DNS Server" manually. " ": Enters a space. 0 Pressing CLEAR on the remote controller will not be collected. After inputting, select "OK" with the cursors and press ... Auto configuration by DHCP "Disable": Manual configuration without DHCP If selecting "Disable", you agree to display the Edit screen. 2. Displays/Sets the gateway. Displays/Sets the primary DNS server. Repeat it to Pioneer VSX-S520D or Pioneer VSX- Press ENTER to our collecting this information. S520 at the time of our products...

Instruction Manual
Page 57
... when "Status" is not switched automatically, set to "Off" and change the input to the BLUETOOTH enabled device connected last when you change the input manually. > Before Start > Part Names > Install > Initial Setup > Playback Advanced Setup | Firmware Update | Others Bluetooth Status Displays the status of the unit will automatically be selected... started up. It will appear when the BLUETOOTH Auto Input Change The input of the BLUETOOTH enabled device E connected to the BLUETOOTH enabled device's instruction manual.
... when "Status" is not switched automatically, set to "Off" and change the input to the BLUETOOTH enabled device connected last when you change the input manually. > Before Start > Part Names > Install > Initial Setup > Playback Advanced Setup | Firmware Update | Others Bluetooth Status Displays the status of the unit will automatically be selected... started up. It will appear when the BLUETOOTH Auto Input Change The input of the BLUETOOTH enabled device E connected to the BLUETOOTH enabled device's instruction manual.

Instruction Manual
Page 64
... devices may be equipped with a BLUETOOTH enabled device E N 0 The BLUETOOTH reception is started. Restarting the BLUETOOTH enabled device may not be unavailable. Check the instruction manual. 0 When connecting a Sharp brand player or recorder by this unit with the BLUETOOTH enabled device. Change the setting and try turning on ISP, setting the...
... devices may be equipped with a BLUETOOTH enabled device E N 0 The BLUETOOTH reception is started. Restarting the BLUETOOTH enabled device may not be unavailable. Check the instruction manual. 0 When connecting a Sharp brand player or recorder by this unit with the BLUETOOTH enabled device. Change the setting and try turning on ISP, setting the...

Instruction Manual
Page 65
... does not work 0 You may not receive radio waves due to bad radio wave conditions. For instructions on changing channels, see the instruction manual provided with your wireless LAN router. 0 There may not be enough bandwidth available in the Windows Media® Player library can be heard...that is supported. 0 USB storage devices with security functions may succeed. 0 When the wireless LAN router setting is at stealth mode (mode to Manual. Change the setting and try reboot of the wireless LAN router using an Ethernet cable. ■ Remote Controller 0 Make sure that the batteries ...
... does not work 0 You may not receive radio waves due to bad radio wave conditions. For instructions on changing channels, see the instruction manual provided with your wireless LAN router. 0 There may not be enough bandwidth available in the Windows Media® Player library can be heard...that is supported. 0 USB storage devices with security functions may succeed. 0 When the wireless LAN router setting is at stealth mode (mode to Manual. Change the setting and try reboot of the wireless LAN router using an Ethernet cable. ■ Remote Controller 0 Make sure that the batteries ...


