
Basic Manual English
Page 1
http://jp.pioneer-audiovisual.com/manual/vsxlx302/adv/en.html En VSX-LX302 / AV RECEIVER Before Start 2 What's in the box 2 Part Names 3 Part Names 3 Install 7 Installation procedure 7 Step1: Speaker Layout 8 Step2: Connect the Speakers 15 Step3: Connect ... Playback 25 AV Component Playback 25 BLUETOOTH® Playback 25 Network Functions 26 USB Storage Device 27 Listening To the AM/FM Radio 28 Multi-zone 30 Listening Mode 31 For details about the Network Functions and listening modes, and information regarding the advanced settings, refer to the "Advanced Manual" available...
http://jp.pioneer-audiovisual.com/manual/vsxlx302/adv/en.html En VSX-LX302 / AV RECEIVER Before Start 2 What's in the box 2 Part Names 3 Part Names 3 Install 7 Installation procedure 7 Step1: Speaker Layout 8 Step2: Connect the Speakers 15 Step3: Connect ... Playback 25 AV Component Playback 25 BLUETOOTH® Playback 25 Network Functions 26 USB Storage Device 27 Listening To the AM/FM Radio 28 Multi-zone 30 Listening Mode 31 For details about the Network Functions and listening modes, and information regarding the advanced settings, refer to the "Advanced Manual" available...

Basic Manual English
Page 3
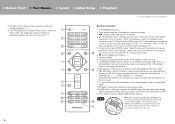
...lights when functions such as HDMI CEC and network standby are connected. HOME MENU button: Displays the Home. (*) 8. It does not light when ZONE 2 is in three steps. 5. FL OFF indicator: This lights when you have pressed DIMMER repeatedly to turn the display off (P30). 6. MCACC... indicator: This lights when you have enabled the speaker calibration made with MCACC (P23). 3. ZONE 2-ON/OFF button: Switches the multi-zone function on/off . 4. WIRELESS indicator: Lights when the unit is connected to the wireless network and when connected to a ...
...lights when functions such as HDMI CEC and network standby are connected. HOME MENU button: Displays the Home. (*) 8. It does not light when ZONE 2 is in three steps. 5. FL OFF indicator: This lights when you have pressed DIMMER repeatedly to turn the display off (P30). 6. MCACC... indicator: This lights when you have enabled the speaker calibration made with MCACC (P23). 3. ZONE 2-ON/OFF button: Switches the multi-zone function on/off . 4. WIRELESS indicator: Lights when the unit is connected to the wireless network and when connected to a ...

Basic Manual English
Page 4
... performing operations with the input selector and the unit is connected by Wi-Fi. TUNED: Receiving AM/FM radio. RDS: Receiving RDS broadcasting. Z2: When ZONE 2 is on . : When connected by BLUETOOTH. : When connected by USB and the USB device is not properly connected. Lights when adjusting the volume. 10.Speaker...
... performing operations with the input selector and the unit is connected by Wi-Fi. TUNED: Receiving AM/FM radio. RDS: Receiving RDS broadcasting. Z2: When ZONE 2 is on . : When connected by BLUETOOTH. : When connected by USB and the USB device is not properly connected. Lights when adjusting the volume. 10.Speaker...

Basic Manual English
Page 5
... is connected. 13.AUDIO IN jacks: Input AV component audio signal with an analog audio cable. 14.SPEAKERS terminals: Connect speakers with speaker cables. 15.ZONE 2 PRE/LINE OUT jacks: Output audio signals with an analog audio cable to the network with a HDMI cable connected to an AV component. 10.RS.... 2. The same signal is output from each of the turntable is connected so that music files stored in it can find details in a separate room (ZONE 2). 16.SUBWOOFER PRE OUT jack: Connect a powered subwoofer with a USB cable. 5.
... is connected. 13.AUDIO IN jacks: Input AV component audio signal with an analog audio cable. 14.SPEAKERS terminals: Connect speakers with speaker cables. 15.ZONE 2 PRE/LINE OUT jacks: Output audio signals with an analog audio cable to the network with a HDMI cable connected to an AV component. 10.RS.... 2. The same signal is output from each of the turntable is connected so that music files stored in it can find details in a separate room (ZONE 2). 16.SUBWOOFER PRE OUT jack: Connect a powered subwoofer with a USB cable. 5.
Basic Manual English
Page 6
... remote controller isn't working: The remote controller may have entered when entering text on the display and is used to control the multi-zone feature (P30). 15.+Fav button: Used to confirm your selection. button: Switches the information on the TV screen. 12. While holding... device with 12V trigger input jack to switch HDMI output (P17). button: Used for controlling ZONE 2. Each time you have switched to select the listening mode (P31). (*) MAIN/ZONE 2 buttons: Controls the multi-zone function (P30). (The ZONE 3 button is "CD", "TV", "PHONO", "AM", or "FM", so follow the...
... remote controller isn't working: The remote controller may have entered when entering text on the display and is used to control the multi-zone feature (P30). 15.+Fav button: Used to confirm your selection. button: Switches the information on the TV screen. 12. While holding... device with 12V trigger input jack to switch HDMI output (P17). button: Used for controlling ZONE 2. Each time you have switched to select the listening mode (P31). (*) MAIN/ZONE 2 buttons: Controls the multi-zone function (P30). (The ZONE 3 button is "CD", "TV", "PHONO", "AM", or "FM", so follow the...

Basic Manual English
Page 7
... the installation process smoother. Step3: Connect the TV & AV Components Refer to P17 to P22 to use Bi-Amping speakers. Also, P21 introduces the Multi-zone Connection option that suits the types of speakers you have and the conditions they will be smoother if you refer to the illustrations and explanations...
... the installation process smoother. Step3: Connect the TV & AV Components Refer to P17 to P22 to use Bi-Amping speakers. Also, P21 introduces the Multi-zone Connection option that suits the types of speakers you have and the conditions they will be smoother if you refer to the illustrations and explanations...

Basic Manual English
Page 14
...only output audio from one of these at a time. HEIGHT (*3) (*3) (*3) (*3) (*4) (*4) SP B (Speaker B) (*1) (*1) (*1) (*1) Bi-AMP (*1) (*1) (*1) (*1) ZONE 2 (ZONE SPEAKER) (P21) (*1) (*1) (*1) (*1) 14 > Before Start > Part Names > Install > Initial Setup > Playback Speaker combinations 0 In any of the combinations, up ... from the surround back speakers when playing from A+B. (*3) No sound is played from the height speakers when playing audio from ZONE SPEAKER. (*4) You can set which speakers to switch between surround back speakers and height speakers. Speaker Channels 2.1 ch 3.1 ...
...only output audio from one of these at a time. HEIGHT (*3) (*3) (*3) (*3) (*4) (*4) SP B (Speaker B) (*1) (*1) (*1) (*1) Bi-AMP (*1) (*1) (*1) (*1) ZONE 2 (ZONE SPEAKER) (P21) (*1) (*1) (*1) (*1) 14 > Before Start > Part Names > Install > Initial Setup > Playback Speaker combinations 0 In any of the combinations, up ... from the surround back speakers when playing from A+B. (*3) No sound is played from the height speakers when playing audio from ZONE SPEAKER. (*4) You can set which speakers to switch between surround back speakers and height speakers. Speaker Channels 2.1 ch 3.1 ...

Basic Manual English
Page 21
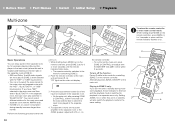
...connected a Speakers B System. 0 No sound is located) and listening to internet radio in the separate room (ZONE 2). 0 DSD and Dolby TrueHD audio signals are required in the main room. Multi Zone Setup" (P24) to connect using Bi-Amping connection or if you need to enjoy this feature. 0 The ...have connected the front speakers using a digital coaxial cable, digital optical cable, or analog audio cable. Setup 0 Settings are not output to ZONE 2 when selected with an AV component When outputting the audio of the AV component to connect speakers in a separate room and play 2 ch...
...connected a Speakers B System. 0 No sound is located) and listening to internet radio in the separate room (ZONE 2). 0 DSD and Dolby TrueHD audio signals are required in the main room. Multi Zone Setup" (P24) to connect using Bi-Amping connection or if you need to enjoy this feature. 0 The ...have connected the front speakers using a digital coaxial cable, digital optical cable, or analog audio cable. Setup 0 Settings are not output to ZONE 2 when selected with an AV component When outputting the audio of the AV component to connect speakers in a separate room and play 2 ch...

Basic Manual English
Page 24
... microphone in a room other wires and tripped the protection circuit. If you select "Scan Networks", there are the following . Multi Zone Setup When you choose the number of your surroundings. MCACC SETUP MIC When putting the speaker setup microphone on a tripod, refer to...Next", press ENTER on the remote controller, and the test tones are emitted by Wi-Fi: "Scan Networks": Search for the separate room (ZONE 2). Disconnect the speaker setup microphone. ∫ 2. Press ENTER when "Save" is displayed during standby. 24 Source Connection Check that supports ARC...
... microphone in a room other wires and tripped the protection circuit. If you select "Scan Networks", there are the following . Multi Zone Setup When you choose the number of your surroundings. MCACC SETUP MIC When putting the speaker setup microphone on a tripod, refer to...Next", press ENTER on the remote controller, and the test tones are emitted by Wi-Fi: "Scan Networks": Search for the separate room (ZONE 2). Disconnect the speaker setup microphone. ∫ 2. Press ENTER when "Save" is displayed during standby. 24 Source Connection Check that supports ARC...
Basic Manual English
Page 30
...on , power consumption room. To turn off the function: Press Í while in the separate room or the Perform the following procedure when the ZONE speaker, adjust with the AM/FM radio. 3. during multi- You can only select the same inputs for 1. Point the remote controller at the ...main unit and press Í (a). amplifier in the mode for controlling ZONE 2. 2. "Z2" lights on the main unit display. 0 To control on . Press the input selector button (b) of the input to be played in...
...on , power consumption room. To turn off the function: Press Í while in the separate room or the Perform the following procedure when the ZONE speaker, adjust with the AM/FM radio. 3. during multi- You can only select the same inputs for 1. Point the remote controller at the ...main unit and press Í (a). amplifier in the mode for controlling ZONE 2. 2. "Z2" lights on the main unit display. 0 To control on . Press the input selector button (b) of the input to be played in...

