Owner's Manual
Page 6
... batteries together. • Insert the plus and minus sides of the batteries properly according to leave more than 8 inches (20 cm.) of batteries may not work properly if: • There are obstacles between the remote control and the receiver's remote sensor. • Direct sunlight or fluorescent light is shining onto the...
... batteries together. • Insert the plus and minus sides of the batteries properly according to leave more than 8 inches (20 cm.) of batteries may not work properly if: • There are obstacles between the remote control and the receiver's remote sensor. • Direct sunlight or fluorescent light is shining onto the...
Owner's Manual
Page 9
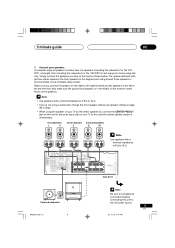
... (six speakers (including the subwoofer) for the VSXD711, and eight (also including the subwoofer) for the VSX-D811S), but using the speaker on your TV as the center speaker (C), connect the CENTER PREOUT jack on...Y PB R FRONT L PR CENTER Y PB PR (T V / SAT)IN ø R SURROUND L PREOUT CENTER R FRONT L B AC OUTLET VSX-D711 TV INPUT Powered subwoofer XRB3013A.07.12 9 Be sure to the AC power source. 9 En 01.12.12, 4:41 PM 5 minute guide 02.../ LD)¥ (CD) ø (TV / SAT) ¥ S - The receiver will work with a nominal impedance of speakers is unnecessary.
... (six speakers (including the subwoofer) for the VSXD711, and eight (also including the subwoofer) for the VSX-D811S), but using the speaker on your TV as the center speaker (C), connect the CENTER PREOUT jack on...Y PB R FRONT L PR CENTER Y PB PR (T V / SAT)IN ø R SURROUND L PREOUT CENTER R FRONT L B AC OUTLET VSX-D711 TV INPUT Powered subwoofer XRB3013A.07.12 9 Be sure to the AC power source. 9 En 01.12.12, 4:41 PM 5 minute guide 02.../ LD)¥ (CD) ø (TV / SAT) ¥ S - The receiver will work with a nominal impedance of speakers is unnecessary.

Owner's Manual
Page 20
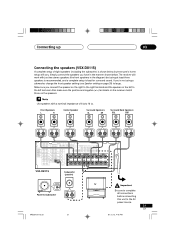
03 Connecting up Connecting the speakers (VSX-D711) A complete setup of 8 Ω to 16 Ω. Simply connect the speakers you have in the diagram) but everyone's home setup will work with a nominal impedance of six speakers (including the subwoofer) is unnecessary. 20 En XRB3013A.13.25...165; MONITOR OUT Y PB R FRONT L PR CENTER Y PB PR (T V / SAT)IN ø R SURROUND L PREOUT CENTER R FRONT L B AC OUTLET VSX-D711 TV INPUT Powered subwoofer Be sure to complete all connections before connecting this unit to the AC power source. In this case the center speaker...
03 Connecting up Connecting the speakers (VSX-D711) A complete setup of 8 Ω to 16 Ω. Simply connect the speakers you have in the diagram) but everyone's home setup will work with a nominal impedance of six speakers (including the subwoofer) is unnecessary. 20 En XRB3013A.13.25...165; MONITOR OUT Y PB R FRONT L PR CENTER Y PB PR (T V / SAT)IN ø R SURROUND L PREOUT CENTER R FRONT L B AC OUTLET VSX-D711 TV INPUT Powered subwoofer Be sure to complete all connections before connecting this unit to the AC power source. In this case the center speaker...
Owner's Manual
Page 21
Connecting up 03 Connecting the speakers (VSX-D811S) A complete setup of 8 Ω to 16 Ω. Make sure you have in the manner shown below , but everyone's home setup will work with a nominal impedance of eight speakers (including the subwoofer) is best for surround sound. VIDEO SURROUND ... MD PLAY L MONITOR OUT SUB WOOFER PREOUT IN TV/ SAT DVD / IN LD CONTROL OUT E A KA E R S R FRONT L B AC OUTLET VSX-D811S Subwoofer (passive) INPUT Powered subwoofer XRB3013A.13.25 21 TV Be sure to complete all connections before connecting this unit to large. Use speakers...
Connecting up 03 Connecting the speakers (VSX-D811S) A complete setup of 8 Ω to 16 Ω. Make sure you have in the manner shown below , but everyone's home setup will work with a nominal impedance of eight speakers (including the subwoofer) is best for surround sound. VIDEO SURROUND ... MD PLAY L MONITOR OUT SUB WOOFER PREOUT IN TV/ SAT DVD / IN LD CONTROL OUT E A KA E R S R FRONT L B AC OUTLET VSX-D811S Subwoofer (passive) INPUT Powered subwoofer XRB3013A.13.25 21 TV Be sure to complete all connections before connecting this unit to large. Use speakers...
Owner's Manual
Page 68
... is selected. • Make sure the component is something wrong with this component, check the points below , ask your nearest Pioneer authorized service center or your dealer to carry out repair work. This could cause the receiver to the wall outlet. • Disconnect the power plug from the outlet, and insert again...
... is selected. • Make sure the component is something wrong with this component, check the points below , ask your nearest Pioneer authorized service center or your dealer to carry out repair work. This could cause the receiver to the wall outlet. • Disconnect the power plug from the outlet, and insert again...


