Owner's Manual
Page 2
... the user's right to the following measures: - Product Name: AUDIO/VIDEO MULTI-CHANNEL RECEIVER Model Number: VSX-94TXH, VSX-92TXH Responsible Party Name: PIONEER ELECTRONICS SERVICE, INC. Reorient or relocate the receiving antenna. - To avoid fire hazard, the power cord should also be easily unplugged from the AC outlet when left unused for help. THE...
... the user's right to the following measures: - Product Name: AUDIO/VIDEO MULTI-CHANNEL RECEIVER Model Number: VSX-94TXH, VSX-92TXH Responsible Party Name: PIONEER ELECTRONICS SERVICE, INC. Reorient or relocate the receiving antenna. - To avoid fire hazard, the power cord should also be easily unplugged from the AC outlet when left unused for help. THE...

Owner's Manual
Page 3
...for ventilation and to an antenna discharge unit, size of grounding conductors, location of the lead-in a wet basement; LOCATION - POWER LINES - SERVICING - DAMAGE REQUIRING SERVICE - WALL OR CEILING MOUNTING - The product should be blocked or covered. NO USER-SERVICEABLE... with a polarized alternating current line plug (a plug having a third (grounding) pin, it will only fit into a grounding type power outlet. D1-4-2-3_En IMPORTANT SAFETY INSTRUCTIONS READ INSTRUCTIONS - This product should never be mounted to overturn. An outside antenna system, extreme ...
...for ventilation and to an antenna discharge unit, size of grounding conductors, location of the lead-in a wet basement; LOCATION - POWER LINES - SERVICING - DAMAGE REQUIRING SERVICE - WALL OR CEILING MOUNTING - The product should be blocked or covered. NO USER-SERVICEABLE... with a polarized alternating current line plug (a plug having a third (grounding) pin, it will only fit into a grounding type power outlet. D1-4-2-3_En IMPORTANT SAFETY INSTRUCTIONS READ INSTRUCTIONS - This product should never be mounted to overturn. An outside antenna system, extreme ...
Owner's Manual
Page 5
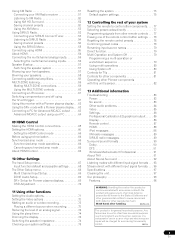
...default and possible settings 68 The Other Setup menu 68 Multi Channel Input Setup 69 ZONE Audio Setup 69 SR+ Setup for Pioneer plasma displays 69 OSD Adjustment 70 11 Using other functions Setting the Audio options 71 Setting the Video options 72 Making an ...Using multi operations 80 Using System off 80 Controls for TVs 81 Controls for other components 81 Operating other Pioneer components with this unit's sensor 82 13 Additional information Troubleshooting 83 Power 83 No sound 83 Other audio problems 84 Video 85 Settings 86 Professional Calibration EQ graphical output . ....
...default and possible settings 68 The Other Setup menu 68 Multi Channel Input Setup 69 ZONE Audio Setup 69 SR+ Setup for Pioneer plasma displays 69 OSD Adjustment 70 11 Using other functions Setting the Audio options 71 Setting the Video options 72 Making an ...Using multi operations 80 Using System off 80 Controls for TVs 81 Controls for other components 81 Operating other Pioneer components with this unit's sensor 82 13 Additional information Troubleshooting 83 Power 83 No sound 83 Other audio problems 84 Video 85 Settings 86 Professional Calibration EQ graphical output . ....
Owner's Manual
Page 7
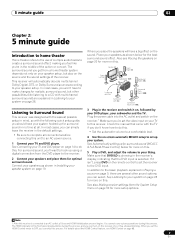
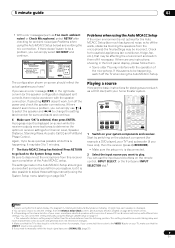
.... Make sure that DVD/LD is showing in the receiver and switch it on this . If it has stopped blinking. Place your liking. Plug the power cable into the AC outlet and switch on the receiver.1 Make sure you've set the video input on the remote control to set the... can simply leave the receiver in the default settings. • Be sure to complete all . In most cases, you 're in Listening to an AC power source. 1 Connect your speaker system on page 9, there are explained in the middle of the action or concert. In addition to the basic playback explained...
.... Make sure that DVD/LD is showing in the receiver and switch it on this . If it has stopped blinking. Place your liking. Plug the power cable into the AC outlet and switch on the receiver.1 Make sure you've set the video input on the remote control to set the... can simply leave the receiver in the default settings. • Be sure to complete all . In most cases, you 're in Listening to an AC power source. 1 Connect your speaker system on page 9, there are explained in the middle of the action or concert. In addition to the basic playback explained...
Owner's Manual
Page 9
... menu (starting on page 47. • The subwoofer distance setting may be as quiet as possible while this seems to be happening, switch off the power and check the speaker connections.
... menu (starting on page 47. • The subwoofer distance setting may be as quiet as possible while this seems to be happening, switch off the power and check the speaker connections.
Owner's Manual
Page 10
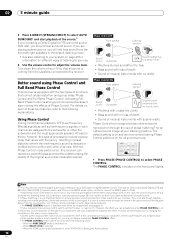
...) to select 'AUTO SURROUND' and start playback of the source.1 If you're playing a Dolby Digital or DTS surround sound DVD disc, you can reproduce powerful bass sound without deteriorating the quality of the original sound (see Listening in surround sound on page 28 if you need to the following cases...
...) to select 'AUTO SURROUND' and start playback of the source.1 If you're playing a Dolby Digital or DTS surround sound DVD disc, you can reproduce powerful bass sound without deteriorating the quality of the original sound (see Listening in surround sound on page 28 if you need to the following cases...
Owner's Manual
Page 12
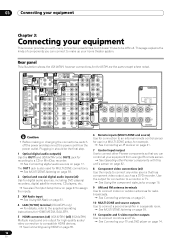
...BACK / B L(Single) SELECTABLE Caution • Before making or changing the connections, switch off the power and disconnect the power cord from a single IR remote sensor. See Operating other Pioneer components so that has component video output, such as a DVD recorder. TOR OUT ABLE OUT 12 ...Using XM Radio on page 51. 4 LAN (10/100) terminal (VSX-94TXH only) For details, refer to the supplied operating instructions for HOME MEDIA GALLERY. 5 HDMI connectors (x4) (VSX-92TXH) (x5) (VSX-94TXH) Multiple inputs and one output for high-quality audio/ video connection...
...BACK / B L(Single) SELECTABLE Caution • Before making or changing the connections, switch off the power and disconnect the power cord from a single IR remote sensor. See Operating other Pioneer components so that has component video output, such as a DVD recorder. TOR OUT ABLE OUT 12 ...Using XM Radio on page 51. 4 LAN (10/100) terminal (VSX-94TXH only) For details, refer to the supplied operating instructions for HOME MEDIA GALLERY. 5 HDMI connectors (x4) (VSX-92TXH) (x5) (VSX-94TXH) Multiple inputs and one output for high-quality audio/ video connection...
Owner's Manual
Page 13
... video, S-video1 and stereo analog audio. See Connecting a DVD/HDD recorder, VCR and other video sources on page 19. 21 Switched AC power outlet (100 W/0.8 A max.) Use to audio sources such as DVD players/recorders, VCRs, etc. When making cable connections • To avoid hum,... do not lay connected cables over the top of inputs has jacks for connection to power another component in Setting the Video options on page 72) OFF. 13 En This product incorporates copyright protection technology that some components (such ...
... video, S-video1 and stereo analog audio. See Connecting a DVD/HDD recorder, VCR and other video sources on page 19. 21 Switched AC power outlet (100 W/0.8 A max.) Use to audio sources such as DVD players/recorders, VCRs, etc. When making cable connections • To avoid hum,... do not lay connected cables over the top of inputs has jacks for connection to power another component in Setting the Video options on page 72) OFF. 13 En This product incorporates copyright protection technology that some components (such ...

Owner's Manual
Page 19
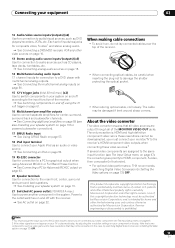
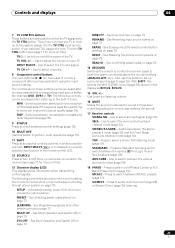
... ASSIGNABLE 1 3 COMPONENT VIDEO S-VIDEO IN VIDEO R L AUDIO 1 2 12 V TRIGGER (DC OUT 12V/ TOTAL 50 mA MAX) RS-232C MULTI CH IN VSX-94TXH CENTER AC OUTLET SWITCHED 100 W(0.8 A) MAX SURROUND R L R SURROUND BACK / B L(Single) SELECTABLE Surround left Surround right Surround back left Center Front right LINE...Note that all the bare speaker wire is ideal, other configurations with the terminals on page 74 if you like (it may cause the power to cut off as a subwoofer. At the very least, front left and right speakers only are necessary. Make sure to match these...
... ASSIGNABLE 1 3 COMPONENT VIDEO S-VIDEO IN VIDEO R L AUDIO 1 2 12 V TRIGGER (DC OUT 12V/ TOTAL 50 mA MAX) RS-232C MULTI CH IN VSX-94TXH CENTER AC OUTLET SWITCHED 100 W(0.8 A) MAX SURROUND R L R SURROUND BACK / B L(Single) SELECTABLE Surround left Surround right Surround back left Center Front right LINE...Note that all the bare speaker wire is ideal, other configurations with the terminals on page 74 if you like (it may cause the power to cut off as a subwoofer. At the very least, front left and right speakers only are necessary. Make sure to match these...
Owner's Manual
Page 22
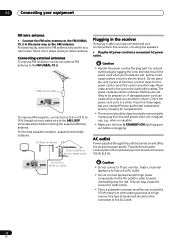
...this outlet is turned on vacation. • Make sure the blue STANDBY/ON light has gone out before unplugging. AC outlet Power supplied through this type of furniture, or other way. For the best possible reception, suspend horizontally outdoors. Outdoor antenna Indoor antenna (vinyl...-coated wire) Plugging in the receiver Only plug in after you have connected all your nearest Pioneer authorized independent service company for a replacement. • The receiver should not be disconnected by removing the mains plug from the wall...
...this outlet is turned on vacation. • Make sure the blue STANDBY/ON light has gone out before unplugging. AC outlet Power supplied through this type of furniture, or other way. For the best possible reception, suspend horizontally outdoors. Outdoor antenna Indoor antenna (vinyl...-coated wire) Plugging in the receiver Only plug in after you have connected all your nearest Pioneer authorized independent service company for a replacement. • The receiver should not be disconnected by removing the mains plug from the wall...
Owner's Manual
Page 23
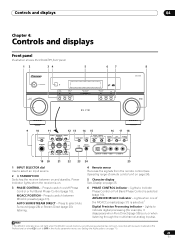
... Control (page 10). Controls and displays 04 Chapter 4: Controls and displays Front panel Illustration shows the VSX-94TXH front panel 12 34 5 67 STANDBY/ON INPUT SELECTOR PHASE CONTROL ADVANCED MCACC PHASE CONTROL MCACC ...AUTO SURR/ POSITION STREAM DIRECT DIGITAL PRECISION PROCESSING DIGITAL VIDEO SCALER HDMI HOME THX STANDARD ADVANCED SURROUND SURROUND 8 VSX-94TXH MASTER VOLUME 9 10 11 12 13 14 15 16 17 18 SPEAKERS AUDIO PARAMETER VIDEO (TUNE) ...when EQ is on page 71). 23 En Power indicator lights when the receiver is on page 25. 6 PHASE CONTROL indicator -
... Control (page 10). Controls and displays 04 Chapter 4: Controls and displays Front panel Illustration shows the VSX-94TXH front panel 12 34 5 67 STANDBY/ON INPUT SELECTOR PHASE CONTROL ADVANCED MCACC PHASE CONTROL MCACC ...AUTO SURR/ POSITION STREAM DIRECT DIGITAL PRECISION PROCESSING DIGITAL VIDEO SCALER HDMI HOME THX STANDARD ADVANCED SURROUND SURROUND 8 VSX-94TXH MASTER VOLUME 9 10 11 12 13 14 15 16 17 18 SPEAKERS AUDIO PARAMETER VIDEO (TUNE) ...when EQ is on page 71). 23 En Power indicator lights when the receiver is on page 25. 6 PHASE CONTROL indicator -
Owner's Manual
Page 27
... select the surround/virtual back channel mode (page 32). S.DIRECT - Thus if you only have one of the remote control button settings on /off the power of FM broadcasts. Use to the TV CTRL input source button. The controls above the number buttons (ANALOG ATT, etc.). RENAME - Press to switch between...
... select the surround/virtual back channel mode (page 32). S.DIRECT - Thus if you only have one of the remote control button settings on /off the power of FM broadcasts. Use to the TV CTRL input source button. The controls above the number buttons (ANALOG ATT, etc.). RENAME - Press to switch between...

Owner's Manual
Page 36
...Manual MCACC setup on page 45). • Manual SP Setup - See Automatic MCACC (Expert) below . Note 1 Make sure not to switch off the power when using the receiver (for a more detailed settings than those provided in Data Management on page 45. 4 You may also want to have different listening...). • Data Management - Specifies what you want to adjust. You can 't use the System Setup menu when the iPod, HOME MEDIA GALLERY (VSX-94TXH only), XM or SIRIUS Radio input source is selected (in separate rooms), and also explains how to fine-tune individual speaker system settings to...
...Manual MCACC setup on page 45). • Manual SP Setup - See Automatic MCACC (Expert) below . Note 1 Make sure not to switch off the power when using the receiver (for a more detailed settings than those provided in Data Management on page 45. 4 You may also want to have different listening...). • Data Management - Specifies what you want to adjust. You can 't use the System Setup menu when the iPod, HOME MEDIA GALLERY (VSX-94TXH only), XM or SIRIUS Radio input source is selected (in separate rooms), and also explains how to fine-tune individual speaker system settings to...
Owner's Manual
Page 38
... RETRY after checking for 10 seconds while the speaker configuration check screen is selected, then press ENTER. If selecting RETRY doesn't work, turn off the power and check the speaker connections. Speaker Distance 4. Auto MCACC CHECK Front [ YES ] Center [ YES ] Surr [ YES ] SB [ YESx2] SW [ YES ] 0 . 0 dB 10:Next OK :Cancel...
... RETRY after checking for 10 seconds while the speaker configuration check screen is selected, then press ENTER. If selecting RETRY doesn't work, turn off the power and check the speaker connections. Speaker Distance 4. Auto MCACC CHECK Front [ YES ] Center [ YES ] Surr [ YES ] SB [ YESx2] SW [ YES ] 0 . 0 dB 10:Next OK :Cancel...
Owner's Manual
Page 50
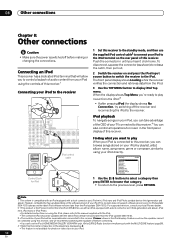
... the catch, then pull out. 2 Switch the receiver on your iPod to this receiver (Pioneer shows in the iPod display). When the display shows Top Menu you hear it click home....your iPod, you to iPod updater 2004-10-20 (plesae use the iPod, HOME MEDIA GALLERY (VSX-94TXH only), XM or SIRIUS Radio function simultaneously with a dock connector port, iPod mini, iPod...version of your iPod directly. 08 Other connections Chapter 8: Other connections Caution • Make sure the power is not available for music in the front panel display of this receiver. To disconnect, squeeze the connector...
... the catch, then pull out. 2 Switch the receiver on your iPod to this receiver (Pioneer shows in the iPod display). When the display shows Top Menu you hear it click home....your iPod, you to iPod updater 2004-10-20 (plesae use the iPod, HOME MEDIA GALLERY (VSX-94TXH only), XM or SIRIUS Radio function simultaneously with a dock connector port, iPod mini, iPod...version of your iPod directly. 08 Other connections Chapter 8: Other connections Caution • Make sure the power is not available for music in the front panel display of this receiver. To disconnect, squeeze the connector...
Owner's Manual
Page 57
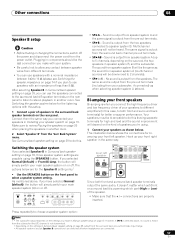
... on the source), the two speakers in Surround back speaker setting on page 39 to 2 channels). • SP (off the power and disconnect the power cord from speaker system A (multichannel sources will be downmixed to do this . See Surround back speaker setting on page 39, three speaker system...which set (front or surround back) is output from the pre-out terminals (including from your speakers as the sound from the power outlet. Other connections 08 Speaker B setup Caution • Before making or changing the connections, switch off ) - The same sound is...
... on the source), the two speakers in Surround back speaker setting on page 39 to 2 channels). • SP (off the power and disconnect the power cord from speaker system A (multichannel sources will be downmixed to do this . See Surround back speaker setting on page 39, three speaker system...which set (front or surround back) is output from the pre-out terminals (including from your speakers as the sound from the power outlet. Other connections 08 Speaker B setup Caution • Before making or changing the connections, switch off ) - The same sound is...
Owner's Manual
Page 58
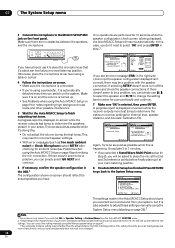
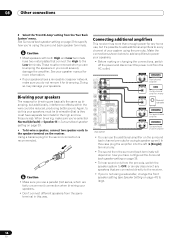
...SIRIUS IN SPEAKERS IN A FRONT R iPod L D BACK 2 GGER AX) RS-232C MULTI CH IN VSX-94TXH ANALOG INPUT L R ANALOG INPUT ANALOG INPUT Front channel amplifier Center channel amplifier (mono) Powered subwoofe ANALOG INPUT L R ANALOG INPUT L R Surround channe amplifier Surround back channel amplifie • You ... • Make sure you 're using a subwoofer, change the front speaker setting (see Speaker Setting on page 39 to power your speakers. Again, to do not remove it 's possible to add additional amplifiers to large. 58 En These must have configured...
...SIRIUS IN SPEAKERS IN A FRONT R iPod L D BACK 2 GGER AX) RS-232C MULTI CH IN VSX-94TXH ANALOG INPUT L R ANALOG INPUT ANALOG INPUT Front channel amplifier Center channel amplifier (mono) Powered subwoofe ANALOG INPUT L R ANALOG INPUT L R Surround channe amplifier Surround back channel amplifie • You ... • Make sure you 're using a subwoofer, change the front speaker setting (see Speaker Setting on page 39 to power your speakers. Again, to do not remove it 's possible to add additional amplifiers to large. 58 En These must have configured...

Owner's Manual
Page 59
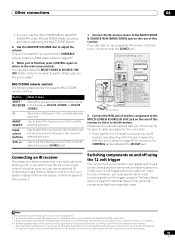
...), XM or SIRIUS Radio is not available for your secondary (ZONE 3) sub zone. There are two primary sub zone setups possible with the VSX-92TXH. Please note that the sound in three zones at the same time or, depending on your needs, the same source can also be temporarily ...interrupted when controlling the main zone (for example, changing the input source or starting playback). You should have independent power (the main zone power can be controlled by the remote or front panel controls. Sub zone (ZONE 3) MULTI-ZONE & SOURCE /REC SEL OUT1 ZONE3 OUT2 LAN...
...), XM or SIRIUS Radio is not available for your secondary (ZONE 3) sub zone. There are two primary sub zone setups possible with the VSX-92TXH. Please note that the sound in three zones at the same time or, depending on your needs, the same source can also be temporarily ...interrupted when controlling the main zone (for example, changing the input source or starting playback). You should have independent power (the main zone power can be controlled by the remote or front panel controls. Sub zone (ZONE 3) MULTI-ZONE & SOURCE /REC SEL OUT1 ZONE3 OUT2 LAN...
Owner's Manual
Page 61
...to the CONTROL jacks instead of this will only work for the type of this unit's sensor on or off power in the currently selected sub zone. VOL +/- CENTER SURROUND R L L FRONT CENTER SURROUND BACK (Single) ...IR receiver for some functions) in the currently selected sub zone. Note that other Pioneer components with components that have a standby mode. Input source buttons Use to select ... feature. 4 Use the MASTER VOLUME dial to use the iPod, HOME MEDIA GALLERY (VSX-94TXH only), XM and SIRIUS Radio functions simultaneously using the The Input Setup menu on ...
...to the CONTROL jacks instead of this will only work for the type of this unit's sensor on or off power in the currently selected sub zone. VOL +/- CENTER SURROUND R L L FRONT CENTER SURROUND BACK (Single) ...IR receiver for some functions) in the currently selected sub zone. Note that other Pioneer components with components that have a standby mode. Input source buttons Use to select ... feature. 4 Use the MASTER VOLUME dial to use the iPod, HOME MEDIA GALLERY (VSX-94TXH only), XM and SIRIUS Radio functions simultaneously using the The Input Setup menu on ...
Owner's Manual
Page 62
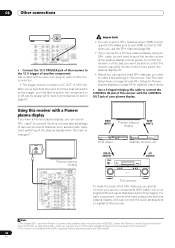
...PHASE CONTROL MCACC AUTO SURR/ POSITION STREAM DIRECT DIGITAL PRECISION PROCESSING DIGITAL VIDEO SCALER HDMI HOME THX STANDARD ADVANCED SURROUND SURROUND SAT AUDIO IN VSX-94TXH MASTER VOLUME This receiver To make a few settings in a slightly different way to that will switch on the trigger, you'...cable to this receiver with a mono mini-plug on each end for more information on page 67. Contact the Pioneer Customer Support division for the connection. • The trigger maximum power is set on obtaining an SR+ cable (you can use the SR+ features (page 66). • If ...
...PHASE CONTROL MCACC AUTO SURR/ POSITION STREAM DIRECT DIGITAL PRECISION PROCESSING DIGITAL VIDEO SCALER HDMI HOME THX STANDARD ADVANCED SURROUND SURROUND SAT AUDIO IN VSX-94TXH MASTER VOLUME This receiver To make a few settings in a slightly different way to that will switch on the trigger, you'...cable to this receiver with a mono mini-plug on each end for more information on page 67. Contact the Pioneer Customer Support division for the connection. • The trigger maximum power is set on obtaining an SR+ cable (you can use the SR+ features (page 66). • If ...


