
Owner's Manual
Page 4
... options 40 Choosing the input signal 43 Using the headphone 43 06 The System Setup menu Using the System Setup menu 44 Manual speaker setup 45 Speaker Setting 45 Crossover Network 47 Channel Level 47 Speaker Distance 48 The Input Assign menu 48 The Speaker System setting 49 The Video Parameter setting 50 Video Converter 50... system Basic playback 34 Auto playback 35 Listening in surround sound 35 Using the Advanced surround effects . . . . . 36 Listening in a safe place for buying this Pioneer product.
... options 40 Choosing the input signal 43 Using the headphone 43 06 The System Setup menu Using the System Setup menu 44 Manual speaker setup 45 Speaker Setting 45 Crossover Network 47 Channel Level 47 Speaker Distance 48 The Input Assign menu 48 The Speaker System setting 49 The Video Parameter setting 50 Video Converter 50... system Basic playback 34 Auto playback 35 Listening in surround sound 35 Using the Advanced surround effects . . . . . 36 Listening in a safe place for buying this Pioneer product.
Owner's Manual
Page 6
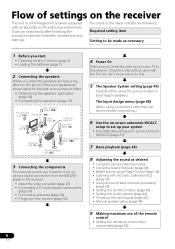
... abundance of the remote control • Setting the remote to control other than the recommended connections.) 6 Use the on-screen automatic MCACC setup to set the video input on the sound. Check the manual that came with Acoustic Calibration EQ (page 39) • Using surround back channel... TV to this . 5 The Speaker System setting (page 49) (Specify either using the surround back or front height speaker.) The Input Assign menu (page 48) (When using Phase Control (page 38) • Listening with the TV if you don't know how to make the connections and settings....
... abundance of the remote control • Setting the remote to control other than the recommended connections.) 6 Use the on-screen automatic MCACC setup to set the video input on the sound. Check the manual that came with Acoustic Calibration EQ (page 39) • Using surround back channel... TV to this . 5 The Speaker System setting (page 49) (Specify either using the surround back or front height speaker.) The Input Assign menu (page 48) (When using Phase Control (page 38) • Listening with the TV if you don't know how to make the connections and settings....
Owner's Manual
Page 13
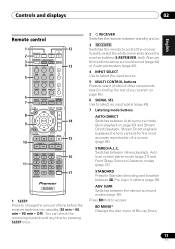
... (page 43). 7 Listening mode buttons AUTO/DIRECT Switches between the various surround modes (page 36). STANDARD ADV SURR AUDIO PARAMETER TOP 8 MENU TUNE TUNER EDIT MASTER TOOLS VOLUME MENU PRESET ENTER 9 HOME MENU SETUP iPod CTRL CATEGORY TUNE BAND RETURN DTV/ TV MUTE 10 BASS TRE 11 MEMORY HDD DVD VCR 1 2 3 DISP S.RETRIEVER SB...
... (page 43). 7 Listening mode buttons AUTO/DIRECT Switches between the various surround modes (page 36). STANDARD ADV SURR AUDIO PARAMETER TOP 8 MENU TUNE TUNER EDIT MASTER TOOLS VOLUME MENU PRESET ENTER 9 HOME MENU SETUP iPod CTRL CATEGORY TUNE BAND RETURN DTV/ TV MUTE 10 BASS TRE 11 MEMORY HDD DVD VCR 1 2 3 DISP S.RETRIEVER SB...
Owner's Manual
Page 14
... a CD, etc. SETUP Press to control BD/DVD menus/options. Press BD, DVD or DVR first to browse SIRIUS radio broadcasts. Press TUNER or SIRIUS first to DIRECT or PURE DIRECT. 14 En When TUNER is set to access: TUNER EDIT Memorizes stations for Pioneer flat panel TVs. 11...These buttons also function as described below. Note 1 The tone controls are disabled when the listening mode is pressed, also used to access the System Setup menu (page 44). There are used to select preset radio stations (page 53). 10 Component control buttons The main buttons (, , etc.) are...
... a CD, etc. SETUP Press to control BD/DVD menus/options. Press BD, DVD or DVR first to browse SIRIUS radio broadcasts. Press TUNER or SIRIUS first to DIRECT or PURE DIRECT. 14 En When TUNER is set to access: TUNER EDIT Memorizes stations for Pioneer flat panel TVs. 11...These buttons also function as described below. Note 1 The tone controls are disabled when the listening mode is pressed, also used to access the System Setup menu (page 44). There are used to select preset radio stations (page 53). 10 Component control buttons The main buttons (, , etc.) are...
Owner's Manual
Page 31
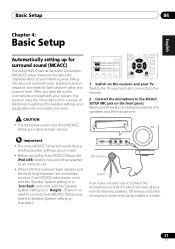
... microphone at high volume. RECEIVER SLEEP TV SOURCE CONTROL RECEIVER INPUT SELECT BD DVD TV INPUT AUDIO PARAMETER TOP MENU TUNE TUNER EDIT MASTER TOOLS VOLUME MENU PRESET ENTER HOME MENU SETUP iPod CTRL CATEGORY TUNE BAND RETURN DTV/ TV MUTE 1 Switch on the front panel. Make sure there are... connected, conduct Auto MCACC setup twice: once with the Speaker System setting is in 'Surr.Back' and once with your ...
... microphone at high volume. RECEIVER SLEEP TV SOURCE CONTROL RECEIVER INPUT SELECT BD DVD TV INPUT AUDIO PARAMETER TOP MENU TUNE TUNER EDIT MASTER TOOLS VOLUME MENU PRESET ENTER HOME MENU SETUP iPod CTRL CATEGORY TUNE BAND RETURN DTV/ TV MUTE 1 Switch on the front panel. Make sure there are... connected, conduct Auto MCACC setup twice: once with the Speaker System setting is in 'Surr.Back' and once with your ...
Owner's Manual
Page 32
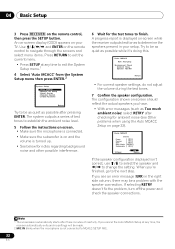
... the remote control to navigate through the screens and select menu items. Press RETURN to exit the current menu. • Press SETUP at any time to exit the System Setup menu.1 4 Select 'Auto MCACC' from the System Setup menu then press ENTER.2 System Setup 1.Auto MCACC 2.Manual SP Setup 3.Input Assign 4.Speaker System 5.Video Parameter Return Try to be...
... the remote control to navigate through the screens and select menu items. Press RETURN to exit the current menu. • Press SETUP at any time to exit the System Setup menu.1 4 Select 'Auto MCACC' from the System Setup menu then press ENTER.2 System Setup 1.Auto MCACC 2.Manual SP Setup 3.Input Assign 4.Speaker System 5.Video Parameter Return Try to be...
Owner's Manual
Page 33
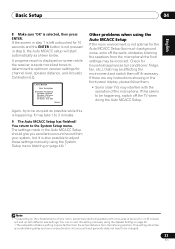
... and switch them . • Some older TVs may take 1 to the System Setup menu. Check for the Auto MCACC Setup (too much background noise, echo off the TV when doing the Auto MCACC Setup. Again, try to be happening, switch off the walls, obstacles blocking the speakers ... EQ. 1.Auto MCACC Now Analyzing Surround Analyzing Speaker System Speaker Distance Channel Level Acoustic Cal EQ Return Other problems when using the System Setup menu (starting on page 44).1 Note 1 • Depending on the characteristics of the microphone. You can correct the setting manually using the...
... and switch them . • Some older TVs may take 1 to the System Setup menu. Check for the Auto MCACC Setup (too much background noise, echo off the TV when doing the Auto MCACC Setup. Again, try to be happening, switch off the walls, obstacles blocking the speakers ... EQ. 1.Auto MCACC Now Analyzing Surround Analyzing Speaker System Speaker Distance Channel Level Acoustic Cal EQ Return Other problems when using the System Setup menu (starting on page 44).1 Note 1 • Depending on the characteristics of the microphone. You can correct the setting manually using the...
Owner's Manual
Page 35
... channel sound5 • NEO:6 CINEMA - With two channel sources, you 're playing and selects multichannel or stereo playback as necessary.1 AUTO/ STEREO/ BD MENU DIRECT A.L.C. See above • Straight Decode - See above • DOLBY PLIIz HEIGHT - See above • DOLBY PLII MUSIC - Up to movie ... in surround sound above for auto playback of source you're listening to 2-channel sources in the display. Listening to your speaker setup and the type of a source. Press repeatedly until AUTO SURROUND shows briefly in the display (it will automatically be selected and ...
... channel sound5 • NEO:6 CINEMA - With two channel sources, you 're playing and selects multichannel or stereo playback as necessary.1 AUTO/ STEREO/ BD MENU DIRECT A.L.C. See above • Straight Decode - See above • DOLBY PLIIz HEIGHT - See above • DOLBY PLII MUSIC - Up to movie ... in surround sound above for auto playback of source you're listening to 2-channel sources in the display. Listening to your speaker setup and the type of a source. Press repeatedly until AUTO SURROUND shows briefly in the display (it will automatically be selected and ...
Owner's Manual
Page 38
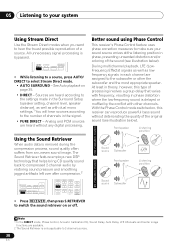
... EQ, Sound Delay, Auto Delay, LFE Attenuate and Center image functions are heard according to the settings made in the Surround Setup (speaker setting, channel level, speaker distance), as well as lowfrequency signals in each channel are heard without deteriorating the quality of...SHIFT • Press RECEIVER , then press S.RETRIEVER to switch the sound retriever on page 35. • DIRECT - AUTO/ STEREO/ BD MENU DIRECT A.L.C. The Sound Retriever feature employs new DSP technology that varies with other the subwoofer and the most appropriate speaker. Better sound using Phase ...
... EQ, Sound Delay, Auto Delay, LFE Attenuate and Center image functions are heard according to the settings made in the Surround Setup (speaker setting, channel level, speaker distance), as well as lowfrequency signals in each channel are heard without deteriorating the quality of...SHIFT • Press RECEIVER , then press S.RETRIEVER to switch the sound retriever on page 35. • DIRECT - AUTO/ STEREO/ BD MENU DIRECT A.L.C. The Sound Retriever feature employs new DSP technology that varies with other the subwoofer and the most appropriate speaker. Better sound using Phase ...
Owner's Manual
Page 40
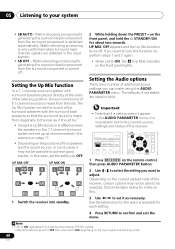
...additional sound settings you want to turn this case, set the setting to select the setting you can make using the AUDIO PARAMETER menu. Important • Note that the surround sound is heard from the surround component is only performed when surround back channel signals are...from the surround component is turned off . RECEIVER SLEEP TV SOURCE CONTROL AUDIO PARAMETER TOP MENU TUNE TUNER EDIT MASTER TOOLS VOLUME MENU PRESET PRESET RECEIVER INPUT SELECT INPUT ENTER BD DVD TV HOME MENU SETUP iPod CTRL C GO TUNE BAND RETURN 1 Press RECEIVER on the front panel lights....
...additional sound settings you want to turn this case, set the setting to select the setting you can make using the AUDIO PARAMETER menu. Important • Note that the surround sound is heard from the surround component is only performed when surround back channel signals are...from the surround component is turned off . RECEIVER SLEEP TV SOURCE CONTROL AUDIO PARAMETER TOP MENU TUNE TUNER EDIT MASTER TOOLS VOLUME MENU PRESET PRESET RECEIVER INPUT SELECT INPUT ENTER BD DVD TV HOME MENU SETUP iPod CTRL C GO TUNE BAND RETURN 1 Press RECEIVER on the front panel lights....
Owner's Manual
Page 44
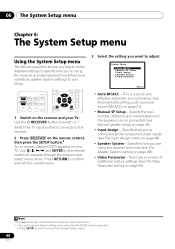
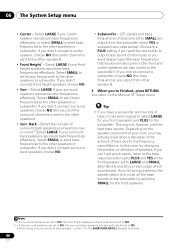
... - There are a number of the speakers you've connected (see Manual speaker setup on page 31). • Manual SP Setup - This is selected. • Press SETUP at any time to exit the System Setup menu. 44 En Specify the size, number, distance and overall balance of additional picture ... 45). • Input Assign - Use and ENTER on page 49). • Video Parameter - 06 The System Setup menu Chapter 6: The System Setup menu Using the System Setup menu The following section shows you how to make detailed settings to specify how you're using the speaker terminals (see The...
... - There are a number of the speakers you've connected (see Manual speaker setup on page 31). • Manual SP Setup - This is selected. • Press SETUP at any time to exit the System Setup menu. 44 En Specify the size, number, distance and overall balance of additional picture ... 45). • Input Assign - Use and ENTER on page 49). • Video Parameter - 06 The System Setup menu Chapter 6: The System Setup menu Using the System Setup menu The following section shows you how to make detailed settings to specify how you're using the speaker terminals (see The...
Owner's Manual
Page 45
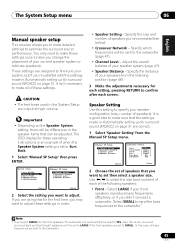
... to LARGE if the front speakers are set to Surr. These settings are designed to fine-tune your speakers from the Manual SP Setup menu. 2.Manual SP Setup a.Speaker Setting b.Crossover Network c.Channel Level d.Speaker Distance 2a.Speaker Setting Front SMALL Front Height [ SMALL ] Center [ SMALL ... Subwoofer: YES Return Return 2 Choose the set then select a speaker size. The System Setup menu 06 English Deutsch Français Italiano Nederlands Español Manual speaker setup This receiver allows you to make sure that the settings made in Automatically setting up for ...
... to LARGE if the front speakers are set to Surr. These settings are designed to fine-tune your speakers from the Manual SP Setup menu. 2.Manual SP Setup a.Speaker Setting b.Crossover Network c.Channel Level d.Speaker Distance 2a.Speaker Setting Front SMALL Front Height [ SMALL ] Center [ SMALL ... Subwoofer: YES Return Return 2 Choose the set then select a speaker size. The System Setup menu 06 English Deutsch Français Italiano Nederlands Español Manual speaker setup This receiver allows you to make sure that the settings made in Automatically setting up for ...
Owner's Manual
Page 46
.... If you have (one surround back speaker, connect it to low frequency cancellations. Back - Select SMALL to send bass frequencies to the Manual SP Setup menu. 06 The System Setup menu • Center - Select LARGE if your front height speakers reproduce bass frequencies effectively. Select LARGE if your center speaker reproduces bass frequencies effectively...
.... If you have (one surround back speaker, connect it to low frequency cancellations. Back - Select SMALL to send bass frequencies to the Manual SP Setup menu. 06 The System Setup menu • Center - Select LARGE if your front height speakers reproduce bass frequencies effectively. Select LARGE if your center speaker reproduces bass frequencies effectively...
Owner's Manual
Page 47
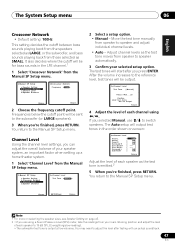
...bass sounds playing back from the speakers selected as LARGE, or the subwoofer, and bass sounds playing back from the Manual SP Setup menu. 2.Manual SP Setup a.Speaker Setting b.Crossover Network c.Channel Level d.Speaker Distance 2b.Crossover Network Frequency 100Hz Return Return 2 Choose the frequency cutoff point...tone is emitted.2 5 When you 're finished, press RETURN. If you press ENTER. You return to the Manual SP Setup menu. You return to the Manual SP Setup menu. Back R [ Surr. You may need to adjust the level after you selected Manual, use / to speaker ...
...bass sounds playing back from the speakers selected as LARGE, or the subwoofer, and bass sounds playing back from the Manual SP Setup menu. 2.Manual SP Setup a.Speaker Setting b.Crossover Network c.Channel Level d.Speaker Distance 2b.Crossover Network Frequency 100Hz Return Return 2 Choose the frequency cutoff point...tone is emitted.2 5 When you 're finished, press RETURN. If you press ENTER. You return to the Manual SP Setup menu. You return to the Manual SP Setup menu. Back R [ Surr. You may need to adjust the level after you selected Manual, use / to speaker ...

Owner's Manual
Page 48
... , then press CH SELECT and LEV +/- Use and ENTER on your TV connected to the receiver using /. 06 The System Setup menu Tip • You can also press CH SELECT and use / to select the channel, and then use / ...; to adjust the channel levels. Speaker Distance For good sound depth and separation from the Manual SP Setup menu. 2.Manual SP Setup a.Speaker Setting b.Crossover Network c.Channel Level d.Speaker Distance Return 2d.Speaker Distance Front L Center Front R Surround R Surr. DVD Important &#...
... , then press CH SELECT and LEV +/- Use and ENTER on your TV connected to the receiver using /. 06 The System Setup menu Tip • You can also press CH SELECT and use / to select the channel, and then use / ...; to adjust the channel levels. Speaker Distance For good sound depth and separation from the Manual SP Setup menu. 2.Manual SP Setup a.Speaker Setting b.Crossover Network c.Channel Level d.Speaker Distance Return 2d.Speaker Distance Front L Center Front R Surround R Surr. DVD Important &#...
Owner's Manual
Page 49
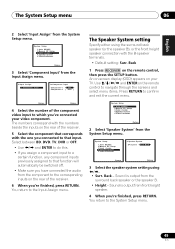
... which you connected to that function will automatically be switched off. • Make sure you have connected the audio from the System Setup menu. The Speaker System setting Specify either using /. • Surr. Back Return Return 3 Select the speaker system setting using... with the one you 've connected your TV. Sound is output from the System Setup menu. An on-screen display (OSD) appears on your video component. System Setup 1.Auto MCACC 2.Manual SP Setup 3.Input Assign 4.Speaker System 5.Video Parameter Return 3 Select 'Component Input' from the...
... which you connected to that function will automatically be switched off. • Make sure you have connected the audio from the System Setup menu. The Speaker System setting Specify either using /. • Surr. Back Return Return 3 Select the speaker system setting using... with the one you 've connected your TV. Sound is output from the System Setup menu. An on-screen display (OSD) appears on your video component. System Setup 1.Auto MCACC 2.Manual SP Setup 3.Input Assign 4.Speaker System 5.Video Parameter Return 3 Select 'Component Input' from the...
Owner's Manual
Page 50
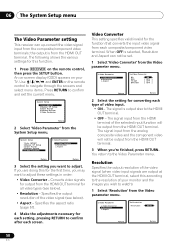
... Converter This setting specifies valid/invalid for all video types (see below ). • Resolution - 06 The System Setup menu The Video Parameter setting This receiver can not be set. 1 Select 'Video Converter' from the Video parameter menu. 5.Video Parameter a.Video Converter b.Resolution c.Aspect 5a.Video Converter BD DVD T V / S AT DVR/VCR ON [ OFF...
... Converter This setting specifies valid/invalid for all video types (see below ). • Resolution - 06 The System Setup menu The Video Parameter setting This receiver can not be set. 1 Select 'Video Converter' from the Video parameter menu. 5.Video Parameter a.Video Converter b.Resolution c.Aspect 5a.Video Converter BD DVD T V / S AT DVR/VCR ON [ OFF...

Owner's Manual
Page 51
... output from the component output terminals. 2 If the image doesn't match your monitor type, cropping or black bands appear). 1 Select 'Aspect' from the Video parameter menu. 5.Video Parameter a.Video Converter b.Resolution c.Aspect 5c.Aspect BD DVD T V / S AT DVR/VCR VIDEO NORMAL [THROUGH] [THROUGH] [ NORMAL ] [THROUGH] Return Return 2...same resolution as when input. • 480p/720p/1080i/1080p - English Deutsch Français Italiano Nederlands Español The System Setup menu 06 2 Select output resolution.1 • AUTO - The resolution is output unchanged. • NORMAL -
... output from the component output terminals. 2 If the image doesn't match your monitor type, cropping or black bands appear). 1 Select 'Aspect' from the Video parameter menu. 5.Video Parameter a.Video Converter b.Resolution c.Aspect 5c.Aspect BD DVD T V / S AT DVR/VCR VIDEO NORMAL [THROUGH] [THROUGH] [ NORMAL ] [THROUGH] Return Return 2...same resolution as when input. • 480p/720p/1080i/1080p - English Deutsch Français Italiano Nederlands Español The System Setup menu 06 2 Select output resolution.1 • AUTO - The resolution is output unchanged. • NORMAL -
Owner's Manual
Page 52
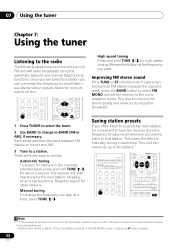
... RECEIVER SLEEP TV SOURCE CONTROL RECEIVER INPUT SELECT BD DVD TV INPUT DVR CD CD-R CH AUDIO PARAMETER TOP MENU TUNE TUNER EDIT MASTER TOOLS VOLUME MENU ENTER HOME MENU SETUP iPod CTRL CATEGORY TUNE BAND RETURN DTV/ TV MUTE ADAPTER iPod USB VIDEO TUNER SIRIUS SIGNAL SEL VOL BASS ... frequency for recall later- DVR CD CD-R CH ADAPTER iPod USB VIDEO TUNER SIRIUS SIGNAL SEL VOL AUDIO PARAMETER TOP MENU TUNE TUNER EDIT MASTER TOOLS VOLUME MENU ENTER HOME MENU SETUP iPod CTRL TUNE BAND RETURN 1 Press TUNER to select the tuner. 2 Use BAND to change the frequency one ....
... RECEIVER SLEEP TV SOURCE CONTROL RECEIVER INPUT SELECT BD DVD TV INPUT DVR CD CD-R CH AUDIO PARAMETER TOP MENU TUNE TUNER EDIT MASTER TOOLS VOLUME MENU ENTER HOME MENU SETUP iPod CTRL CATEGORY TUNE BAND RETURN DTV/ TV MUTE ADAPTER iPod USB VIDEO TUNER SIRIUS SIGNAL SEL VOL BASS ... frequency for recall later- DVR CD CD-R CH ADAPTER iPod USB VIDEO TUNER SIRIUS SIGNAL SEL VOL AUDIO PARAMETER TOP MENU TUNE TUNER EDIT MASTER TOOLS VOLUME MENU ENTER HOME MENU SETUP iPod CTRL TUNE BAND RETURN 1 Press TUNER to select the tuner. 2 Use BAND to change the frequency one ....
Owner's Manual
Page 62
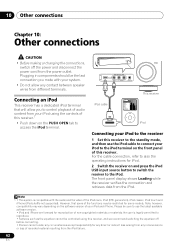
CONTROL ON / OFF VIDEO INPUT USB iPod iPhone VIDEO L AUDIO R MCACC SETUP MIC MASTER VOLUME iPod cable This receiver Music Genius > Playlists Artists Albums Songs Radio Genres Composers Audiobooks MENU iPod Connecting your iPod to the receiver 1 Set this receiver...10: Other connections CAUTION • Before making or changing the connections, switch off before connecting. • Pioneer cannot under any circumstances accept responsibility for any direct or indirect loss arising from any contact between speaker wires from the iPod....
CONTROL ON / OFF VIDEO INPUT USB iPod iPhone VIDEO L AUDIO R MCACC SETUP MIC MASTER VOLUME iPod cable This receiver Music Genius > Playlists Artists Albums Songs Radio Genres Composers Audiobooks MENU iPod Connecting your iPod to the receiver 1 Set this receiver...10: Other connections CAUTION • Before making or changing the connections, switch off before connecting. • Pioneer cannot under any circumstances accept responsibility for any direct or indirect loss arising from any contact between speaker wires from the iPod....


