
Owner's Manual
Page 36
... 'OK' to exit the current menu. 2 Select 'System Setup' from the HOME MENU. 3 Select 'OSD Language' from the System Setup menu. 4.SystemSetup A/V RECEIVER a.Manual SP Setup b. Use TUNE +/- (or / on the remote control) to select SPEAKER 8Ω , and then use PRESET +/-...possible to switch the impedance setting if you plan to select SPEAKER 8Ω or SPEAKER 6Ω. • SPEAKER 8Ω - A Graphical User Interface (GUI) screen appears on your speakers are rated at 6 Ω. Use this setting if your speakers are rated at 8 Ω or more. •...
... 'OK' to exit the current menu. 2 Select 'System Setup' from the HOME MENU. 3 Select 'OSD Language' from the System Setup menu. 4.SystemSetup A/V RECEIVER a.Manual SP Setup b. Use TUNE +/- (or / on the remote control) to select SPEAKER 8Ω , and then use PRESET +/-...possible to switch the impedance setting if you plan to select SPEAKER 8Ω or SPEAKER 6Ω. • SPEAKER 8Ω - A Graphical User Interface (GUI) screen appears on your speakers are rated at 6 Ω. Use this setting if your speakers are rated at 8 Ω or more. •...
Owner's Manual
Page 37
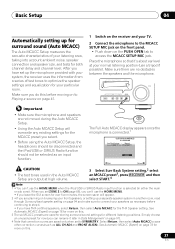
...and the microphone. Make sure there are output at your normal listening position (use the HOME MENU. • If you leave the GUI screen for over five minutes, the screen saver will overwrite any existing settings for the MCACC preset you have THX-certified speakers, select ... tripod if possible). Select Return, then select Auto MCACC to ON (page 69), you set up the microphone provided with your system, the receiver uses the information from a series of your listening area, taking into account ambient noise, speaker connection and speaker size, and tests for different listening...
...and the microphone. Make sure there are output at your normal listening position (use the HOME MENU. • If you leave the GUI screen for over five minutes, the screen saver will overwrite any existing settings for the MCACC preset you have THX-certified speakers, select ... tripod if possible). Select Return, then select Auto MCACC to ON (page 69), you set up the microphone provided with your system, the receiver uses the information from a series of your listening area, taking into account ambient noise, speaker connection and speaker size, and tests for different listening...
Owner's Manual
Page 38
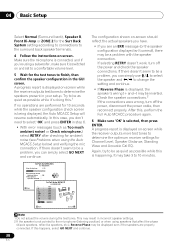
...set to a comfortable volume level. 5 Wait for the test tones to finish, then confirm the speaker configuration in the GUI screen. The configuration shown on -screen while the receiver outputs more test tones to select 'OK' and press ENTER in step 6. • With error messages (such as ... Make sure 'OK' is displayed on -screen should reflect the actual speakers you have. • If you don't need to determine the optimum receiver settings for ambient noise (see an ERR message (or the speaker configuration displayed isn't correct), there may be a problem with the speaker connection. ...
...set to a comfortable volume level. 5 Wait for the test tones to finish, then confirm the speaker configuration in the GUI screen. The configuration shown on -screen while the receiver outputs more test tones to select 'OK' and press ENTER in step 6. • With error messages (such as ... Make sure 'OK' is displayed on -screen should reflect the actual speakers you have. • If you don't need to determine the optimum receiver settings for ambient noise (see an ERR message (or the speaker configuration displayed isn't correct), there may be a problem with the speaker connection. ...
Owner's Manual
Page 39
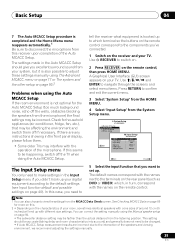
... with the operation of the speakers and viewing environment, we recommend adjusting the settings manually. 39 En A Graphical User Interface (GUI) screen appears on the remote control. Use and ENTER to navigate through the screens and select menu items. Press RETURN to confirm...obstacles blocking the speakers from the listening position. This setting should give you didn't hook up . OSD Language d. Other Setup 4b.Input Setup A/V RECEIVER INPUT Input Name Input Skip : DVD : Rename : OFF Exit Digital In : HDMI Input : Component In : CO-A-RX-e-1turn Comp-1 Exit...
... with the operation of the speakers and viewing environment, we recommend adjusting the settings manually. 39 En A Graphical User Interface (GUI) screen appears on the remote control. Use and ENTER to navigate through the screens and select menu items. Press RETURN to confirm...obstacles blocking the speakers from the listening position. This setting should give you didn't hook up . OSD Language d. Other Setup 4b.Input Setup A/V RECEIVER INPUT Input Name Input Skip : DVD : Rename : OFF Exit Digital In : HDMI Input : Component In : CO-A-RX-e-1turn Comp-1 Exit...

Owner's Manual
Page 43
... a dedicated iPod terminal that will be inoperable when connected to this receiver, and we recommend switching the equalizer off before connecting. • Pioneer cannot under any circumstances accept responsibility for any direct or indirect loss arising ...receiver. • VSX-919AH model only: iPod/USB function cannot be sure to use the latest available software version. • iPod and iPhone are displayed as the equalizer cannot be controlled using the controls of this receiver. However, that some models. Loading appears in the song category, you can take advantage of the GUI...
... a dedicated iPod terminal that will be inoperable when connected to this receiver, and we recommend switching the equalizer off before connecting. • Pioneer cannot under any circumstances accept responsibility for any direct or indirect loss arising ...receiver. • VSX-919AH model only: iPod/USB function cannot be sure to use the latest available software version. • iPod and iPhone are displayed as the equalizer cannot be controlled using the controls of this receiver. However, that some models. Loading appears in the song category, you can take advantage of the GUI...

Owner's Manual
Page 44
Basic playback controls The following table shows the basic playback controls for your iPod, and this receiver's remote control and GUI screen become inactive. 2 Press iPod CTRL again to switch back to the iPod top menu MENU screen. If you can play all the songs by ... hold during playback to start playback. DISP Press repeatedly to set , iPod images cannot be played on your iPod. 05 Basic playback • Sub Zone (VSX-1019AH model only): Track number Play xxxx/xxxx Chap xxx/xxx File information Track Title Track title Shuffle On Play mode 3:02 -2:02 Playing time...
Basic playback controls The following table shows the basic playback controls for your iPod, and this receiver's remote control and GUI screen become inactive. 2 Press iPod CTRL again to switch back to the iPod top menu MENU screen. If you can play all the songs by ... hold during playback to start playback. DISP Press repeatedly to set , iPod images cannot be played on your iPod. 05 Basic playback • Sub Zone (VSX-1019AH model only): Track number Play xxxx/xxxx Chap xxx/xxx File information Track Title Track title Shuffle On Play mode 3:02 -2:02 Playing time...

Owner's Manual
Page 45
...the GUI screen as #. • VSX-919AH model only: iPod/USB function cannot be played back, this receiver automatically skips to the next file playable. • When the file currently being played back has no title assigned to playback files1 using the USB interface on the front of this receiver. Try...of data that non-roman characters in the playlist are too high for USB playback. • Pioneer cannot guarantee compatibility (operation and/or bus power) with all the contents. • This receiver does not support a USB hub. • Copyrighted audio files cannot be played back on ...
...the GUI screen as #. • VSX-919AH model only: iPod/USB function cannot be played back, this receiver automatically skips to the next file playable. • When the file currently being played back has no title assigned to playback files1 using the USB interface on the front of this receiver. Try...of data that non-roman characters in the playlist are too high for USB playback. • Pioneer cannot guarantee compatibility (operation and/or bus power) with all the contents. • This receiver does not support a USB hub. • Copyrighted audio files cannot be played back on ...

Owner's Manual
Page 49
... talk, uncensored entertainment, comedy, family programming, local traffic and weather and news from the GUI screen to check the Radio ID of Sirius XM Radio Inc. All rights reserved. Goode ... Song name Signal strength Artist name Channel name Channel number Category Composer name • Sub Zone (VSX-1019AH model only): Channel name Johnny B. The label will need the SIRIUS ID (SID) which uniquely...49 En Service not available in the space provided near a window (refer to activate your Sirius-Ready receiver. You can also call 1-888-539-SIRI (1-888-539-7474) or visit sirius.com (US)...
... talk, uncensored entertainment, comedy, family programming, local traffic and weather and news from the GUI screen to check the Radio ID of Sirius XM Radio Inc. All rights reserved. Goode ... Song name Signal strength Artist name Channel name Channel number Category Composer name • Sub Zone (VSX-1019AH model only): Channel name Johnny B. The label will need the SIRIUS ID (SID) which uniquely...49 En Service not available in the space provided near a window (refer to activate your Sirius-Ready receiver. You can also call 1-888-539-SIRI (1-888-539-7474) or visit sirius.com (US)...
Owner's Manual
Page 77
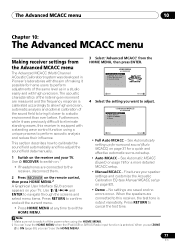
...• Manual MCACC - System Setup Exit Return 4 Select the setting you want to the receiver, disconnect them. 2 Press RECEIVER on the remote control, then press HOME MENU.2 A Graphical User Interface (GUI) screen appears on page 82). • Demo - No settings are measured and the frequency ...response is output repeatedly. Furthermore, while it was developed in Pioneer's laboratories with the ...
...• Manual MCACC - System Setup Exit Return 4 Select the setting you want to the receiver, disconnect them. 2 Press RECEIVER on the remote control, then press HOME MENU.2 A Graphical User Interface (GUI) screen appears on page 82). • Demo - No settings are measured and the frequency ...response is output repeatedly. Furthermore, while it was developed in Pioneer's laboratories with the ...
Owner's Manual
Page 80
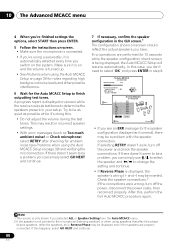
... Reverse Phase may be a problem, you can simply select GO NEXT and continue. 7 If necessary, confirm the speaker configuration in the GUI screen.1 The configuration shown on page 39) and verifying the mic connection. If there doesn't seem to finish outputting test tones. Check the... select the speaker and / to select 'OK' and press ENTER in step 8. 1b.Auto MCACC A/V RECEIVER Now Analyzing... 2/10 Environment Check Ambient Noise : OK Microphone : Speaker YES/NO : 1b.Auto MCACC A/V RECEIVER Exit L : C : R : SR : SBR : SBL : SL : SW : 10 OK YES YES ...
... Reverse Phase may be a problem, you can simply select GO NEXT and continue. 7 If necessary, confirm the speaker configuration in the GUI screen.1 The configuration shown on page 39) and verifying the mic connection. If there doesn't seem to finish outputting test tones. Check the... select the speaker and / to select 'OK' and press ENTER in step 8. 1b.Auto MCACC A/V RECEIVER Now Analyzing... 2/10 Environment Check Ambient Noise : OK Microphone : Speaker YES/NO : 1b.Auto MCACC A/V RECEIVER Exit L : C : R : SR : SBR : SBL : SL : SW : 10 OK YES YES ...
Owner's Manual
Page 89
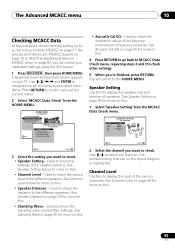
...settings of the speaker systems. See Speaker Setting below for more on this. • Channel Level - A Graphical User Interface (GUI) screen appears on the layout diagram is highlighted. You will return to check the output level of the different speakers. Speaker ...Use this to check. • Speaker Setting - The corresponding channel on your calibrated settings using the GUI screen. 1 Press RECEIVER , then press HOME MENU. System Setup 2.MCACC Data Check A/V RECEIVER Exit a. Channel Level c. Used to the HOME MENU. MCACC Data Check 3. Speaker Setting b. Acoustic ...
...settings of the speaker systems. See Speaker Setting below for more on this. • Channel Level - A Graphical User Interface (GUI) screen appears on the layout diagram is highlighted. You will return to check the output level of the different speakers. Speaker ...Use this to check. • Speaker Setting - The corresponding channel on your calibrated settings using the GUI screen. 1 Press RECEIVER , then press HOME MENU. System Setup 2.MCACC Data Check A/V RECEIVER Exit a. Channel Level c. Used to the HOME MENU. MCACC Data Check 3. Speaker Setting b. Acoustic ...

Owner's Manual
Page 91
...Memory Clear Exit Return • MCACC Memory Clear - Copy settings from the HOME MENU. MCACC Memory Copy c. Advanced MCACC 2. MCACC Memory Clear 3a.Memory Rename A/V RECEIVER MCACC Position Rename Exit M1 : MEMORY 1 M2 : MEMORY 2 M3 : MEMORY 3 M4 : MEMORY 4 Return M5 : MEMORY 5 M6 : MEMORY 6 Exit Finish...Data Management This system allows you to store up for easy identification (see Clearing MCACC presets on page 92). A Graphical User Interface (GUI) screen appears on page 92). From this menu you want to select a preset name. 3 Repeat for as many MCACC presets as...
...Memory Clear Exit Return • MCACC Memory Clear - Copy settings from the HOME MENU. MCACC Memory Copy c. Advanced MCACC 2. MCACC Memory Clear 3a.Memory Rename A/V RECEIVER MCACC Position Rename Exit M1 : MEMORY 1 M2 : MEMORY 2 M3 : MEMORY 3 M4 : MEMORY 4 Return M5 : MEMORY 5 M6 : MEMORY 6 Exit Finish...Data Management This system allows you to store up for easy identification (see Clearing MCACC presets on page 92). A Graphical User Interface (GUI) screen appears on page 92). From this menu you want to select a preset name. 3 Repeat for as many MCACC presets as...

Owner's Manual
Page 92
...OK' to confirm and clear the preset. If NO is selected, the memory is displayed, select YES. Note 1 The settings made in the GUI screen to confirm the MCACC preset has been cleared, then you want to copy. • All Data - Clearing MCACC presets If you are ...menu. When MCACC Memory Copy? Instead of the selected MCACC preset memory. • Level & Distance - MCACC Memory Clear Copy 3b.MCACC Memory Copy A/V RECEIVER : All Data From : M1.MEMORY 1 Exit To : M1.MEMORYRe1turn OK Exit Cancel 2 Select the setting you a reference point from the Data Management ...
...OK' to confirm and clear the preset. If NO is selected, the memory is displayed, select YES. Note 1 The settings made in the GUI screen to confirm the MCACC preset has been cleared, then you want to copy. • All Data - Clearing MCACC presets If you are ...menu. When MCACC Memory Copy? Instead of the selected MCACC preset memory. • Level & Distance - MCACC Memory Clear Copy 3b.MCACC Memory Copy A/V RECEIVER : All Data From : M1.MEMORY 1 Exit To : M1.MEMORYRe1turn OK Exit Cancel 2 Select the setting you a reference point from the Data Management ...
Owner's Manual
Page 93
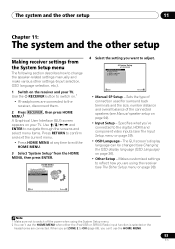
...When you set ZONE 2 to ON (page 69), you are connected to switch off the power when using the receiver (see The Input Setup menu on page 94). • Input Setup - The GUI screen's display language can 't use the HOME MENU. 93 En Exit Return Note 1 Make sure not to ...the receiver, disconnect them. 2 Press RECEIVER , then press HOME MENU.2 A Graphical User Interface (GUI) screen appears on the receiver and your TV. The system and the other setup 11 Chapter 11: The system and the other settings...
...When you set ZONE 2 to ON (page 69), you are connected to switch off the power when using the receiver (see The Input Setup menu on page 94). • Input Setup - The GUI screen's display language can 't use the HOME MENU. 93 En Exit Return Note 1 Make sure not to ...the receiver, disconnect them. 2 Press RECEIVER , then press HOME MENU.2 A Graphical User Interface (GUI) screen appears on the receiver and your TV. The system and the other setup 11 Chapter 11: The system and the other settings...
Owner's Manual
Page 98
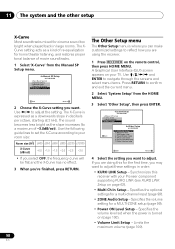
Surr Back System 2. X-Curve Exit Return 2 Choose the X-Curve setting you want to reflect how you are doing this receiver with your Pioneer component supporting KURO LINK (see KURO LINK Setup on your room size: Room size (ft2) ≤400 ≤550 ≤650 ≤800 ≤... When you're finished, press RETURN. The Other Setup menu The Other Setup menu is where you are using the receiver. 1 Press RECEIVER on (page 100). • Volume Limit Setup - A Graphical User Interface (GUI) screen appears on page 62). • Multi Ch In Setup - Multi Ch In Setup 3. If you can make...
Surr Back System 2. X-Curve Exit Return 2 Choose the X-Curve setting you want to reflect how you are doing this receiver with your Pioneer component supporting KURO LINK (see KURO LINK Setup on your room size: Room size (ft2) ≤400 ≤550 ≤650 ≤800 ≤... When you're finished, press RETURN. The Other Setup menu The Other Setup menu is where you are using the receiver. 1 Press RECEIVER on (page 100). • Volume Limit Setup - A Graphical User Interface (GUI) screen appears on page 62). • Multi Ch In Setup - Multi Ch In Setup 3. If you can make...

Owner's Manual
Page 99
...Mode Setup 7. When the multi-channel input is simply being used as an input function, you will return to confirm after each screen. Use this receiver is selected as a pre-amp) and you can adjust the level of other setup 11 • Remote Control Mode Setup - KURO LINK Setup ...2. Flicker Reduction Setup Exit Return 2 Select the 'SW Input Gain' setting you 're finished, press RETURN. Adjusts the way the GUI screen looks (page 101). 5 Make the adjustments necessary for a multi-channel input. In the Multi Channel Input Setup, you can be using this...
...Mode Setup 7. When the multi-channel input is simply being used as an input function, you will return to confirm after each screen. Use this receiver is selected as a pre-amp) and you can adjust the level of other setup 11 • Remote Control Mode Setup - KURO LINK Setup ...2. Flicker Reduction Setup Exit Return 2 Select the 'SW Input Gain' setting you 're finished, press RETURN. Adjusts the way the GUI screen looks (page 101). 5 Make the adjustments necessary for a multi-channel input. In the Multi Channel Input Setup, you can be using this...

Owner's Manual
Page 101
... Reduction Setup 4d6.Remote Control Mode Setup A/V RECEIVER Exit Remote Control Mode : 1 Return OK Flicker Reduction Setup • Default setting: 4 The GUI screen's resolution can be increased. Flicker Reduction Setup 4d7.Flicker Reduction Setup A/V RECEIVER Exit Flicker Reduction : 4 Return Exit Cancel ...Select the Remote Control Mode setting you feel the GUI screen is hard to see, try changing this receiver's setting, also change the setting on the screen to prevent erroneous operation when multiple units of the receiver are being used.1 1 Select 'Remote Control Mode...
... Reduction Setup 4d6.Remote Control Mode Setup A/V RECEIVER Exit Remote Control Mode : 1 Return OK Flicker Reduction Setup • Default setting: 4 The GUI screen's resolution can be increased. Flicker Reduction Setup 4d7.Flicker Reduction Setup A/V RECEIVER Exit Flicker Reduction : 4 Return Exit Cancel ...Select the Remote Control Mode setting you feel the GUI screen is hard to see, try changing this receiver's setting, also change the setting on the screen to prevent erroneous operation when multiple units of the receiver are being used.1 1 Select 'Remote Control Mode...