

Owner's Manual
Page 1
AUDIO/VIDEO MULTI-CHANNEL RECEIVER RECEPTEUR AUDIOVISUEL A VOIES MULTI-CANAUX RECEPTOR AUDIO-VIDEO MULTICANAL VSX-821-K Register your product on http://www.pioneerelectronics.com (US) http://www.pioneerelectronics.ca (Canada) • Protect your new investment The... new product • Improve product development Your input helps us continue to design products that meet your needs. • Receive a free Pioneer newsletter Registered customers can opt in to receive a monthly newsletter. http://www.pioneerelectronics.com (US) http://www.pioneerelectronics.ca (Canada) Operating Instructions ...
AUDIO/VIDEO MULTI-CHANNEL RECEIVER RECEPTEUR AUDIOVISUEL A VOIES MULTI-CANAUX RECEPTOR AUDIO-VIDEO MULTICANAL VSX-821-K Register your product on http://www.pioneerelectronics.com (US) http://www.pioneerelectronics.ca (Canada) • Protect your new investment The... new product • Improve product development Your input helps us continue to design products that meet your needs. • Receive a free Pioneer newsletter Registered customers can opt in to receive a monthly newsletter. http://www.pioneerelectronics.com (US) http://www.pioneerelectronics.ca (Canada) Operating Instructions ...

Owner's Manual
Page 4
... function 31 Setting the Audio options 32 Making an audio or a video recording 33 06 The System Setup menu Using the System Setup menu 34 Manual speaker setup 34 Speaker Setting 34 Crossover Network 35 Channel Level 35 Speaker Distance 36 The Input Assign menu 36 The Pre Out Setting 37... 05 Listening to your system Choosing the listening mode 29 Auto playback 29 Listening in a safe place for future reference. After you for buying this Pioneer product.
... function 31 Setting the Audio options 32 Making an audio or a video recording 33 06 The System Setup menu Using the System Setup menu 34 Manual speaker setup 34 Speaker Setting 34 Crossover Network 35 Channel Level 35 Speaker Distance 36 The Input Assign menu 36 The Pre Out Setting 37... 05 Listening to your system Choosing the listening mode 29 Auto playback 29 Listening in a safe place for future reference. After you for buying this Pioneer product.

Owner's Manual
Page 5
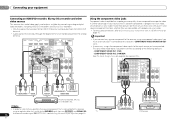
in extremely hot or cold areas - Check the manual that came with the TV if you don't know how to do this. 4 The Pre Out Setting (page 37) (When connecting the front height ... 30) • Using surround back channel processing (page 31) • Setting the Up Mix function (page 31) • Setting the Audio options (page 32) • Manual speaker setup (page 34) 8 Making maximum use of the remote control • Setting the remote to a device that gives off a magnetic field). Don't install...
in extremely hot or cold areas - Check the manual that came with the TV if you don't know how to do this. 4 The Pre Out Setting (page 37) (When connecting the front height ... 30) • Using surround back channel processing (page 31) • Setting the Up Mix function (page 31) • Setting the Audio options (page 32) • Manual speaker setup (page 34) 8 Making maximum use of the remote control • Setting the remote to a device that gives off a magnetic field). Don't install...
Owner's Manual
Page 16
... input through the digital terminal will not be done if you must also have your component with no HDMI terminal on page 15. See the manuals that are input to the following defaults: -
... input through the digital terminal will not be done if you must also have your component with no HDMI terminal on page 15. See the manuals that are input to the following defaults: -

Owner's Manual
Page 20
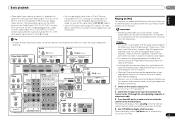
... uses the information from the System Setup menu, then press ENTER. After you cancel the Auto MCACC setup at high volume. System Setup 1.Auto MCACC 2.Manual SP Setup 3.Input Assign 4.Pre Out Setting 5.HDMI Setup 6.Auto Power Down 7.FL Demo Mode Return • MIC IN blinks when the microphone is not...
... uses the information from the System Setup menu, then press ENTER. After you cancel the Auto MCACC setup at high volume. System Setup 1.Auto MCACC 2.Manual SP Setup 3.Input Assign 4.Pre Out Setting 5.HDMI Setup 6.Auto Power Down 7.FL Demo Mode Return • MIC IN blinks when the microphone is not...

Owner's Manual
Page 21
...check the speaker connections. 9 Make sure 'OK' is selected, then press ENTER. A progress report is also possible to adjust these settings manually using the System Setup menu (starting on page 34. • The subwoofer distance setting may be farther than the actual distance from the microphone...of around 12 cm (5 inches) will start automatically as possible while this seems to the next step. You can correct the setting manually using the Auto MCACC setup below). The configuration shown on -screen while the receiver outputs more test tones to be incorrect. If this...
...check the speaker connections. 9 Make sure 'OK' is selected, then press ENTER. A progress report is also possible to adjust these settings manually using the System Setup menu (starting on page 34. • The subwoofer distance setting may be farther than the actual distance from the microphone...of around 12 cm (5 inches) will start automatically as possible while this seems to the next step. You can correct the setting manually using the Auto MCACC setup below). The configuration shown on -screen while the receiver outputs more test tones to be incorrect. If this...
Owner's Manual
Page 23
For more details, refer to the instruction manual supplied with your iPod using this receiver can only play music from the...is playing an analog signal. The compatible signals via the HDMI terminals are licensed for reproduction of Pioneer. •Installing software versions other digital signal formats, set the signal input to enjoy the picture ... Plus, DTS-EXPRESS, DTS-HD Master Audio and DVD Audio (including 192 kHz). Important • Pioneer cannot under any circumstances accept responsibility for some of the functions may result in incompatibility with DTS is legally...
For more details, refer to the instruction manual supplied with your iPod using this receiver can only play music from the...is playing an analog signal. The compatible signals via the HDMI terminals are licensed for reproduction of Pioneer. •Installing software versions other digital signal formats, set the signal input to enjoy the picture ... Plus, DTS-EXPRESS, DTS-HD Master Audio and DVD Audio (including 192 kHz). Important • Pioneer cannot under any circumstances accept responsibility for some of the functions may result in incompatibility with DTS is legally...

Owner's Manual
Page 27
...select a channel from your favorite genre, press CATEGORY and use / to select a genre, and then use just the front panel display to the manual for the SiriusConnect Home tuner for any time, press RETURN. You can check the strength of the tuner itself. You can also use the number... on page 46. 27 En English Français Español SIRIUS, XM and all channels are trademarks of the AC adapter and this manual. The label will need to check the Radio ID of XM' service is automatically chosen (without pressing ENTER) after pressing SIRIUS the display shows ...
...select a channel from your favorite genre, press CATEGORY and use / to select a genre, and then use just the front panel display to the manual for the SiriusConnect Home tuner for any time, press RETURN. You can check the strength of the tuner itself. You can also use the number... on page 46. 27 En English Français Español SIRIUS, XM and all channels are trademarks of the AC adapter and this manual. The label will need to check the Radio ID of XM' service is automatically chosen (without pressing ENTER) after pressing SIRIUS the display shows ...
Owner's Manual
Page 28
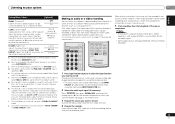
...1 ENTER VIDEO 2 TUNER SIRIUS VOL HOME MENU SETUP iPod CTRL CATEGORY 1 Press TUNER to select the station preset you want to a station. Manual tuning To change the band (FM or AM), if necessary. RECEIVER SLEEP TV SOURCE CONTROL AUDIO PARAMETER TOP MENU TUNER EDIT MASTER TOOLS VOLUME TUNE...to be lost and will be reprogrammed. • Stations are three ways to FM and AM radio broadcasts using the automatic (search) and manual (step) tuning functions. You can memorize the frequency for recall later-see Saving station presets below for the next station, stopping when it ...
...1 ENTER VIDEO 2 TUNER SIRIUS VOL HOME MENU SETUP iPod CTRL CATEGORY 1 Press TUNER to select the station preset you want to a station. Manual tuning To change the band (FM or AM), if necessary. RECEIVER SLEEP TV SOURCE CONTROL AUDIO PARAMETER TOP MENU TUNER EDIT MASTER TOOLS VOLUME TUNE...to be lost and will be reprogrammed. • Stations are three ways to FM and AM radio broadcasts using the automatic (search) and manual (step) tuning functions. You can memorize the frequency for recall later-see Saving station presets below for the next station, stopping when it ...

Owner's Manual
Page 30
... to the number of where the front left over after compression. Use to provide a rich surround sound effect directed to the settings made in the Manual SP Setup (speaker setting, channel level, speaker distance), as well as with dynamic soundtracks. Using the Advanced surround BD MENU ADV SURR ADVANCED SURROUND The...
... to the number of where the front left over after compression. Use to provide a rich surround sound effect directed to the settings made in the Manual SP Setup (speaker setting, channel level, speaker distance), as well as with dynamic soundtracks. Using the Advanced surround BD MENU ADV SURR ADVANCED SURROUND The...
Owner's Manual
Page 33
...iPod USB or ADAPTER input is selected is only available for HDMI. e. The initial set the audio recording level automatically-check the component's instruction manual if you're unsure. 5 Start recording, then start playback of the receiver will switch over, and you want to include ON surround speakers...time by using S.RETRIEVER button. If you want to the receiver (such as a CD player or TV). Tune to OFF and adjust the delay time manually. into the recording device and set A.DLY to the radio station, load the CD, video, DVD etc. 4 Prepare the recorder. H.GAIN (Height ...
...iPod USB or ADAPTER input is selected is only available for HDMI. e. The initial set the audio recording level automatically-check the component's instruction manual if you're unsure. 5 Start recording, then start playback of the receiver will switch over, and you want to include ON surround speakers...time by using S.RETRIEVER button. If you want to the receiver (such as a CD player or TV). Tune to OFF and adjust the delay time manually. into the recording device and set A.DLY to the radio station, load the CD, video, DVD etc. 4 Prepare the recorder. H.GAIN (Height ...

Owner's Manual
Page 34
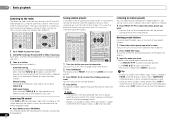
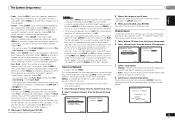
...on page 37). CAUTION • The test tones used in Automatically setting up for system setup. • If headphones are correct. 1 Select 'Manual SP Setup' from the System Setup menu. 2 Select 'Speaker Setting' from the listening position (page 36). • Input Assign - Back. Use... to your TV. Specify which frequencies will be sent to select the size (and number) of each of your speakers from the Manual SP Setup menu. 2.Manual SP Setup a.Speaker Setting b.Crossover Network c.Channel Level d.Speaker Distance 2a.Speaker Setting Front SMALL Center [ SMALL ] Surr [ SMALL...
...on page 37). CAUTION • The test tones used in Automatically setting up for system setup. • If headphones are correct. 1 Select 'Manual SP Setup' from the System Setup menu. 2 Select 'Speaker Setting' from the listening position (page 36). • Input Assign - Back. Use... to your TV. Specify which frequencies will be sent to select the size (and number) of each of your speakers from the Manual SP Setup menu. 2.Manual SP Setup a.Speaker Setting b.Crossover Network c.Channel Level d.Speaker Distance 2a.Speaker Setting Front SMALL Center [ SMALL ] Surr [ SMALL...
Owner's Manual
Page 35
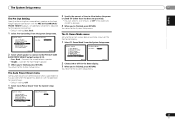
...LARGE and SMALL alternatively and let your selected setup option. Frequencies below ). You return to the Manual SP Setup menu. Move the test tone manually from the Manual SP Setup menu. 2.Manual SP Setup a.Speaker Setting b.Crossover Network c.Channel Level d.Speaker Distance 2b.Crossover Network Frequency 100Hz ...ears judge which sounds best. After the volume increases to the reference level, test tones will be output. 2c.Channel Level Test Tone [ Manual ] Please Wait . . .20 Caution Loud test tones will be fixed to the other speakers or subwoofer. Select LARGE if your front ...
...LARGE and SMALL alternatively and let your selected setup option. Frequencies below ). You return to the Manual SP Setup menu. Move the test tone manually from the Manual SP Setup menu. 2.Manual SP Setup a.Speaker Setting b.Crossover Network c.Channel Level d.Speaker Distance 2b.Crossover Network Frequency 100Hz ...ears judge which sounds best. After the volume increases to the reference level, test tones will be output. 2c.Channel Level Test Tone [ Manual ] Please Wait . . .20 Caution Loud test tones will be fixed to the other speakers or subwoofer. Select LARGE if your front ...

Owner's Manual
Page 36
...receiver using a component video input, you didn't hook up your equipment according to the default settings for effective surround sound. 1 Select 'Manual SP Setup' from the System Setup menu. 2 Select 'Speaker Distance' from the Input Assign menu. 3.Input Assign a.Component Input 3a... component). The receiver can change the channel levels at low volumes. FL Demo Mode Return 2 Select 'Component Input' from the Manual SP Setup menu. 2.Manual SP Setup a.Speaker Setting b.Crossover Network c.Channel Level d.Speaker Distance Return 2d.Speaker Distance Front L Center Front R Surround R ...
...receiver using a component video input, you didn't hook up your equipment according to the default settings for effective surround sound. 1 Select 'Manual SP Setup' from the System Setup menu. 2 Select 'Speaker Distance' from the Input Assign menu. 3.Input Assign a.Component Input 3a... component). The receiver can change the channel levels at low volumes. FL Demo Mode Return 2 Select 'Component Input' from the Manual SP Setup menu. 2.Manual SP Setup a.Speaker Setting b.Crossover Network c.Channel Level d.Speaker Distance Return 2d.Speaker Distance Front L Center Front R Surround R ...
Owner's Manual
Page 37
... is desired). 3 When you're finished, press RETURN. FL Demo Mode 4.Pre Out Setting Pre Out Surr. Connect the surround back speaker. • Height - Manual SP Setup 3 . Auto Power Down 7 . Pre Out Setting 5 . You return to the System Setup menu. Connect the front height speaker. 3 When you ... The System Setup menu 06 English Français Español The Pre Out Setting Specify either using Surr. Auto MCACC 2 . Manual SP Setup 3 . Input Assign 4 . HDMI Setup 6 . The Auto Power Down menu Set to the System Setup menu. Auto MCACC 2 . Auto MCACC...
... is desired). 3 When you're finished, press RETURN. FL Demo Mode 4.Pre Out Setting Pre Out Surr. Connect the surround back speaker. • Height - Manual SP Setup 3 . Auto Power Down 7 . Pre Out Setting 5 . You return to the System Setup menu. Connect the front height speaker. 3 When you ... The System Setup menu 06 English Français Español The Pre Out Setting Specify either using Surr. Auto MCACC 2 . Manual SP Setup 3 . Input Assign 4 . HDMI Setup 6 . The Auto Power Down menu Set to the System Setup menu. Auto MCACC 2 . Auto MCACC...
Owner's Manual
Page 38
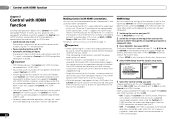
... - 07 Control with HDMI function Chapter 7: Control with HDMI function Synchronized operations below ). The Control with HDMI function may not work with Pioneer made Control with HDMI-compatible components and components of other components. • Be sure to connect the TV's audio cable to the HDMI ...for each component. 1 Switch on your TV. Enables the Control with HDMI function, set ARC at any operations during initialization, and you want . Manual SP Setup 3 . When using HDMI on . 2 Switch the TV input to switch the power off , audio and video of inputs The receiver...
... - 07 Control with HDMI function Chapter 7: Control with HDMI function Synchronized operations below ). The Control with HDMI function may not work with Pioneer made Control with HDMI-compatible components and components of other components. • Be sure to connect the TV's audio cable to the HDMI ...for each component. 1 Switch on your TV. Enables the Control with HDMI function, set ARC at any operations during initialization, and you want . Manual SP Setup 3 . When using HDMI on . 2 Switch the TV input to switch the power off , audio and video of inputs The receiver...
Owner's Manual
Page 44
.... Broadcast stations cannot be selected automatically. Connect an outdoor antenna (refer to set the Control with HDMI to the instruction manual supplied with the source component. There seems to be able to make sure it away from the receiver (or move antennas farther away... equipment on page 10). Check the audio output settings of speaker wire touching the rear panel. If the message persists, call a Pioneer authorized independent service company. If synchronized operations are not needed, set up . The Dolby Digital or DTS source you are correct and...
.... Broadcast stations cannot be selected automatically. Connect an outdoor antenna (refer to set the Control with HDMI to the instruction manual supplied with the source component. There seems to be able to make sure it away from the receiver (or move antennas farther away... equipment on page 10). Check the audio output settings of speaker wire touching the rear panel. If the message persists, call a Pioneer authorized independent service company. If synchronized operations are not needed, set up . The Dolby Digital or DTS source you are correct and...
Owner's Manual
Page 45
... configuration. 45 En The OSD screen (System Setup menu or the menu screen for support. Configuration Connect your monitor, please consult the component or monitor manual or contact the manufacturer for the iPod/USB) isn't displayed. The OSD will not output from another position. Avoid exposing the remote sensor...
... configuration. 45 En The OSD screen (System Setup menu or the menu screen for support. Configuration Connect your monitor, please consult the component or monitor manual or contact the manufacturer for the iPod/USB) isn't displayed. The OSD will not output from another position. Avoid exposing the remote sensor...

Owner's Manual
Page 142
...THE COST OF PARTS OR LABOR WHICH WOULD BE OTHERWISE PROVIDED WITHOUT CHARGE UNDER THIS WARRANTY OBTAINED FROM ANY SOURCE OTHER THAN A PIONEER AUTHORIZED SERVICE COMPANY OR OTHER DESIGNATED LOCATION. EXCEPT AS EXPRESSLY PROVIDED HEREIN, THERE ARE NO REPRESENTATIONS, WARRANTIES, OBLIGATIONS OR CONDITIONS, ..., SUBSEQUENT DAMAGE FROM LEAKING, DAMAGE FROM INOPERATIVE BATTERIES, OR THE USE OF BATTERIES NOT CONFORMING TO THOSE SPECIFIED IN THE OWNER'S MANUAL. Following our response to any remedies, created by POC in transit. OR CANADA. and Canada should a dispute arise between you...
...THE COST OF PARTS OR LABOR WHICH WOULD BE OTHERWISE PROVIDED WITHOUT CHARGE UNDER THIS WARRANTY OBTAINED FROM ANY SOURCE OTHER THAN A PIONEER AUTHORIZED SERVICE COMPANY OR OTHER DESIGNATED LOCATION. EXCEPT AS EXPRESSLY PROVIDED HEREIN, THERE ARE NO REPRESENTATIONS, WARRANTIES, OBLIGATIONS OR CONDITIONS, ..., SUBSEQUENT DAMAGE FROM LEAKING, DAMAGE FROM INOPERATIVE BATTERIES, OR THE USE OF BATTERIES NOT CONFORMING TO THOSE SPECIFIED IN THE OWNER'S MANUAL. Following our response to any remedies, created by POC in transit. OR CANADA. and Canada should a dispute arise between you...
Owner's Manual
Page 144
... ASIACENTRE PTE. LTD. 5 Arco Lane, Heatherton, Victoria, 3202, Australia, TEL: (03) 9586-6300 PIONEER ELECTRONICS DE MEXICO S.A. Descarguese una versión electrónica de este manual desde nuestra web. Published by Pioneer Corporation. P.O. DE C.V. Blvd.Manuel Avila Camacho 138 10 piso Col.Lomas de Chapultepec, Mexico, D.F. 11000 TEL: 55-9178-4270 K002_B2_En...
... ASIACENTRE PTE. LTD. 5 Arco Lane, Heatherton, Victoria, 3202, Australia, TEL: (03) 9586-6300 PIONEER ELECTRONICS DE MEXICO S.A. Descarguese una versión electrónica de este manual desde nuestra web. Published by Pioneer Corporation. P.O. DE C.V. Blvd.Manuel Avila Camacho 138 10 piso Col.Lomas de Chapultepec, Mexico, D.F. 11000 TEL: 55-9178-4270 K002_B2_En...


