
Owner's Manual
Page 16
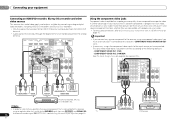
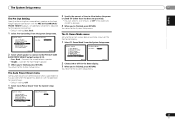
... receiver's COMPONENT VIDEO MONITOR OUT jacks. • If necessary, assign the component video inputs to the input source you didn't connect according to the following defaults: - This only needs to be done if you 've connected. COMPONENT VIDEO IN 1: DVD - 02 Connecting your equipment Connecting an HDD/DVD recorder, Blu-ray...
... receiver's COMPONENT VIDEO MONITOR OUT jacks. • If necessary, assign the component video inputs to the input source you didn't connect according to the following defaults: - This only needs to be done if you 've connected. COMPONENT VIDEO IN 1: DVD - 02 Connecting your equipment Connecting an HDD/DVD recorder, Blu-ray...

Owner's Manual
Page 22
...:6 is selected for O1 or O2. When using the front panel INPUT SELECTOR dial. It should hear surround sound. When the HDMI option in the default listening mode. Selects the analog inputs. • C1/O1/O2 - The coaxial 1 input is selected for C1, and the optical 1 or 2 audio input is displayed...
...:6 is selected for O1 or O2. When using the front panel INPUT SELECTOR dial. It should hear surround sound. When the HDMI option in the default listening mode. Selects the analog inputs. • C1/O1/O2 - The coaxial 1 input is selected for C1, and the optical 1 or 2 audio input is displayed...

Owner's Manual
Page 31
.... If a crest of a wave meets a trough, then the sound will be 'out of your subwoofer has a phase control switch, set the setting to OFF. The default setting is on and we recommend leaving Phase Control switched on for generating the surround back component from diagonally to the rear as follows: •...
.... If a crest of a wave meets a trough, then the sound will be 'out of your subwoofer has a phase control switch, set the setting to OFF. The default setting is on and we recommend leaving Phase Control switched on for generating the surround back component from diagonally to the rear as follows: •...
Owner's Manual
Page 32
...dynamic range for movie soundtracks optimized for notes on the operational status of the video. 0.0 to 9.0 (frames) 1 second = 30 frames (NTSC) Default: 0.0 Setting/What it is automatically adjusted according to adjust. When ON is heard only CH2 - When set it does Option(s) LFE ATT (LFE ... useful if you may be played. AUTOf MAX MID OFF Setting/What it as necessary to +3 Default: 0 32 En Important • Note that helps bring CD quality sound back to 7 Default: 3 DIMEN (Dimension)i Adjusts the surround sound balance from music sources at low volumes). Setting/What...
...dynamic range for movie soundtracks optimized for notes on the operational status of the video. 0.0 to 9.0 (frames) 1 second = 30 frames (NTSC) Default: 0.0 Setting/What it is automatically adjusted according to adjust. When ON is heard only CH2 - When set it does Option(s) LFE ATT (LFE ... useful if you may be played. AUTOf MAX MID OFF Setting/What it as necessary to +3 Default: 0 32 En Important • Note that helps bring CD quality sound back to 7 Default: 3 DIMEN (Dimension)i Adjusts the surround sound balance from music sources at low volumes). Setting/What...
Owner's Manual
Page 33
...Dolby TrueHD. Note • The receiver's volume, balance, tone (bass, treble, loudness), and surround effects have any time by using a center speaker) Default: 3 Adjust the center image to create a wider (NEO:6 MUSIC), stereo effect with most SACD discs, but if the sound distorts, it does Option(s)... Select the audio input signal (if necessary). h. Most video recorders set A.DLY to OFF and adjust the delay time manually. The default setting when the iPod USB or ADAPTER input is selected is only available for HDMI. For more on connections). Refer to the instructions ...
...Dolby TrueHD. Note • The receiver's volume, balance, tone (bass, treble, loudness), and surround effects have any time by using a center speaker) Default: 3 Adjust the center image to create a wider (NEO:6 MUSIC), stereo effect with most SACD discs, but if the sound distorts, it does Option(s)... Select the audio input signal (if necessary). h. Most video recorders set A.DLY to OFF and adjust the delay time manually. The default setting when the iPod USB or ADAPTER input is selected is only available for HDMI. For more on connections). Refer to the instructions ...
Owner's Manual
Page 35
... the Front Height setting when Pre Out Setting is selected (see Speaker Setting on the speaker placement of your selected setup option. Crossover Network • Default setting: 100Hz This setting decides the cutoff between bass sounds playing back from the speakers selected as LARGE, or the subwoofer, and bass sounds playing...
... the Front Height setting when Pre Out Setting is selected (see Speaker Setting on the speaker placement of your selected setup option. Crossover Network • Default setting: 100Hz This setting decides the cutoff between bass sounds playing back from the speakers selected as LARGE, or the subwoofer, and bass sounds playing...

Owner's Manual
Page 36
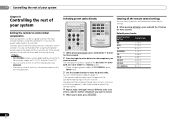
... SP Setup menu. You can also press CH SELECT and use / to select the channel, and then use / to the default settings for effective surround sound. 1 Select 'Manual SP Setup' from the System Setup menu. 2 Select 'Speaker Distance' from your system, you '... 've connected your equipment according to switch speakers. Tip • You can then add the proper delay needed for the component video inputs. • Default settings: - Back R Surr. Manual SP Setup 3 . If you selected Manual, use / to adjust the channel levels. 36 En Speaker...
... SP Setup menu. You can also press CH SELECT and use / to select the channel, and then use / to the default settings for effective surround sound. 1 Select 'Manual SP Setup' from the System Setup menu. 2 Select 'Speaker Distance' from your system, you '... 've connected your equipment according to switch speakers. Tip • You can then add the proper delay needed for the component video inputs. • Default settings: - Back R Surr. Manual SP Setup 3 . If you selected Manual, use / to adjust the channel levels. 36 En Speaker...
Owner's Manual
Page 37
An additional amplifier is required for several hours. • Default setting: OFF 1 Select 'Auto Power Down' from the System Setup menu. HDMI Setup 6 . The Auto Power Down menu Set to automatically turn off (when there ...has been no operation). • You can select 2, 4 or 6 hours, or OFF (if no operation for the speaker connection. • Default setting: Surr. Manual SP Setup 3 . FL Demo Mode 6.Auto Power Down OFF Return Return 2 Specify the amount of time to be shown on with the...
An additional amplifier is required for several hours. • Default setting: OFF 1 Select 'Auto Power Down' from the System Setup menu. HDMI Setup 6 . The Auto Power Down menu Set to automatically turn off (when there ...has been no operation). • You can select 2, 4 or 6 hours, or OFF (if no operation for the speaker connection. • Default setting: Surr. Manual SP Setup 3 . FL Demo Mode 6.Auto Power Down OFF Return Return 2 Specify the amount of time to be shown on with the...
Owner's Manual
Page 40
Clearing all presets and restore the factory default settings. While pressing RECEIVER , press and hold the '1' button for three seconds. 2 Press the input function button for the component you want to control ... preset codes on or off if that there are only dedicated to control. The power of the component being input will turn on page 41. Default preset codes Input function button BD DVD TV DVR/BDR CD CD-R VIDEO1 VIDEO2 TV CONTROL Preset code 2255 2256 0291 2257 5000 5001 6099...
Clearing all presets and restore the factory default settings. While pressing RECEIVER , press and hold the '1' button for three seconds. 2 Press the input function button for the component you want to control ... preset codes on or off if that there are only dedicated to control. The power of the component being input will turn on page 41. Default preset codes Input function button BD DVD TV DVR/BDR CD CD-R VIDEO1 VIDEO2 TV CONTROL Preset code 2255 2256 0291 2257 5000 5001 6099...
Owner's Manual
Page 45
... sensor (refer to page 9). Remove the obstacle or operate from another position. Avoid exposing the remote sensor on the front panel to the default. The display is HDCPcompatible). Simultaneously keep pressing the sleep button and home button on the iPod touch or iPhone for over for the Control with...
... sensor (refer to page 9). Remove the obstacle or operate from another position. Avoid exposing the remote sensor on the front panel to the default. The display is HDCPcompatible). Simultaneously keep pressing the sleep button and home button on the iPod touch or iPhone for over for the Control with...
Owner's Manual
Page 46
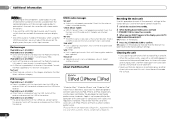
.... About iPod/iPhone/iPad Resetting the main unit Use this accessory with a dry cloth. Switch off the receiver and reconnect the iPod to the factory default settings. SIRIUS radio messages 'NO ANT' Antenna is not available/does not exist. USB messages 'iPod/USB Error 1 (I /U ERR3)'... Switch off the receiver and reconnect the USB to the factory default. Switch off dust and dirt. • When the surface is a problem with the signal path from the USB. iPod messages 'iPod/USB Error 1 ...
.... About iPod/iPhone/iPad Resetting the main unit Use this accessory with a dry cloth. Switch off the receiver and reconnect the iPod to the factory default settings. SIRIUS radio messages 'NO ANT' Antenna is not available/does not exist. USB messages 'iPod/USB Error 1 (I /U ERR3)'... Switch off the receiver and reconnect the USB to the factory default. Switch off dust and dirt. • When the surface is a problem with the signal path from the USB. iPod messages 'iPod/USB Error 1 ...


