

Owner's Manual
Page 4
... operating instructions so you have finished reading the instructions, put them away in the receiver 19 03 Basic Setup Canceling the demo display 20 Automatically setting up for surround sound (MCACC). . . 20 Other problems when using the Auto MCACC setup . . . 21 04 Basic playback Playing a ... terminal 18 Connecting an iPod 19 Connecting a USB device 19 4 En Plugging in a safe place for buying this Pioneer product. After you will know how to operate your system Setting the remote to control other components 40 Selecting preset codes directly 40 Clearing all the remote control...
... operating instructions so you have finished reading the instructions, put them away in the receiver 19 03 Basic Setup Canceling the demo display 20 Automatically setting up for surround sound (MCACC). . . 20 Other problems when using the Auto MCACC setup . . . 21 04 Basic playback Playing a ... terminal 18 Connecting an iPod 19 Connecting a USB device 19 4 En Plugging in a safe place for buying this Pioneer product. After you will know how to operate your system Setting the remote to control other components 40 Selecting preset codes directly 40 Clearing all the remote control...

Owner's Manual
Page 5
...Control (page 31) • Listening with the sound. - in places where there is a full-fledged AV receiver equipped with an abundance of settings on the receiver The unit is vibration or other than the recommended connections.) Using the Audio Return Channel function (page 38) (When the connected ...TV supports the HDMI Audio Return Channel function.) 5 Use the on-screen automatic MCACC setup to set the video input on a level and stable surface. near a cassette deck (or close to a device that are very dusty - in direct sunlight ...
...Control (page 31) • Listening with the sound. - in places where there is a full-fledged AV receiver equipped with an abundance of settings on the receiver The unit is vibration or other than the recommended connections.) Using the Audio Return Channel function (page 38) (When the connected ...TV supports the HDMI Audio Return Channel function.) 5 Use the on-screen automatic MCACC setup to set the video input on a level and stable surface. near a cassette deck (or close to a device that are very dusty - in direct sunlight ...
Owner's Manual
Page 6
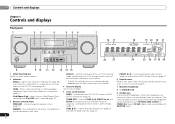
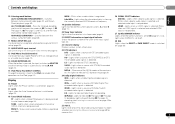
... input name can be checked by selecting an input source. • The Pre Out setting may or may not be controlled in SIRIUS Radio (page 27). TUNER EDIT - CHANNEL RECEIVER VSX-821 HDMI iPod iPhone iPad INPUT SELECTOR STANDBY /ON SPEAKERS DIMMER DISPLAY BAND TUNER EDIT TUNE PRESET ...61557; STANDBY/ON 9 PHONES jack Use to change the speaker system (page 12). HDMI - DIMMER - The listening mode when the sound is automatically set to preset the channel in four steps. Switches the display of remote control on page 7. 5 Tuner control buttons BAND - Dims or brightens the display...
... input name can be checked by selecting an input source. • The Pre Out setting may or may not be controlled in SIRIUS Radio (page 27). TUNER EDIT - CHANNEL RECEIVER VSX-821 HDMI iPod iPhone iPad INPUT SELECTOR STANDBY /ON SPEAKERS DIMMER DISPLAY BAND TUNER EDIT TUNE PRESET ...61557; STANDBY/ON 9 PHONES jack Use to change the speaker system (page 12). HDMI - DIMMER - The listening mode when the sound is automatically set to preset the channel in four steps. Switches the display of remote control on page 7. 5 Tuner control buttons BAND - Dims or brightens the display...
Owner's Manual
Page 7
...27 Up Mix/DIMMER indicator Lights when the Up Mix function is detected. NEO:6 - Lights when a source with DTS 96/24 encoded audio signals is set to indicate 2 Pro Logic II/2 Pro Logic IIx decoding. EX - Lights when a stereo FM broadcast is in sleep mode (page 8). 21 PRESET ...Dolby Digital EX decoding. 18 Tuner/SIRIUS indicators ST - DIGITAL - Lights when an HDMI signal is detected. 2HD - Also, lights when DIMMER is set to indicate NEO:6 processing (page 29). 24 Dolby Digital indicators Display 2D - When one of the receiver is being received in surround sound on ...
...27 Up Mix/DIMMER indicator Lights when the Up Mix function is detected. NEO:6 - Lights when a source with DTS 96/24 encoded audio signals is set to indicate 2 Pro Logic II/2 Pro Logic IIx decoding. EX - Lights when a stereo FM broadcast is in sleep mode (page 8). 21 PRESET ...Dolby Digital EX decoding. 18 Tuner/SIRIUS indicators ST - DIGITAL - Lights when an HDMI signal is detected. 2HD - Also, lights when DIMMER is set to indicate NEO:6 processing (page 29). 24 Dolby Digital indicators Display 2D - When one of the receiver is being received in surround sound on ...
Owner's Manual
Page 8
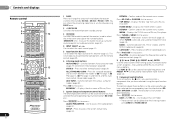
... between the iPod controls and the receiver controls (page 24). 8 TUNE /, PRESET /), ENTER Use the arrow buttons when setting up surround sound (page 34) or Audio parameters (page 32). 4 INPUT SELECT Use to select the input source (page 22). 5 Input ...- Confirm and exit the current menu screen. Press to access: TOP MENU - Press RECEIVER first to select stereo playback (page 29). When TUNER is set up your surround sound system (page 34). Switches between the various surround modes (page 30). Press to access: BASS -/+, TRE -/+ - SETUP -...
... between the iPod controls and the receiver controls (page 24). 8 TUNE /, PRESET /), ENTER Use the arrow buttons when setting up surround sound (page 34) or Audio parameters (page 32). 4 INPUT SELECT Use to select the input source (page 22). 5 Input ...- Confirm and exit the current menu screen. Press to access: TOP MENU - Press RECEIVER first to select stereo playback (page 29). When TUNER is set up your surround sound system (page 34). Switches between the various surround modes (page 30). Press to access: BASS -/+, TRE -/+ - SETUP -...

Owner's Manual
Page 9
...have a longer life. 7 m (23 ft.) Press SIRIUS first to directly select a radio frequency (page 28) or the tracks on /off Acoustic Calibration EQ setting (page 30). Use to access: DTV/TV - VOL +/- - Press to switch on the input source you can be checked by pressing BASS -/+ (page ...other component controls Use the number buttons to access: CAUTION D.ACCESS - There are obstacles between the hard disk, DVD and VCR controls for Pioneer TVs. 10 Number buttons and other components connected to turn on your country or area. - Press repeatedly to adjust the level (page 35...
...have a longer life. 7 m (23 ft.) Press SIRIUS first to directly select a radio frequency (page 28) or the tracks on /off Acoustic Calibration EQ setting (page 30). Use to access: DTV/TV - VOL +/- - Press to switch on the input source you can be checked by pressing BASS -/+ (page ...other component controls Use the number buttons to access: CAUTION D.ACCESS - There are obstacles between the hard disk, DVD and VCR controls for Pioneer TVs. 10 Number buttons and other components connected to turn on your country or area. - Press repeatedly to adjust the level (page 35...
Owner's Manual
Page 10
...required. If not, place them . Also, make sure the center speaker does not cross the line formed by turning off the Up Mix function (see Setting the Up Mix function on the speaker placement Where you 're listening to them at a narrower angle. • Place the center speaker above the ...) system: a FHL FHR R L C SW 120 SL 120 SR a. Use less of an angle for home theater playback. • If the surround speakers cannot be set directly to the side of the listening position with a 7.1-channel system, the surround effect can be enhanced by the leading edge of this unit and...
...required. If not, place them . Also, make sure the center speaker does not cross the line formed by turning off the Up Mix function (see Setting the Up Mix function on the speaker placement Where you 're listening to them at a narrower angle. • Place the center speaker above the ...) system: a FHL FHR R L C SW 120 SL 120 SR a. Use less of an angle for home theater playback. • If the surround speakers cannot be set directly to the side of the listening position with a 7.1-channel system, the surround effect can be enhanced by the leading edge of this unit and...
Owner's Manual
Page 11
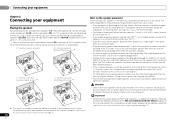
... of the unit and additional amplifier to add a surround back or front height speaker. • The Pre Out setting must be set if the above connections are set to stereo playback in another room. Connecting your equipment 02 English Français Español Connecting the speakers ...The receiver will suffice) (see The Pre Out Setting on page 12. However, note that all connections before touching any of electric shock when connecting or disconnecting the speaker cables, disconnect the...
... of the unit and additional amplifier to add a surround back or front height speaker. • The Pre Out setting must be set if the above connections are set to stereo playback in another room. Connecting your equipment 02 English Français Español Connecting the speakers ...The receiver will suffice) (see The Pre Out Setting on page 12. However, note that all connections before touching any of electric shock when connecting or disconnecting the speaker cables, disconnect the...
Owner's Manual
Page 12
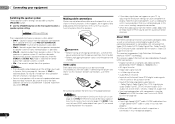
... signals can use speakers with a normal impedance between 12 Ω and 16 Ω when you want to select a speaker system setting. If connecting the player and the TV via this case, use HDMI cables. This receiver incorporates High-Definition Multimedia Interface (HDMI®...8226; Before unplugging the power cord, switch the power into standby. 02 Connecting your equipment Switching the speaker system Three speaker system settings are possible using the Control with HDMI function (see below through HDMI connections. • Digital transfer of uncompressed video (contents ...
... signals can use speakers with a normal impedance between 12 Ω and 16 Ω when you want to select a speaker system setting. If connecting the player and the TV via this case, use HDMI cables. This receiver incorporates High-Definition Multimedia Interface (HDMI®...8226; Before unplugging the power cord, switch the power into standby. 02 Connecting your equipment Switching the speaker system Three speaker system settings are possible using the Control with HDMI function (see below through HDMI connections. • Digital transfer of uncompressed video (contents ...
Owner's Manual
Page 14
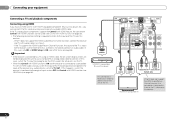
... receiver. - If the TV and playback components support the Control with HDMI feature, the convenient Control with HDMI functions can connect it to this case, set ARC at HDMI Setup to ON (see the OSD of the unit on page 38). Important • If the receiver is connected to a TV using... an HDMI cable, the on-screen display (OSD) will not be used (see Control with HDMI function on page 38). • The following connection/setting is required to listen to the sound of the TV over this case, switch the TV input to analog to see HDMI Setup on the...
... receiver. - If the TV and playback components support the Control with HDMI feature, the convenient Control with HDMI functions can connect it to this case, set ARC at HDMI Setup to ON (see the OSD of the unit on page 38). Important • If the receiver is connected to a TV using... an HDMI cable, the on-screen display (OSD) will not be used (see Control with HDMI function on page 38). • The following connection/setting is required to listen to the sound of the TV over this case, switch the TV input to analog to see HDMI Setup on the...
Owner's Manual
Page 15
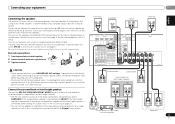
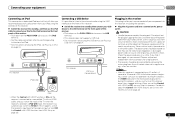
... PRE OUT Connecting a satellite receiver or other playback component) with no HDMI terminal This diagram shows connections of a TV and DVD player (or other digital set-top box Satellite and cable receivers, and terrestrial digital TV tuners are all examples of so-called 'settop boxes'. • If the... set-top box or video component also has an HDMI or a component video output, you can connect this receiver using a coaxial cable, first, switch to the ...
... PRE OUT Connecting a satellite receiver or other playback component) with no HDMI terminal This diagram shows connections of a TV and DVD player (or other digital set-top box Satellite and cable receivers, and terrestrial digital TV tuners are all examples of so-called 'settop boxes'. • If the... set-top box or video component also has an HDMI or a component video output, you can connect this receiver using a coaxial cable, first, switch to the ...
Owner's Manual
Page 19
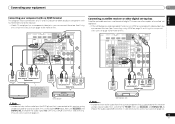
... the receiver's selection is iPod USB input, the receiver may automatically switch to the USB terminal on . If you find it damaged, ask your nearest Pioneer authorized independent service company for iPod. • For instructions on playing the iPod, see HDMI Setup on page 38. 19 En CONTROL ON / OFF ... on vacation. For details about the Control with HDMI feature, see Playing a USB device on the power cord or pinch the cord in after you set the Control with HDMI function on page 38). Do not place the unit, a piece of this receiver. • Push down on the PUSH OPEN...
... the receiver's selection is iPod USB input, the receiver may automatically switch to the USB terminal on . If you find it damaged, ask your nearest Pioneer authorized independent service company for iPod. • For instructions on playing the iPod, see HDMI Setup on page 38. 19 En CONTROL ON / OFF ... on vacation. For details about the Control with HDMI feature, see Playing a USB device on the power cord or pinch the cord in after you set the Control with HDMI function on page 38). Do not place the unit, a piece of this receiver. • Push down on the PUSH OPEN...

Owner's Manual
Page 20
... DTV/ TV MUTE 1 Switch on the receiver and your TV. 2 Switch the TV input to the input that the Pre Out setting is correctly set up the microphone provided with your system, the receiver uses the information from the System Setup menu, then press ENTER. Try to be... Tripod If you cancel the Auto MCACC setup at any time, the receiver automatically exits and no obstacles between the speakers and the microphone. Automatically setting up . • When using a table or a chair. 4 Press RECEIVER on the remote control to navigate through the corresponding composite or component cable....
... DTV/ TV MUTE 1 Switch on the receiver and your TV. 2 Switch the TV input to the input that the Pre Out setting is correctly set up the microphone provided with your system, the receiver uses the information from the System Setup menu, then press ENTER. Try to be... Tripod If you cancel the Auto MCACC setup at any time, the receiver automatically exits and no obstacles between the speakers and the microphone. Automatically setting up . • When using a table or a chair. 4 Press RECEIVER on the remote control to navigate through the corresponding composite or component cable....

Owner's Manual
Page 21
...RETRY after checking for ambient noise (see an error message (ERR) in step 8, the Auto MCACC setup will end up with different size settings. Again, try to be incorrect. Check for household appliances (air conditioner, fridge, fan, etc.), that may be changed. If selecting RETRY...the speakers present in the front panel display, please follow them off the TV when doing this seems to determine the optimum receiver settings for channel level, speaker distance, and Acoustic Calibration EQ. If you excellent surround sound from the listening position. Note • ...
...RETRY after checking for ambient noise (see an error message (ERR) in step 8, the Auto MCACC setup will end up with different size settings. Again, try to be incorrect. Check for household appliances (air conditioner, fridge, fan, etc.), that may be changed. If selecting RETRY...the speakers present in the front panel display, please follow them off the TV when doing this seems to determine the optimum receiver settings for channel level, speaker distance, and Acoustic Calibration EQ. If you excellent surround sound from the listening position. Note • ...

Owner's Manual
Page 22
... Press RECEIVER , then press SIGNAL SEL to select the audio input signal corresponding to the input signal and listening mode, check the connections and settings. The coaxial 1 input is selected for C1, and the optical 1 or 2 audio input is automatically selected. Start by using the remote control...VIDEO 2 TUNER SIRIUS VOL BASS TRE 1 Switch on the front panel display whether or not surround sound playback is an MPEG audio option, set to H (HDMI). Each press cycles through your DVD player or digital satellite receiver. When using a surround back speaker, 2D is fixed to...
... Press RECEIVER , then press SIGNAL SEL to select the audio input signal corresponding to the input signal and listening mode, check the connections and settings. The coaxial 1 input is selected for C1, and the optical 1 or 2 audio input is automatically selected. Start by using the remote control...VIDEO 2 TUNER SIRIUS VOL BASS TRE 1 Switch on the front panel display whether or not surround sound playback is an MPEG audio option, set to H (HDMI). Each press cycles through your DVD player or digital satellite receiver. When using a surround back speaker, 2D is fixed to...
Owner's Manual
Page 23
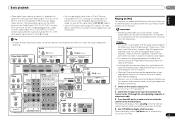
... for any direct or indirect loss arising from any circumstances accept responsibility for the software version of iPod/iPhone/iPad indicated on the website of Pioneer. •Installing software versions other than CD-R input RECEIVER SIGNAL SEL 0 O2 DVR/ BDR OUT IN 1 (DVD) ASSIGNABLE IN DVD IN IN ...to 96 kHz) and DTS (including DTS 96 kHz/24 bit) digital signal formats. CD-R (CD-R input) 2. With other digital signal formats, set the signal input to 192 kHz sampling frequencies), Dolby TrueHD, Dolby Digital Plus, DTS-EXPRESS, DTS-HD Master Audio and DVD Audio (including 192 kHz...
... for any direct or indirect loss arising from any circumstances accept responsibility for the software version of iPod/iPhone/iPad indicated on the website of Pioneer. •Installing software versions other than CD-R input RECEIVER SIGNAL SEL 0 O2 DVR/ BDR OUT IN 1 (DVD) ASSIGNABLE IN DVD IN IN ...to 96 kHz) and DTS (including DTS 96 kHz/24 bit) digital signal formats. CD-R (CD-R input) 2. With other digital signal formats, set the signal input to 192 kHz sampling frequencies), Dolby TrueHD, Dolby Digital Plus, DTS-EXPRESS, DTS-HD Master Audio and DVD Audio (including 192 kHz...
Owner's Manual
Page 26
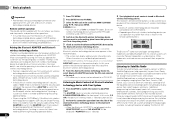
... of your most trusted sources. Easy to follow installation and setup instructions are those of XM' 04 Basic playback Important • Pioneer does not guarantee proper connection and operation of Bluetooth wireless technology device with Your System 1 Press ADAPTER to switch the receiver to ... device's security code is "0000", there is the step necessary to register Bluetooth wireless technology device to make the security code setting. Remote control operation The remote control supplied with this system. 4 Switch on the Bluetooth wireless technology device that you to play...
... of your most trusted sources. Easy to follow installation and setup instructions are those of XM' 04 Basic playback Important • Pioneer does not guarantee proper connection and operation of Bluetooth wireless technology device with Your System 1 Press ADAPTER to switch the receiver to ... device's security code is "0000", there is the step necessary to register Bluetooth wireless technology device to make the security code setting. Remote control operation The remote control supplied with this system. 4 Switch on the Bluetooth wireless technology device that you to play...

Owner's Manual
Page 27
... select channels. After pressing ENTER, the preset number stop blinking and the receiver stores the SIRIUS channel. Clear the channel skip function set for children. SIRIUS, XM and all channels are displayed because this time. and its subsidiaries. Listening to SIRIUS Radio After connecting, ... in Alaska and Hawaii. Selecting channels and browsing by directly inputting their channel number and providing the parental lock password. • Password Set - The 'Best of the AC adapter and this manual. You can call SIRIUS toll-free at : https://activate.siriusradio.com Follow ...
... select channels. After pressing ENTER, the preset number stop blinking and the receiver stores the SIRIUS channel. Clear the channel skip function set for children. SIRIUS, XM and all channels are displayed because this time. and its subsidiaries. Listening to SIRIUS Radio After connecting, ... in Alaska and Hawaii. Selecting channels and browsing by directly inputting their channel number and providing the parental lock password. • Password Set - The 'Best of the AC adapter and this manual. You can call SIRIUS toll-free at : https://activate.siriusradio.com Follow ...
Owner's Manual
Page 28
... one step at a time, press TUNE /. Tip • To erase a station name, follow steps 1 and 2, and press ENTER while the display is weak, set the receiver to the mono reception mode. Press BAND to select FM MONO. Repeat to search for over a month, the station memories will be...
... one step at a time, press TUNE /. Tip • To erase a station name, follow steps 1 and 2, and press ENTER while the display is weak, set the receiver to the mono reception mode. Press BAND to select FM MONO. Repeat to search for over a month, the station memories will be...

Owner's Manual
Page 29
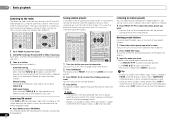
...playback sound levels if each sound level varies with the music source recorded in surround sound below for more on the current source, settings and status of source you're playing and selects multichannel or stereo playback as necessary. • Press AUTO/DIRECT repeatedly until AUTO... on your speaker environment or the source. While listening to a source, press the listening mode button repeatedly to your speaker settings). Dolby Digital and DTS multichannel sources are DTS NEO:6 DOLBY PLIIz HEIGHT Straight Decodee Movie/Music Movie/Music No additional effects Yes No ...
...playback sound levels if each sound level varies with the music source recorded in surround sound below for more on the current source, settings and status of source you're playing and selects multichannel or stereo playback as necessary. • Press AUTO/DIRECT repeatedly until AUTO... on your speaker environment or the source. While listening to a source, press the listening mode button repeatedly to your speaker settings). Dolby Digital and DTS multichannel sources are DTS NEO:6 DOLBY PLIIz HEIGHT Straight Decodee Movie/Music Movie/Music No additional effects Yes No ...


