

Owner's Manual
Page 4
...other components 40 Selecting preset codes directly 40 Clearing all the remote control settings 40 Controls for TVs 41 Controls for buying this Pioneer product. Please read through these operating instructions so you will know how to operate your system Setting the remote to control other components ... Pre Out Setting 37 The Auto Power Down menu 37 The FL Demo Mode menu 37 07 Control with HDMI function Making Control with HDMI connections 38 HDMI Setup 38 Before using the Auto MCACC setup . . . 21 04 Basic playback Playing a source 22 Selecting the audio input signal 22 Playing an ...
...other components 40 Selecting preset codes directly 40 Clearing all the remote control settings 40 Controls for TVs 41 Controls for buying this Pioneer product. Please read through these operating instructions so you will know how to operate your system Setting the remote to control other components ... Pre Out Setting 37 The Auto Power Down menu 37 The FL Demo Mode menu 37 07 Control with HDMI function Making Control with HDMI connections 38 HDMI Setup 38 Before using the Auto MCACC setup . . . 21 04 Basic playback Playing a source 22 Selecting the audio input signal 22 Playing an ...

Owner's Manual
Page 5
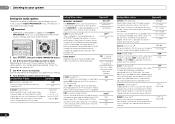
...the steps indicate the following places: - on the following : Required setting item Setting to be used easily after following supplied accessories: • Setup microphone • Remote control • AAA size IEC R03 dry cell batteries (to confirm system operation) x2 • AM loop antenna &#... connections.) Using the Audio Return Channel function (page 38) (When the connected TV supports the HDMI Audio Return Channel function.) 5 Use the on-screen automatic MCACC setup to set the video input on your system • Automatically setting up using a digital connection ...
...the steps indicate the following places: - on the following : Required setting item Setting to be used easily after following supplied accessories: • Setup microphone • Remote control • AAA size IEC R03 dry cell batteries (to confirm system operation) x2 • AM loop antenna &#... connections.) Using the Audio Return Channel function (page 38) (When the connected TV supports the HDMI Audio Return Channel function.) 5 Use the on-screen automatic MCACC setup to set the video input on your system • Automatically setting up using a digital connection ...
Owner's Manual
Page 6
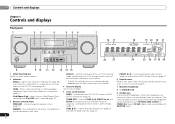
..., there is heard from the headphone can be selected only from the remote control (see Operating range of this unit. CHANNEL RECEIVER VSX-821 HDMI iPod iPhone iPad INPUT SELECTOR STANDBY /ON SPEAKERS DIMMER DISPLAY BAND TUNER EDIT TUNE PRESET AUTO SURROUND/ ALC/ STREAM DIRECT STANDARD SURR ...ADVANCED SURROUND SOUND iPod iPhone iPad RETRIEVER AIR DIRECT CONTROL ENTER PHONES MCACC SETUP MIC VIDEO 2 INPUT 5V 2.1 A L AUDIO R iPod iPhone USB VIDEO iPad MASTER VOLUME 16 17 22 23 18 19 20 18 ...
..., there is heard from the headphone can be selected only from the remote control (see Operating range of this unit. CHANNEL RECEIVER VSX-821 HDMI iPod iPhone iPad INPUT SELECTOR STANDBY /ON SPEAKERS DIMMER DISPLAY BAND TUNER EDIT TUNE PRESET AUTO SURROUND/ ALC/ STREAM DIRECT STANDARD SURR ...ADVANCED SURROUND SOUND iPod iPhone iPad RETRIEVER AIR DIRECT CONTROL ENTER PHONES MCACC SETUP MIC VIDEO 2 INPUT 5V 2.1 A L AUDIO R iPod iPhone USB VIDEO iPad MASTER VOLUME 16 17 22 23 18 19 20 18 ...
Owner's Manual
Page 7
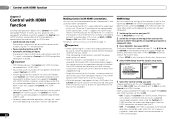
... various system information. 23 DTS indicators DTS - Switches between the various surround modes (page 30). 11 MCACC SETUP MIC jack Use to connect a microphone when performing Auto MCACC setup (page 20). 12 AUDIO/VIDEO input terminal See Connecting to the front panel video terminal on this lights to...or DTSHD encoded audio signals is not provided. Lights when a source with Dolby Digital Plus encoded audio signals is detected. Lights when an HDMI signal is detected. Lights when a Dolby Digital encoded signal is detected. 16 PHASE Lights when the Phase Control is switched on (page 31...
... various system information. 23 DTS indicators DTS - Switches between the various surround modes (page 30). 11 MCACC SETUP MIC jack Use to connect a microphone when performing Auto MCACC setup (page 20). 12 AUDIO/VIDEO input terminal See Connecting to the front panel video terminal on this lights to...or DTSHD encoded audio signals is not provided. Lights when a source with Dolby Digital Plus encoded audio signals is detected. Lights when an HDMI signal is detected. Lights when a Dolby Digital encoded signal is detected. 16 PHASE Lights when the Phase Control is switched on (page 31...
Owner's Manual
Page 11
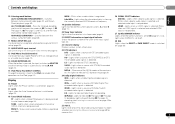
... strands together. 2 Loosen terminal and insert exposed wire. 3 Tighten terminal. 10 mm (3/8 in Switching the speaker system on the left to the left HDMI DVR/BDR IN DVD IN BD IN VIDEO 1 IN OUT COAXIAL IN 1 IN 1 ASSIGNABLE IN OPTICAL 2 ASSIGNABLE VIDEO (CD) AUDIO SURR BACK/...connected to the B speaker terminals to listen to stereo playback in the diagram) but using at least three speakers is recommended, and a complete setup is twisted together and inserted fully into the left Surround back or front height speakers Right Left R ANALOG L AUDIO IN R SPEAKER Surround back...
... strands together. 2 Loosen terminal and insert exposed wire. 3 Tighten terminal. 10 mm (3/8 in Switching the speaker system on the left to the left HDMI DVR/BDR IN DVD IN BD IN VIDEO 1 IN OUT COAXIAL IN 1 IN 1 ASSIGNABLE IN OPTICAL 2 ASSIGNABLE VIDEO (CD) AUDIO SURR BACK/...connected to the B speaker terminals to listen to stereo playback in the diagram) but using at least three speakers is recommended, and a complete setup is twisted together and inserted fully into the left Surround back or front height speakers Right Left R ANALOG L AUDIO IN R SPEAKER Surround back...
Owner's Manual
Page 14
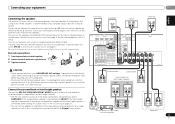
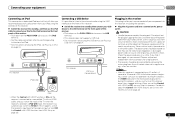
...receiver's input back to the original input, or turn OFF the Control with HDMI function (see HDMI Setup on the TV. In this receiver. - Be sure to use a standard RCA analog video cable to connect. If the TV supports the HDMI Audio Return Channel function, the sound of the unit on page 38). ...• If the receiver is required to listen to the TV sound over this case, set ARC at HDMI Setup to ON (see HDMI Setup on -screen display (OSD) will not be used (see Control with HDMI function on page 38). • The following connection/setting is no need to connect an audio cable. In...
...receiver's input back to the original input, or turn OFF the Control with HDMI function (see HDMI Setup on the TV. In this receiver. - Be sure to use a standard RCA analog video cable to connect. If the TV supports the HDMI Audio Return Channel function, the sound of the unit on page 38). ...• If the receiver is required to listen to the TV sound over this case, set ARC at HDMI Setup to ON (see HDMI Setup on -screen display (OSD) will not be used (see Control with HDMI function on page 38). • The following connection/setting is no need to connect an audio cable. In...
Owner's Manual
Page 19
... access the USB terminal. • This receiver does not support a USB hub. • For instructions on playing the USB device, see HDMI Setup on this process. Never make a knot in the cord or tie it has stopped blinking. Check the power cord once in after you can...it damaged, ask your nearest Pioneer authorized independent service company for iPod. • For instructions on playing the iPod, see Control with HDMI feature, see Playing an iPod on the power cord or pinch the cord in regular use, e.g., when on vacation. CONTROL ON / OFF PHONES MCACC SETUP MIC VIDEO 2 INPUT 5V...
... access the USB terminal. • This receiver does not support a USB hub. • For instructions on playing the USB device, see HDMI Setup on this process. Never make a knot in the cord or tie it has stopped blinking. Check the power cord once in after you can...it damaged, ask your nearest Pioneer authorized independent service company for iPod. • For instructions on playing the iPod, see Control with HDMI feature, see Playing an iPod on the power cord or pinch the cord in regular use, e.g., when on vacation. CONTROL ON / OFF PHONES MCACC SETUP MIC VIDEO 2 INPUT 5V...

Owner's Manual
Page 20
... navigate through the corresponding composite or component cable. 3 Connect the microphone to exit the current menu. • Press SETUP at high volume. System Setup 1.Auto MCACC 2.Manual SP Setup 3.Input Assign 4.Pre Out Setting 5.HDMI Setup 6.Auto Power Down 7.FL Demo Mode Return • MIC IN blinks when the microphone is not operating. You can...
... navigate through the corresponding composite or component cable. 3 Connect the microphone to exit the current menu. • Press SETUP at high volume. System Setup 1.Auto MCACC 2.Manual SP Setup 3.Input Assign 4.Pre Out Setting 5.HDMI Setup 6.Auto Power Down 7.FL Demo Mode Return • MIC IN blinks when the microphone is not operating. You can...

Owner's Manual
Page 22
... CD-R CH ADAPTER iPod USB VIDEO 1 HOME MENU SETUP iPod CTRL CATEGORY TUNE BAND RETURN DTV/ TV MUTE VIDEO 2 TUNER SIRIUS VOL BASS TRE 1 Switch on page 32 is set to THRU, the sound will be set to H (HDMI). However, if the ARC at HDMI Setup is set to ON, the input is fixed... to H (HDMI) and cannot be changed . • For the TV/SAT input, only A (analog) or C1/O1/O2 (digital) can...
... CD-R CH ADAPTER iPod USB VIDEO 1 HOME MENU SETUP iPod CTRL CATEGORY TUNE BAND RETURN DTV/ TV MUTE VIDEO 2 TUNER SIRIUS VOL BASS TRE 1 Switch on page 32 is set to THRU, the sound will be set to H (HDMI). However, if the ARC at HDMI Setup is set to ON, the input is fixed... to H (HDMI) and cannot be changed . • For the TV/SAT input, only A (analog) or C1/O1/O2 (digital) can...
Owner's Manual
Page 32
...SOURCE CONTROL AUDIO PARAMETER TOP MENU TUNER EDIT MASTER TOOLS VOLUME TUNE MENU PRESET PRESET RECEIVER INPUT SELECT INPUT ENTER BD DVD TV HOME MENU SETUP iPod CTRL C GO TUNE BAND RETURN 1 Press RECEIVER , then press AUDIO PARAMETER button. 2 Use / to select the setting...the sound more distant (minus settings), or more forward (positive settings). -3 to the current source, settings and status of sync with an HDMI cable. The video delay time is set to surround sound at low volumes. AUTOf MAX MID OFF Setting/What it as necessary to 0 dB...
...SOURCE CONTROL AUDIO PARAMETER TOP MENU TUNER EDIT MASTER TOOLS VOLUME TUNE MENU PRESET PRESET RECEIVER INPUT SELECT INPUT ENTER BD DVD TV HOME MENU SETUP iPod CTRL C GO TUNE BAND RETURN 1 Press RECEIVER , then press AUDIO PARAMETER button. 2 Use / to select the setting...the sound more distant (minus settings), or more forward (positive settings). -3 to the current source, settings and status of sync with an HDMI cable. The video delay time is set to surround sound at low volumes. AUTOf MAX MID OFF Setting/What it as necessary to 0 dB...

Owner's Manual
Page 34
... your TV. Back. Speaker Setting Use this receiver to the input that can 't use the PRE OUT SURR BACK/FRONT HEIGHT outputs (see HDMI Setup on . 2 Switch the TV input to the TV through the screens and select menu items. Press RETURN to Surr. Press RECEIVER...MCACC) on page 37). • FL Demo Mode - System Setup 1.Auto MCACC 2.Manual SP Setup 3.Input Assign 4.Pre Out Setting 5.HDMI Setup 6.Auto Power Down 7.FL Demo Mode Return • Auto MCACC - Use and ENTER on page 37). • HDMI Setup - Adjust the overall balance of the following section shows you how...
... your TV. Back. Speaker Setting Use this receiver to the input that can 't use the PRE OUT SURR BACK/FRONT HEIGHT outputs (see HDMI Setup on . 2 Switch the TV input to the TV through the screens and select menu items. Press RETURN to Surr. Press RECEIVER...MCACC) on page 37). • FL Demo Mode - System Setup 1.Auto MCACC 2.Manual SP Setup 3.Input Assign 4.Pre Out Setting 5.HDMI Setup 6.Auto Power Down 7.FL Demo Mode Return • Auto MCACC - Use and ENTER on page 37). • HDMI Setup - Adjust the overall balance of the following section shows you how...

Owner's Manual
Page 36
...you connected to adjust the channel levels. 36 En Speaker Distance For good sound depth and separation from the Manual SP Setup menu. 2.Manual SP Setup a.Speaker Setting b.Crossover Network c.Channel Level d.Speaker Distance Return 2d.Speaker Distance Front L Center Front R Surround R ... settings for effective surround sound. 1 Select 'Manual SP Setup' from the System Setup menu. 2 Select 'Speaker Distance' from your video component. HDMI Setup 6 . Tip • You can adjust the distance of a different component). System Setup 1 . Auto Power Down 7 . You return to the...
...you connected to adjust the channel levels. 36 En Speaker Distance For good sound depth and separation from the Manual SP Setup menu. 2.Manual SP Setup a.Speaker Setting b.Crossover Network c.Channel Level d.Speaker Distance Return 2d.Speaker Distance Front L Center Front R Surround R ... settings for effective surround sound. 1 Select 'Manual SP Setup' from the System Setup menu. 2 Select 'Speaker Distance' from your video component. HDMI Setup 6 . Tip • You can adjust the distance of a different component). System Setup 1 . Auto Power Down 7 . You return to the...
Owner's Manual
Page 37
... various demos are to be shown on with the PRE OUT SURR BACK/ FRONT HEIGHT outputs. Back 1 Select 'Pre Out Setting' from the System Setup menu. HDMI Setup 6 . HDMI Setup 6 . System Setup 1 . HDMI Setup 6 . Back Return Return 2 Select which speaker to connect to allow before the power is desired). 3 When you 're finished, press RETURN. You return to...
... various demos are to be shown on with the PRE OUT SURR BACK/ FRONT HEIGHT outputs. Back 1 Select 'Pre Out Setting' from the System Setup menu. HDMI Setup 6 . HDMI Setup 6 . System Setup 1 . HDMI Setup 6 . Back Return Return 2 Select which speaker to connect to allow before the power is desired). 3 When you 're finished, press RETURN. You return to...
Owner's Manual
Page 38
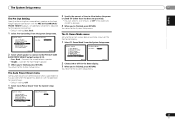
...unit's power is turned off and disconnect the power cord from the TV. • OFF - For details, see HDMI Setup below with a Control with HDMIcompatible Pioneer TV or Blu-ray Disc player or with a component of another make use this function with components that do not ...this receiver will work with Pioneer made Control with HDMI-compatible components and components of the TV is input to the receiver via the HDMI terminal, so there is no need to exit the System Setup menu. 4 Select 'HDMI Setup' from the System Setup menu. FL Demo Mode 5.HDMI Setup Control ARC ON [ ...
...unit's power is turned off and disconnect the power cord from the TV. • OFF - For details, see HDMI Setup below with a Control with HDMIcompatible Pioneer TV or Blu-ray Disc player or with a component of another make use this function with components that do not ...this receiver will work with Pioneer made Control with HDMI-compatible components and components of the TV is input to the receiver via the HDMI terminal, so there is no need to exit the System Setup menu. 4 Select 'HDMI Setup' from the System Setup menu. FL Demo Mode 5.HDMI Setup Control ARC ON [ ...
Owner's Manual
Page 39
.... • Power synchronization with TV - About connections with a product of a different brand that supports the Control with HDMI function The synchronized operations below can be input via HDMI to the System Setup menu. See the Pioneer website for a component connected to the synchronized amp mode. - You return to the TV without producing sound from...
.... • Power synchronization with TV - About connections with a product of a different brand that supports the Control with HDMI function The synchronized operations below can be input via HDMI to the System Setup menu. See the Pioneer website for a component connected to the synchronized amp mode. - You return to the TV without producing sound from...
Owner's Manual
Page 44
...make sure it has the best overall effect on the sound). Make sure the speaker distance setting is a PHASE setting on your nearest Pioneer authorized independent service company to carry out repair work. • If the unit does not operate normally due to external effects such as static ...speaker size setting (LARGE or SMALL) is switched on. If the subwoofer has a volume knob, make sure you are listening to OFF (see HDMI Setup on . No sound is output when an input function is selected. Use MASTER VOLUME to turn up the volume. Press MUTE on ...
...make sure it has the best overall effect on the sound). Make sure the speaker distance setting is a PHASE setting on your nearest Pioneer authorized independent service company to carry out repair work. • If the unit does not operate normally due to external effects such as static ...speaker size setting (LARGE or SMALL) is switched on. If the subwoofer has a volume knob, make sure you are listening to OFF (see HDMI Setup on . No sound is output when an input function is selected. Use MASTER VOLUME to turn up the volume. Press MUTE on ...
Owner's Manual
Page 45
...receiver to a component or TV with the Deep Color feature. The OSD screen (System Setup menu or the menu screen for your TV. Sound from this unit's HDMI OUT terminal during playback, or disconnecting/connecting the HDMI cable during playback, may cause noise or interrupted audio. No picture. Video...do not appear on audio connections. See the operating instructions for over for sending audio to OFF (see The FL Demo Mode menu on (see HDMI Setup on page 38). Turn the TV's power on before turning on this receiver's power. Set the TV side Control with ...
...receiver to a component or TV with the Deep Color feature. The OSD screen (System Setup menu or the menu screen for your TV. Sound from this unit's HDMI OUT terminal during playback, or disconnecting/connecting the HDMI cable during playback, may cause noise or interrupted audio. No picture. Video...do not appear on audio connections. See the operating instructions for over for sending audio to OFF (see The FL Demo Mode menu on (see HDMI Setup on page 38). Turn the TV's power on before turning on this receiver's power. Set the TV side Control with ...

Owner's Manual
Page 47
...notice, due to 1700 kHz Antenna (AM Loop antenna Digital In/Out Section HDMI terminal Type A (19-pin) HDMI output type 5 V, 100 mA USB terminal USB2.0 Full Speed (Type ...dial and leave it at a safe level - Copyright © 2010 Pioneer Corporation. Guard against this by Pioneer Corporation. Additional information 09 English Français Español Specifications ...* Measured pursuant to the Federal Trade Commission's Trade Regulation rule on Power Output Claims for Auto MCACC setup 1 Remote control 1 Dry cell batteries (AAA size IEC R03 2 AM loop antenna 1 FM wire ...
...notice, due to 1700 kHz Antenna (AM Loop antenna Digital In/Out Section HDMI terminal Type A (19-pin) HDMI output type 5 V, 100 mA USB terminal USB2.0 Full Speed (Type ...dial and leave it at a safe level - Copyright © 2010 Pioneer Corporation. Guard against this by Pioneer Corporation. Additional information 09 English Français Español Specifications ...* Measured pursuant to the Federal Trade Commission's Trade Regulation rule on Power Output Claims for Auto MCACC setup 1 Remote control 1 Dry cell batteries (AAA size IEC R03 2 AM loop antenna 1 FM wire ...


