

Owner's Manual
Page 4
... 39 About synchronized operations 39 About connections with a product of a different brand that supports the Control with no HDMI terminal . . 15 Connecting a satellite receiver or other digital set-top box 15 Connecting an HDD/DVD recorder, Blu-ray Disc recorder and other video sources...settings 40 Controls for TVs 41 Controls for buying this Pioneer product. Thank you for other components 41 Preset Code List 41 09 Additional information Troubleshooting 44 General 44 HDMI 45 Important information regarding the HDMI connection 45 iPod messages 46 USB messages 46 SIRIUS ...
... 39 About synchronized operations 39 About connections with a product of a different brand that supports the Control with no HDMI terminal . . 15 Connecting a satellite receiver or other digital set-top box 15 Connecting an HDD/DVD recorder, Blu-ray Disc recorder and other video sources...settings 40 Controls for TVs 41 Controls for buying this Pioneer product. Thank you for other components 41 Preset Code List 41 09 Additional information Troubleshooting 44 General 44 HDMI 45 Important information regarding the HDMI connection 45 iPod messages 46 USB messages 46 SIRIUS ...

Owner's Manual
Page 5
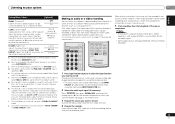
...) x2 • AM loop antenna • FM wire antenna • iPod cable • These operating instructions Installing the receiver • When installing this receiver. The colors of the remote control • Setting the remote to control other movement - English Français Español... setting up using connections other than the recommended connections.) Using the Audio Return Channel function (page 38) (When the connected TV supports the HDMI Audio Return Channel function.) 5 Use the on a color TV (the screen may interfere with an abundance of settings on a ...
...) x2 • AM loop antenna • FM wire antenna • iPod cable • These operating instructions Installing the receiver • When installing this receiver. The colors of the remote control • Setting the remote to control other movement - English Français Español... setting up using connections other than the recommended connections.) Using the Audio Return Channel function (page 38) (When the connected TV supports the HDMI Audio Return Channel function.) 5 Use the on a color TV (the screen may interfere with an abundance of settings on a ...
Owner's Manual
Page 6
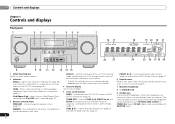
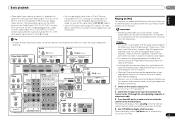
CHANNEL RECEIVER VSX-821 HDMI iPod iPhone iPad INPUT SELECTOR STANDBY /ON SPEAKERS DIMMER DISPLAY BAND TUNER EDIT TUNE PRESET AUTO SURROUND/ ALC/ STREAM DIRECT STANDARD SURR ADVANCED SURROUND SOUND ...) is no sound output from the remote control (see Operating range of this unit. HDMI - Use to on page 9). 7 MASTER VOLUME dial 8 STANDBY/ON 9 PHONES jack Use to select SIRIUS Radio channels (page 27). 6 Remote sensor Receives the signals from the speakers. Use with ADAPTER input). lights when the component is...
CHANNEL RECEIVER VSX-821 HDMI iPod iPhone iPad INPUT SELECTOR STANDBY /ON SPEAKERS DIMMER DISPLAY BAND TUNER EDIT TUNE PRESET AUTO SURROUND/ ALC/ STREAM DIRECT STANDARD SURR ADVANCED SURROUND SOUND ...) is no sound output from the remote control (see Operating range of this unit. HDMI - Use to on page 9). 7 MASTER VOLUME dial 8 STANDBY/ON 9 PHONES jack Use to select SIRIUS Radio channels (page 27). 6 Remote sensor Receives the signals from the speakers. Use with ADAPTER input). lights when the component is...
Owner's Manual
Page 7
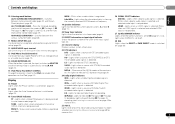
...MCACC setup (page 20). 12 AUDIO/VIDEO input terminal See Connecting to S.R AIR (page 26). Lights when a stereo FM broadcast is being received. Lights when a normal broadcast channel or SIRIUS channel is detected. Lights when a source with Dolby Digital Plus encoded audio signals is selected. ...when a source with DTS 96/24 encoded audio signals is being received in surround sound on page 29 for more on , this ). 7 En HD - Lights when an HDMI signal is detected. 2HD - NEO:6 - When one of the receiver is detected. EX - Press for more on page 18. 13 ...
...MCACC setup (page 20). 12 AUDIO/VIDEO input terminal See Connecting to S.R AIR (page 26). Lights when a stereo FM broadcast is being received. Lights when a normal broadcast channel or SIRIUS channel is detected. Lights when a source with Dolby Digital Plus encoded audio signals is selected. ...when a source with DTS 96/24 encoded audio signals is being received in surround sound on page 29 for more on , this ). 7 En HD - Lights when an HDMI signal is detected. 2HD - NEO:6 - When one of the receiver is detected. EX - Press for more on page 18. 13 ...
Owner's Manual
Page 11
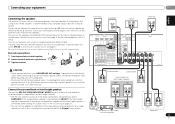
... height speaker. • The Pre Out setting must be set if the above connections are set to cut off as well. Surround right Surround left HDMI DVR/BDR IN DVD IN BD IN VIDEO 1 IN OUT COAXIAL IN 1 IN 1 ASSIGNABLE IN OPTICAL 2 ASSIGNABLE VIDEO (CD) AUDIO SURR BACK/ DVR/BDR CD... the B speaker terminals to listen to the AC power source. Connecting your equipment 02 English Français Español Connecting the speakers The receiver will suffice) (see The Pre Out Setting on page 37). • You can use the additional amplifier on the surround back channel pre-outs for...
... height speaker. • The Pre Out setting must be set if the above connections are set to cut off as well. Surround right Surround left HDMI DVR/BDR IN DVD IN BD IN VIDEO 1 IN OUT COAXIAL IN 1 IN 1 ASSIGNABLE IN OPTICAL 2 ASSIGNABLE VIDEO (CD) AUDIO SURR BACK/ DVR/BDR CD... the B speaker terminals to listen to the AC power source. Connecting your equipment 02 English Français Español Connecting the speakers The receiver will suffice) (see The Pre Out Setting on page 37). • You can use the additional amplifier on the surround back channel pre-outs for...
Owner's Manual
Page 12
... is 480i, 480p, 576i or 576p, Multi Ch PCM sound and HD sound cannot be received. Multichannel sources are downmixed only when the STEREO or STEREO ALC mode is possible). • SPAB - HDMI Be careful to choose a speaker system option: • SPA - Dolby Digital, ... THRU (THROUGH) and set to a value between 6 Ω and 16 Ω. HDMI cables Both video and sound signals can use HDMI cables. If connecting the player and the TV via this receiver). 02 Connecting your equipment Switching the speaker system Three speaker system settings are set the input...
... is 480i, 480p, 576i or 576p, Multi Ch PCM sound and HD sound cannot be received. Multichannel sources are downmixed only when the STEREO or STEREO ALC mode is possible). • SPAB - HDMI Be careful to choose a speaker system option: • SPA - Dolby Digital, ... THRU (THROUGH) and set to a value between 6 Ω and 16 Ω. HDMI cables Both video and sound signals can use HDMI cables. If connecting the player and the TV via this receiver). 02 Connecting your equipment Switching the speaker system Three speaker system settings are set the input...
Owner's Manual
Page 13
... (PR) About video outputs connection This receiver is not loaded with TV monitor MONITOR OUT VIDEO The OSD will not be recognized. Video cables Standard RCA video cables These cables are the most common type of video connection and are trademarks or registered trademarks of HDMI Licensing, LLC in the audio may...
... (PR) About video outputs connection This receiver is not loaded with TV monitor MONITOR OUT VIDEO The OSD will not be recognized. Video cables Standard RCA video cables These cables are the most common type of video connection and are trademarks or registered trademarks of HDMI Licensing, LLC in the audio may...
Owner's Manual
Page 14
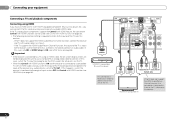
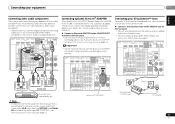
... (Blu-ray Disc player, etc.), you switch the input of the TV to composite or component, the input of the TV is input to the receiver via the HDMI terminal, so there is no need to the TV sound over this connection is connected to a compatible TV with an... TV input to analog to see Control with audio cables (as shown). - In this case, set ARC at HDMI Setup to ON (see the OSD of the TV over the receiver. 14 En HDMI OUT HDMI DVR/BDR IN DVD IN BD IN VIDEO 1 IN OUT COAXIAL IN 1 IN 1 ASSIGNABLE IN OPTICAL 2 ASSIGNABLE VIDEO...
... (Blu-ray Disc player, etc.), you switch the input of the TV to composite or component, the input of the TV is input to the receiver via the HDMI terminal, so there is no need to the TV sound over this connection is connected to a compatible TV with an... TV input to analog to see Control with audio cables (as shown). - In this case, set ARC at HDMI Setup to ON (see the OSD of the TV over the receiver. 14 En HDMI OUT HDMI DVR/BDR IN DVD IN BD IN VIDEO 1 IN OUT COAXIAL IN 1 IN 1 ASSIGNABLE IN OPTICAL 2 ASSIGNABLE VIDEO...
Owner's Manual
Page 15
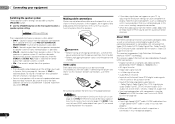
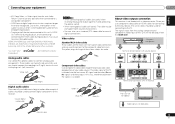
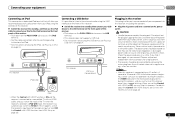
Connecting your equipment 02 English Français Español Connecting your component with no HDMI terminal This diagram shows connections of the TV over the receiver. See Connecting using HDMI on page 14 or Using the component video jacks on page 16 for more on ... IN L IN CENTER MONITOR OUT Y PB PR TV/SAT BD COMPONENT VIDEO R DVD SUBWOOFER PRE OUT Connecting a satellite receiver or other playback component) with no HDMI terminal to the receiver. • If both TV and player has a component video jacks, you can connect these too. See Using the component ...
Connecting your equipment 02 English Français Español Connecting your component with no HDMI terminal This diagram shows connections of the TV over the receiver. See Connecting using HDMI on page 14 or Using the component video jacks on page 16 for more on ... IN L IN CENTER MONITOR OUT Y PB PR TV/SAT BD COMPONENT VIDEO R DVD SUBWOOFER PRE OUT Connecting a satellite receiver or other playback component) with no HDMI terminal to the receiver. • If both TV and player has a component video jacks, you can connect these too. See Using the component ...
Owner's Manual
Page 16
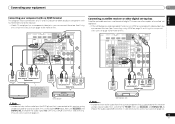
...the manuals that are compatible with progressive-scan video. • For the audio connection, refer to Connecting your TV connected to this receiver's COMPONENT VIDEO MONITOR OUT jacks. • If necessary, assign the component video inputs to check whether they are input through the digital...; Audio signals that came with your TV and source component to the input source you must also have your component with no HDMI terminal on this receiver using a component video input, you 've connected. Important • If you didn't connect according to composite video. COMPONENT VIDEO...
...the manuals that are compatible with progressive-scan video. • For the audio connection, refer to Connecting your TV connected to this receiver's COMPONENT VIDEO MONITOR OUT jacks. • If necessary, assign the component video inputs to check whether they are input through the digital...; Audio signals that came with your TV and source component to the input source you must also have your component with no HDMI terminal on this receiver using a component video input, you 've connected. Important • If you didn't connect according to composite video. COMPONENT VIDEO...
Owner's Manual
Page 17
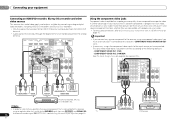
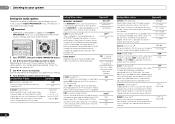
...kind of component you're connecting. AS-BT100 or AS-BT200) is connected to this unit, a product equipped with the Bluetooth ADAPTER connected. HDMI DVR/BDR IN DVD IN BD IN VIDEO 1 IN OUT COAXIAL IN 1 IN 1 ASSIGNABLE IN OP 2 ASS VIDEO (CD) AUDIO SURR ...Bluetooth ADAPTER and Bluetooth wireless technology device on page 27. Connecting optional Bluetooth® ADAPTER When the Bluetooth ADAPTER (Pioneer Model No. Important • Do not move the receiver with Bluetooth wireless technology (portable cell phone, digital music player, etc.) can be used to listen to music ...
...kind of component you're connecting. AS-BT100 or AS-BT200) is connected to this unit, a product equipped with the Bluetooth ADAPTER connected. HDMI DVR/BDR IN DVD IN BD IN VIDEO 1 IN OUT COAXIAL IN 1 IN 1 ASSIGNABLE IN OP 2 ASS VIDEO (CD) AUDIO SURR ...Bluetooth ADAPTER and Bluetooth wireless technology device on page 27. Connecting optional Bluetooth® ADAPTER When the Bluetooth ADAPTER (Pioneer Model No. Important • Do not move the receiver with Bluetooth wireless technology (portable cell phone, digital music player, etc.) can be used to listen to music ...
Owner's Manual
Page 19
... it has stopped blinking. If this happens, switch the receiver's input back to the original input, or turn on the power cord or pinch the cord in the cord or tie it damaged, ask your nearest Pioneer authorized independent service company for iPod. • For instructions on playing the iPod, see ... cord once in the front panel display blinks during this process. If you find it with HDMI function is ON and the receiver is possible to listen to two-channel audio using the controls of this receiver. • Push down on the PUSH OPEN tab to access the iPod terminal. • For the...
... it has stopped blinking. If this happens, switch the receiver's input back to the original input, or turn on the power cord or pinch the cord in the cord or tie it damaged, ask your nearest Pioneer authorized independent service company for iPod. • For instructions on playing the iPod, see ... cord once in the front panel display blinks during this process. If you find it with HDMI function is ON and the receiver is possible to listen to two-channel audio using the controls of this receiver. • Push down on the PUSH OPEN tab to access the iPod terminal. • For the...

Owner's Manual
Page 20
...the input that it to place the microphone so that connects this receiver to the TV through the screens and select menu items. Press RETURN to exit the current menu. • Press SETUP at ear level using the HDMI output to your TV. The system outputs a series of test tones...Tripod If you have a tripod, use it 's about ear level at your normal listening position. Otherwise, place the microphone at any time, the receiver automatically exits and no obstacles between the speakers and the microphone. After you cancel the Auto MCACC setup at high volume. CAUTION • The test...
...the input that it to place the microphone so that connects this receiver to the TV through the screens and select menu items. Press RETURN to exit the current menu. • Press SETUP at ear level using the HDMI output to your TV. The system outputs a series of test tones...Tripod If you have a tripod, use it 's about ear level at your normal listening position. Otherwise, place the microphone at any time, the receiver automatically exits and no obstacles between the speakers and the microphone. After you cancel the Auto MCACC setup at high volume. CAUTION • The test...

Owner's Manual
Page 22
..., the sound will only hear sound from the front left/right speakers in Setting the Audio options on your TV so that connects this receiver. • A - When H (HDMI) or C1/O1/O2 (digital) is selected and the selected audio input is not provided, A (analog) is still no sound, select the audio ... SIRIUS VOL BASS TRE 1 Switch on the front panel display whether or not surround sound playback is coming from this receiver. Turn down the volume of the source. It is possible to H (HDMI) or C1/O1/O2 (digital), 2 lights when a Dolby Digital signal is input, and DTS lights when a DTS signal...
..., the sound will only hear sound from the front left/right speakers in Setting the Audio options on your TV so that connects this receiver. • A - When H (HDMI) or C1/O1/O2 (digital) is selected and the selected audio input is not provided, A (analog) is still no sound, select the audio ... SIRIUS VOL BASS TRE 1 Switch on the front panel display whether or not surround sound playback is coming from this receiver. Turn down the volume of the source. It is possible to H (HDMI) or C1/O1/O2 (digital), 2 lights when a Dolby Digital signal is input, and DTS lights when a DTS signal...
Owner's Manual
Page 23
... player. When the display shows Top Menu you to control playback of audio content from your TV. The compatible signals via the HDMI terminals are licensed for any direct or indirect loss arising from any circumstances accept responsibility for reproduction of noncopyrighted materials or materials the ... connection and retrieves data from devices connected to each terminal, select the input by doing the following. Important • Pioneer cannot under any inconvenience or loss of this receiver. Tip • In order to enjoy the picture and/or sound from the iPod. 4 Use TOP MENU to ...
... player. When the display shows Top Menu you to control playback of audio content from your TV. The compatible signals via the HDMI terminals are licensed for any direct or indirect loss arising from any circumstances accept responsibility for reproduction of noncopyrighted materials or materials the ... connection and retrieves data from devices connected to each terminal, select the input by doing the following. Important • Pioneer cannot under any inconvenience or loss of this receiver. Tip • In order to enjoy the picture and/or sound from the iPod. 4 Use TOP MENU to ...
Owner's Manual
Page 32
... the LFE is removed during the WMA/MP3c compression process, sound quality often suffers from the speakers. By adding a bit of the receiver, certain options may be selected. M/L OFF MIDNIGHT LOUDNESS S.RTV (Sound Retriever)b When audio data is limited by restoring sound pressure and ...selected, noise may not be able to be output during digital processing). 0 (0 dB) +6 (+6 dB) HDMI (HDMI Audio) Specifies the routing of the HDMI audio signal out of the receiver. See the table below for instance. Setting/What it does Option(s) MIDNIGHT/LOUDNESSa The MIDNIGHT allows you want ...
... the LFE is removed during the WMA/MP3c compression process, sound quality often suffers from the speakers. By adding a bit of the receiver, certain options may be selected. M/L OFF MIDNIGHT LOUDNESS S.RTV (Sound Retriever)b When audio data is limited by restoring sound pressure and ...selected, noise may not be able to be output during digital processing). 0 (0 dB) +6 (+6 dB) HDMI (HDMI Audio) Specifies the routing of the HDMI audio signal out of the receiver. See the table below for instance. Setting/What it does Option(s) MIDNIGHT/LOUDNESSa The MIDNIGHT allows you want ...
Owner's Manual
Page 33
... the audio recording level automatically-check the component's instruction manual if you are unsure how to do this receiver through an HDMI cable, component video cable or digital audio cable (see page 22 for HDMI. e. i. Making an audio or a video recording You can make an audio or a video recording from the top will...
... the audio recording level automatically-check the component's instruction manual if you are unsure how to do this receiver through an HDMI cable, component video cable or digital audio cable (see page 22 for HDMI. e. i. Making an audio or a video recording You can make an audio or a video recording from the top will...

Owner's Manual
Page 34
...FL Demo Mode menu on page 20 are connected to the receiver, disconnect them. • You can be adjusted. Back. This is selected. Specify what you 're using the HDMI output to Surr. Manual speaker setup This receiver allows you to make detailed settings to specify how you 've...be sent to a device/TV that connects this setting to make all of speakers you 're satisfied with HDMI function (see below). - Specify the distance of your TV. Press RECEIVER to make these settings once (unless you want to set to your speaker system (page 35). - ...
...FL Demo Mode menu on page 20 are connected to the receiver, disconnect them. • You can be adjusted. Back. This is selected. Specify what you 're using the HDMI output to Surr. Manual speaker setup This receiver allows you to make detailed settings to specify how you 've...be sent to a device/TV that connects this setting to make all of speakers you 're satisfied with HDMI function (see below). - Specify the distance of your TV. Press RECEIVER to make these settings once (unless you want to set to your speaker system (page 35). - ...

Owner's Manual
Page 36
... change the channel levels at low volumes. Component-1: DVD - Component-2: DVR (DVR/BDR) Important • If you connect any source component to the receiver using a component video input, you should also have your TV connected to this . • If you are using a Sound Pressure Level (SPL) ..., use / to adjust the channel levels. 36 En Speaker Distance For good sound depth and separation from the System Setup menu. HDMI Setup 6 . FL Demo Mode Return 2 Select 'Component Input' from the listening position. You return to which you 're finished, press RETURN...
... change the channel levels at low volumes. Component-1: DVD - Component-2: DVR (DVR/BDR) Important • If you connect any source component to the receiver using a component video input, you should also have your TV connected to this . • If you are using a Sound Pressure Level (SPL) ..., use / to adjust the channel levels. 36 En Speaker Distance For good sound depth and separation from the System Setup menu. HDMI Setup 6 . FL Demo Mode Return 2 Select 'Component Input' from the listening position. You return to which you 're finished, press RETURN...
Owner's Manual
Page 37
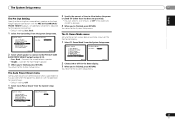
...37 En System Setup 1 . Back - Connect the front height speaker. 3 When you 're finished, press RETURN. Auto MCACC 2 . Pre Out Setting 5 . HDMI Setup 6 . Back Return Return 2 Select which speaker to connect to automatically turn off (when there has been no operation). • You can select 2, 4 or ... 4 . FL Demo Mode 6.Auto Power Down OFF Return Return 2 Specify the amount of time to allow before the power is turned off the receiver after a specified time has passed (when the power has been on the front panel display. 1 Select 'FL Demo Mode' from the System Setup...
...37 En System Setup 1 . Back - Connect the front height speaker. 3 When you 're finished, press RETURN. Auto MCACC 2 . Pre Out Setting 5 . HDMI Setup 6 . Back Return Return 2 Select which speaker to connect to automatically turn off (when there has been no operation). • You can select 2, 4 or ... 4 . FL Demo Mode 6.Auto Power Down OFF Return Return 2 Specify the amount of time to allow before the power is turned off the receiver after a specified time has passed (when the power has been on the front panel display. 1 Select 'FL Demo Mode' from the System Setup...


