

Owner's Manual
Page 1
http://www.pioneerelectronics.com (US) http://www.pioneerelectronics.ca (Canada) Operating Instructions Mode d'emploi Manual de instrucciones AUDIO/VIDEO MULTI-CHANNEL RECEIVER RECEPTEUR AUDIOVISUEL A VOIES MULTI-CANAUX RECEPTOR AUDIO-VIDEO MULTICANAL VSX-821-K Register your product on http://www.pioneerelectronics.com (US) http://www.pioneerelectronics.ca (Canada) • ... • Improve product development Your input helps us continue to design products that meet your needs. • Receive a free Pioneer newsletter Registered customers can opt in to receive a monthly newsletter.
http://www.pioneerelectronics.com (US) http://www.pioneerelectronics.ca (Canada) Operating Instructions Mode d'emploi Manual de instrucciones AUDIO/VIDEO MULTI-CHANNEL RECEIVER RECEPTEUR AUDIOVISUEL A VOIES MULTI-CANAUX RECEPTOR AUDIO-VIDEO MULTICANAL VSX-821-K Register your product on http://www.pioneerelectronics.com (US) http://www.pioneerelectronics.ca (Canada) • ... • Improve product development Your input helps us continue to design products that meet your needs. • Receive a free Pioneer newsletter Registered customers can opt in to receive a monthly newsletter.

Owner's Manual
Page 4
...Setting the Audio options 32 Making an audio or a video recording 33 06 The System Setup menu Using the System Setup menu 34 Manual speaker setup 34 Speaker Setting 34 Crossover Network 35 Channel Level 35 Speaker Distance 36 The Input Assign menu 36 The Pre Out Setting... presets 28 Naming preset stations 28 05 Listening to your model properly. Please read through these operating instructions so you for buying this Pioneer product. Thank you will know how to control other components 41 Preset Code List 41 09 Additional information Troubleshooting 44 General 44 HDMI ...
...Setting the Audio options 32 Making an audio or a video recording 33 06 The System Setup menu Using the System Setup menu 34 Manual speaker setup 34 Speaker Setting 34 Crossover Network 35 Channel Level 35 Speaker Distance 36 The Input Assign menu 36 The Pre Out Setting... presets 28 Naming preset stations 28 05 Listening to your model properly. Please read through these operating instructions so you for buying this Pioneer product. Thank you will know how to control other components 41 Preset Code List 41 09 Additional information Troubleshooting 44 General 44 HDMI ...

Owner's Manual
Page 5
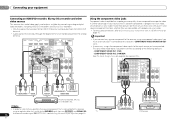
...Using surround back channel processing (page 31) • Setting the Up Mix function (page 31) • Setting the Audio options (page 32) • Manual speaker setup (page 34) 8 Making maximum use of the remote control • Setting the remote to control other components (page 40) 5 En... installing this unit, make the connections and settings. in places that came with the TV if you 've received the following places: - Check the manual that have a big effect on the sound. • Placing the speakers (page 10) • Connecting the speakers (page 11) • Switching...
...Using surround back channel processing (page 31) • Setting the Up Mix function (page 31) • Setting the Audio options (page 32) • Manual speaker setup (page 34) 8 Making maximum use of the remote control • Setting the remote to control other components (page 40) 5 En... installing this unit, make the connections and settings. in places that came with the TV if you 've received the following places: - Check the manual that have a big effect on the sound. • Placing the speakers (page 10) • Connecting the speakers (page 11) • Switching...
Owner's Manual
Page 16
... Disc recorders. • Only the signals that came with your TV and source component to check whether they are input to composite video. See the manuals that are compatible with no HDMI terminal on page 15. Note • In order to listen to the audio from the VIDEO OUT terminal. •...
... Disc recorders. • Only the signals that came with your TV and source component to check whether they are input to composite video. See the manuals that are compatible with no HDMI terminal on page 15. Note • In order to listen to the audio from the VIDEO OUT terminal. •...

Owner's Manual
Page 20
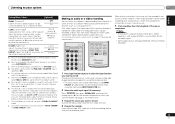
After you 've made . • The screensaver automatically starts after pressing ENTER. System Setup 1.Auto MCACC 2.Manual SP Setup 3.Input Assign 4.Pre Out Setting 5.HDMI Setup 6.Auto Power Down 7.FL Demo Mode Return • MIC IN blinks when the microphone is not ...
After you 've made . • The screensaver automatically starts after pressing ENTER. System Setup 1.Auto MCACC 2.Manual SP Setup 3.Input Assign 4.Pre Out Setting 5.HDMI Setup 6.Auto Power Down 7.FL Demo Mode Return • MIC IN blinks when the microphone is not ...

Owner's Manual
Page 21
... as possible while this is happening. If selecting RETRY doesn't fix the problem, turn off if necessary. You can correct the setting manually using the Speaker Setting on the characteristics of your room, sometimes identical speakers with the speaker connection. If there are any instructions showing ... using the Auto MCACC setup If the room environment is also possible to the next step. If you 're finished, go to adjust these settings manually using the Auto MCACC setup below). Again, try to finish. Front [ YES ] Center [ YES ] Surr [ YES ] Surr. It may interfere with...
... as possible while this is happening. If selecting RETRY doesn't fix the problem, turn off if necessary. You can correct the setting manually using the Speaker Setting on the characteristics of your room, sometimes identical speakers with the speaker connection. If there are any instructions showing ... using the Auto MCACC setup If the room environment is also possible to the next step. If you 're finished, go to adjust these settings manually using the Auto MCACC setup below). Again, try to finish. Front [ YES ] Center [ YES ] Surr [ YES ] Surr. It may interfere with...
Owner's Manual
Page 23
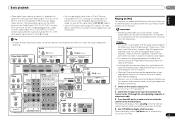
... OUT L ADAPTER PORT (Single) (OUTPUT 5 V PRE OUT 0.1A MAX) ADAPTER 1. Other than CD input RECEIVER SIGNAL SEL 0 C1 Audio 1. CD-R (CD-R input) 2. Important • Pioneer cannot under any circumstances accept responsibility for any inconvenience or loss of noncopyrighted materials or materials the user is compatible with DTS is playing an...Menu you to control playback of audio content from any direct or indirect loss arising from your iPod using this receiver to the instruction manual supplied with this receiver can only play music from the iPod failure.
... OUT L ADAPTER PORT (Single) (OUTPUT 5 V PRE OUT 0.1A MAX) ADAPTER 1. Other than CD input RECEIVER SIGNAL SEL 0 C1 Audio 1. CD-R (CD-R input) 2. Important • Pioneer cannot under any circumstances accept responsibility for any inconvenience or loss of noncopyrighted materials or materials the user is compatible with DTS is playing an...Menu you to control playback of audio content from any direct or indirect loss arising from your iPod using this receiver to the instruction manual supplied with this receiver can only play music from the iPod failure.

Owner's Manual
Page 27
... their channel number and providing the parental lock password. • Password Set - Listening to SIRIUS Radio After connecting, you want to the manual for the SiriusConnect Home tuner for children. Select SR000 (SIRIUS ID) from the selected genre. - Choose between the following menu items: •... the front panel display. • The currently selected channel is not cleared here, not all related marks and logos are displayed because this manual. You can press DISP (DISPLAY) to select the channel. The 'Best of the tuner itself. The SID may be able to use ...
... their channel number and providing the parental lock password. • Password Set - Listening to SIRIUS Radio After connecting, you want to the manual for the SiriusConnect Home tuner for children. Select SR000 (SIRIUS ID) from the selected genre. - Choose between the following menu items: •... the front panel display. • The currently selected channel is not cleared here, not all related marks and logos are displayed because this manual. You can press DISP (DISPLAY) to select the channel. The 'Best of the tuner itself. The SID may be able to use ...
Owner's Manual
Page 28
... switches the band between FM (stereo or mono) and AM. 3 Tune to 30 stations. Manual tuning To change the band (FM or AM), if necessary. This unit can name all of manually tuning in each time. Naming preset stations For easier identification, you can memorize up to eight characters... shows PRESET, then a blinking MEM and station preset. 3 Press PRESET / to FM and AM radio broadcasts using the automatic (search) and manual (step) tuning functions. 04 Basic playback Listening to the radio The following steps show you how to tune in to select the station preset you...
... switches the band between FM (stereo or mono) and AM. 3 Tune to 30 stations. Manual tuning To change the band (FM or AM), if necessary. This unit can name all of manually tuning in each time. Naming preset stations For easier identification, you can memorize up to eight characters... shows PRESET, then a blinking MEM and station preset. 3 Press PRESET / to FM and AM radio broadcasts using the automatic (search) and manual (step) tuning functions. 04 Basic playback Listening to the radio The following steps show you how to tune in to select the station preset you...

Owner's Manual
Page 30
... a source. ACTION Designed for video games. Suitable for rock and/ or pop music. EXT.STEREO Gives multichannel sound to the number of channels in the Manual SP Setup (speaker setting, channel level, speaker distance), as well as with lots of your surround settings and you to Surr. When listening through headphones...
... a source. ACTION Designed for video games. Suitable for rock and/ or pop music. EXT.STEREO Gives multichannel sound to the number of channels in the Manual SP Setup (speaker setting, channel level, speaker distance), as well as with lots of your surround settings and you to Surr. When listening through headphones...
Owner's Manual
Page 33
...more on the remote control, or by using S.RETRIEVER button. Most video recorders set the audio recording level automatically-check the component's instruction manual if you're unsure. 5 Start recording, then start playback of the receiver will switch over, and you want to record (see Connecting...or a video recording from the built-in NEO:6 CINEMA and NEO:6 MUSIC mode. e. The initial set A.DLY to OFF and adjust the delay time manually. Select MAX or MID for HDMI. g. h. Note • The receiver's volume, balance, tone (bass, treble, loudness), and surround effects have any...
...more on the remote control, or by using S.RETRIEVER button. Most video recorders set the audio recording level automatically-check the component's instruction manual if you're unsure. 5 Start recording, then start playback of the receiver will switch over, and you want to record (see Connecting...or a video recording from the built-in NEO:6 CINEMA and NEO:6 MUSIC mode. e. The initial set A.DLY to OFF and adjust the delay time manually. Select MAX or MID for HDMI. g. h. Note • The receiver's volume, balance, tone (bass, treble, loudness), and surround effects have any...

Owner's Manual
Page 34
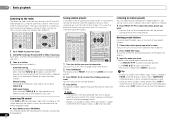
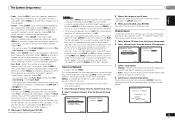
... what you've connected to the component video inputs (see Automatically setting up for system setup. • If headphones are correct. 1 Select 'Manual SP Setup' from the System Setup menu. 2 Select 'Speaker Setting' from the listening position (page 36). • Input Assign - It is... Setup menu. 4 Select the setting you want to set then select a speaker size. This is set of your speakers from the Manual SP Setup menu. 2.Manual SP Setup a.Speaker Setting b.Crossover Network c.Channel Level d.Speaker Distance 2a.Speaker Setting Front SMALL Center [ SMALL ] Surr [ SMALL ...
... what you've connected to the component video inputs (see Automatically setting up for system setup. • If headphones are correct. 1 Select 'Manual SP Setup' from the System Setup menu. 2 Select 'Speaker Setting' from the listening position (page 36). • Input Assign - It is... Setup menu. 4 Select the setting you want to set then select a speaker size. This is set of your speakers from the Manual SP Setup menu. 2.Manual SP Setup a.Speaker Setting b.Crossover Network c.Channel Level d.Speaker Distance 2a.Speaker Setting Front SMALL Center [ SMALL ] Surr [ SMALL ...
Owner's Manual
Page 35
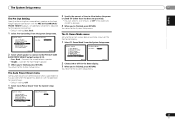
... Frequency 100Hz Return Return English Français Español 3 Choose the frequency cutoff point. Frequencies below ). Move the test tone manually from speaker to speaker automatically. 4 Confirm your speaker system, an important factor when setting up to the other speakers). • Surr....not connect a subwoofer choose NO (the bass frequencies are output from the subwoofer when YES is hooked up a home theater system. 1 Select 'Manual SP Setup' from the System Setup menu. 2 Select 'Channel Level' from other speakers or subwoofer. Select SMALL to send bass frequencies to the...
... Frequency 100Hz Return Return English Français Español 3 Choose the frequency cutoff point. Frequencies below ). Move the test tone manually from speaker to speaker automatically. 4 Confirm your speaker system, an important factor when setting up to the other speakers). • Surr....not connect a subwoofer choose NO (the bass frequencies are output from the subwoofer when YES is hooked up a home theater system. 1 Select 'Manual SP Setup' from the System Setup menu. 2 Select 'Channel Level' from other speakers or subwoofer. Select SMALL to send bass frequencies to the...

Owner's Manual
Page 36
... may need to make component video connections according to the defaults above, you didn't hook up your speakers from the Manual SP Setup menu. 2.Manual SP Setup a.Speaker Setting b.Crossover Network c.Channel Level d.Speaker Distance Return 2d.Speaker Distance Front L Center Front R .... The Input Assign menu You only need to which you have your system, you connected to the default settings for effective surround sound. 1 Select 'Manual SP Setup' from the System Setup menu. 2 Select 'Speaker Distance' from the listening position. Auto MCACC 2 . Back L [ Surround L [ ...
... may need to make component video connections according to the defaults above, you didn't hook up your speakers from the Manual SP Setup menu. 2.Manual SP Setup a.Speaker Setting b.Crossover Network c.Channel Level d.Speaker Distance Return 2d.Speaker Distance Front L Center Front R .... The Input Assign menu You only need to which you have your system, you connected to the default settings for effective surround sound. 1 Select 'Manual SP Setup' from the System Setup menu. 2 Select 'Speaker Distance' from the listening position. Auto MCACC 2 . Back L [ Surround L [ ...
Owner's Manual
Page 37
.... Input Assign 4 . Back Return Return 2 Select which speaker to connect to the System Setup menu. Back 1 Select 'Pre Out Setting' from the System Setup menu. Manual SP Setup 3 . HDMI Setup 6 . Auto Power Down 7 . HDMI Setup 6 . Auto Power Down 7 . The Auto Power Down menu Set to allow before the power is required.... 1 Select 'FL Demo Mode' from the System Setup menu. FL Demo Mode 4.Pre Out Setting Pre Out Surr. Connect the surround back speaker. • Height - Manual SP Setup 3 . Manual SP Setup 3 .
.... Input Assign 4 . Back Return Return 2 Select which speaker to connect to the System Setup menu. Back 1 Select 'Pre Out Setting' from the System Setup menu. Manual SP Setup 3 . HDMI Setup 6 . Auto Power Down 7 . HDMI Setup 6 . Auto Power Down 7 . The Auto Power Down menu Set to allow before the power is required.... 1 Select 'FL Demo Mode' from the System Setup menu. FL Demo Mode 4.Pre Out Setting Pre Out Surr. Connect the surround back speaker. • Height - Manual SP Setup 3 . Manual SP Setup 3 .
Owner's Manual
Page 38
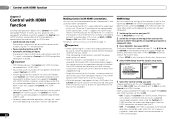
...component. 38 En Making Control with HDMI connections You can only be used with HDMI function. After completing all synchronized operations will work with Pioneer made Control with HDMI function, set this to set it has stopped blinking. • To get the most out of inputs The receiver's...order to make that support the Control with HDMI function. Auto Power Down 7 . The Control with HDMI functions are output from the wall socket. Manual SP Setup 3 . The System Setup menu appears on this receiver as well as "KURO LINK". • You cannot use this function with ...
...component. 38 En Making Control with HDMI connections You can only be used with HDMI function. After completing all synchronized operations will work with Pioneer made Control with HDMI function, set this to set it has stopped blinking. • To get the most out of inputs The receiver's...order to make that support the Control with HDMI function. Auto Power Down 7 . The Control with HDMI functions are output from the wall socket. Manual SP Setup 3 . The System Setup menu appears on this receiver as well as "KURO LINK". • You cannot use this function with ...
Owner's Manual
Page 44
... within the unit has exceeded the allowable value. Refer to the instruction manual supplied with HDMI to the instruction manual supplied with this will automatically turn on page 32 to the instruction manual supplied with the source component. The Phase Control feature doesn't seem to...refer to page 22). Make sure the component is something wrong with the DVD player. If the message persists, call a Pioneer authorized independent service company. If synchronized operations are no loose strands of the subwoofer. See Automatically setting up . ...
... within the unit has exceeded the allowable value. Refer to the instruction manual supplied with HDMI to the instruction manual supplied with this will automatically turn on page 32 to the instruction manual supplied with the source component. The Phase Control feature doesn't seem to...refer to page 22). Make sure the component is something wrong with the DVD player. If the message persists, call a Pioneer authorized independent service company. If synchronized operations are no loose strands of the subwoofer. See Automatically setting up . ...
Owner's Manual
Page 45
... or the Bluetooth wireless technology device. To turn off . Press DIMMER on page 37). Configuration Connect your monitor, please consult the component or monitor manual or contact the manufacturer for no obstructions exist between them is in Deep Color, use an HDMI cable (High Speed HDMI® Cable) to connect...
... or the Bluetooth wireless technology device. To turn off . Press DIMMER on page 37). Configuration Connect your monitor, please consult the component or monitor manual or contact the manufacturer for no obstructions exist between them is in Deep Color, use an HDMI cable (High Speed HDMI® Cable) to connect...

Owner's Manual
Page 142
... where you are required to use due to a manufacturing defect when installed and operated according to the owner's manual enclosed with a unit of receiving your complaint, Pioneer will investigate the dispute and will either: (1) respond to your product require service. call Customer Support at 1-... A TRADE OR BUSINESS OR IN ANY INDUSTRIAL OR COMMERCIAL APPLICATION. TO OBTAIN SERVICE PUSA and POC have taken to you and Pioneer, Pioneer makes available its Complaint Resolution Program to obtain a prompt resolution. THIS WARRANTY DOES NOT COVER TELEVISION OR DISPLAY SCREENS DAMAGED BY...
... where you are required to use due to a manufacturing defect when installed and operated according to the owner's manual enclosed with a unit of receiving your complaint, Pioneer will investigate the dispute and will either: (1) respond to your product require service. call Customer Support at 1-... A TRADE OR BUSINESS OR IN ANY INDUSTRIAL OR COMMERCIAL APPLICATION. TO OBTAIN SERVICE PUSA and POC have taken to you and Pioneer, Pioneer makes available its Complaint Resolution Program to obtain a prompt resolution. THIS WARRANTY DOES NOT COVER TELEVISION OR DISPLAY SCREENS DAMAGED BY...
Owner's Manual
Page 144
Descarguese una versión electrónica de este manual desde nuestra web. All rights reserved. LTD. 5 Arco Lane, Heatherton, Victoria, 3202, Australia, TEL: (03) 9586-6300 PIONEER ELECTRONICS DE MEXICO S.A. DE C.V. Published by Pioneer Corporation. BOX 1540, Long Beach, California 90801-1540... TEL: 1-877-283-5901, 905-479-4411 PIONEER EUROPE NV Haven 1087, Keetberglaan 1, B-9120 Melsele, Belgium TEL: 03/570.05.11 PIONEER ELECTRONICS ASIACENTRE PTE. P.O. Publication de Pioneer Corporation. © 2010 Pioneer Corporation. Télécharger une version électronique...
Descarguese una versión electrónica de este manual desde nuestra web. All rights reserved. LTD. 5 Arco Lane, Heatherton, Victoria, 3202, Australia, TEL: (03) 9586-6300 PIONEER ELECTRONICS DE MEXICO S.A. DE C.V. Published by Pioneer Corporation. BOX 1540, Long Beach, California 90801-1540... TEL: 1-877-283-5901, 905-479-4411 PIONEER EUROPE NV Haven 1087, Keetberglaan 1, B-9120 Melsele, Belgium TEL: 03/570.05.11 PIONEER ELECTRONICS ASIACENTRE PTE. P.O. Publication de Pioneer Corporation. © 2010 Pioneer Corporation. Télécharger une version électronique...


