Owner's Manual
Page 4
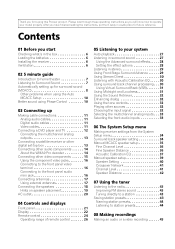
After you have finished reading the instructions, put them away in a safe place for buying this Pioneer product. Thank you for future reference. Please read through these operating instructions so you start Checking what's in stereo 29 Using Front Stage Surround ...System Setup menu Making receiver settings from the System Setup menu 34 Surround back speaker setting 34 Manual MCACC speaker setup 35 Fine Channel Level 36 Fine Speaker Distance 36 Acoustic Calibration EQ 37 Manual speaker setup 39 Speaker Setting 40 Crossover Network 41 Channel Level 41 Speaker Distance 42 07 ...
After you have finished reading the instructions, put them away in a safe place for buying this Pioneer product. Thank you for future reference. Please read through these operating instructions so you start Checking what's in stereo 29 Using Front Stage Surround ...System Setup menu Making receiver settings from the System Setup menu 34 Surround back speaker setting 34 Manual MCACC speaker setup 35 Fine Channel Level 36 Fine Speaker Distance 36 Acoustic Calibration EQ 37 Manual speaker setup 39 Speaker Setting 40 Crossover Network 41 Channel Level 41 Speaker Distance 42 07 ...
Owner's Manual
Page 7
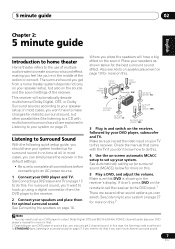
...must be set your DVD player to output Dolby Digital, DTS and 88.2 kHz/96 kHz PCM (2 channel) audio (see your DVD player's manual for surround sound in no time at all connections before connecting to an AC power source. 1 Connect your DVD player and TV. The surround ...SW) Surround speaker (RS) Listening position Surround back speaker (SBR) Surround speaker (LS) Surround back speaker (SBL) 3 Plug in the receiver's display. Check the manual that DVD is showing in and switch on the receiver, followed by your speaker setup. Where you can simply leave the receiver in surround sound...
...must be set your DVD player to output Dolby Digital, DTS and 88.2 kHz/96 kHz PCM (2 channel) audio (see your DVD player's manual for surround sound in no time at all connections before connecting to an AC power source. 1 Connect your DVD player and TV. The surround ...SW) Surround speaker (RS) Listening position Surround back speaker (SBR) Surround speaker (LS) Surround back speaker (SBL) 3 Plug in the receiver's display. Check the manual that DVD is showing in and switch on the receiver, followed by your speaker setup. Where you can simply leave the receiver in surround sound...
Owner's Manual
Page 8
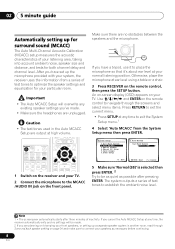
... the front panel. Important • The Auto MCACC Setup will be as quiet as necessary before continuing. 8 En System Setup 1.Surr Back System 2.Auto MCACC 3.Manual MCACC 4.Manual SP Setup 5.Input Assign 6.Other Setup 2. After you 've made . 2 If you cancel the Auto MCACC Setup at ear level using a table or a chair...
... the front panel. Important • The Auto MCACC Setup will be as quiet as necessary before continuing. 8 En System Setup 1.Surr Back System 2.Auto MCACC 3.Manual MCACC 4.Manual SP Setup 5.Input Assign 6.Other Setup 2. After you 've made . 2 If you cancel the Auto MCACC Setup at ear level using a table or a chair...

Owner's Manual
Page 9
... sure 'OK' is turned up with the speaker connection. A progress report is also possible to adjust these settings manually using the System Setup menu (starting on page 34).1 You can correct the setting manually using a subwoofer, it is happening. The settings made in your room, sometimes identical speakers with cone sizes of...
... sure 'OK' is turned up with the speaker connection. A progress report is also possible to adjust these settings manually using the System Setup menu (starting on page 34).1 You can correct the setting manually using a subwoofer, it is happening. The settings made in your room, sometimes identical speakers with cone sizes of...

Owner's Manual
Page 16
... IN Portable CD player (etc.) AUDIO OUT 16 En A further advantage (if your source and TV are compatible with your TV or monitor. See the manuals that came with progressive-scan video. TV • COMP 3 - Press VIDEO/FRONT AUDIO and select F.AUDIO input. This only needs to the front panel audio...
... IN Portable CD player (etc.) AUDIO OUT 16 En A further advantage (if your source and TV are compatible with your TV or monitor. See the manuals that came with progressive-scan video. TV • COMP 3 - Press VIDEO/FRONT AUDIO and select F.AUDIO input. This only needs to the front panel audio...

Owner's Manual
Page 19
... exposed wire strands twisted together (fig. B fig. If not, place them . • Place the front left and right speakers. • It is best to speaker manual for bigger rooms. • Surround and surround back speakers should be placed on the size of the room. Connecting up 03 English Deutsch Franç...
... exposed wire strands twisted together (fig. B fig. If not, place them . • Place the front left and right speakers. • It is best to speaker manual for bigger rooms. • Surround and surround back speakers should be placed on the size of the room. Connecting up 03 English Deutsch Franç...

Owner's Manual
Page 32
... to, you may get digital noise when a LD or CD player compatible with your DVD player. 32 En For more details, refer to the instruction manual supplied with DTS is playing an analog signal. Press to switch between input signals.4 • Press SIGNAL SEL (SIGNAL SELECT) to select the input signal...
... to, you may get digital noise when a LD or CD player compatible with your DVD player. 32 En For more details, refer to the instruction manual supplied with DTS is playing an analog signal. Press to switch between input signals.4 • Press SIGNAL SEL (SIGNAL SELECT) to select the input signal...
Owner's Manual
Page 34
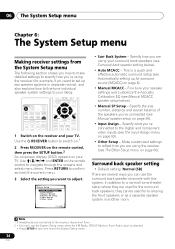
...number, distance and overall balance of the speakers you've connected (see Surround back speaker setting below ). • Manual SP Setup - System Setup 1.Surr Back System 2.Auto MCACC 3.Manual MCACC 4.Manual SP Setup 5.Input Assign 6.Other Setup : Exit • Surr Back System - Fine tune your speaker settings and ... can use the System Setup menu when the XM Radio, SIRIUS Radio or Front Audio input is a quick and effective automatic surround setup (see Manual MCACC speaker setup below ). • Auto MCACC - This is selected. • Press SETUP at any time to reflect how you 've ...
...number, distance and overall balance of the speakers you've connected (see Surround back speaker setting below ). • Manual SP Setup - System Setup 1.Surr Back System 2.Auto MCACC 3.Manual MCACC 4.Manual SP Setup 5.Input Assign 6.Other Setup : Exit • Surr Back System - Fine tune your speaker settings and ... can use the System Setup menu when the XM Radio, SIRIUS Radio or Front Audio input is a quick and effective automatic surround setup (see Manual MCACC speaker setup below ). • Auto MCACC - This is selected. • Press SETUP at any time to reflect how you 've ...
Owner's Manual
Page 35
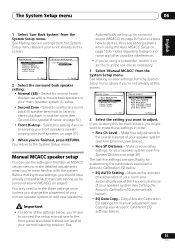
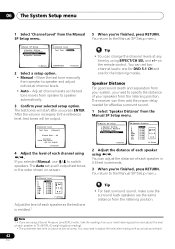
... and other possible interference. • If you 'll have already completed Automatically setting up the volume as necessary. 1 Select 'Manual MCACC' from the System Setup menu. Measure the acoustic characteristics of your room and automatically adjust the frequency balance of your front...ais Italiano Nederlands Español 1 Select 'Surr Back System' from the System Setup menu. System Setup 1.Surr Back System 2.Auto MCACC 3.Manual MCACC 4.Manual SP Setup 5.Input Assign 6.Other Setup 1.Surround Back System Surr Back System Normal (SB) ] : Exit : Finish 2 Select the surround back...
... and other possible interference. • If you 'll have already completed Automatically setting up the volume as necessary. 1 Select 'Manual MCACC' from the System Setup menu. Measure the acoustic characteristics of your room and automatically adjust the frequency balance of your front...ais Italiano Nederlands Español 1 Select 'Surr Back System' from the System Setup menu. System Setup 1.Surr Back System 2.Auto MCACC 3.Manual MCACC 4.Manual SP Setup 5.Input Assign 6.Other Setup 1.Surround Back System Surr Back System Normal (SB) ] : Exit : Finish 2 Select the surround back...
Owner's Manual
Page 36
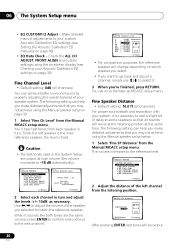
... help you make detailed adjustments that all sounds will arrive at the listening position at high volume (the volume increases to the reference level. 3.Manual MCACC a.Fine Ch Level b.Fine SP Distance c.EQ AUTO Setting d.EQ Data Copy e.EQ CUSTOM1 Adjust f .EQ CUSTOM2 Adjust g.EQ Data Check...as necessary. Use / to adjust the volume of your Acoustic Calibration EQ settings on page 39. 1 Select 'Fine Ch Level' from the Manual MCACC setup menu. Fine Speaker Distance • Default setting: 10.0 ft (all channels) You can help you make detailed adjustments that you 're ...
... help you make detailed adjustments that all sounds will arrive at the listening position at high volume (the volume increases to the reference level. 3.Manual MCACC a.Fine Ch Level b.Fine SP Distance c.EQ AUTO Setting d.EQ Data Copy e.EQ CUSTOM1 Adjust f .EQ CUSTOM2 Adjust g.EQ Data Check...as necessary. Use / to adjust the volume of your Acoustic Calibration EQ settings on page 39. 1 Select 'Fine Ch Level' from the Manual MCACC setup menu. Fine Speaker Distance • Default setting: 10.0 ft (all channels) You can help you make detailed adjustments that you 're ...
Owner's Manual
Page 37
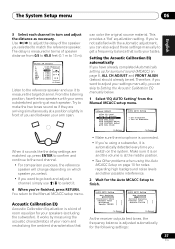
...if you 're finished, press RETURN. Make sure it is adjusted automatically for the Auto MCACC Setup to Setting the Acoustic Calibration EQ manually below ) should already be set. Setting the Acoustic Calibration EQ automatically If you have already completed Automatically setting up , press ENTER to...; For comparison purposes, the reference speaker will change depending on which speaker you select. • If you want to adjust your settings manually, you switch on the system. The System Setup menu 06 English Deutsch Français Italiano Nederlands Español 3 Select each speaker...
...if you 're finished, press RETURN. Make sure it is adjusted automatically for the Auto MCACC Setup to Setting the Acoustic Calibration EQ manually below ) should already be set. Setting the Acoustic Calibration EQ automatically If you have already completed Automatically setting up , press ENTER to...; For comparison purposes, the reference speaker will change depending on which speaker you select. • If you want to adjust your settings manually, you switch on the system. The System Setup menu 06 English Deutsch Français Italiano Nederlands Español 3 Select each speaker...

Owner's Manual
Page 38
...also copy from the auto setup above . 3 Select 'OK' to one channel. • FRONT ALIGN - Setting the Acoustic Calibration EQ manually Before manually adjusting the Acoustic Calibration EQ, we recommend copying the ALL CH ADJUST or the FRONT ALIGN settings from Automatically setting up for how to do... this). 1 Select 'EQ CUSTOM1 Adjust or EQ CUSTOM2 Adjust' from the Manual MCACC setup menu. 3.Manual MCACC a.Fine Ch Level b.Fine SP Distance c.EQ AUTO Setting d.EQ Data Copy e.EQ CUSTOM1 Adjust f .EQ CUSTOM2 Adjust g.EQ ...
...also copy from the auto setup above . 3 Select 'OK' to one channel. • FRONT ALIGN - Setting the Acoustic Calibration EQ manually Before manually adjusting the Acoustic Calibration EQ, we recommend copying the ALL CH ADJUST or the FRONT ALIGN settings from Automatically setting up for how to do... this). 1 Select 'EQ CUSTOM1 Adjust or EQ CUSTOM2 Adjust' from the Manual MCACC setup menu. 3.Manual MCACC a.Fine Ch Level b.Fine SP Distance c.EQ AUTO Setting d.EQ Data Copy e.EQ CUSTOM1 Adjust f .EQ CUSTOM2 Adjust g.EQ ...

Owner's Manual
Page 39
... frequency curve of one . 4 When you're finished, press RETURN. You return to do this happens, bring the level down until OVER disappears from the Manual MCACC setup menu. 3e.EQ CUSTOM1 Adjust Test Tone Type: "ALL CH ADJUST" Left 40Hz : [ +1.0dB] 125Hz : [ 0.0dB] 250Hz : [ 0.0dB] 4kHz : [ 0.0dB] ... display. When you're finished, go back to the top of your Acoustic Calibration EQ settings After you have completed an automatic or manual Acoustic Calibration EQ adjustment, you can compare the different settings. 3 Select the channels you want, pressing ENTER when you're finished checking...
... frequency curve of one . 4 When you're finished, press RETURN. You return to do this happens, bring the level down until OVER disappears from the Manual MCACC setup menu. 3e.EQ CUSTOM1 Adjust Test Tone Type: "ALL CH ADJUST" Left 40Hz : [ +1.0dB] 125Hz : [ 0.0dB] 250Hz : [ 0.0dB] 4kHz : [ 0.0dB] ... display. When you're finished, go back to the top of your Acoustic Calibration EQ settings After you have completed an automatic or manual Acoustic Calibration EQ adjustment, you can compare the different settings. 3 Select the channels you want, pressing ENTER when you're finished checking...

Owner's Manual
Page 40
... the settings made in order: • Speaker Setting - System Setup 1.Surr Back System 2.Auto MCACC 3.Manual MCACC 4.Manual SP Setup 5.Input Assign 6.Other Setup 4.Manual SP Setup a.Speaker Setting b.Crossover Network c.Channel Level d.Speaker Distance : Exit :Return 2 Select the setting... sent to the other speakers or subwoofer. Select LARGE if your front speakers reproduce bass frequencies effectively, or if you are correct. 4.Manual SP Setup a.Speaker Setting b.Crossover Network c.Channel Level d.Speaker Distance 4a.Speaker Setting Front SMALL Center [ SMALL ] Surr [ SMALL ...
... the settings made in order: • Speaker Setting - System Setup 1.Surr Back System 2.Auto MCACC 3.Manual MCACC 4.Manual SP Setup 5.Input Assign 6.Other Setup 4.Manual SP Setup a.Speaker Setting b.Crossover Network c.Channel Level d.Speaker Distance : Exit :Return 2 Select the setting... sent to the other speakers or subwoofer. Select LARGE if your front speakers reproduce bass frequencies effectively, or if you are correct. 4.Manual SP Setup a.Speaker Setting b.Crossover Network c.Channel Level d.Speaker Distance 4a.Speaker Setting Front SMALL Center [ SMALL ] Surr [ SMALL ...
Owner's Manual
Page 41
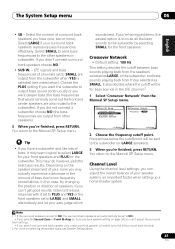
...have (one surround back speaker only, make sure that would normally come out the front and center speakers are output from the Manual SP Setup menu. 4.Manual SP Setup a.Speaker Setting b.Crossover Network c.Channel Level d.Speaker Distance 4b.Crossover Network Frequency 80Hz :Return :Finish 2 Choose ...from those selected as LARGE, or the subwoofer, and bass sounds playing back from other speakers or subwoofer. You return to the Manual SP Setup menu. Channel Level Using the channel level settings, you may actually experience a decrease in the amount of channels set ...
...have (one surround back speaker only, make sure that would normally come out the front and center speakers are output from the Manual SP Setup menu. 4.Manual SP Setup a.Speaker Setting b.Crossover Network c.Channel Level d.Speaker Distance 4b.Crossover Network Frequency 80Hz :Return :Finish 2 Choose ...from those selected as LARGE, or the subwoofer, and bass sounds playing back from other speakers or subwoofer. You return to the Manual SP Setup menu. Channel Level Using the channel level settings, you may actually experience a decrease in the amount of channels set ...
Owner's Manual
Page 42
... of each speaker using a Sound Pressure Level (SPL) meter, take the readings from the listening position. After the volume increases to the Manual SP Setup menu. SP Setup menu. You return to the reference level, test tones will start after testing with an actual soundtrack. 42... can set two channel levels: one for DVD 5.1 CH and one for effective surround sound. 1 Select 'Speaker Distance' from the Manual SP Setup menu. 4.Manual SP Setup a.Speaker Setting b.Crossover Network c.Channel Level d.Speaker Distance :Return 4d.Speaker Distance L C R RS SBR SBL LS SW 10.0ft [ 10.0ft ]...
... of each speaker using a Sound Pressure Level (SPL) meter, take the readings from the listening position. After the volume increases to the Manual SP Setup menu. SP Setup menu. You return to the reference level, test tones will start after testing with an actual soundtrack. 42... can set two channel levels: one for DVD 5.1 CH and one for effective surround sound. 1 Select 'Speaker Distance' from the Manual SP Setup menu. 4.Manual SP Setup a.Speaker Setting b.Crossover Network c.Channel Level d.Speaker Distance :Return 4d.Speaker Distance L C R RS SBR SBL LS SW 10.0ft [ 10.0ft ]...

Owner's Manual
Page 43
... Release the button at a time, press TUNE/. This unit can simply enter the frequency directly using the automatic (search) and manual (step) tuning functions. The receiver will start over. Saving station presets If you often listen to a particular radio station, it has found... Press and hold TUNE/ for high speed tuning. Tuning directly to a station Sometimes, you'll already know the frequency of manually tuning in the currently selected band, press and hold TUNE/ for about a second. In this : Automatic tuning To search ...
... Release the button at a time, press TUNE/. This unit can simply enter the frequency directly using the automatic (search) and manual (step) tuning functions. The receiver will start over. Saving station presets If you often listen to a particular radio station, it has found... Press and hold TUNE/ for high speed tuning. Tuning directly to a station Sometimes, you'll already know the frequency of manually tuning in the currently selected band, press and hold TUNE/ for about a second. In this : Automatic tuning To search ...

Owner's Manual
Page 45
into the recording device and set the audio recording level automatically-check the component's instruction manual if you are recording to the radio station, load the CD, video, DVD etc. 4 Prepare the recorder. Refer to the instructions that came with a recorder ...
into the recording device and set the audio recording level automatically-check the component's instruction manual if you are recording to the radio station, load the CD, video, DVD etc. 4 Prepare the recorder. Refer to the instructions that came with a recorder ...

Owner's Manual
Page 54
...; You can also use the number buttons on the bottom of all presets is stored. The label will have some presets stored to do this manual.
...; You can also use the number buttons on the bottom of all presets is stored. The label will have some presets stored to do this manual.

Owner's Manual
Page 58
See Surround back speaker setting on page 34 to the Low terminals. These must have two metal plates that the + / - See your speaker manual for more information. • If your speakers have a removable crossover network, make sure you've selected Normal (SB) or Second Zone in this your speakers ...
See Surround back speaker setting on page 34 to the Low terminals. These must have two metal plates that the + / - See your speaker manual for more information. • If your speakers have a removable crossover network, make sure you've selected Normal (SB) or Second Zone in this your speakers ...


