Owner's Manual
Page 4
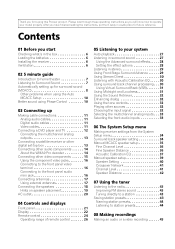
...08 Making recordings Making an audio or a video recording 45 Contents 01 Before you start Checking what's in a safe place for buying this Pioneer product. Thank you for future reference. After you have finished reading the instructions, put them away in the box 6 Loading the batteries 6... Making receiver settings from the System Setup menu 34 Surround back speaker setting 34 Manual MCACC speaker setup 35 Fine Channel Level 36 Fine Speaker Distance 36 Acoustic Calibration EQ 37 Manual speaker setup 39 Speaker Setting 40 Crossover Network 41 Channel Level 41 Speaker Distance...
...08 Making recordings Making an audio or a video recording 45 Contents 01 Before you start Checking what's in a safe place for buying this Pioneer product. Thank you for future reference. After you have finished reading the instructions, put them away in the box 6 Loading the batteries 6... Making receiver settings from the System Setup menu 34 Surround back speaker setting 34 Manual MCACC speaker setup 35 Fine Channel Level 36 Fine Speaker Distance 36 Acoustic Calibration EQ 37 Manual speaker setup 39 Speaker Setting 40 Crossover Network 41 Channel Level 41 Speaker Distance...
Owner's Manual
Page 7
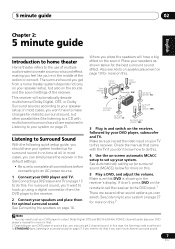
... sound. Place your speakers as shown below for surround sound in the default settings. • Be sure to complete all . Also see your DVD player's manual for more on this). 2 Depending on your DVD player or source disc, you may only get from the DVD player to the receiver. 2 Connect your... cases, you won't have to make changes for realistic surround sound, but also on the source and the sound settings of the receiver. Check the manual that DVD is showing in and switch on the receiver, followed by your TV to an AC power source. 1 Connect your DVD player and TV...
... sound. Place your speakers as shown below for surround sound in the default settings. • Be sure to complete all . Also see your DVD player's manual for more on this). 2 Depending on your DVD player or source disc, you may only get from the DVD player to the receiver. 2 Connect your... cases, you won't have to make changes for realistic surround sound, but also on the source and the sound settings of the receiver. Check the manual that DVD is showing in and switch on the receiver, followed by your TV to an AC power source. 1 Connect your DVD player and TV...
Owner's Manual
Page 8
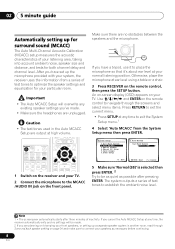
... STANDARD ADV.SURR PHASE ACOUSTIC EQ DIALOG SOUND RETRIEVER EFFECT /CH SEL LEVEL GUIDE SETUP SUBTITLE TUNE CH - System Setup 1.Surr Back System 2.Auto MCACC 3.Manual MCACC 4.Manual SP Setup 5.Input Assign 6.Other Setup 2. Note 1 • The screensaver automatically starts after three minutes of test tones to optimize the speaker settings and...
... STANDARD ADV.SURR PHASE ACOUSTIC EQ DIALOG SOUND RETRIEVER EFFECT /CH SEL LEVEL GUIDE SETUP SUBTITLE TUNE CH - System Setup 1.Surr Back System 2.Auto MCACC 3.Manual MCACC 4.Manual SP Setup 5.Input Assign 6.Other Setup 2. Note 1 • The screensaver automatically starts after three minutes of test tones to optimize the speaker settings and...

Owner's Manual
Page 9
... Depending on the characteristics of around 12 cm (5 inches) will start again from your system, but it is also possible to adjust these settings manually using a subwoofer, it 's doing this is happening. A progress report is displayed on-screen while the receiver outputs test tones to be as ... sure the microphone is connected. • If you're using the System Setup menu (starting on page 34).1 You can correct the setting manually using the Speaker Setting on page 40. • The subwoofer distance setting may be a problem with different size settings. The configuration shown on...
... Depending on the characteristics of around 12 cm (5 inches) will start again from your system, but it is also possible to adjust these settings manually using a subwoofer, it 's doing this is happening. A progress report is displayed on-screen while the receiver outputs test tones to be as ... sure the microphone is connected. • If you're using the System Setup menu (starting on page 34).1 You can correct the setting manually using the Speaker Setting on page 40. • The subwoofer distance setting may be a problem with different size settings. The configuration shown on...

Owner's Manual
Page 16
... Video camera (etc.) Connecting to check whether they are compatible with your source to the input source you made the rear panel connections. See the manuals that came with progressive-scan video. DVR See Assigning the component video inputs on page 59 for the connection. 2 If necessary, assign the component video...
... Video camera (etc.) Connecting to check whether they are compatible with your source to the input source you made the rear panel connections. See the manuals that came with progressive-scan video. DVR See Assigning the component video inputs on page 59 for the connection. 2 If necessary, assign the component video...

Owner's Manual
Page 19
.... If you do not have provided a few turns until the wire is in .) • The speaker terminals also accept single banana plugs. (Refer to speaker manual for bigger rooms. • Surround and surround back speakers should be placed on top of the TV, be sure to be floorstanding, while others should...
.... If you do not have provided a few turns until the wire is in .) • The speaker terminals also accept single banana plugs. (Refer to speaker manual for bigger rooms. • Surround and surround back speakers should be placed on top of the TV, be sure to be floorstanding, while others should...

Owner's Manual
Page 32
... SELECT) to select the input signal corresponding to the source component. Selects an optical or coaxial digital signal. For more details, refer to the instruction manual supplied with DTS is set the signal input to DIGITAL. • Some DVD players don't output DTS signals. Use the input select buttons.3 4 Start playback...
... SELECT) to select the input signal corresponding to the source component. Selects an optical or coaxial digital signal. For more details, refer to the instruction manual supplied with DTS is set the signal input to DIGITAL. • Some DVD players don't output DTS signals. Use the input select buttons.3 4 Start playback...
Owner's Manual
Page 34
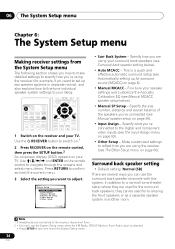
...on the remote control, then press the SETUP button.2 An on-screen display (OSD) appears on the receiver and your surround back speakers (see Manual MCACC speaker setup below ). • Auto MCACC - Specify the size, number, distance and overall balance of the speakers you've connected (...TOUCH COPY CH+ TOP MENU TUNE ST ST ENTER MENU T.EDIT GUIDE SETUP SUBTITLE TUNE CH - System Setup 1.Surr Back System 2.Auto MCACC 3.Manual MCACC 4.Manual SP Setup 5.Input Assign 6.Other Setup : Exit • Surr Back System - In addition to a normal home theater setup where they are ...
...on the remote control, then press the SETUP button.2 An on-screen display (OSD) appears on the receiver and your surround back speakers (see Manual MCACC speaker setup below ). • Auto MCACC - Specify the size, number, distance and overall balance of the speakers you've connected (...TOUCH COPY CH+ TOP MENU TUNE ST ST ENTER MENU T.EDIT GUIDE SETUP SUBTITLE TUNE CH - System Setup 1.Surr Back System 2.Auto MCACC 3.Manual MCACC 4.Manual SP Setup 5.Input Assign 6.Other Setup : Exit • Surr Back System - In addition to a normal home theater setup where they are ...
Owner's Manual
Page 35
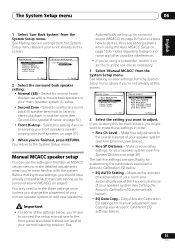
...below ). • EQ Data Copy - See Automatically setting up for manual adjustment (see Second Zone speaker B setup on page 36). System Setup 1.Surr Back System 2.Auto MCACC 3.Manual MCACC 4.Manual SP Setup 5.Input Assign 6.Other Setup : Exit 3.Manual MCACC a.Fine Ch Level b.Fine SP Distance c.EQ AUTO Setting d....page 8 if you 're doing this setting if you're bi-amping your main (speaker system A) setup. • Second Zone - Manual MCACC speaker setup You can use with the system. Select this for normal home theater use the settings in your front speakers (see Fine ...
...below ). • EQ Data Copy - See Automatically setting up for manual adjustment (see Second Zone speaker B setup on page 36). System Setup 1.Surr Back System 2.Auto MCACC 3.Manual MCACC 4.Manual SP Setup 5.Input Assign 6.Other Setup : Exit 3.Manual MCACC a.Fine Ch Level b.Fine SP Distance c.EQ AUTO Setting d....page 8 if you 're doing this setting if you're bi-amping your main (speaker system A) setup. • Second Zone - Manual MCACC speaker setup You can use with the system. Select this for normal home theater use the settings in your front speakers (see Fine ...
Owner's Manual
Page 36
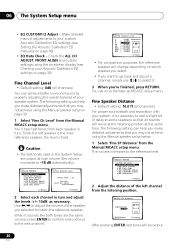
...all channels) You can help you make detailed adjustments that you may not achieve using the on-screen display (see Setting the Acoustic Calibration EQ manually on which speaker you select. • If you selected to your system, it is fixed. When it . 3 When you're finished, ... • For comparison purposes, the reference speaker will arrive at the listening position at the same time. The volume increases to the reference level. 3.Manual MCACC a.Fine Ch Level b.Fine SP Distance c.EQ AUTO Setting d.EQ Data Copy e.EQ CUSTOM1 Adjust f .EQ CUSTOM2 Adjust g.EQ Data Check :Return...
...all channels) You can help you make detailed adjustments that you may not achieve using the on-screen display (see Setting the Acoustic Calibration EQ manually on which speaker you select. • If you selected to your system, it is fixed. When it . 3 When you're finished, ... • For comparison purposes, the reference speaker will arrive at the listening position at the same time. The volume increases to the reference level. 3.Manual MCACC a.Fine Ch Level b.Fine SP Distance c.EQ AUTO Setting d.EQ Data Copy e.EQ CUSTOM1 Adjust f .EQ CUSTOM2 Adjust g.EQ Data Check :Return...
Owner's Manual
Page 37
.... 4 When you want to select it is adjusted automatically for the Auto MCACC Setup to get a frequency balance that can also adjust these settings manually to finish. 3c.EQ AUTO Setting Now Analyzing Environment Check Ambient Noise [ ] Microphone [ ] Speaker YES/NO [ ] 3c.EQ AUTO Setting ... volume is at a position slightly in front of your arms outstretched pointing at each channel in terms of speaker distance from the Manual MCACC setup menu. 3.Manual MCACC a.Fine Ch Level b.Fine SP Distance c.EQ AUTO Setting d.EQ Data Copy e.EQ CUSTOM1 Adjust f .EQ CUSTOM2 Adjust ...
.... 4 When you want to select it is adjusted automatically for the Auto MCACC Setup to get a frequency balance that can also adjust these settings manually to finish. 3c.EQ AUTO Setting Now Analyzing Environment Check Ambient Noise [ ] Microphone [ ] Speaker YES/NO [ ] 3c.EQ AUTO Setting ... volume is at a position slightly in front of your arms outstretched pointing at each channel in terms of speaker distance from the Manual MCACC setup menu. 3.Manual MCACC a.Fine Ch Level b.Fine SP Distance c.EQ AUTO Setting d.EQ Data Copy e.EQ CUSTOM1 Adjust f .EQ CUSTOM2 Adjust ...

Owner's Manual
Page 38
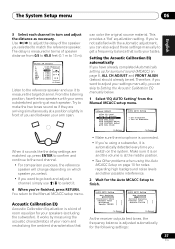
.... • FRONT ALIGN - Instead of the custom settings. Speakers are set . When adjusting, test tones will give you want to manually adjust the Acoustic Calibration EQ (see Copying your Acoustic Calibration EQ settings above for surround sound (MCACC) on page 8) to the Acoustic...• You can be set in accordance with the front speaker settings. You return to one channel. Setting the Acoustic Calibration EQ manually Before manually adjusting the Acoustic Calibration EQ, we recommend copying the ALL CH ADJUST or the FRONT ALIGN settings from the auto setup above . ...
.... • FRONT ALIGN - Instead of the custom settings. Speakers are set . When adjusting, test tones will give you want to manually adjust the Acoustic Calibration EQ (see Copying your Acoustic Calibration EQ settings above for surround sound (MCACC) on page 8) to the Acoustic...• You can be set in accordance with the front speaker settings. You return to one channel. Setting the Acoustic Calibration EQ manually Before manually adjusting the Acoustic Calibration EQ, we recommend copying the ALL CH ADJUST or the FRONT ALIGN settings from the auto setup above . ...

Owner's Manual
Page 39
...;/ to select the channel. You only need to make detailed settings to do this happens, bring the level down until OVER disappears from the Manual MCACC setup menu. 3e.EQ CUSTOM1 Adjust Test Tone Type: "ALL CH ADJUST" Left 40Hz : [ +1.0dB] 125Hz : [ 0.0dB] 250Hz : [ 0.0dB] 4kHz : [ 0.0dB] 13kHz : ... output at high volume (the volume increases to make all of one . 4 When you're finished, press RETURN. You return to the Manual MCACC setup menu. Caution • The test tones used in the System Setup are designed to fine-tune your Acoustic Calibration EQ settings After ...
...;/ to select the channel. You only need to make detailed settings to do this happens, bring the level down until OVER disappears from the Manual MCACC setup menu. 3e.EQ CUSTOM1 Adjust Test Tone Type: "ALL CH ADJUST" Left 40Hz : [ +1.0dB] 125Hz : [ 0.0dB] 250Hz : [ 0.0dB] 4kHz : [ 0.0dB] 13kHz : ... output at high volume (the volume increases to make all of one . 4 When you're finished, press RETURN. You return to the Manual MCACC setup menu. Caution • The test tones used in the System Setup are designed to fine-tune your Acoustic Calibration EQ settings After ...

Owner's Manual
Page 40
... 'Speaker Setting' from the listening position (page 42). 3 Make the adjustments necessary for surround sound (MCACC) on page 8 are correct. 4.Manual SP Setup a.Speaker Setting b.Crossover Network c.Channel Level d.Speaker Distance 4a.Speaker Setting Front SMALL Center [ SMALL ] Surr [ SMALL ] SB ... connect surround speakers choose NO (the sound of speakers). System Setup 1.Surr Back System 2.Auto MCACC 3.Manual MCACC 4.Manual SP Setup 5.Input Assign 6.Other Setup 4.Manual SP Setup a.Speaker Setting b.Crossover Network c.Channel Level d.Speaker Distance : Exit :Return 2 Select the...
... 'Speaker Setting' from the listening position (page 42). 3 Make the adjustments necessary for surround sound (MCACC) on page 8 are correct. 4.Manual SP Setup a.Speaker Setting b.Crossover Network c.Channel Level d.Speaker Distance 4a.Speaker Setting Front SMALL Center [ SMALL ] Surr [ SMALL ] SB ... connect surround speakers choose NO (the sound of speakers). System Setup 1.Surr Back System 2.Auto MCACC 3.Manual MCACC 4.Manual SP Setup 5.Input Assign 6.Other Setup 4.Manual SP Setup a.Speaker Setting b.Crossover Network c.Channel Level d.Speaker Distance : Exit :Return 2 Select the...
Owner's Manual
Page 41
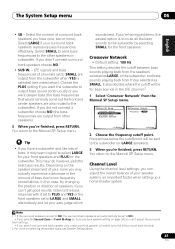
...also decides where the cutoff will be for the front speakers. Note 1 • If the surround speakers are output from the Manual SP Setup menu. 4.Manual SP Setup a.Speaker Setting b.Crossover Network c.Channel Level d.Speaker Distance 4b.Crossover Network Frequency 80Hz :Return :Finish 2 Choose the...LARGE speakers). 3 When you can adjust the overall balance of your surround back speakers reproduce bass frequencies effectively. You return to the Manual SP Setup menu. If you 're finished, press RETURN. Channel Level Using the channel level settings, you 're finished, press ...
...also decides where the cutoff will be for the front speakers. Note 1 • If the surround speakers are output from the Manual SP Setup menu. 4.Manual SP Setup a.Speaker Setting b.Crossover Network c.Channel Level d.Speaker Distance 4b.Crossover Network Frequency 80Hz :Return :Finish 2 Choose the...LARGE speakers). 3 When you can adjust the overall balance of your surround back speakers reproduce bass frequencies effectively. You return to the Manual SP Setup menu. If you 're finished, press RETURN. Channel Level Using the channel level settings, you 're finished, press ...
Owner's Manual
Page 42
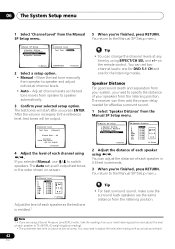
... reference level, test tones will start after testing with an actual soundtrack. 42 En 06 The System Setup menu 1 Select 'Channel Level' from the Manual 5 When you selected Manual, use / to switch speakers. on -screen: 4c.Channel Level L 0.0dB C [ 0.0dB ] R [ 0.0dB ] RS [ 0.0dB ] SBR ...set two channel levels: one for DVD 5.1 CH and one for effective surround sound. 1 Select 'Speaker Distance' from the Manual SP Setup menu. 4.Manual SP Setup a.Speaker Setting b.Crossover Network c.Channel Level d.Speaker Distance :Return 4d.Speaker Distance L C R RS SBR SBL LS...
... reference level, test tones will start after testing with an actual soundtrack. 42 En 06 The System Setup menu 1 Select 'Channel Level' from the Manual 5 When you selected Manual, use / to switch speakers. on -screen: 4c.Channel Level L 0.0dB C [ 0.0dB ] R [ 0.0dB ] RS [ 0.0dB ] SBR ...set two channel levels: one for DVD 5.1 CH and one for effective surround sound. 1 Select 'Speaker Distance' from the Manual SP Setup menu. 4.Manual SP Setup a.Speaker Setting b.Crossover Network c.Channel Level d.Speaker Distance :Return 4d.Speaker Distance L C R RS SBR SBL LS...

Owner's Manual
Page 43
...improve the sound quality and allow you want to listen to enjoy the broadcast. Manual tuning To change the frequency one . Tuning directly to a station Sometimes, you'll already know the frequency of manually tuning in the currently selected band, press and hold TUNE/ for the... the band. 2 Press D.ACCESS (SHIFT+ENTER). 3 Use the number buttons to FM and AM radio broadcasts using the automatic (search) and manual (step) tuning functions. REC RETURN AUDIO HDD DVD REC STOP TUNER DISP CLASS MPX D.ACCESS MIDNIGHT ANALOG ATT DIMMER ENTER DISC SLEEP +10 SIGNAL...
...improve the sound quality and allow you want to listen to enjoy the broadcast. Manual tuning To change the frequency one . Tuning directly to a station Sometimes, you'll already know the frequency of manually tuning in the currently selected band, press and hold TUNE/ for the... the band. 2 Press D.ACCESS (SHIFT+ENTER). 3 Use the number buttons to FM and AM radio broadcasts using the automatic (search) and manual (step) tuning functions. REC RETURN AUDIO HDD DVD REC STOP TUNER DISP CLASS MPX D.ACCESS MIDNIGHT ANALOG ATT DIMMER ENTER DISC SLEEP +10 SIGNAL...

Owner's Manual
Page 45
... buttons (or INPUT SELECT). 2 Select the input signal (if necessary). into the recording device and set the audio recording level automatically-check the component's instruction manual if you also need to use the same type of the source component.1 Note 1 • The receiver's volume, balance, tone (bass, treble, loudness), and surround...
... buttons (or INPUT SELECT). 2 Select the input signal (if necessary). into the recording device and set the audio recording level automatically-check the component's instruction manual if you also need to use the same type of the source component.1 Note 1 • The receiver's volume, balance, tone (bass, treble, loudness), and surround...

Owner's Manual
Page 54
... presets is unrivaled. Connecting your SIRIUS Connect Tuner To receive SIRIUS Satellite Radio broadcasts, you will need to have some presets stored to do this manual. Only SIRIUS has more . SIRIUS also has more information, visit www.sirius.com. Connect SIRIUS on the internet at 1-888-539-SIRIUS (1-888-539-7474...
... presets is unrivaled. Connecting your SIRIUS Connect Tuner To receive SIRIUS Satellite Radio broadcasts, you will need to have some presets stored to do this manual. Only SIRIUS has more . SIRIUS also has more information, visit www.sirius.com. Connect SIRIUS on the internet at 1-888-539-SIRIUS (1-888-539-7474...

Owner's Manual
Page 58
connections are basically the same as bi-amping, but additionally, interference effects within the wire could severely damage the amplifier. See your speaker manual for more information. • If your speakers The reasons for the high and low frequencies). Bi-wiring your speakers have a removable crossover network, make sure ...
connections are basically the same as bi-amping, but additionally, interference effects within the wire could severely damage the amplifier. See your speaker manual for more information. • If your speakers The reasons for the high and low frequencies). Bi-wiring your speakers have a removable crossover network, make sure ...


