Owner's Manual
Page 4
...menu Making receiver settings from the System Setup menu 32 Automatic MCACC (Expert 32 Surround back speaker setting 34 Manual MCACC setup 35 Fine Channel Level 35 Fine Speaker Distance 36 Standing Wave 36 Acoustic Calibration EQ 37 Professional... Acoustic Calibration EQ 37 Data Management 40 Manual speaker setup 41 Speaker Setting 41 Channel Level 42 Speaker Distance 43 Bass Peak Level 43 X-Curve 44 ... 46 Listening to operate your model properly. After you for buying this Pioneer product.
...menu Making receiver settings from the System Setup menu 32 Automatic MCACC (Expert 32 Surround back speaker setting 34 Manual MCACC setup 35 Fine Channel Level 35 Fine Speaker Distance 36 Standing Wave 36 Acoustic Calibration EQ 37 Professional... Acoustic Calibration EQ 37 Data Management 40 Manual speaker setup 41 Speaker Setting 41 Channel Level 42 Speaker Distance 43 Bass Peak Level 43 X-Curve 44 ... 46 Listening to operate your model properly. After you for buying this Pioneer product.

Owner's Manual
Page 7
... with your system, the receiver uses the information from the DVD player to your TV to this . Connect your TV and DVD player. Check the manual that the DVD input is showing in Listening to your system on this unit to an AC power source. 1 Connect your speakers as shown below...
... with your system, the receiver uses the information from the DVD player to your TV to this . Connect your TV and DVD player. Check the manual that the DVD input is showing in Listening to your system on this unit to an AC power source. 1 Connect your speakers as shown below...

Owner's Manual
Page 8
...SUB W. [ YES ] [ YES ] [ YES ] [ Yx2 ] [ YES ] [ OK ] :Cancel The configuration shown on-screen should give you can correct the setting manually using the Auto MCACC Setup below) and verifying the mic connection. If there doesn't seem to cancel.2 4 Select 'Auto MCACC' from the listening position. 02... no obstacles between the speakers and the microphone. Make sure the microphone is connected, and if you see Problems when using the Manual speaker setup on page 41. • The subwoofer distance setting may result in another room, read through the screens and select menu...
...SUB W. [ YES ] [ YES ] [ YES ] [ Yx2 ] [ YES ] [ OK ] :Cancel The configuration shown on-screen should give you can correct the setting manually using the Auto MCACC Setup below) and verifying the mic connection. If there doesn't seem to cancel.2 4 Select 'Auto MCACC' from the listening position. 02... no obstacles between the speakers and the microphone. Make sure the microphone is connected, and if you see Problems when using the Manual speaker setup on page 41. • The subwoofer distance setting may result in another room, read through the screens and select menu...

Owner's Manual
Page 9
... 26 if you need to check the digital audio output settings on the playback component (for all sound is now selected.) 2 If you need to manually switch the input signal type press SIGNAL SEL (page 28). 3 • You may be set to this receiver. (For example, if you connected this receiver...
... 26 if you need to check the digital audio output settings on the playback component (for all sound is now selected.) 2 If you need to manually switch the input signal type press SIGNAL SEL (page 28). 3 • You may be set to this receiver. (For example, if you connected this receiver...
Owner's Manual
Page 14
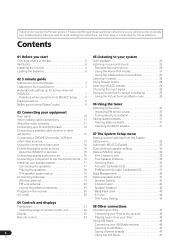
03 Connecting your equipment • For a second recorder, use the DIGITAL 3 (DVR/ VCR2) inputs. Use an optical cable for which source. VSX-74TXVi MULTI-ROOM &SOURCE /REC SEL OUT1 ROOM3(ZONE3) OUT2 MULTI-ROOM & SOURCE IN ROOM2(ZONE2) OUT FM UNBAL 75Ω MONITOR OUT S400 ... Setup menu on page 61. 2 Connect the COMPONENT VIDEO OUT jacks to tell the receiver which delivers a very stable, flicker-free picture. See the manuals that came with your TV or monitor. You can output digital audio, connect an optical-type1 digital audio output from the recorder to composite or...
03 Connecting your equipment • For a second recorder, use the DIGITAL 3 (DVR/ VCR2) inputs. Use an optical cable for which source. VSX-74TXVi MULTI-ROOM &SOURCE /REC SEL OUT1 ROOM3(ZONE3) OUT2 MULTI-ROOM & SOURCE IN ROOM2(ZONE2) OUT FM UNBAL 75Ω MONITOR OUT S400 ... Setup menu on page 61. 2 Connect the COMPONENT VIDEO OUT jacks to tell the receiver which delivers a very stable, flicker-free picture. See the manuals that came with your TV or monitor. You can output digital audio, connect an optical-type1 digital audio output from the recorder to composite or...

Owner's Manual
Page 18
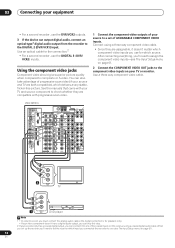
... the speakers towards the listening position. apart, at about 3/8 in position, tighten the terminal until there is switched on. Important • Please refer to the manual that all speakers are securely installed. Use less of an angle for bigger rooms. • Surround and surround back speakers should help you want to...
... the speakers towards the listening position. apart, at about 3/8 in position, tighten the terminal until there is switched on. Important • Please refer to the manual that all speakers are securely installed. Use less of an angle for bigger rooms. • Surround and surround back speakers should help you want to...
Owner's Manual
Page 28
... as well as follows: • AUTO - STATUS SIGNAL SEL SBch STEREO MULTI OPE THX STANDARD ADV. For more details, refer to the instruction manual supplied with your DVD player. • Even when i.LINK is selected and the i.LINK indicator lights, you won't hear any sound if the output...heard before playback of a source. Note 1 There are heard without any sound delay and hi-bit/hi-sampling settings. Selects an i.LINK signal (VSX-74TXVi only). Please select AUTO SURROUND or DIRECT if this receiver. 28 En See Data Management on page 26. • DIRECT - Choosing the...
... as well as follows: • AUTO - STATUS SIGNAL SEL SBch STEREO MULTI OPE THX STANDARD ADV. For more details, refer to the instruction manual supplied with your DVD player. • Even when i.LINK is selected and the i.LINK indicator lights, you won't hear any sound if the output...heard before playback of a source. Note 1 There are heard without any sound delay and hi-bit/hi-sampling settings. Selects an i.LINK signal (VSX-74TXVi only). Please select AUTO SURROUND or DIRECT if this receiver. 28 En See Data Management on page 26. • DIRECT - Choosing the...

Owner's Manual
Page 30
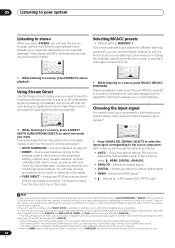
Manual tuning To change the band (FM or AM), if necessary. High speed tuning Press and hold TUNE / for about a second. Tuning directly to a station Sometimes, ... select the tuner. 2 Use the BAND button to 106.00 (FM), press 1, 0, 6, 0, 0. If you can simply enter the frequency directly using the automatic (search) and manual (step) tuning functions. Each press switches the band between FM and AM. 3 Tune to a station below.
Manual tuning To change the band (FM or AM), if necessary. High speed tuning Press and hold TUNE / for about a second. Tuning directly to a station Sometimes, ... select the tuner. 2 Use the BAND button to 106.00 (FM), press 1, 0, 6, 0, 0. If you can simply enter the frequency directly using the automatic (search) and manual (step) tuning functions. Each press switches the band between FM and AM. 3 Tune to a station below.

Owner's Manual
Page 31
... (remote) to select characters. • Press ENTER to confirm a character. Tip • To erase a station name, simply repeat steps 1-3 and input four spaces instead of manually tuning in which the station is also stored. Press repeatedly to cycle through classes A, B and C. 3 Press ST / to select the station preset you want to...
... (remote) to select characters. • Press ENTER to confirm a character. Tip • To erase a station name, simply repeat steps 1-3 and input four spaces instead of manually tuning in which the station is also stored. Press repeatedly to cycle through classes A, B and C. 3 Press ST / to select the station preset you want to...

Owner's Manual
Page 32
...Calibration EQ (see The Other Setup menu on page 7, you are using your surround back speakers (see Data Management on page 34). • Manual MCACC - Automatic MCACC (Expert) If your setup requires more detailed setup. • Surr Back System - channel level) from the System Setup ... of inactivity. See Automatically setting up to six different MCACC presets3, which are connected to the digital and component video inputs (see Manual speaker setup on the receiver and your TV. See Automatic MCACC (Expert) below . Specify how you can calibrate your system differently ...
...Calibration EQ (see The Other Setup menu on page 7, you are using your surround back speakers (see Data Management on page 34). • Manual MCACC - Automatic MCACC (Expert) If your setup requires more detailed setup. • Surr Back System - channel level) from the System Setup ... of inactivity. See Automatically setting up to six different MCACC presets3, which are connected to the digital and component video inputs (see Manual speaker setup on the receiver and your TV. See Automatic MCACC (Expert) below . Specify how you can calibrate your system differently ...
Owner's Manual
Page 33
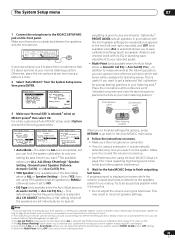
... DIGITAL IN S-VIDEO VIDEO L AUDIO R If you switch on page 40). 3 The Aco Cal EQ Pro. System Setup 1.Auto MCACC 2.Surr Back System 3.Manual MCACC 4.Data Management 5.Manual SP Setup 6.Input Setup 7.Other Setup : Exit 1.Auto MCACC Surr Back System [ Normal (SB) ] Data Save to the MCACC SETUP MIC jack on this...
... DIGITAL IN S-VIDEO VIDEO L AUDIO R If you switch on page 40). 3 The Aco Cal EQ Pro. System Setup 1.Auto MCACC 2.Surr Back System 3.Manual MCACC 4.Data Management 5.Manual SP Setup 6.Input Setup 7.Other Setup : Exit 1.Auto MCACC Surr Back System [ Normal (SB) ] Data Save to the MCACC SETUP MIC jack on this...

Owner's Manual
Page 34
...the speaker configuration in step 3), you will end up with different size settings. The overall balance of your room (see Problems when using the Manual speaker setup on page 41. • The subwoofer distance setting may take 2-6 minutes. • If you selected a Multi-Point setup ...system. Adjustments to be used for the surround back speakers, they can correct the setting manually using the Auto MCACC Setup on this) • Channel Level - Filter settings to adjust these settings manually using the System Setup menu (starting on this)3 • Standing Wave - If ...
...the speaker configuration in step 3), you will end up with different size settings. The overall balance of your room (see Problems when using the Manual speaker setup on page 41. • The subwoofer distance setting may take 2-6 minutes. • If you selected a Multi-Point setup ...system. Adjustments to be used for the surround back speakers, they can correct the setting manually using the Auto MCACC Setup on this) • Channel Level - Filter settings to adjust these settings manually using the System Setup menu (starting on this)3 • Standing Wave - If ...
Owner's Manual
Page 35
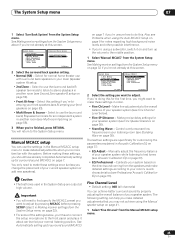
.... • If you're using the Auto MCACC Setup on page 9 for surround sound (MCACC) on page 7 if you may not achieve using the Manual speaker setup on page 41. 1 Select 'Fine Ch Level' from the System Setup menu. Control overly resonant low frequencies in your listening room (see Standing... (see Bi-amping your front speakers on page 53). • Multi Room & Source - If you 're more familiar with surround back speakers in the Manual MCACC setup menu to make detailed adjustments when you 're doing this screen. Calibrate your system based on the direct sound coming from the System...
.... • If you're using the Auto MCACC Setup on page 9 for surround sound (MCACC) on page 7 if you may not achieve using the Manual speaker setup on page 41. 1 Select 'Fine Ch Level' from the System Setup menu. Control overly resonant low frequencies in your listening room (see Standing... (see Bi-amping your front speakers on page 53). • Multi Room & Source - If you 're more familiar with surround back speakers in the Manual MCACC setup menu to make detailed adjustments when you 're doing this screen. Calibrate your system based on the direct sound coming from the System...

Owner's Manual
Page 36
... 0.5 to select it to adjust the other speakers in turn and adjust the levels (+/ - 10dB) as necessary. Note that it may not achieve using the Manual speaker setup below. 3b.Fine SP Distance L R C SL SR SBL SBR SW 10.0ft (Reference) [ 9.0ft ] 9.5ft [ 6.0ft ] [ 6.5ft ] [ 6.0ft ] [ 6.5ft ] [...go back and adjust a channel, simply use / to 45.0 feet. Use / to adjust the volume of speaker distance from the Manual MCACC setup menu. 3.Manual MCACC a.Fine Ch Level b.Fine SP Distance c.Standing Wave d.EQ Adjust e.EQ Professional 3b.Fine SP Distance MCACC:M1. Try to make...
... 0.5 to select it to adjust the other speakers in turn and adjust the levels (+/ - 10dB) as necessary. Note that it may not achieve using the Manual speaker setup below. 3b.Fine SP Distance L R C SL SR SBL SBR SW 10.0ft (Reference) [ 9.0ft ] 9.5ft [ 6.0ft ] [ 6.5ft ] [ 6.0ft ] [ 6.5ft ] [...go back and adjust a channel, simply use / to 45.0 feet. Use / to adjust the volume of speaker distance from the Manual MCACC setup menu. 3.Manual MCACC a.Fine Ch Level b.Fine SP Distance c.Standing Wave d.EQ Adjust e.EQ Professional 3b.Fine SP Distance MCACC:M1. Try to make...

Owner's Manual
Page 37
...[ -2.5] :Finish Use the / buttons to the targeted frequency). 3 When you will return to the Manual MCACC setup menu. indicator shows in your MCACC presets.1 1 Select 'Standing Wave' from Pioneer-see Connecting a PC for Advanced MCACC output on page 60 for more on speaker placement, your listening ...position, and ultimately the shape of the screen and use / to get a frequency balance that can also adjust these settings manually to raise or lower ...
...[ -2.5] :Finish Use the / buttons to the targeted frequency). 3 When you will return to the Manual MCACC setup menu. indicator shows in your MCACC presets.1 1 Select 'Standing Wave' from Pioneer-see Connecting a PC for Advanced MCACC output on page 60 for more on speaker placement, your listening ...position, and ultimately the shape of the screen and use / to get a frequency balance that can also adjust these settings manually to raise or lower ...

Owner's Manual
Page 38
...By analyzing the graph, you should be examined both with and without the equalization performed by this difference increases as audio is output from Pioneer - Level Test tone As soon as the sound is often not necessary to make a 20-40ms setting. The sooner the frequency analysis,... a graphical output that can set the time period at which the microphone captures the sound for system calibration with the results, the manual Advanced EQ setup (below shows the difference between standard acoustic calibration and professional calibration (the gray circles represent the point at 0ms)....
...By analyzing the graph, you should be examined both with and without the equalization performed by this difference increases as audio is output from Pioneer - Level Test tone As soon as the sound is often not necessary to make a 20-40ms setting. The sooner the frequency analysis,... a graphical output that can set the time period at which the microphone captures the sound for system calibration with the results, the manual Advanced EQ setup (below shows the difference between standard acoustic calibration and professional calibration (the gray circles represent the point at 0ms)....

Owner's Manual
Page 39
... will take about 1-4 minutes for calibration, then select 'Go'. The System Setup menu 07 Using Professional Acoustic Calibration EQ 1 Select 'EQ Professional' then press ENTER. 3.Manual MCACC a.Fine Ch Level b.Fine SP Distance c.Standing Wave d.EQ Adjust e.EQ Professional 3e.EQ Professional 1.Reverb Measurement 2.Reverb View 3.Reverb Output PC 4.Advanced EQ...
... will take about 1-4 minutes for calibration, then select 'Go'. The System Setup menu 07 Using Professional Acoustic Calibration EQ 1 Select 'EQ Professional' then press ENTER. 3.Manual MCACC a.Fine Ch Level b.Fine SP Distance c.Standing Wave d.EQ Adjust e.EQ Professional 3e.EQ Professional 1.Reverb Measurement 2.Reverb View 3.Reverb Output PC 4.Advanced EQ...

Owner's Manual
Page 40
System Setup 1.Auto MCACC 2.Surr Back System 3.Manual MCACC 4.Data Management 5.Manual SP Setup 6.Input Setup 7.Other Setup : Exit 4.Data Management a.MCACC Data Check b.MCACC Data Copy c.Memory Rename d.Memory Clear :Return 2 Select ...TRIM :+12.0dB No. 1 2 3 f : 110Hz : 110Hz : 110Hz Q : 3.0 : 3.0 : 3.0 A T T : 12.0dB : 10.0dB : 12.0dB :Return 5 When you are given the option to manually adjust the Acoustic Calibration EQ (see Manual MCACC setup above if you want (see Renaming MCACC presets below ). MEMORY 2 ] Start Copy [Cancel ] :Return :Cancel Note 1 This can be done...
System Setup 1.Auto MCACC 2.Surr Back System 3.Manual MCACC 4.Data Management 5.Manual SP Setup 6.Input Setup 7.Other Setup : Exit 4.Data Management a.MCACC Data Check b.MCACC Data Copy c.Memory Rename d.Memory Clear :Return 2 Select ...TRIM :+12.0dB No. 1 2 3 f : 110Hz : 110Hz : 110Hz Q : 3.0 : 3.0 : 3.0 A T T : 12.0dB : 10.0dB : 12.0dB :Return 5 When you are given the option to manually adjust the Acoustic Calibration EQ (see Manual MCACC setup above if you want (see Renaming MCACC presets below ). MEMORY 2 ] Start Copy [Cancel ] :Return :Cancel Note 1 This can be done...

Owner's Manual
Page 41
...to make these settings in the OSD to confirm the MCACC preset has been cleared, then you are output at high volume. 1 Select 'Manual SP Setup' then press ENTER. Adjust the tonal balance of your speaker configuration (size, number of that this for movie soundtracks (page ... these settings once (unless you want to SMALL. 41 En System Setup 1.Auto MCACC 2.Surr Back System 3.Manual MCACC 4.Data Management 5.Manual SP Setup 6.Input Setup 7.Other Setup : Exit 5.Manual SP Setup a.Speaker Setting b.Channel Level c.Speaker Distance d.Bass Peak Level e.X-Curve f.THX Audio Setting :Return ...
...to make these settings in the OSD to confirm the MCACC preset has been cleared, then you are output at high volume. 1 Select 'Manual SP Setup' then press ENTER. Adjust the tonal balance of your speaker configuration (size, number of that this for movie soundtracks (page ... these settings once (unless you want to SMALL. 41 En System Setup 1.Auto MCACC 2.Surr Back System 3.Manual MCACC 4.Data Management 5.Manual SP Setup 6.Input Setup 7.Other Setup : Exit 5.Manual SP Setup a.Speaker Setting b.Channel Level c.Speaker Distance d.Bass Peak Level e.X-Curve f.THX Audio Setting :Return ...

Owner's Manual
Page 42
...front speakers). • Surround - The test tones will return to the subwoofer. 2 • If you press ENTER. 5b.Channel Level Test Tone [ Manual ] Setting Start Please Wait . . . 20 Caution! In this point will automatically be sent to 80Hz. 42 En It also decides where the cutoff ... is to route all bass frequencies are set to LARGE if the front speakers are sent to the Manual SP Setup menu. Move the test tone manually from the Manual SP Setup menu. 5.Manual SP Setup a.Speaker Setting b.Channel Level c.Speaker Distance d.Bass Peak Level e.X-Curve f.THX Audio Setting ...
...front speakers). • Surround - The test tones will return to the subwoofer. 2 • If you press ENTER. 5b.Channel Level Test Tone [ Manual ] Setting Start Please Wait . . . 20 Caution! In this point will automatically be sent to 80Hz. 42 En It also decides where the cutoff ... is to route all bass frequencies are set to LARGE if the front speakers are sent to the Manual SP Setup menu. Move the test tone manually from the Manual SP Setup menu. 5.Manual SP Setup a.Speaker Setting b.Channel Level c.Speaker Distance d.Bass Peak Level e.X-Curve f.THX Audio Setting ...


