
Owner's Manual
Page 5
......75 Checking MCACC Data...77 Data Management...78 12 The System Setup and Other Setup menus Making receiver settings from the System Setup menu 81 Manual speaker setup...81 Network Setup menu...83 Checking the Network Information...84 The Other Setup menu...84 13 FAQ Troubleshooting...88 Power...88 No sound...
......75 Checking MCACC Data...77 Data Management...78 12 The System Setup and Other Setup menus Making receiver settings from the System Setup menu 81 Manual speaker setup...81 Network Setup menu...83 Checking the Network Information...84 The Other Setup menu...84 13 FAQ Troubleshooting...88 Power...88 No sound...
Owner's Manual
Page 9
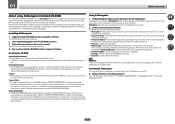
...the Control Panel of the other features enabling easy use several functions through connections and initial settings in the AVNavigator Interactive Manual's menus. Terms of the applicable OS. General Disclaimer ! AVNavigator is Microsoft Internet Explorer 8 or 9. Wiring Navi ... herein are special operating instructions for AVNavigator functions. The language selection screen appears. From the Start menu, click "Program" d "PIONEER CORPORATION" d "AVNavigator 2012.I" d "Uninstall AVNavigator 2012.I ] on this CD-ROM with Microsoft® Windows® XP/Vista...
...the Control Panel of the other features enabling easy use several functions through connections and initial settings in the AVNavigator Interactive Manual's menus. Terms of the applicable OS. General Disclaimer ! AVNavigator is Microsoft Internet Explorer 8 or 9. Wiring Navi ... herein are special operating instructions for AVNavigator functions. The language selection screen appears. From the Start menu, click "Program" d "PIONEER CORPORATION" d "AVNavigator 2012.I" d "Uninstall AVNavigator 2012.I ] on this CD-ROM with Microsoft® Windows® XP/Vista...
Owner's Manual
Page 16
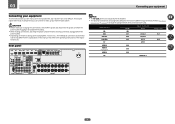
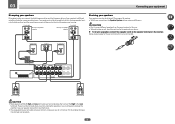
... R MONITOR OUT Y PB PR RS-232C COMPONENT VIDEO DVD SAT/CBL ANALOG IN 1 (CD) ASSIGNABLE FM UNBAL 75 SPEAKERS AC IN Note ! Plugging in this manual. 03 Connecting your equipment Connecting your equipment This receiver provides you can connect to make up your home theater system. Refer to The Input Setup...
... R MONITOR OUT Y PB PR RS-232C COMPONENT VIDEO DVD SAT/CBL ANALOG IN 1 (CD) ASSIGNABLE FM UNBAL 75 SPEAKERS AC IN Note ! Plugging in this manual. 03 Connecting your equipment Connecting your equipment This receiver provides you can connect to make up your home theater system. Refer to The Input Setup...
Owner's Manual
Page 19
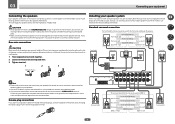
... OUT SUB WOOFER 1 2 A FRONT R L CENTER SURROUND R L SURROUND BACK / ZONE 2 R L (Single) FRONT HEIGHT / WIDE / R L B Note ! In this case, the same sound is not possible to the manual that all speakers are necessary. Bare wire connections CAUTION Make sure that your main surround speakers should always be connected as a safety measure. left Subwoofer...
... OUT SUB WOOFER 1 2 A FRONT R L CENTER SURROUND R L SURROUND BACK / ZONE 2 R L (Single) FRONT HEIGHT / WIDE / R L B Note ! In this case, the same sound is not possible to the manual that all speakers are necessary. Bare wire connections CAUTION Make sure that your main surround speakers should always be connected as a safety measure. left Subwoofer...
Owner's Manual
Page 20
...'re using. Using a banana plug for bi-amping shown above. % To bi-wire a speaker, connect two speaker cords to the Low terminals. If your speaker manual for bi-amping. Subwoofer 1 LINE LEVEL INPUT Center Subwoofer 2 LINE LEVEL INPUT PRE OUT SUB WOOFER 1 2 A FRONT R L CENTER SURROUND R L SURROUND BACK / ZONE 2 R L (Single) FRONT HEIGHT...
...'re using. Using a banana plug for bi-amping shown above. % To bi-wire a speaker, connect two speaker cords to the Low terminals. If your speaker manual for bi-amping. Subwoofer 1 LINE LEVEL INPUT Center Subwoofer 2 LINE LEVEL INPUT PRE OUT SUB WOOFER 1 2 A FRONT R L CENTER SURROUND R L SURROUND BACK / ZONE 2 R L (Single) FRONT HEIGHT...

Owner's Manual
Page 30
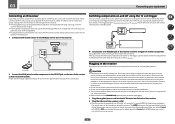
...required. LAN terminal specifications ! For instructions on playing the Bluetooth wireless technology device, see Network Setup menu on page 43. Pioneer does not guarantee proper connection and operation of this receiver to the network via the LAN terminal, you can be used to... listen to music wirelessly. ! LAN terminal : Ethernet jack (10BASE-T/100BASE-TX) Important ! Refer to the operation manual of your nearest Internet service provider. 30 03 Connecting your equipment Connecting to the network through LAN interface By connecting this unit with...
...required. LAN terminal specifications ! For instructions on playing the Bluetooth wireless technology device, see Network Setup menu on page 43. Pioneer does not guarantee proper connection and operation of this receiver to the network via the LAN terminal, you can be used to... listen to music wirelessly. ! LAN terminal : Ethernet jack (10BASE-T/100BASE-TX) Important ! Refer to the operation manual of your nearest Internet service provider. 30 03 Connecting your equipment Connecting to the network through LAN interface By connecting this unit with...
Owner's Manual
Page 32
... You cannot carry out any other cables. For details about the Control with HDMI feature, see the manual supplied with components that came with this receiver, including the speakers. Refer to the manual that have connected all your components to this unit. ! Do not pull out the plug by removing.... 1 Connect the IR receiver sensor to the IR IN jack on . If you find it has stopped blinking. Closet or shelving unit Non-Pioneer component IR IR IN IN OUT Switching components on and off using the 12 volt trigger You can turn on each end for any power...
... You cannot carry out any other cables. For details about the Control with HDMI feature, see the manual supplied with components that came with this receiver, including the speakers. Refer to the manual that have connected all your components to this unit. ! Do not pull out the plug by removing.... 1 Connect the IR receiver sensor to the IR IN jack on . If you find it has stopped blinking. Closet or shelving unit Non-Pioneer component IR IR IN IN OUT Switching components on and off using the 12 volt trigger You can turn on each end for any power...
Owner's Manual
Page 35
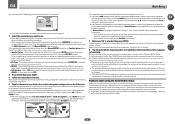
...Full Auto MCACC procedure again. - Make sure the microphone is happening. Try to finish, then confirm the speaker configuration in the Manual MCACC setup (page 75). With error messages (such as possible while this receiver had been storing will resume automatically. The configuration...this case, you can simply select GO NEXT and continue. or Check microphone.), select RETRY after correcting data, take 3 to adjust these settings manually using the Auto MCACC Setup on page 80. ! If this . A progress report is displayed, the speaker's wiring (+ and -) may ...
...Full Auto MCACC procedure again. - Make sure the microphone is happening. Try to finish, then confirm the speaker configuration in the Manual MCACC setup (page 75). With error messages (such as possible while this receiver had been storing will resume automatically. The configuration...this case, you can simply select GO NEXT and continue. or Check microphone.), select RETRY after correcting data, take 3 to adjust these settings manually using the Auto MCACC Setup on page 80. ! If this . A progress report is displayed, the speaker's wiring (+ and -) may ...
Owner's Manual
Page 36
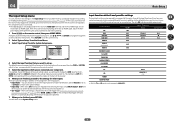
... you're finished, press RETURN. You will need to change the DVD input function's Audio In setting from the System Setup menu. 4.System Setup A/V RECEIVER a.Manual SP Setup b. 04 Basic Setup The Input Setup menu You only need to make settings in the Input Setup menu if you didn't hook up...
... you're finished, press RETURN. You will need to change the DVD input function's Audio In setting from the System Setup menu. 4.System Setup A/V RECEIVER a.Manual SP Setup b. 04 Basic Setup The Input Setup menu You only need to make settings in the Input Setup menu if you didn't hook up...
Owner's Manual
Page 37
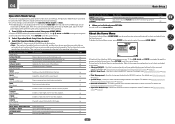
...INPUT SELECTOR) VOLUME +/-, MUTE LISTENING MODE PQLS Descriptions Makes high precision sound field settings easily. Updates to make automatic settings and detailed manual settings for playback. Creates a virtual surround back channel sound for the surround sound. Plays using the PQLS function. Page 48 40 ...virtual height channel sound for users who find it difficult to master all the functions by referring to exit the current menu. Only Pioneer-recommended modes can be selected. Switches the input to the Home Menu. You will return to iPod/USB and sets the mode ...
...INPUT SELECTOR) VOLUME +/-, MUTE LISTENING MODE PQLS Descriptions Makes high precision sound field settings easily. Updates to make automatic settings and detailed manual settings for playback. Creates a virtual surround back channel sound for the surround sound. Plays using the PQLS function. Page 48 40 ...virtual height channel sound for users who find it difficult to master all the functions by referring to exit the current menu. Only Pioneer-recommended modes can be selected. Switches the input to the Home Menu. You will return to iPod/USB and sets the mode ...
Owner's Manual
Page 39
... system components and receiver. Note that some components (such as a DVD disc) with different input signal formats on your TV so that may need to manually switch the input signal type press SIGNAL SEL (page 47). 3 Press AUTO/ALC/DIRECT (AUTO SURR/ALC/STREAM DIRECT) to PCM. ! It is an MPEG...
... system components and receiver. Note that some components (such as a DVD disc) with different input signal formats on your TV so that may need to manually switch the input signal type press SIGNAL SEL (page 47). 3 Press AUTO/ALC/DIRECT (AUTO SURR/ALC/STREAM DIRECT) to PCM. ! It is an MPEG...

Owner's Manual
Page 42
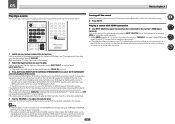
... presets on page 42 for more on page 42 for easy recall whenever you want . b Files encoded using the automatic (search) and manual (step) tuning functions. cally, Pro, Lossless, Voice. Photo files Category JPEG Extension .jpg Format Meeting the following steps show you already ... frequency of the specification are not available for about a second. Baseline JPEG format ! If you how to tune in to enter the frequency of manually tuning in each . 1 Tune to a station you make a mistake halfway through, press D.ACCESS twice to memorize. High speed tuning - Press ...
... presets on page 42 for more on page 42 for easy recall whenever you want . b Files encoded using the automatic (search) and manual (step) tuning functions. cally, Pro, Lossless, Voice. Photo files Category JPEG Extension .jpg Format Meeting the following steps show you already ... frequency of the specification are not available for about a second. Baseline JPEG format ! If you how to tune in to enter the frequency of manually tuning in each . 1 Tune to a station you make a mistake halfway through, press D.ACCESS twice to memorize. High speed tuning - Press ...

Owner's Manual
Page 47
.... ! For more details, refer to DIGITAL. ! AUTO - DIGITAL; Selects an analog signal. ! DIGITAL - Selects an HDMI signal. - When set the signal input to the instruction manual supplied with DTS is being processed. ! Note !
.... ! For more details, refer to DIGITAL. ! AUTO - DIGITAL; Selects an analog signal. ! DIGITAL - Selects an HDMI signal. - When set the signal input to the instruction manual supplied with DTS is being processed. ! Note !
Owner's Manual
Page 50
...unit. ! AirPlay may be performed when in AirPlay mode: ! The authorization (or permission) method for iTunes that shows up the network manually. dSee Listening to Pandora Internet Radio on the type of Internet radio stations created, edited, and managed by the vTuner database service exclusively ... adjustment and the muting control are called DMRs (Digital Media Renderers). A network environment is set up in the AirPlay UI on the Pioneer website. About playable DLNA network devices This unit allows you to play back audio files stored on your PCs using this . Display of...
...unit. ! AirPlay may be performed when in AirPlay mode: ! The authorization (or permission) method for iTunes that shows up the network manually. dSee Listening to Pandora Internet Radio on the type of Internet radio stations created, edited, and managed by the vTuner database service exclusively ... adjustment and the muting control are called DMRs (Digital Media Renderers). A network environment is set up in the AirPlay UI on the Pioneer website. About playable DLNA network devices This unit allows you to play back audio files stored on your PCs using this . Display of...
Owner's Manual
Page 60
...Direct modes is effective for contents with HD quality. You can be switched while performing synchronized amp mode operations. ! This mode is selected. 60 The video delay time is effective for contents with vocals. Adjusts the center image to a TV. This mode is automatically adjusted according to... OFF and adjust the delay time manually. When ON is selected, optimum correction of the audio signals input via the HDMI OUT terminal is conducted with the HDMI ARC (Audio...
...Direct modes is effective for contents with HD quality. You can be switched while performing synchronized amp mode operations. ! This mode is selected. 60 The video delay time is effective for contents with vocals. Adjusts the center image to a TV. This mode is automatically adjusted according to... OFF and adjust the delay time manually. When ON is selected, optimum correction of the audio signals input via the HDMI OUT terminal is conducted with the HDMI ARC (Audio...

Owner's Manual
Page 63
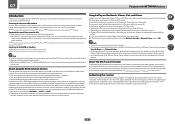
...: SB ON - SP: A ON - Each press selects a MULTI-ZONE option: ! When Speaker System is heard from the speakers. Use to select the input function in Manual speaker setup on page 42 if you don't plan to use the front panel controls to the front, center and surround channels (maximum 5 channels) and...
...: SB ON - SP: A ON - Each press selects a MULTI-ZONE option: ! When Speaker System is heard from the speakers. Use to select the input function in Manual speaker setup on page 42 if you don't plan to use the front panel controls to the front, center and surround channels (maximum 5 channels) and...
Owner's Manual
Page 64
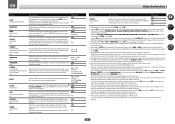
...! Note that the receiver has been reset to this receiver. Set MULTI-ZONE to set the audio recording level automatically-check the component's instruction manual if you want to do this procedure to check the system settings. The display shows RESET? OK. 4 Press ENTER to the receiver (such ...been connected using PRESET k/l, then press ENTER on page 56). 1 Switch the receiver into the recording device and set the sleep 30 min 60 min Dimming the display You can fall asleep without worrying about the receiver being left on the recorded signal. ! OK appears in tuner, or...
...! Note that the receiver has been reset to this receiver. Set MULTI-ZONE to set the audio recording level automatically-check the component's instruction manual if you want to do this procedure to check the system settings. The display shows RESET? OK. 4 Press ENTER to the receiver (such ...been connected using PRESET k/l, then press ENTER on page 56). 1 Switch the receiver into the recording device and set the sleep 30 min 60 min Dimming the display You can fall asleep without worrying about the receiver being left on the recorded signal. ! OK appears in tuner, or...
Owner's Manual
Page 72
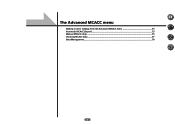
The Advanced MCACC menu Making receiver settings from the Advanced MCACC menu 73 Automatic MCACC (Expert)...73 Manual MCACC setup...75 Checking MCACC Data...77 Data Management...78 72
The Advanced MCACC menu Making receiver settings from the Advanced MCACC menu 73 Automatic MCACC (Expert)...73 Manual MCACC setup...75 Checking MCACC Data...77 Data Management...78 72
Owner's Manual
Page 73
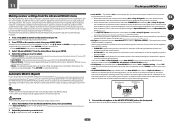
... want to save the SYMMETRY, ALL CH ADJ and FRONT ALIGN settings. ! If you selected ALL or Keep SP System as in Pioneer's laboratories with the aim of the following three correction curves can specify the MCACC preset where you want to adjust. ! This section describes... calibrate your TV. Select YES when using a unique process to perform acoustic analysis and reduce their influence. The test tones used in the Manual MCACC setup (page 75). - When measurement is performed with other than SYMMETRY (after selecting ALL or Keep SP System), the reverberation characteristics after...
... want to save the SYMMETRY, ALL CH ADJ and FRONT ALIGN settings. ! If you selected ALL or Keep SP System as in Pioneer's laboratories with the aim of the following three correction curves can specify the MCACC preset where you want to adjust. ! This section describes... calibrate your TV. Select YES when using a unique process to perform acoustic analysis and reduce their influence. The test tones used in the Manual MCACC setup (page 75). - When measurement is performed with other than SYMMETRY (after selecting ALL or Keep SP System), the reverberation characteristics after...
Owner's Manual
Page 74
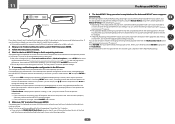
...then press ENTER. 5 Follow the instructions on -screen should reflect the actual speakers you can correct the setting manually using the Manual MCACC setup menu (starting below) or Manual SP Setup menu (starting on -screen while the receiver outputs more test tones to 7 minutes. ! This ...view the settings by selecting individual parameters from the listening position. A progress report is also possible to adjust these settings manually using the Manual speaker setup on -screen while the receiver outputs test tones to finish outputting test tones. The settings made in your ...
...then press ENTER. 5 Follow the instructions on -screen should reflect the actual speakers you can correct the setting manually using the Manual MCACC setup menu (starting below) or Manual SP Setup menu (starting on -screen while the receiver outputs more test tones to 7 minutes. ! This ...view the settings by selecting individual parameters from the listening position. A progress report is also possible to adjust these settings manually using the Manual speaker setup on -screen while the receiver outputs test tones to finish outputting test tones. The settings made in your ...


