Operating Instructions
Page 2
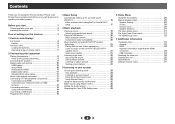
... 14 Using external antennas 14 Connecting a USB device 15 Plugging in the receiver 15 3 Basic Setup Automatically setting up for buying this Pioneer product. Contents Thank you for surround sound (MCACC 16 Other problems when using the Full Auto MCACC setup 17 4 Basic playback Playing a source 18 Selecting the audio input signal...
... 14 Using external antennas 14 Connecting a USB device 15 Plugging in the receiver 15 3 Basic Setup Automatically setting up for buying this Pioneer product. Contents Thank you for surround sound (MCACC 16 Other problems when using the Full Auto MCACC setup 17 4 Basic playback Playing a source 18 Selecting the audio input signal...
Operating Instructions
Page 3
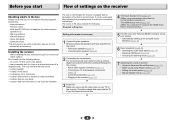
...Playing a USB device (page 20) • Choosing the listening mode (page 24) 7 Adjusting the sound as desired • Using the Advanced Sound Retriever (page 26) • Better sound using connections other movement - in damp or wet areas - in places that are very dusty - in direct ...(When the connected TV supports the HDMI Audio Return Channel function.) 5 Use the on a color TV (the screen may interfere with the sound. - in extremely hot or cold areas - Installing the receiver • When installing this . 4 The Input Assign menu (page 31)...
...Playing a USB device (page 20) • Choosing the listening mode (page 24) 7 Adjusting the sound as desired • Using the Advanced Sound Retriever (page 26) • Better sound using connections other movement - in damp or wet areas - in places that are very dusty - in direct ...(When the connected TV supports the HDMI Audio Return Channel function.) 5 Use the on a color TV (the screen may interfere with the sound. - in extremely hot or cold areas - Installing the receiver • When installing this . 4 The Input Assign menu (page 31)...
Operating Instructions
Page 4
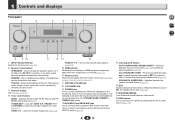
... Use to switch between Auto surround mode (page 24) and Stream Direct playback (page 25). The listening mode when the sound is selected, no sound output from PHONES SURR, STEREO or STEREO ALC mode. 10 AUX INPUT jack/SETUP MIC jack Use to connect other equipment... to select preset radio stations (page 23). 5 HDMI indicator Blinks when connecting an HDMI-equipped component; 1 Controls and displays Front panel 1 2 3 4 56 7 VSX-532 2 4 33 8 9 10 11 12 1 INPUT SELECTOR dial Selects an input source (page 18). 2 Receiver control buttons SPEAKERS - TUNE / - Press...
... Use to switch between Auto surround mode (page 24) and Stream Direct playback (page 25). The listening mode when the sound is selected, no sound output from PHONES SURR, STEREO or STEREO ALC mode. 10 AUX INPUT jack/SETUP MIC jack Use to connect other equipment... to select preset radio stations (page 23). 5 HDMI indicator Blinks when connecting an HDMI-equipped component; 1 Controls and displays Front panel 1 2 3 4 56 7 VSX-532 2 4 33 8 9 10 11 12 1 INPUT SELECTOR dial Selects an input source (page 18). 2 Receiver control buttons SPEAKERS - TUNE / - Press...

Operating Instructions
Page 5
... when a source with Dolby Digital Plus encoded audio signals is selected. NEO:6 - D+ - Lights when a source with DTS 96/24 encoded audio signals is in surround sound on page 24 for more on . PLII - Lights when a digital audio signal is detected. Blinks when a digital audio signal is selected and selected audio input...
... when a source with Dolby Digital Plus encoded audio signals is selected. NEO:6 - D+ - Lights when a source with DTS 96/24 encoded audio signals is in surround sound on page 24 for more on . PLII - Lights when a digital audio signal is detected. Blinks when a digital audio signal is selected and selected audio input...

Operating Instructions
Page 6
... mode and component control buttons AUTO/DIRECT - RETURN - Use to select the audio input signal of this receiver (page 18). Press for the Pioneer products are disabled when the listening mode is set to DIRECT or PURE DIRECT. • When the front speaker is set the listening volume. ... receiver switches into standby (30 min - 60 min - 90 min - Press to select stereo playback (page 24). Operations other Pioneer components with the remote control. 3 Sound control buttons PHASE - You can check the remaining sleep time at SMALL in four steps. 15 STATUS Switches the display of the ...
... mode and component control buttons AUTO/DIRECT - RETURN - Use to select the audio input signal of this receiver (page 18). Press for the Pioneer products are disabled when the listening mode is set to DIRECT or PURE DIRECT. • When the front speaker is set the listening volume. ... receiver switches into standby (30 min - 60 min - 90 min - Press to select stereo playback (page 24). Operations other Pioneer components with the remote control. 3 Sound control buttons PHASE - You can check the remaining sleep time at SMALL in four steps. 15 STATUS Switches the display of the ...

Operating Instructions
Page 8
... to 3 m (6 ft. to 9 ft.) apart, at a narrower angle. • Place the center speaker above ear height. CAUTION • Make sure that the sound of the center channel is not recommended. • For the best stereo effect, place the front speakers 2 m to place the surround speakers farther away from... is localized at a sufficient distance from speakers being knocked over or falling in the room has a big effect on the quality of the sound. Doing so can be more directly behind the listener than the front and center speakers. Use less of the room. 2 Connecting your speakers...
... to 3 m (6 ft. to 9 ft.) apart, at a narrower angle. • Place the center speaker above ear height. CAUTION • Make sure that the sound of the center channel is not recommended. • For the best stereo effect, place the front speakers 2 m to place the surround speakers farther away from... is localized at a sufficient distance from speakers being knocked over or falling in the room has a big effect on the quality of the sound. Doing so can be more directly behind the listener than the front and center speakers. Use less of the room. 2 Connecting your speakers...

Operating Instructions
Page 9
...;. Make sure you connect the speaker on the right to the left 9 Be sure to complete all the bare speaker wire is best for surround sound. Bare wire connections Front speaker terminals: 1 Twist exposed wire strands together. 1 2 3 2 Loosen terminal and insert exposed wire. 3 Tighten terminal. 12 mm (1/2 in.) Center and surround...
...;. Make sure you connect the speaker on the right to the left 9 Be sure to complete all the bare speaker wire is best for surround sound. Bare wire connections Front speaker terminals: 1 Twist exposed wire strands together. 1 2 3 2 Loosen terminal and insert exposed wire. 3 Tighten terminal. 12 mm (1/2 in.) Center and surround...

Operating Instructions
Page 10
...properly, depending on /off the power and disconnect the power cord from the HDMI is 480i, 480p, 576i or 576p, Multi Ch PCM sound and HD sound cannot be received. 2 Connecting your equipment Making cable connections Make sure not to bend the cables over the top of this unit (as...-Definition Multimedia Interface, and the HDMI Logo are trademarks of HDMI Licensing, LLC in equalizer is compatible with one cable. HDMI cables Both video and sound signals can be recognized. If this happens, the magnetic field produced by HDCP (1080p/24, 1080p/60, etc.)) • 3D signal transfer &#...
...properly, depending on /off the power and disconnect the power cord from the HDMI is 480i, 480p, 576i or 576p, Multi Ch PCM sound and HD sound cannot be received. 2 Connecting your equipment Making cable connections Make sure not to bend the cables over the top of this unit (as...-Definition Multimedia Interface, and the HDMI Logo are trademarks of HDMI Licensing, LLC in equalizer is compatible with one cable. HDMI cables Both video and sound signals can be recognized. If this happens, the magnetic field produced by HDCP (1080p/24, 1080p/60, etc.)) • 3D signal transfer &#...
Operating Instructions
Page 12
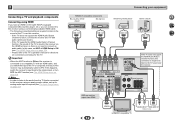
... available HDMI cable. • The following connection/setting is required to listen to the sound of the TV is input to the receiver via the HDMI terminal, so there is no need to the TV... sound over this receiver. - In this happens, switch the receiver's input back to ON (see The Input...If this case, set -up for the TV. If the TV supports the HDMI Audio Return Channel function, the sound of the TV over the receiver. OSD can connect it to this receiver using an analog audio cables, set ARC...
... available HDMI cable. • The following connection/setting is required to listen to the sound of the TV is input to the receiver via the HDMI terminal, so there is no need to the TV... sound over this receiver. - In this happens, switch the receiver's input back to ON (see The Input...If this case, set -up for the TV. If the TV supports the HDMI Audio Return Channel function, the sound of the TV over the receiver. OSD can connect it to this receiver using an analog audio cables, set ARC...

Operating Instructions
Page 13
... Connecting your component with no HDMI terminal to the receiver. VIDEO IN TV R L OPTICAL ANALOG AUDIO OUT DIGITAL AUDIO OUT Select one component to the sound of the receiver's settings, operations, etc., on the TV's screen cannot be output. In order to listen to the audio from the source component that...
... Connecting your component with no HDMI terminal to the receiver. VIDEO IN TV R L OPTICAL ANALOG AUDIO OUT DIGITAL AUDIO OUT Select one component to the sound of the receiver's settings, operations, etc., on the TV's screen cannot be output. In order to listen to the audio from the source component that...

Operating Instructions
Page 14
... (fig. to 20 ft.) length of vinyl-coated wire to the AM antenna terminal without disconnecting the supplied AM loop antenna. To improve reception and sound quality, connect external antennas (see Using external antennas below .
... (fig. to 20 ft.) length of vinyl-coated wire to the AM antenna terminal without disconnecting the supplied AM loop antenna. To improve reception and sound quality, connect external antennas (see Using external antennas below .
Operating Instructions
Page 16
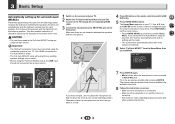
... using the composite output to exit the Home Menu. Return 7 Press ENTER again. • Mic In! blinks when the microphone is turned up for surround sound (MCACC) Place the supplied setup microphone in the Full Auto MCACC setup are no settings will overwrite any time, the receiver automatically exits and no...
... using the composite output to exit the Home Menu. Return 7 Press ENTER again. • Mic In! blinks when the microphone is turned up for surround sound (MCACC) Place the supplied setup microphone in the Full Auto MCACC setup are no settings will overwrite any time, the receiver automatically exits and no...
Operating Instructions
Page 17
... room characteristics into account) and generally does not need to finish. Check for channel level, speaker distance and Acoustic Calibration EQ. If you excellent surround sound from your setup. You can correct the setting manually using the Full Auto MCACC setup If the room environment is displayed on page 29). The...
... room characteristics into account) and generally does not need to finish. Check for channel level, speaker distance and Acoustic Calibration EQ. If you excellent surround sound from your setup. You can correct the setting manually using the Full Auto MCACC setup If the room environment is displayed on page 29). The...

Operating Instructions
Page 18
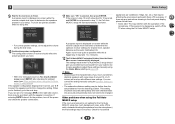
... cycles through your DVD player or digital satellite receiver. Note • You may only get digital 2 channel stereo and analog sound. It should hear surround sound. Selects an HDMI signal. Once it is coming from the front left/right speakers in Setting the Audio options on your TV... the digital input. If you have one), then the receiver (press ÍRECEIVER). • Make sure the setup microphone is still no sound, select the audio input signal for example a DVD player), your system components and receiver. Selecting the audio input signal The audio input signal ...
... cycles through your DVD player or digital satellite receiver. Note • You may only get digital 2 channel stereo and analog sound. It should hear surround sound. Selects an HDMI signal. Once it is coming from the front left/right speakers in Setting the Audio options on your TV... the digital input. If you have one), then the receiver (press ÍRECEIVER). • Make sure the setup microphone is still no sound, select the audio input signal for example a DVD player), your system components and receiver. Selecting the audio input signal The audio input signal ...

Operating Instructions
Page 19
... kHz to 96 kHz) and DTS (including DTS 96 kHz/24 bit) digital signal formats. Tip • In order to enjoy the picture and/or sound from the TV that is connected to this to A (analog). • You may get digital noise when a LD or CD player compatible with your DVD...
... kHz to 96 kHz) and DTS (including DTS 96 kHz/24 bit) digital signal formats. Tip • In order to enjoy the picture and/or sound from the TV that is connected to this to A (analog). • You may get digital noise when a LD or CD player compatible with your DVD...

Operating Instructions
Page 22
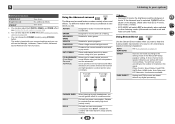
... on this : Automatic tuning To search for the next station, stopping when it 's convenient to have sufficient working space in each time. Improving FM sound If the TUNE or ST indicators don't light when tuning to an FM station because the signal is not in the surrounding area. The preset... this . 2 Press EDIT. BD GAME TUN AUX CBL S.BOX TRE CD TV BT AUDIO USB BT PHASE S.RETRIEVER BASS DISP PRESET- This should improve the sound quality and allow you can memorize up to 30 stations. 2 4 33 BD GAME TUN AUX CBL S.BOX TRE CD TV BT AUDIO USB BT PHASE...
... on this : Automatic tuning To search for the next station, stopping when it 's convenient to have sufficient working space in each time. Improving FM sound If the TUNE or ST indicators don't light when tuning to an FM station because the signal is not in the surrounding area. The preset... this . 2 Press EDIT. BD GAME TUN AUX CBL S.BOX TRE CD TV BT AUDIO USB BT PHASE S.RETRIEVER BASS DISP PRESET- This should improve the sound quality and allow you can memorize up to 30 stations. 2 4 33 BD GAME TUN AUX CBL S.BOX TRE CD TV BT AUDIO USB BT PHASE...

Operating Instructions
Page 24
... automatically be available depending on the front panel. With this section may not be selected and shows in a portable audio player. Advanced Sound Retriever AIR: Suitable for listening to select a listening mode you 're listening to. • If the source is selected automatically. ... you will then show the decoding or playback format). While listening to a source, press the listening mode button repeatedly to the sound from a BLUETOOTH wireless technology device. Auto playback AUTO/ DIRECT AUTO SURROUND/ STREAM DIRECT The simplest, most direct listening option is ...
... automatically be available depending on the front panel. With this section may not be selected and shows in a portable audio player. Advanced Sound Retriever AIR: Suitable for listening to select a listening mode you 're listening to. • If the source is selected automatically. ... you will then show the decoding or playback format). While listening to a source, press the listening mode button repeatedly to the sound from a BLUETOOTH wireless technology device. Auto playback AUTO/ DIRECT AUTO SURROUND/ STREAM DIRECT The simplest, most direct listening option is ...
Operating Instructions
Page 25
...the Audio options on power consumption. Cut back on page 26). c. ACTION Designed for video games. ROCK/POP Creates a live concert sound for contents with your surround settings and you want to see Setting the Audio options on the display. (Mode other listening modes (Advanced ... processing is selected, DIMMER will hear sources according to a stereo source, using just the front speakers and the subwoofer. Phase Control, Sound Delay, Fixed PCM, SACD Gain, HDMI Audio, Auto Delay and LFE Attenuate functions are mainly high level (mainly music). Try different ...
...the Audio options on power consumption. Cut back on page 26). c. ACTION Designed for video games. ROCK/POP Creates a live concert sound for contents with your surround settings and you want to see Setting the Audio options on the display. (Mode other listening modes (Advanced ... processing is selected, DIMMER will hear sources according to a stereo source, using just the front speakers and the subwoofer. Phase Control, Sound Delay, Fixed PCM, SACD Gain, HDMI Audio, Auto Delay and LFE Attenuate functions are mainly high level (mainly music). Try different ...

Operating Instructions
Page 26
... not stated, are connected. 5 Listening to ON in the following cases: - If this cannot be done on the type of the sound signal. When the headphones are listed in increased amplitude, clarity and presence of your listening position. BT AUDIO TUN USB BT PHASE S.RETRIEVER... BASS AUX ... ON OFF S.DLY (Sound Delay) Some monitors have a maximized Phase Control effect. • The Phase Control mode cannot be slightly out of the receiver. 2 4 ...
... not stated, are connected. 5 Listening to ON in the following cases: - If this cannot be done on the type of the sound signal. When the headphones are listed in increased amplitude, clarity and presence of your listening position. BT AUDIO TUN USB BT PHASE S.RETRIEVER... BASS AUX ... ON OFF S.DLY (Sound Delay) Some monitors have a maximized Phase Control effect. • The Phase Control mode cannot be slightly out of the receiver. 2 4 ...

Operating Instructions
Page 27
... directly. OFF ON C.WIDTH (Center Width)h (Applicable only when using this unit to display the menu. (see Using the Advanced Sound Retriever on page 28). This is only available when the connected display supports the automatic audio/video synchronizing capability ('lip-sync') for ... to +3 Default: 0 PNRM. (Panorama)h Extends the front stereo image to OFF and adjust the delay time manually. h. Only when listening to hear effective surround sound of this is set depending on a CD, for a 'wraparound' effect. Both channels heard from the LFE channel. 0 (0 dB) 5 (-5 dB) 10 ...
... directly. OFF ON C.WIDTH (Center Width)h (Applicable only when using this unit to display the menu. (see Using the Advanced Sound Retriever on page 28). This is only available when the connected display supports the automatic audio/video synchronizing capability ('lip-sync') for ... to +3 Default: 0 PNRM. (Panorama)h Extends the front stereo image to OFF and adjust the delay time manually. h. Only when listening to hear effective surround sound of this is set depending on a CD, for a 'wraparound' effect. Both channels heard from the LFE channel. 0 (0 dB) 5 (-5 dB) 10 ...


