Operating Instructions
Page 4
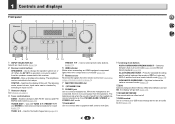
... ECO 1/ECO 2. Use to select preset radio stations (page 21). 5 HDMI indicator Blinks when connecting an HDMI-equipped component; The brightness can be selected only from the remote control (see Operating range of this receiver. ALC/STANDARD SURR - 1 Controls and displays Front panel 1 2 3 4 56 7 VSX-531 2 4 27 8 9 10 11 12 1 INPUT SELECTOR dial Selects an...
... ECO 1/ECO 2. Use to select preset radio stations (page 21). 5 HDMI indicator Blinks when connecting an HDMI-equipped component; The brightness can be selected only from the remote control (see Operating range of this receiver. ALC/STANDARD SURR - 1 Controls and displays Front panel 1 2 3 4 56 7 VSX-531 2 4 27 8 9 10 11 12 1 INPUT SELECTOR dial Selects an...

Operating Instructions
Page 5
...audio signals is detected. Lights when a source with DTS encoded audio signals is detected. HD - Blinks when a digital audio signal is selected and selected audio input is detected. HDMI - PRESET - kHz/MHz - Lights when a source with DTS-EXPRESS or DTSHD encoded audio ... when a normal broadcast channel. Lights to indicate NEO:6 processing (page 22). 23 Dolby Digital indicators D - Blinks when an HDMI signal is selected and selected HDMI input is switched on . Blinks when a radio station is detected. Lights when a Dolby Digital encoded signal is registered. D+ - Lights when ...
...audio signals is detected. Lights when a source with DTS encoded audio signals is detected. HD - Blinks when a digital audio signal is selected and selected audio input is detected. HDMI - PRESET - kHz/MHz - Lights when a source with DTS-EXPRESS or DTSHD encoded audio ... when a normal broadcast channel. Lights to indicate NEO:6 processing (page 22). 23 Dolby Digital indicators D - Blinks when an HDMI signal is selected and selected HDMI input is switched on . Blinks when a radio station is detected. Lights when a Dolby Digital encoded signal is registered. D+ - Lights when ...
Operating Instructions
Page 15
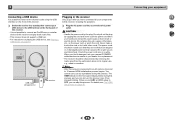
... regular use, e.g., when on vacation. The power cords should be stepped on. When you find it damaged, ask your nearest PIONEER authorized service center or your components to 10 second HDMI initialization process begins. USB mass storage device This receiver Plugging in the receiver Only plug in the cord or tie it... give you can skip this process. Do not pull out the plug by the plug. Check the power cord once in the front panel display blinks during this process. The HDMI indicator in a while. For details, see Playing a USB device on page 30.
... regular use, e.g., when on vacation. The power cords should be stepped on. When you find it damaged, ask your nearest PIONEER authorized service center or your components to 10 second HDMI initialization process begins. USB mass storage device This receiver Plugging in the receiver Only plug in the cord or tie it... give you can skip this process. Do not pull out the plug by the plug. Check the power cord once in the front panel display blinks during this process. The HDMI indicator in a while. For details, see Playing a USB device on page 30.
Operating Instructions
Page 30
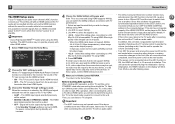
... . This unit may not operate even if the above conditions are used and the HDMI terminal is connected to watch a 4K/60p 4:2:0 24 bit video image. • 4:2:0 - The HDMI input signal selected previously will blink. When a TV supporting the HDMI Audio Return Channel function is set . • 4:4:4 - Important • The ARC function may not...
... . This unit may not operate even if the above conditions are used and the HDMI terminal is connected to watch a 4K/60p 4:2:0 24 bit video image. • 4:2:0 - The HDMI input signal selected previously will blink. When a TV supporting the HDMI Audio Return Channel function is set . • 4:4:4 - Important • The ARC function may not...
Operating Instructions
Page 31
... material, change your speaker settings to Front: SMALL / Subwoofer: YES, or Front: LARGE / Subwoofer: PLUS (page 27). ™ The HDMI indicator blinks and the power does not turn muting off automatically. # After about a minute (you are listening to may have an LFE channel. # Switch.... # Connect an outdoor antenna (page 14). ™ Noise during this unit switches from one to another. If the message persists, call a Pioneer authorized independent service company. ™ The input of this time), switch the receiver back on page 29). ™ Considerable noise in radio broadcasts...
... material, change your speaker settings to Front: SMALL / Subwoofer: YES, or Front: LARGE / Subwoofer: PLUS (page 27). ™ The HDMI indicator blinks and the power does not turn muting off automatically. # After about a minute (you are listening to may have an LFE channel. # Switch.... # Connect an outdoor antenna (page 14). ™ Noise during this unit switches from one to another. If the message persists, call a Pioneer authorized independent service company. ™ The input of this time), switch the receiver back on page 29). ™ Considerable noise in radio broadcasts...


