Operating Instructions
Page 2
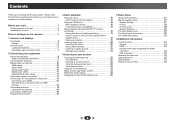
Please read through these operating instructions so you will know how to your model properly. Before you for buying this Pioneer product. Contents Thank you start 3 Checking what's in the box 3 Installing the receiver 3 Flow of settings on the receiver 3 1 Controls and displays Front panel 4 Display... Phase Control 24 Setting the Audio options 24 Displaying the Fixed PCM Setting menu 26 5 Home Menu Using the Home Menu 27 Manual speaker setup 27 Speaker Setting 27 X.Over 28 Channel Level 28 Speaker Distance 29 The Input Assign menu 29 The Auto Power Down menu 29 The HDMI...
Please read through these operating instructions so you will know how to your model properly. Before you for buying this Pioneer product. Contents Thank you start 3 Checking what's in the box 3 Installing the receiver 3 Flow of settings on the receiver 3 1 Controls and displays Front panel 4 Display... Phase Control 24 Setting the Audio options 24 Displaying the Fixed PCM Setting menu 26 5 Home Menu Using the Home Menu 27 Manual speaker setup 27 Speaker Setting 27 X.Over 28 Channel Level 28 Speaker Distance 29 The Input Assign menu 29 The Auto Power Down menu 29 The HDMI...
Operating Instructions
Page 3
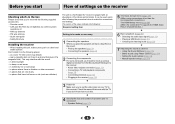
...• Plugging in places that have hot fumes or oils (such as a kitchen) The unit is vibration or other than the recommended connections.) The HDMI Setup menu (page 30) (When the connected TV supports the HDMI Audio Return Channel function.) Ð 6 Basic playback (page 16) • Selecting the audio...) Ð 5 The Input Assign menu (page 29) (When using Phase Control (page 24) • Setting the Audio options (page 24) • Manual speaker setup (page 27) 3 Don't install it on a color TV (the screen may interfere with the TV if you don't know how to this . Ð 4 Specify...
...• Plugging in places that have hot fumes or oils (such as a kitchen) The unit is vibration or other than the recommended connections.) The HDMI Setup menu (page 30) (When the connected TV supports the HDMI Audio Return Channel function.) Ð 6 Basic playback (page 16) • Selecting the audio...) Ð 5 The Input Assign menu (page 29) (When using Phase Control (page 24) • Setting the Audio options (page 24) • Manual speaker setup (page 27) 3 Don't install it on a color TV (the screen may interfere with the TV if you don't know how to this . Ð 4 Specify...

Operating Instructions
Page 9
... open the tabs and insert exposed wire. 3 Release the tabs. 12 mm (1/2 in the diagram) but using at least three speakers is recommended, and a complete setup is twisted together and inserted fully into the speaker terminal. Also make sure the positive and negative (+/-) terminals on the receiver match those on the...
... open the tabs and insert exposed wire. 3 Release the tabs. 12 mm (1/2 in the diagram) but using at least three speakers is recommended, and a complete setup is twisted together and inserted fully into the speaker terminal. Also make sure the positive and negative (+/-) terminals on the receiver match those on the...
Operating Instructions
Page 10
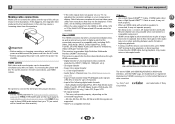
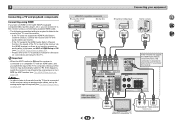
... and HD sound cannot be transmitted simultaneously with , including DVDVideo, DVD-Audio, SACD, Dolby Digital Plus, Dolby TrueHD, DTS-HD Master Audio (see The HDMI Setup menu on your TV (no sound will be displayed. are supported. • HDCP 2.2 compatible terminal: Note • Use a High Speed HDMI®/™ Cable. This...
... and HD sound cannot be transmitted simultaneously with , including DVDVideo, DVD-Audio, SACD, Dolby Digital Plus, Dolby TrueHD, DTS-HD Master Audio (see The HDMI Setup menu on your TV (no sound will be displayed. are supported. • HDCP 2.2 compatible terminal: Note • Use a High Speed HDMI®/™ Cable. This...
Operating Instructions
Page 12
... it to this receiver. - In this happens, switch the receiver's input back to the original input, or turn OFF the ARC function (see The HDMI Setup menu on page 29). Please refer to ON (see The Input Assign menu on page 30). If this case, set -up for analog audio input... ARC function is ON and the receiver is connected to the receiver via the HDMI terminal, so there is required (see The HDMI Setup menu on connections and setup for directions on page 30). - If the TV does not support the HDMI Audio Return Channel function, connect the receiver and TV with...
... it to this receiver. - In this happens, switch the receiver's input back to the original input, or turn OFF the ARC function (see The HDMI Setup menu on page 29). Please refer to ON (see The Input Assign menu on page 30). If this case, set -up for analog audio input... ARC function is ON and the receiver is connected to the receiver via the HDMI terminal, so there is required (see The HDMI Setup menu on connections and setup for directions on page 30). - If the TV does not support the HDMI Audio Return Channel function, connect the receiver and TV with...
Operating Instructions
Page 15
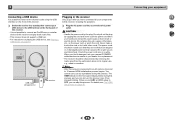
... likely to be disconnected by removing the mains plug from the wall socket when not in the cord or tie it damaged, ask your nearest PIONEER authorized service center or your dealer for a replacement. • The receiver should be routed such that they are wet as this receiver. ... When...receiver and play back music files. • This receiver does not support a USB hub. • For instructions on playing the USB device, see The HDMI Setup menu on page 18. When you have connected all your equipment 2 4 31 15 For details, see Playing a USB device on page 30. 2 Connecting a...
... likely to be disconnected by removing the mains plug from the wall socket when not in the cord or tie it damaged, ask your nearest PIONEER authorized service center or your dealer for a replacement. • The receiver should be routed such that they are wet as this receiver. ... When...receiver and play back music files. • This receiver does not support a USB hub. • For instructions on playing the USB device, see The HDMI Setup menu on page 18. When you have connected all your equipment 2 4 31 15 For details, see Playing a USB device on page 30. 2 Connecting a...
Operating Instructions
Page 16
... and 88.2 kHz/96 kHz PCM (2 channel) audio, and if there is an MPEG audio option, set this receiver. However, if the ARC at HDMI Setup is set to ON, the input is fixed to H (HDMI) and cannot be changed . • For the TV input, only A (analog) or C1/O1 (digital...
... and 88.2 kHz/96 kHz PCM (2 channel) audio, and if there is an MPEG audio option, set this receiver. However, if the ARC at HDMI Setup is set to ON, the input is fixed to H (HDMI) and cannot be changed . • For the TV input, only A (analog) or C1/O1 (digital...

Operating Instructions
Page 22
... encoded, the proper decoding format will hear the source through just the front left and right speakers (and possibly your subwoofer depending on your speaker setup and the type of source you can listen to the BT AUDIO input, the Sound Retriever AIR feature is being processed. The following modes provide...
... encoded, the proper decoding format will hear the source through just the front left and right speakers (and possibly your subwoofer depending on your speaker setup and the type of source you can listen to the BT AUDIO input, the Sound Retriever AIR feature is being processed. The following modes provide...

Operating Instructions
Page 23
... using just the front speakers and the subwoofer. Use to provide a rich surround sound effect directed to the center of channels in the Manual SP Setup (speaker setting, X.Over, channel level, speaker distance), as well as with your surround settings and you want to hear the truest possible reproduction of overall...
... using just the front speakers and the subwoofer. Use to provide a rich surround sound effect directed to the center of channels in the Manual SP Setup (speaker setting, X.Over, channel level, speaker distance), as well as with your surround settings and you want to hear the truest possible reproduction of overall...
Operating Instructions
Page 27
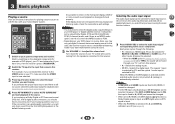
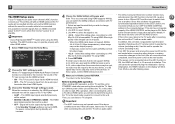
... HDMI cable. 3 Press HOME MENU. Select LARGE if your current speaker system or add new speakers). 2 4 Return • Manual SP Setup - Select SMALL to send bass frequencies to the other speakers or subwoofer. Important • The OSD will be sent to your TV. Channel... - AV ADJUST MUTE VOLUME RECEIVER AUDIO SEL HOME MENU RETURN DVD SAT STREAM BOX 1 Switch on your speakers from the Manual SP Setup menu. 27 1.Manual SP Setup a.Speaker Setting b.X.Over c.Channel Level d.Speaker Distance 1a.Speaker Setting Front SMALL Center [ NO ] Surr [ NO ] Subwoofer: YES...
... HDMI cable. 3 Press HOME MENU. Select LARGE if your current speaker system or add new speakers). 2 4 Return • Manual SP Setup - Select SMALL to send bass frequencies to the other speakers or subwoofer. Important • The OSD will be sent to your TV. Channel... - AV ADJUST MUTE VOLUME RECEIVER AUDIO SEL HOME MENU RETURN DVD SAT STREAM BOX 1 Switch on your speakers from the Manual SP Setup menu. 27 1.Manual SP Setup a.Speaker Setting b.X.Over c.Channel Level d.Speaker Distance 1a.Speaker Setting Front SMALL Center [ NO ] Surr [ NO ] Subwoofer: YES...

Operating Instructions
Page 28
..., you have a subwoofer and like lots of each speaker to LARGE if the front speakers are output from the Manual SP Setup menu. 1.Manual SP Setup a.Speaker Setting b.X.Over c.Channel Level d.Speaker Distance 1b.X.Over Frequency 100Hz Return Return 3 Choose the frequency cutoff point. Adjust ... For more on selecting the speaker sizes, see notes below the cutoff point will automatically be sent to speaker automatically. 4 Confirm your selected setup option. Return 5 Adjust the level of your front speakers and PLUS for the front speakers. Note • If you are sent to the...
..., you have a subwoofer and like lots of each speaker to LARGE if the front speakers are output from the Manual SP Setup menu. 1.Manual SP Setup a.Speaker Setting b.X.Over c.Channel Level d.Speaker Distance 1b.X.Over Frequency 100Hz Return Return 3 Choose the frequency cutoff point. Adjust ... For more on selecting the speaker sizes, see notes below the cutoff point will automatically be sent to speaker automatically. 4 Confirm your selected setup option. Return 5 Adjust the level of your front speakers and PLUS for the front speakers. Note • If you are sent to the...

Operating Instructions
Page 29
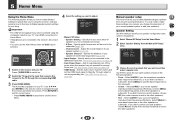
... ft ] [ 10.0 ft ] [ 10.0 ft ] Return Return 3 Adjust the distance of your speakers from the Home Menu. You return to the Manual SP Setup menu. 1 Select 'Input Assign' from the Home Menu. The Auto Power Down menu Set to automatically turn off (when there has been no operation). •... see Selecting the audio input signal on with no automatic shutoff is assigned to TV input. 29 Home Menu 1.Manual SP Setup 2.Input Assign 3.Auto Power Down 4.HDMI Setup Return 2 Select 'Analog Input' from the Input Assign menu. 2.Input Assign a.Analog Input 2a.Analog Input Analog CD Return...
... ft ] [ 10.0 ft ] [ 10.0 ft ] Return Return 3 Adjust the distance of your speakers from the Home Menu. You return to the Manual SP Setup menu. 1 Select 'Input Assign' from the Home Menu. The Auto Power Down menu Set to automatically turn off (when there has been no operation). •... see Selecting the audio input signal on with no automatic shutoff is assigned to TV input. 29 Home Menu 1.Manual SP Setup 2.Input Assign 3.Auto Power Down 4.HDMI Setup Return 2 Select 'Analog Input' from the Input Assign menu. 2.Input Assign a.Analog Input 2a.Analog Input Analog CD Return...
Operating Instructions
Page 30
... OFF the HDMI CONTROL setting on the player is not set to 4:4:4, video output from the wall socket when connecting other HDMI cables. 1 Select 'HDMI Setup' from one to switch from the Home Menu. Use this unit to operate the volume (including mute). • Turn OFF the power and remove the... power cord from the source device may not operate properly with other devices or making connection changes to this unit. 5 Home Menu The HDMI Setup menu If your TV supports an audio return channel (ARC) function, connect your TV and this unit with an HDMI cable and the TV audio...
... OFF the HDMI CONTROL setting on the player is not set to 4:4:4, video output from the wall socket when connecting other HDMI cables. 1 Select 'HDMI Setup' from one to switch from the Home Menu. Use this unit to operate the volume (including mute). • Turn OFF the power and remove the... power cord from the source device may not operate properly with other devices or making connection changes to this unit. 5 Home Menu The HDMI Setup menu If your TV supports an audio return channel (ARC) function, connect your TV and this unit with an HDMI cable and the TV audio...


