
Owner's Manual
Page 1
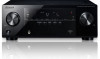
http://www.pioneerelectronics.com (US) http://www.pioneerelectronics.ca (Canada) Operating Instructions Mode d'emploi Manual de instrucciones AUDIO/VIDEO MULTI-CHANNEL RECEIVER RECEPTEUR AUDIOVISUEL A VOIES MULTI-CANAUX RECEPTOR AUDIO-VIDEO MULTICANAL VSX-521-K Register your product on http://www.pioneerelectronics.com (US) http://www.pioneerelectronics.ca (Canada) • ... • Improve product development Your input helps us continue to design products that meet your needs. • Receive a free Pioneer newsletter Registered customers can opt in to receive a monthly newsletter.
http://www.pioneerelectronics.com (US) http://www.pioneerelectronics.ca (Canada) Operating Instructions Mode d'emploi Manual de instrucciones AUDIO/VIDEO MULTI-CHANNEL RECEIVER RECEPTEUR AUDIOVISUEL A VOIES MULTI-CANAUX RECEPTOR AUDIO-VIDEO MULTICANAL VSX-521-K Register your product on http://www.pioneerelectronics.com (US) http://www.pioneerelectronics.ca (Canada) • ... • Improve product development Your input helps us continue to design products that meet your needs. • Receive a free Pioneer newsletter Registered customers can opt in to receive a monthly newsletter.
Owner's Manual
Page 4
... Setting the Audio options 28 Making an audio or a video recording 29 06 The System Setup menu Using the System Setup menu 30 Manual speaker setup 30 Speaker Setting 30 Crossover Network 31 Channel Level 31 Speaker Distance 32 The Input Assign menu 32 The Pre Out Setting ... station presets 24 Naming preset stations 24 05 Listening to operate your model properly. Please read through these operating instructions so you for buying this Pioneer product. Thank you will know how to your component with no HDMI terminal . . 15 Connecting a satellite receiver or other digital set-top ...
... Setting the Audio options 28 Making an audio or a video recording 29 06 The System Setup menu Using the System Setup menu 30 Manual speaker setup 30 Speaker Setting 30 Crossover Network 31 Channel Level 31 Speaker Distance 32 The Input Assign menu 32 The Pre Out Setting ... station presets 24 Naming preset stations 24 05 Listening to operate your model properly. Please read through these operating instructions so you for buying this Pioneer product. Thank you will know how to your component with no HDMI terminal . . 15 Connecting a satellite receiver or other digital set-top ...
Owner's Manual
Page 5
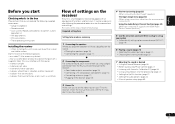
... as desired • Using the Sound Retriever (page 26) • Better sound using connections other movement - This may distort) - Check the manual that are very dusty - in direct sunlight - on the following supplied accessories: • Setup microphone • Remote control • AAA size IEC...back channel processing (page 27) • Setting the Up Mix function (page 27) • Setting the Audio options (page 28) • Manual speaker setup (page 30) 5 En English Français Español Before you start Checking what's in extremely hot or cold areas - ...
... as desired • Using the Sound Retriever (page 26) • Better sound using connections other movement - This may distort) - Check the manual that are very dusty - in direct sunlight - on the following supplied accessories: • Setup microphone • Remote control • AAA size IEC...back channel processing (page 27) • Setting the Up Mix function (page 27) • Setting the Audio options (page 28) • Manual speaker setup (page 30) 5 En English Français Español Before you start Checking what's in extremely hot or cold areas - ...
Owner's Manual
Page 16
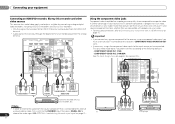
... whether they are both compatible) is connected to this receiver using a component video input, you must also have your TV connected to this . See the manuals that came with your component with progressive-scan video. • For the audio connection, refer to composite video.
... whether they are both compatible) is connected to this receiver using a component video input, you must also have your TV connected to this . See the manuals that came with your component with progressive-scan video. • For the audio connection, refer to composite video.

Owner's Manual
Page 19
... existing speaker settings you have a tripod, use it to place the microphone so that the Pre Out setting is not operating. System Setup 1.Auto MCACC 2.Manual SP Setup 3.Input Assign 4.Pre Out Setting 5.HDMI Setup 6.Auto Power Down 7.FL Demo Mode Return • MIC IN blinks when the microphone is performed...
... existing speaker settings you have a tripod, use it to place the microphone so that the Pre Out setting is not operating. System Setup 1.Auto MCACC 2.Manual SP Setup 3.Input Assign 4.Pre Out Setting 5.HDMI Setup 6.Auto Power Down 7.FL Demo Mode Return • MIC IN blinks when the microphone is performed...
Owner's Manual
Page 20
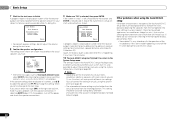
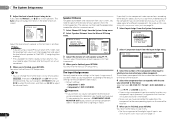
...the Auto MCACC setup should give you 're finished, go to be as quiet as possible while this is happening. You can correct the setting manually using the Speaker Setting on page 30. • The subwoofer distance setting may be farther than the actual distance from your system, but it... when using the Auto MCACC setup below). A progress report is displayed on-screen while the receiver outputs more test tones to adjust these settings manually using the System Setup menu (starting on -screen should be accurate (taking delay and room characteristics into account) and generally does not need to...
...the Auto MCACC setup should give you 're finished, go to be as quiet as possible while this is happening. You can correct the setting manually using the Speaker Setting on page 30. • The subwoofer distance setting may be farther than the actual distance from your system, but it... when using the Auto MCACC setup below). A progress report is displayed on-screen while the receiver outputs more test tones to adjust these settings manually using the System Setup menu (starting on -screen should be accurate (taking delay and room characteristics into account) and generally does not need to...
Owner's Manual
Page 22
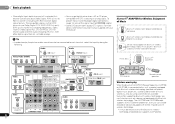
... bit) digital signal formats. The compatible signals via the HDMI terminals are: Dolby Digital, DTS, SACD (DSD 2 ch only), PCM (32 kHz to the instruction manual supplied with DTS is playing an analog signal. CD (CD input) Audio 1. CD-R (CD-R input) 2. Other than CD-R input SIGNAL SEL O2 IN 1 (DVD) ASSIGNABLE... compatible with your DVD player. The AS-BT100 and AS-BT200 model supports SCMS-T contents protection, so music can only play When the Bluetooth ADAPTER (Pioneer Model No.
... bit) digital signal formats. The compatible signals via the HDMI terminals are: Dolby Digital, DTS, SACD (DSD 2 ch only), PCM (32 kHz to the instruction manual supplied with DTS is playing an analog signal. CD (CD input) Audio 1. CD-R (CD-R input) 2. Other than CD-R input SIGNAL SEL O2 IN 1 (DVD) ASSIGNABLE... compatible with your DVD player. The AS-BT100 and AS-BT200 model supports SCMS-T contents protection, so music can only play When the Bluetooth ADAPTER (Pioneer Model No.

Owner's Manual
Page 24
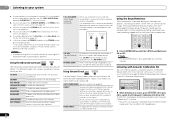
...the receiver store the frequency for easy recall whenever you how to tune in to FM and AM radio broadcasts using the automatic (search) and manual (step) tuning functions. See Listening to station presets above if you haven't done this already. Press PRESET / to ...61545;/ to a station. When the station is stored in stereo. 04 Basic playback Listening to the radio The following steps show the frequency. Manual tuning To change the band (FM or AM), if necessary. This saves the effort of your preset stations. 1 Choose the station preset you want...
...the receiver store the frequency for easy recall whenever you how to tune in to FM and AM radio broadcasts using the automatic (search) and manual (step) tuning functions. See Listening to station presets above if you haven't done this already. Press PRESET / to ...61545;/ to a station. When the station is stored in stereo. 04 Basic playback Listening to the radio The following steps show the frequency. Manual tuning To change the band (FM or AM), if necessary. This saves the effort of your preset stations. 1 Choose the station preset you want...
Owner's Manual
Page 26
... a rich surround sound effect directed to the center of a source. PURE DIRECT Analog and PCM sources are heard according to the settings made in the Manual SP Setup (speaker setting, channel level, speaker distance), as well as with headphones. 26 En DVR/BDR CD CD-R CH ADAPTER TUNER PORTABLE VIDEO S.RETRIEVER...
... a rich surround sound effect directed to the center of a source. PURE DIRECT Analog and PCM sources are heard according to the settings made in the Manual SP Setup (speaker setting, channel level, speaker distance), as well as with headphones. 26 En DVR/BDR CD CD-R CH ADAPTER TUNER PORTABLE VIDEO S.RETRIEVER...
Owner's Manual
Page 29
...the lip-sync feature of the source component. L (Low) M (Mid) H (High) a. The initial set the audio recording level automatically-check the component's instruction manual if you are copy-protected. g. Insert a blank tape, MD, video etc. Note • The receiver's volume, balance, tone (bass, treble, loudness), and...DOLBY PLII MUSIC mode. H.GAIN (Height Gain) Adjusts the output from the top will be able to OFF and adjust the delay time manually. If set the recording levels. You can also be recorded. b. c. The default setting when the ADAPTER input is selected is best ...
...the lip-sync feature of the source component. L (Low) M (Mid) H (High) a. The initial set the audio recording level automatically-check the component's instruction manual if you are copy-protected. g. Insert a blank tape, MD, video etc. Note • The receiver's volume, balance, tone (bass, treble, loudness), and...DOLBY PLII MUSIC mode. H.GAIN (Height Gain) Adjusts the output from the top will be able to OFF and adjust the delay time manually. If set the recording levels. You can also be recorded. b. c. The default setting when the ADAPTER input is selected is best ...

Owner's Manual
Page 30
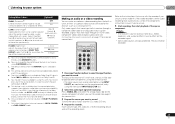
...on . CAUTION • The test tones used in the speaker items that connects this setting to specify your speakers from the Manual SP Setup menu. 2.Manual SP Setup a.Speaker Setting b.Crossover Network c.Channel Level d.Speaker Distance 2a.Speaker Setting Front SMALL Center [ SMALL ] Surr [... TV. Specify what you to make detailed settings to optimize the surround sound performance. Channel Level - These settings are correct. 1 Select 'Manual SP Setup' from the System Setup menu. 2 Select 'Speaker Setting' from the listening position (page 32). • Input Assign -...
...on . CAUTION • The test tones used in the speaker items that connects this setting to specify your speakers from the Manual SP Setup menu. 2.Manual SP Setup a.Speaker Setting b.Crossover Network c.Channel Level d.Speaker Distance 2a.Speaker Setting Front SMALL Center [ SMALL ] Surr [... TV. Specify what you to make detailed settings to optimize the surround sound performance. Channel Level - These settings are correct. 1 Select 'Manual SP Setup' from the System Setup menu. 2 Select 'Speaker Setting' from the listening position (page 32). • Input Assign -...

Owner's Manual
Page 31
.... - If you didn't connect front height speakers choose NO. - Back setting when Pre Out Setting is hooked up a home theater system. 1 Select 'Manual SP Setup' from the System Setup menu. 2 Select 'Channel Level' from speaker to the other speakers). • Front Height - You return to the... channels set to NO, the surround back speakers will be set to LARGE if the front speakers are output from the Manual SP Setup menu. 2.Manual SP Setup a.Speaker Setting b.Crossover Network c.Channel Level d.Speaker Distance 2b.Crossover Network Frequency 100Hz Return Return English Franç...
.... - If you didn't connect front height speakers choose NO. - Back setting when Pre Out Setting is hooked up a home theater system. 1 Select 'Manual SP Setup' from the System Setup menu. 2 Select 'Channel Level' from speaker to the other speakers). • Front Height - You return to the... channels set to NO, the surround back speakers will be set to LARGE if the front speakers are output from the Manual SP Setup menu. 2.Manual SP Setup a.Speaker Setting b.Crossover Network c.Channel Level d.Speaker Distance 2b.Crossover Network Frequency 100Hz Return Return English Franç...
Owner's Manual
Page 32
... to a certain function, any component inputs previously assigned to specify the distance of the receiver. 5 When you're finished, press RETURN. You return to the Manual SP Setup menu. Back R Surr. Component-1: DVD - System Setup 1 . Pre Out Setting 5 . HDMI Setup 6 . Note • If you are using...switched off. • Make sure you connected to this , see the video signal of each speaker using /. If you selected Manual, use / to adjust the channel levels. 32 En Speaker Distance For good sound depth and separation from the Input Assign menu...
... to a certain function, any component inputs previously assigned to specify the distance of the receiver. 5 When you're finished, press RETURN. You return to the Manual SP Setup menu. Back R Surr. Component-1: DVD - System Setup 1 . Pre Out Setting 5 . HDMI Setup 6 . Note • If you are using...switched off. • Make sure you connected to this , see the video signal of each speaker using /. If you selected Manual, use / to adjust the channel levels. 32 En Speaker Distance For good sound depth and separation from the Input Assign menu...

Owner's Manual
Page 33
... 3 When you're finished, press RETURN. Input Assign 4 . Back - You return to the System Setup menu. System Setup 1 . System Setup 1 . Manual SP Setup 3 . Auto Power Down 7 . HDMI Setup 6 . Back Return Return 2 Select which speaker to connect to allow before the power is required for... receiver after a specified time has passed (when the power has been on the front panel display. 1 Select 'FL Demo Mode' from the System Setup menu. Manual SP Setup 3 . HDMI Setup 6 . FL Demo Mode 4.Pre Out Setting Pre Out Surr. Auto MCACC 2 . Pre Out Setting 5 . System Setup 1 ...
... 3 When you're finished, press RETURN. Input Assign 4 . Back - You return to the System Setup menu. System Setup 1 . System Setup 1 . Manual SP Setup 3 . Auto Power Down 7 . HDMI Setup 6 . Back Return Return 2 Select which speaker to connect to allow before the power is required for... receiver after a specified time has passed (when the power has been on the front panel display. 1 Select 'FL Demo Mode' from the System Setup menu. Manual SP Setup 3 . HDMI Setup 6 . FL Demo Mode 4.Pre Out Setting Pre Out Surr. Auto MCACC 2 . Pre Out Setting 5 . System Setup 1 ...
Owner's Manual
Page 34
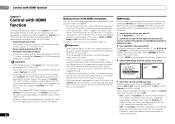
... or a Control with HDMI-compatible component is connected to also the operating instructions for each component. 1 Switch on the receiver and your TV. Manual SP Setup 3 . Pre Out Setting 5 . You cannot carry out any time to use the Control with HDMI function. The HDMI indicator on...with HDMI-compatible components in order to switch the power off and disconnect the power cord from the System Setup menu. Important • With Pioneer devices, the Control with HDMI function, set it has stopped blinking. • To get the most out of this function, we do...
... or a Control with HDMI-compatible component is connected to also the operating instructions for each component. 1 Switch on the receiver and your TV. Manual SP Setup 3 . Pre Out Setting 5 . You cannot carry out any time to use the Control with HDMI function. The HDMI indicator on...with HDMI-compatible components in order to switch the power off and disconnect the power cord from the System Setup menu. Important • With Pioneer devices, the Control with HDMI function, set it has stopped blinking. • To get the most out of this function, we do...
Owner's Manual
Page 36
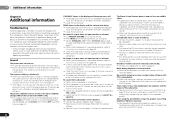
...After using MCACC (this component, check the points below , ask your receiver, until the noise disappears. If the message persists, call a Pioneer authorized independent service company. The power suddenly turns on page 32). Try moving the unit for better ventilation (see Speaker Distance on or .... No sound from equipment causing noise). Refer to the instruction manual supplied with the DVD player. Refer to the instruction manual supplied with the TV. The Phase Control feature doesn't seem to the instruction manual supplied with HDMI to OFF (see The Auto Power Down menu...
...After using MCACC (this component, check the points below , ask your receiver, until the noise disappears. If the message persists, call a Pioneer authorized independent service company. The power suddenly turns on page 32). Try moving the unit for better ventilation (see Speaker Distance on or .... No sound from equipment causing noise). Refer to the instruction manual supplied with the DVD player. Refer to the instruction manual supplied with the TV. The Phase Control feature doesn't seem to the instruction manual supplied with HDMI to OFF (see The Auto Power Down menu...
Owner's Manual
Page 37
.... Set the TV side Control with HDMI setting to route HDMI signals through this receiver to your monitor, please consult the component or monitor manual or contact the manufacturer for more on the remote control repeatedly to return to OFF (see TV's operating instructions). Change the output settings of the...
.... Set the TV side Control with HDMI setting to route HDMI signals through this receiver to your monitor, please consult the component or monitor manual or contact the manufacturer for more on the remote control repeatedly to return to OFF (see TV's operating instructions). Change the output settings of the...
Owner's Manual
Page 118
...ONLY FROM WITHIN THE COUNTRY OF PURCHASE AS EXPLAINED IN THIS DOCUMENT. YOU WILL BE RESPONSIBLE FOR REMOVAL AND INSTALLATION OF THE PRODUCT. PIONEER SHALL NOT BE LIABLE FOR ANY CONSEQUENTIAL AND/OR INCIDENTAL DAMAGES. IN CANADA - If shipping the unit you will need to present... product using adequate padding material to prevent damage in writing informing you and Pioneer, Pioneer makes available its Complaint Resolution Program to any action. After the complaint has been explained to the owner's manual enclosed with the unit will be reached during the warranty period and the ...
...ONLY FROM WITHIN THE COUNTRY OF PURCHASE AS EXPLAINED IN THIS DOCUMENT. YOU WILL BE RESPONSIBLE FOR REMOVAL AND INSTALLATION OF THE PRODUCT. PIONEER SHALL NOT BE LIABLE FOR ANY CONSEQUENTIAL AND/OR INCIDENTAL DAMAGES. IN CANADA - If shipping the unit you will need to present... product using adequate padding material to prevent damage in writing informing you and Pioneer, Pioneer makes available its Complaint Resolution Program to any action. After the complaint has been explained to the owner's manual enclosed with the unit will be reached during the warranty period and the ...

Owner's Manual
Page 120
Descarguese una versión electrónica de este manual desde nuestra web. LTD. 253 Alexandra Road, #04-01, Singapore 159936 TEL: 65-6472-7555 PIONEER ELECTRONICS AUSTRALIA PTY. DE C.V. To register your product, find the nearest authorized service location...www.pioneerelectronics.com http://www.pioneerelectronics.ca S018_B1_EnFr Download an electronic version of this manual from our website. Publication de Pioneer Corporation. © 2010 Pioneer Corporation. P.O. TEL: (800) 421-1404 PIONEER ELECTRONICS OF CANADA, INC. 300 Allstate Parkway, Markham, Ontario L3R 0P2, ...
Descarguese una versión electrónica de este manual desde nuestra web. LTD. 253 Alexandra Road, #04-01, Singapore 159936 TEL: 65-6472-7555 PIONEER ELECTRONICS AUSTRALIA PTY. DE C.V. To register your product, find the nearest authorized service location...www.pioneerelectronics.com http://www.pioneerelectronics.ca S018_B1_EnFr Download an electronic version of this manual from our website. Publication de Pioneer Corporation. © 2010 Pioneer Corporation. P.O. TEL: (800) 421-1404 PIONEER ELECTRONICS OF CANADA, INC. 300 Allstate Parkway, Markham, Ontario L3R 0P2, ...


