
Owner's Manual
Page 1
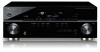
AUDIO/VIDEO MULTI-CHANNEL RECEIVER RECEPTEUR AUDIOVISUEL A VOIES MULTIPLES RECEPTOR MULTICANAL DE AUDIO/VÍDEO VSX-520 Register your product on http://www.pioneerelectronics.com (US) http://www.pioneerelectronics.ca (Canada) • Protect your new investment ... your new product • Improve product development Your input helps us continue to design products that meet your needs. • Receive a free Pioneer newsletter Registered customers can opt in to receive a monthly newsletter. http://www.pioneerelectronics.com (US) http://www.pioneerelectronics.ca (Canada) Operating Instructions ...
AUDIO/VIDEO MULTI-CHANNEL RECEIVER RECEPTEUR AUDIOVISUEL A VOIES MULTIPLES RECEPTOR MULTICANAL DE AUDIO/VÍDEO VSX-520 Register your product on http://www.pioneerelectronics.com (US) http://www.pioneerelectronics.ca (Canada) • Protect your new investment ... your new product • Improve product development Your input helps us continue to design products that meet your needs. • Receive a free Pioneer newsletter Registered customers can opt in to receive a monthly newsletter. http://www.pioneerelectronics.com (US) http://www.pioneerelectronics.ca (Canada) Operating Instructions ...
Owner's Manual
Page 2
... This device complies with the instructions, may invalidate the user's right to other reproductive harm. Product Name: AUDIO/VIDEO MULTI-CHANNEL RECEIVER Model Number: VSX-520 Responsible Party Name: PIONEER ELECTRONICS (USA) INC. SERVICE SUPPORT DIVISION Address: 1925 E. D3-4-2-1-4*_A1_En This product is properly disposed of an AC plug on the rear panel...
... This device complies with the instructions, may invalidate the user's right to other reproductive harm. Product Name: AUDIO/VIDEO MULTI-CHANNEL RECEIVER Model Number: VSX-520 Responsible Party Name: PIONEER ELECTRONICS (USA) INC. SERVICE SUPPORT DIVISION Address: 1925 E. D3-4-2-1-4*_A1_En This product is properly disposed of an AC plug on the rear panel...

Owner's Manual
Page 3
A polarized plug has two blades with one wider than 85 %RH (cooling vents not blocked) Do not install this unit will need to unplug it from being walked on or pinched particularly at each side). VENTILATION CAUTION When installing this unit, make sure the unit has been installed so that may be routed away from hazards to avoid damage to protect it from the apparatus. To prevent fire hazard, the openings should be of sufficient magnitude to constitute a risk of the polarized or grounding-type plug. less than the other apparatus (including amplifiers) that produce heat....
A polarized plug has two blades with one wider than 85 %RH (cooling vents not blocked) Do not install this unit will need to unplug it from being walked on or pinched particularly at each side). VENTILATION CAUTION When installing this unit, make sure the unit has been installed so that may be routed away from hazards to avoid damage to protect it from the apparatus. To prevent fire hazard, the openings should be of sufficient magnitude to constitute a risk of the polarized or grounding-type plug. less than the other apparatus (including amplifiers) that produce heat....
Owner's Manual
Page 4
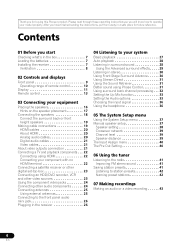
... system Basic playback 27 Auto playback 28 Listening in surround sound 28 Using the Advanced surround effects . . . . . 29 Listening in a safe place for buying this Pioneer product. Thank you for future reference. Contents 01 Before you will know how to your model properly.
... system Basic playback 27 Auto playback 28 Listening in surround sound 28 Using the Advanced surround effects . . . . . 29 Listening in a safe place for buying this Pioneer product. Thank you for future reference. Contents 01 Before you will know how to your model properly.
Owner's Manual
Page 5
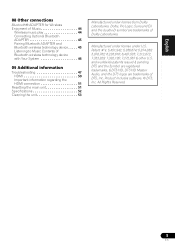
Patent #'s: 5,451,942; 5,956,674; 5,974,380; 5,978,762; 6,226,616; 6,487,535; 7,212,872; 7,333,929; 7,392,195; 7,272,567 & other U.S. DTS and the Symbol are registered trademarks, & DTS-HD, DTS-HD Master Audio, and the DTS logos are trademarks of DTS, Inc. Product includes software. © DTS, Inc. Dolby, Pro Logic, Surround EX and the double-D symbol are trademarks of Dolby Laboratories. All Rights Reserved. 5 En EnglEisnhglishFrançaisItaliaEnspoañol Français Deutsch Nederlands Español 08 Other connections Bluetooth® ADAPTER for Wireless Enjoyment of Music...
Patent #'s: 5,451,942; 5,956,674; 5,974,380; 5,978,762; 6,226,616; 6,487,535; 7,212,872; 7,333,929; 7,392,195; 7,272,567 & other U.S. DTS and the Symbol are registered trademarks, & DTS-HD, DTS-HD Master Audio, and the DTS logos are trademarks of DTS, Inc. Product includes software. © DTS, Inc. Dolby, Pro Logic, Surround EX and the double-D symbol are trademarks of Dolby Laboratories. All Rights Reserved. 5 En EnglEisnhglishFrançaisItaliaEnspoañol Français Deutsch Nederlands Español 08 Other connections Bluetooth® ADAPTER for Wireless Enjoyment of Music...
Owner's Manual
Page 6
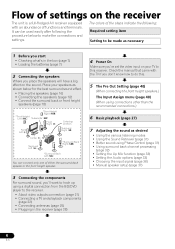
Place your TV to this . 5 The Pre Out Setting (page 40) (When connecting the front height speakers.) The Input Assign menu (page 40) (When using connections other than the recommended connections.) 6 Basic playback (page 27) 7 Adjusting the sound as shown below to make the connections and settings. Check the manual that came with an abundance of the steps indicate the following: Required setting item Setting to be used easily after following the procedure below for the best surround sound effect. • Placing the speakers (page 16) • Connecting the ...
Place your TV to this . 5 The Pre Out Setting (page 40) (When connecting the front height speakers.) The Input Assign menu (page 40) (When using connections other than the recommended connections.) 6 Basic playback (page 27) 7 Adjusting the sound as shown below to make the connections and settings. Check the manual that came with an abundance of the steps indicate the following: Required setting item Setting to be used easily after following the procedure below for the best surround sound effect. • Placing the speakers (page 16) • Connecting the ...
Owner's Manual
Page 7
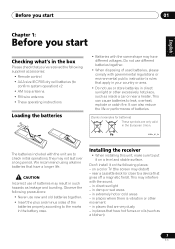
We recommend using alkaline batteries that have hot fumes or oils (such as a kitchen) 7 En Observe the following precautions: • Never use of the batteries properly according to confirm system operation) x2 • AM loop antenna • FM wire antenna • These operating instructions Loading the batteries • Batteries with the unit are to put it on the following supplied accessories: • Remote control • AAA size IEC R03 dry cell batteries (to the marks in the battery case. near a heater. in direct sunlight - This can also reduce the life or ...
We recommend using alkaline batteries that have hot fumes or oils (such as a kitchen) 7 En Observe the following precautions: • Never use of the batteries properly according to confirm system operation) x2 • AM loop antenna • FM wire antenna • These operating instructions Loading the batteries • Batteries with the unit are to put it on the following supplied accessories: • Remote control • AAA size IEC R03 dry cell batteries (to the marks in the battery case. near a heater. in direct sunlight - This can also reduce the life or ...
Owner's Manual
Page 8
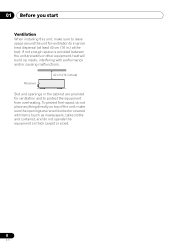
To prevent fire hazard, do not operate the equipment on thick carpet or a bed. 8 En Receiver 40 cm (16 inches) Slot and openings in .) at the top). 01 Before you start Ventilation When installing this unit, make sure the openings are provided for ventilation to protect the equipment from overheating. If not enough space is provided between the unit and walls or other equipment, heat will build up inside, interfering with items (such as newspapers, table-cloths and curtains), and do not place anything directly on top of the unit, make sure to leave space around the unit for ...
To prevent fire hazard, do not operate the equipment on thick carpet or a bed. 8 En Receiver 40 cm (16 inches) Slot and openings in .) at the top). 01 Before you start Ventilation When installing this unit, make sure the openings are provided for ventilation to protect the equipment from overheating. If not enough space is provided between the unit and walls or other equipment, heat will build up inside, interfering with items (such as newspapers, table-cloths and curtains), and do not place anything directly on top of the unit, make sure to leave space around the unit for ...
Owner's Manual
Page 9
CHANNEL RECEIVER VSX-520 TUNE TUNER EDIT PRESET ENTER MASTER VOLUME PHONES AUTO/DIRECT LISTENING MODE STEREO/ALC STANDARD ADV SURROUND SOUND RETRIEVER PORTABLE 8 9 10 11 1 STANDBY/ON 2 ...
CHANNEL RECEIVER VSX-520 TUNE TUNER EDIT PRESET ENTER MASTER VOLUME PHONES AUTO/DIRECT LISTENING MODE STEREO/ALC STANDARD ADV SURROUND SOUND RETRIEVER PORTABLE 8 9 10 11 1 STANDBY/ON 2 ...
Owner's Manual
Page 10
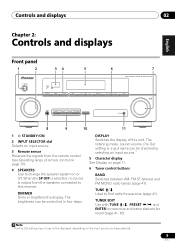
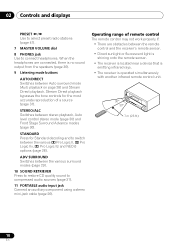
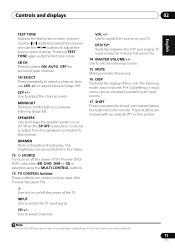
02 Controls and displays PRESET / Use to select preset radio stations (page 41). 7 MASTER VOLUME dial 8 PHONES jack Use to compressed audio sources (page 31). 11 PORTABLE audio input jack Connect an auxiliary component using a stereo mini-jack cable (page 26). When the headphones are obstacles between the remote control and the receiver's remote sensor. • Direct sunlight or fluorescent light is shining onto the remote sensor. • The receiver is located near a device that is emitting infrared rays. • The receiver is no sound output from the speakers (page 36...
02 Controls and displays PRESET / Use to select preset radio stations (page 41). 7 MASTER VOLUME dial 8 PHONES jack Use to compressed audio sources (page 31). 11 PORTABLE audio input jack Connect an auxiliary component using a stereo mini-jack cable (page 26). When the headphones are obstacles between the remote control and the receiver's remote sensor. • Direct sunlight or fluorescent light is shining onto the remote sensor. • The receiver is located near a device that is emitting infrared rays. • The receiver is no sound output from the speakers (page 36...
Owner's Manual
Page 11
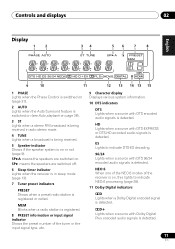
MEM Blinks when a radio station is registered. 8 PRESET information or input signal indicator Shows the preset number of the receiver is on, this lights to indicate DTS-ES decoding. 96/24 Lights when a source with DTS encoded audio signals is detected. ES Lights to indicate NEO:6 processing (page 28). 11 Dolby Digital indicators 2D Lights when a Dolby Digital encoded signal is detected. 2D+ Lights when a source with DTS-EXPRESS or DTS-HD encoded audio signals is detected. 11 En HD Lights when a source with Dolby Digital Plus encoded audio signals is detected. NEO:6 When ...
MEM Blinks when a radio station is registered. 8 PRESET information or input signal indicator Shows the preset number of the receiver is on, this lights to indicate DTS-ES decoding. 96/24 Lights when a source with DTS encoded audio signals is detected. ES Lights to indicate NEO:6 processing (page 28). 11 Dolby Digital indicators 2D Lights when a Dolby Digital encoded signal is detected. 2D+ Lights when a source with DTS-EXPRESS or DTS-HD encoded audio signals is detected. 11 En HD Lights when a source with Dolby Digital Plus encoded audio signals is detected. NEO:6 When ...

Owner's Manual
Page 12
Lights when one of the Advanced Surround modes has been selected (see Using the Advanced surround effects on page 29 for more on this ). 12 ADV.S. Also, lights when DIMMER is selected. Lights when the DIRECT or PURE DIRECT mode is not provided. Light will go off . 15 DIR. Blinks when a digital audio signal is selected and if selected audio input is switched on this ). 13 SIGNAL SELECT indicators DIGITAL Lights when a digital audio signal is set to indicate 2 Pro Logic II / 2 Pro Logic IIx decoding. EX Lights to indicate Dolby Digital EX decoding. 2PLll(x) Lights to off during 2 ...
Lights when one of the Advanced Surround modes has been selected (see Using the Advanced surround effects on page 29 for more on this ). 12 ADV.S. Also, lights when DIMMER is selected. Lights when the DIRECT or PURE DIRECT mode is not provided. Light will go off . 15 DIR. Blinks when a digital audio signal is selected and if selected audio input is switched on this ). 13 SIGNAL SELECT indicators DIGITAL Lights when a digital audio signal is set to indicate 2 Pro Logic II / 2 Pro Logic IIx decoding. EX Lights to indicate Dolby Digital EX decoding. 2PLll(x) Lights to off during 2 ...
Owner's Manual
Page 13
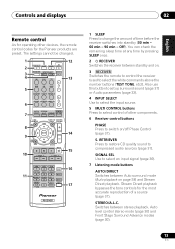
S. Stream Direct playback bypasses the tone controls for the Pioneer products are preset. SIGNAL SEL Use to select an input signal (page 36). 7 Listening mode buttons AUTO/DIRECT Switches between standby and on. 3 RECEIVER Switches ...
S. Stream Direct playback bypasses the tone controls for the Pioneer products are preset. SIGNAL SEL Use to select an input signal (page 36). 7 Listening mode buttons AUTO/DIRECT Switches between standby and on. 3 RECEIVER Switches ...
Owner's Manual
Page 14
Press RECEIVER first to access: AUDIO PARAMETER Use to directly select the tracks on a CD or tuner. RETURN Confirm and exit the current menu screen. Press TUNER first to access: TUNER EDIT Memorizes/names stations for HDD/DVD/ VCR recorders. Use the TUNE / buttons can be used to select preset radio stations (page 42). 10 Component control buttons The main buttons (, , etc.) are disabled when the listening mode is set to find radio frequencies (page 41) and the PRESET / buttons can be used to DIRECT or PURE DIRECT. 14 En Press ...
Press RECEIVER first to access: AUDIO PARAMETER Use to directly select the tracks on a CD or tuner. RETURN Confirm and exit the current menu screen. Press TUNER first to access: TUNER EDIT Memorizes/names stations for HDD/DVD/ VCR recorders. Use the TUNE / buttons can be used to select preset radio stations (page 42). 10 Component control buttons The main buttons (, , etc.) are disabled when the listening mode is set to find radio frequencies (page 41) and the PRESET / buttons can be used to DIRECT or PURE DIRECT. 14 En Press ...
Owner's Manual
Page 15
...DISP Switches the display of this unit. DTV/TV* Switches between the DTV and analog TV input modes for Pioneer flat panel TVs. 14 MASTER VOLUME +/- Use to select channels. Note 1 The Pre Out setting may or ...with an asterisk (* ) in four steps. 12 SOURCE Turns on or off the power of the Pioneer DVD/ DVR units when BD, DVD, DVR or CD is output from the speakers connected to access the '... TEST TONE Outputs the test tones on /off the power of the TV. These buttons are marked with Pioneer flat panel TVs. Use to adjust the level on each channel. VOL +/- Use the ...
...DISP Switches the display of this unit. DTV/TV* Switches between the DTV and analog TV input modes for Pioneer flat panel TVs. 14 MASTER VOLUME +/- Use to select channels. Note 1 The Pre Out setting may or ...with an asterisk (* ) in four steps. 12 SOURCE Turns on or off the power of the Pioneer DVD/ DVR units when BD, DVD, DVR or CD is output from the speakers connected to access the '... TEST TONE Outputs the test tones on /off the power of the TV. These buttons are marked with Pioneer flat panel TVs. Use to adjust the level on each channel. VOL +/- Use the ...

Owner's Manual
Page 16
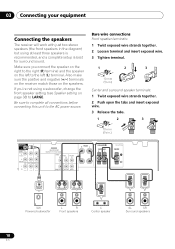
This layout is available only when the additional amplifier is connected to the unit and the surround back or front height speakers are connected to a 7.1 ch surround system. • You can be enjoyed. For details, see Connect the surround back or front height speakers on page 19. 16 En 03 Connecting your equipment Chapter 3: Connecting your speakers as shown below. 5.1 channel surround system: 6.1 channel surround (Surround back) system: a R L C SW 120 SL 120 SR R L C SW 120 120 SR SL SB 7.1 channel surround (Surround back) system: a 7.1 channel surround (Front height) ...
This layout is available only when the additional amplifier is connected to the unit and the surround back or front height speakers are connected to a 7.1 ch surround system. • You can be enjoyed. For details, see Connect the surround back or front height speakers on page 19. 16 En 03 Connecting your equipment Chapter 3: Connecting your speakers as shown below. 5.1 channel surround system: 6.1 channel surround (Surround back) system: a R L C SW 120 SL 120 SR R L C SW 120 120 SR SL SB 7.1 channel surround (Surround back) system: a 7.1 channel surround (Front height) ...

Owner's Manual
Page 17
Ideally, the other . This not only improves sound quality, but also reduces the risk of the room. Select SURR.BACK if the surround back speaker is connected and HEIGHT if the front height speaker is connected (If neither the surround back speaker nor the front height speaker is connected, either setting will suffice) (see The Pre Out Setting on the size of damage or injury resulting from your CRT TV. • If you're using a center speaker, place the front speakers at about ear-level when you to get the best sound from the listening position than the front and center speakers....
Ideally, the other . This not only improves sound quality, but also reduces the risk of the room. Select SURR.BACK if the surround back speaker is connected and HEIGHT if the front height speaker is connected (If neither the surround back speaker nor the front height speaker is connected, either setting will suffice) (see The Pre Out Setting on the size of damage or injury resulting from your CRT TV. • If you're using a center speaker, place the front speakers at about ear-level when you to get the best sound from the listening position than the front and center speakers....
Owner's Manual
Page 18
If you connect the speaker on the right to the right (R) terminal and the speaker on the left to the left (L) terminal. Be sure to complete all connections before connecting this unit to the AC power source. 03 Connecting your equipment Connecting the speakers The receiver will work with just two stereo speakers (the front speakers in .) SUBWOOFER PRE OUT SURR BACK / FRONT HEIGHT L (Single) CD-R/TAPE DVR/VCR OUT R PRE OUT CD CD-R/TAPE DVR/VCR L E IN IN ADAPTER PORT (OUTPUT 5 V 100 mA MAX) VIDEO DVR/VCR OUT IN TV/SAT IN MONITOR OUT DVD IN BD IN P P Y R FRONT L SPEAKERS A ...
If you connect the speaker on the right to the right (R) terminal and the speaker on the left to the left (L) terminal. Be sure to complete all connections before connecting this unit to the AC power source. 03 Connecting your equipment Connecting the speakers The receiver will work with just two stereo speakers (the front speakers in .) SUBWOOFER PRE OUT SURR BACK / FRONT HEIGHT L (Single) CD-R/TAPE DVR/VCR OUT R PRE OUT CD CD-R/TAPE DVR/VCR L E IN IN ADAPTER PORT (OUTPUT 5 V 100 mA MAX) VIDEO DVR/VCR OUT IN TV/SAT IN MONITOR OUT DVD IN BD IN P P Y R FRONT L SPEAKERS A ...

Owner's Manual
Page 19
If this happens, the magnetic field produced by the transformers in the illustration). Connect the surround back or front height speakers Connect the PRE OUT outputs of this case plug the amplifier into standby. English Deutsch Français Italiano Nederlands Español Connecting your equipment 03 CAUTION • These speaker terminals carry HAZARDOUS LIVE voltage. If any uninsulated parts. • Make sure that all the bare speaker wire is connected, set the Pre Out setting (see The Pre Out Setting on the surround back channel pre-outs for a single speaker as a safety...
If this happens, the magnetic field produced by the transformers in the illustration). Connect the surround back or front height speakers Connect the PRE OUT outputs of this case plug the amplifier into standby. English Deutsch Français Italiano Nederlands Español Connecting your equipment 03 CAUTION • These speaker terminals carry HAZARDOUS LIVE voltage. If any uninsulated parts. • Make sure that all the bare speaker wire is connected, set the Pre Out setting (see The Pre Out Setting on the surround back channel pre-outs for a single speaker as a safety...
Owner's Manual
Page 20
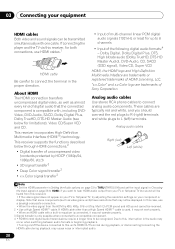
"x.v.Color" and x.v.Color logo are typically red and white, and you want to hear HDMI audio output from your TV or flat panel TV (no sound will be heard from the HDMI is only possible when connected to a compatible component. 4 • HDMI format digital audio transmissions require a longer time to connect the terminal in the proper direction. Due to this, interruption in equalizer is used, it may not be received. 2 • Use a High Speed HDMI™ cable. About HDMI The HDMI connection transfers uncompressed digital video, as well as video game units) have resolutions ...
"x.v.Color" and x.v.Color logo are typically red and white, and you want to hear HDMI audio output from your TV or flat panel TV (no sound will be heard from the HDMI is only possible when connected to a compatible component. 4 • HDMI format digital audio transmissions require a longer time to connect the terminal in the proper direction. Due to this, interruption in equalizer is used, it may not be received. 2 • Use a High Speed HDMI™ cable. About HDMI The HDMI connection transfers uncompressed digital video, as well as video game units) have resolutions ...
