
Owner's Manual
Page 4
...54 Using the Headphones 55 Video Select 55 Adjusting the Brightness of the Display 56 Status Display 56 Using the Tuner 57 Automatic and Manual Tuning 57 MPX Mode 57 Direct Access Tuning 58 Memorizing Frequently Used Stations 59 Naming Memorized Stations 60 Recalling Memorized Stations 61 4 ...Controlling the MULTI-ROOM system from the main room 76 Controlling the MULTI-ROOM system from the sub room 77 The PIONEER SR System: Operating other PIONEER components 78 Multi Operations 79 Performing multi operations 80 System off 81 Using System off 82 Editing Remote Control Display ...
...54 Using the Headphones 55 Video Select 55 Adjusting the Brightness of the Display 56 Status Display 56 Using the Tuner 57 Automatic and Manual Tuning 57 MPX Mode 57 Direct Access Tuning 58 Memorizing Frequently Used Stations 59 Naming Memorized Stations 60 Recalling Memorized Stations 61 4 ...Controlling the MULTI-ROOM system from the main room 76 Controlling the MULTI-ROOM system from the sub room 77 The PIONEER SR System: Operating other PIONEER components 78 Multi Operations 79 Performing multi operations 80 System off 81 Using System off 82 Editing Remote Control Display ...
Owner's Manual
Page 5
...54 Using the Headphones 55 Video Select 55 Adjusting the Brightness of the Display 56 Status Display 56 Using the Tuner 57 Automatic and Manual Tuning 57 MPX Mode 57 Direct Access Tuning 58 Memorizing Frequently Used Stations 59 Naming Memorized Stations 60 Recalling Memorized Stations 61 4 ...Controlling the MULTI-ROOM system from the main room 76 Controlling the MULTI-ROOM system from the sub room 77 The PIONEER SR System: Operating other PIONEER components 78 Multi Operations 79 Performing multi operations 80 System off 81 Using System off 82 Editing Remote Control Display ...
...54 Using the Headphones 55 Video Select 55 Adjusting the Brightness of the Display 56 Status Display 56 Using the Tuner 57 Automatic and Manual Tuning 57 MPX Mode 57 Direct Access Tuning 58 Memorizing Frequently Used Stations 59 Naming Memorized Stations 60 Recalling Memorized Stations 61 4 ...Controlling the MULTI-ROOM system from the main room 76 Controlling the MULTI-ROOM system from the sub room 77 The PIONEER SR System: Operating other PIONEER components 78 Multi Operations 79 Performing multi operations 80 System off 81 Using System off 82 Editing Remote Control Display ...
Owner's Manual
Page 9
... a subwoofer to get home theater surround sound. Particularly important is the number of audio. In general, if you an understanding of the manual. 9 This will be fine. To listen to your receiver. Other possibilities (like listening to a stereo CD with anywhere from your home...sound. For more options when listening to soundtracks. These are explained below and in subsequent chapters but many more details on the VSX-47TX receiver. We call this little guide should give you do anything. QUICK START GUIDE PREPARATION Quick Start Guide Part1 Home Theater:...
... a subwoofer to get home theater surround sound. Particularly important is the number of audio. In general, if you an understanding of the manual. 9 This will be fine. To listen to your receiver. Other possibilities (like listening to a stereo CD with anywhere from your home...sound. For more options when listening to soundtracks. These are explained below and in subsequent chapters but many more details on the VSX-47TX receiver. We call this little guide should give you do anything. QUICK START GUIDE PREPARATION Quick Start Guide Part1 Home Theater:...

Owner's Manual
Page 11
... two speakers hook them up all the sound channels on the back of all your speakers. Follow the diagram below also explains how to speaker manual for watching films because in digital soundtracks the dialog comes from page 13 in (10mm) 3 Tighten terminal. These speakers are important to hook up as...
... two speakers hook them up all the sound channels on the back of all your speakers. Follow the diagram below also explains how to speaker manual for watching films because in digital soundtracks the dialog comes from page 13 in (10mm) 3 Tighten terminal. These speakers are important to hook up as...
Owner's Manual
Page 13
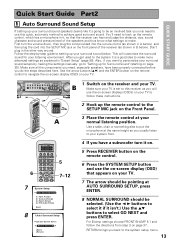
... the Front Panel. 3 Place the remote control at the same height as explained in the other way around. Follow the step-by making the settings manually go to "Setting up the remote control to your system from step 3 on your listening environment.
... the Front Panel. 3 Place the remote control at the same height as explained in the other way around. Follow the step-by making the settings manually go to "Setting up the remote control to your system from step 3 on your listening environment.

Owner's Manual
Page 14
...;5 buttons to select a speaker then the 2 3 buttons to step 12. If you hooked up the remote control microphone and moved obstacles to input the settings manually select ERR=FIX SP with the speaker connection. Put the remote control into the its stand and be as quiet as possible after hitting ENTER...
...;5 buttons to select a speaker then the 2 3 buttons to step 12. If you hooked up the remote control microphone and moved obstacles to input the settings manually select ERR=FIX SP with the speaker connection. Put the remote control into the its stand and be as quiet as possible after hitting ENTER...

Owner's Manual
Page 17
... digital soundtracks like Dolby Digital or DTS you will need to hook up your TV. It is also a good idea to record from your DVD manual for example, a DVD player) there are different than the default settings you will ensure you want to hook up your audio signal with either component...
... digital soundtracks like Dolby Digital or DTS you will need to hook up your TV. It is also a good idea to record from your DVD manual for example, a DVD player) there are different than the default settings you will ensure you want to hook up your audio signal with either component...
Owner's Manual
Page 25
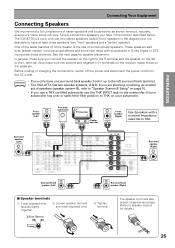
...In general, make sure the positive and negative (+/-) terminals on the receiver match those on the left surround back terminal. • The VSX-47TX has two speaker systems, A & B. If you are planning on the subwoofer (if your subwoofer. Front speaker (Left) Powered subwoofer ...INPUT TV/monitor Center speaker Front speaker (Right) Use Speakers with a nominal impedance rated 6Ω to speaker manual for speaker placement. Surround speaker (Left) DIGITAL PCM/2DIGITAL/DTS 2 OUT 1 PHONO OUT IN R AUDIO L CD DIGITAL IN PCM/2DIGITAL/DTS ...
...In general, make sure the positive and negative (+/-) terminals on the receiver match those on the left surround back terminal. • The VSX-47TX has two speaker systems, A & B. If you are planning on the subwoofer (if your subwoofer. Front speaker (Left) Powered subwoofer ...INPUT TV/monitor Center speaker Front speaker (Right) Use Speakers with a nominal impedance rated 6Ω to speaker manual for speaker placement. Surround speaker (Left) DIGITAL PCM/2DIGITAL/DTS 2 OUT 1 PHONO OUT IN R AUDIO L CD DIGITAL IN PCM/2DIGITAL/DTS ...

Owner's Manual
Page 26
... you have a multiple speaker arrangement the placement of the ASA feature (see page 102 & 103. To achieve the best possible surround sound, install your speaker manuals for speaker placement to read your speakers as heaters, irons, or television sets to the AC OUTLET in order to do not have finished hooking...
... you have a multiple speaker arrangement the placement of the ASA feature (see page 102 & 103. To achieve the best possible surround sound, install your speaker manuals for speaker placement to read your speakers as heaters, irons, or television sets to the AC OUTLET in order to do not have finished hooking...

Owner's Manual
Page 36
... (if you hooked them up to the front panel and in the remote control may not get the full soundtrack from : MANUAL FREE : Sets all the speakers MANUAL THX : Sets all the speakers you connected. In this case, the bass frequencies are set to SMALL. The setup possibilities ... of your speakers will automatically be set to SMALL (X1 or )2, or NO. Choose from a disc. If necessary try different possible settings manually. Setting Up for Surround Sound SPEAKER SYSTEMS The following steps show you how to select the correct setup for the front speakers the subwoofer will...
... (if you hooked them up to the front panel and in the remote control may not get the full soundtrack from : MANUAL FREE : Sets all the speakers MANUAL THX : Sets all the speakers you connected. In this case, the bass frequencies are set to SMALL. The setup possibilities ... of your speakers will automatically be set to SMALL (X1 or )2, or NO. Choose from a disc. If necessary try different possible settings manually. Setting Up for Surround Sound SPEAKER SYSTEMS The following steps show you how to select the correct setup for the front speakers the subwoofer will...

Owner's Manual
Page 37
... ∞ button to go to step 3. If you see memo page 15). Setting Up for the entire soundtrack, which sounds best. Speaker Systems Manual Free Speaker System Select [ Normal Surround ] ( Next) 5,6 7 2.1. If you have a subwoofer, listen to choose the size and number for... your front speakers and leave the subwoofer selected. Speaker Systems Manual Free " Normal Surround " Crossover [ 80Hz ] Normal Surround (THX Speaker = 80Hz) Speaker B : Secound Zone [Return] If you have a subwoofer, the ...
... ∞ button to go to step 3. If you see memo page 15). Setting Up for the entire soundtrack, which sounds best. Speaker Systems Manual Free Speaker System Select [ Normal Surround ] ( Next) 5,6 7 2.1. If you have a subwoofer, listen to choose the size and number for... your front speakers and leave the subwoofer selected. Speaker Systems Manual Free " Normal Surround " Crossover [ 80Hz ] Normal Surround (THX Speaker = 80Hz) Speaker B : Secound Zone [Return] If you have a subwoofer, the ...

Owner's Manual
Page 38
... tone is from your TV 2 There are two ways to set them to the same distance and then use them together, set the CHANNEL DELAY, MANUAL and AUTO. Use the 2 3 buttons to add or subtract the distance in "Setting Up for Surround Sound" (p.35) first. Next, proceed to the reference...method you choose the speaker and adjust the distance yourself. AUTO : This way of setting the distance you 'd like that the speaker is output. 3 For MANUAL, select each speaker. The levels are output at a high volume level. WARNING : Be prepared! The test tones are set the delay time for Surround ...
... tone is from your TV 2 There are two ways to set them to the same distance and then use them together, set the CHANNEL DELAY, MANUAL and AUTO. Use the 2 3 buttons to add or subtract the distance in "Setting Up for Surround Sound" (p.35) first. Next, proceed to the reference...method you choose the speaker and adjust the distance yourself. AUTO : This way of setting the distance you 'd like that the speaker is output. 3 For MANUAL, select each speaker. The levels are output at a high volume level. WARNING : Be prepared! The test tones are set the delay time for Surround ...

Owner's Manual
Page 39
...Auto] [Auto] Normal Surround [Return] Your Speaker Systems " Normal Surround " 1 CHANNEL LEVEL should be output. MANUAL : For this setting method you move the test tone manually and adjust the channel level. Setting Up for Surround Sound CHANNEL LEVEL (channel balance) The following steps show you how... sound output level of the best setting for your subwoofer has a volume control, set automatically by itself and you set the CHANNEL LEVEL: MANUAL; AUTO. MASTER VOLUME rotates to step 1. Proper speaker balance is like that described in "Setting Up for Surround Sound" (p.35) first....
...Auto] [Auto] Normal Surround [Return] Your Speaker Systems " Normal Surround " 1 CHANNEL LEVEL should be output. MANUAL : For this setting method you move the test tone manually and adjust the channel level. Setting Up for Surround Sound CHANNEL LEVEL (channel balance) The following steps show you how... sound output level of the best setting for your subwoofer has a volume control, set automatically by itself and you set the CHANNEL LEVEL: MANUAL; AUTO. MASTER VOLUME rotates to step 1. Proper speaker balance is like that described in "Setting Up for Surround Sound" (p.35) first....

Owner's Manual
Page 40
...Auto [+10. 0dB] [+10. 0dB] [+10. 0dB] [+10. 0dB] SurrBack R [ - - - Channel Level Front L Center Front R Surround R SurrBack R SurrBack L Surround L Subwoofer Manual [ +1. 5dB] [ +1. 5dB] [ +2. 0dB] [ -3. 5dB] [ -1. 5dB] [ +3. 0dB] [ +2. 0dB] [+10. 0dB] [Return] 3 Adjust the level of each ...EFFECT CH/SEL. Setting Up for the AUTO setting where the adjustment is done automatically). dB] SurrBack L [ - - - dB] SurrBack L [ - - - Channel Level Manual Front L [+10. 0dB] Center Front R [+10. 0dB] [+10. 0dB] Surround R [+10. 0dB] SurrBack R [ - - - dB] Surround L [+10. ...
...Auto [+10. 0dB] [+10. 0dB] [+10. 0dB] [+10. 0dB] SurrBack R [ - - - Channel Level Front L Center Front R Surround R SurrBack R SurrBack L Surround L Subwoofer Manual [ +1. 5dB] [ +1. 5dB] [ +2. 0dB] [ -3. 5dB] [ -1. 5dB] [ +3. 0dB] [ +2. 0dB] [+10. 0dB] [Return] 3 Adjust the level of each ...EFFECT CH/SEL. Setting Up for the AUTO setting where the adjustment is done automatically). dB] SurrBack L [ - - - dB] SurrBack L [ - - - Channel Level Manual Front L [+10. 0dB] Center Front R [+10. 0dB] [+10. 0dB] Surround R [+10. 0dB] SurrBack R [ - - - dB] Surround L [+10. ...

Owner's Manual
Page 45
...have to be able to listen to the appropriate input when necessary. For both these select ANALOG for more details, refer to the instruction manual supplied with digital connections if your DVD/LD or LD players using the 2 RF jack. DTS lights when a DTS signal is input....88kHz and 96kHz sampling frequency), and DTS digital signal formats. Also, if you set in the following order of the source component. Check the manual that came with the Best Sound Quality (all sound functions. For PCM 96kHz soundtracks, however, you can 't output 96kHz digital signals. For...
...have to be able to listen to the appropriate input when necessary. For both these select ANALOG for more details, refer to the instruction manual supplied with digital connections if your DVD/LD or LD players using the 2 RF jack. DTS lights when a DTS signal is input....88kHz and 96kHz sampling frequency), and DTS digital signal formats. Also, if you set in the following order of the source component. Check the manual that came with the Best Sound Quality (all sound functions. For PCM 96kHz soundtracks, however, you can 't output 96kHz digital signals. For...

Owner's Manual
Page 57
... the exact frequency of the station you want, see "Direct Access Tuning" on the following steps show you how to tune in the station. For Manual Tuning • To change frequencies one second, then release. OPERATION 57 DTV ON/OFF 8 BAND 3 DTV MENU CLASS 7 EXTRA MENU TUNING + ¡ STATION + &#... first station it locates. Each press switches the band: FM j AM 3 Tune in FM and AM radio broadcasts using the automatic (search) and manual (step) tuning functions. Repeat to select the band (FM or AM). On the remote, this selects the tuner function on the remote control to ...
... the exact frequency of the station you want, see "Direct Access Tuning" on the following steps show you how to tune in the station. For Manual Tuning • To change frequencies one second, then release. OPERATION 57 DTV ON/OFF 8 BAND 3 DTV MENU CLASS 7 EXTRA MENU TUNING + ¡ STATION + &#... first station it locates. Each press switches the band: FM j AM 3 Tune in FM and AM radio broadcasts using the automatic (search) and manual (step) tuning functions. Repeat to select the band (FM or AM). On the remote, this selects the tuner function on the remote control to ...

Owner's Manual
Page 59
... to input your choice. The station is memorized automatically after 5 seconds. 5 Press the ENTER button to select a channel (0~9) within the respective class. See "Automatic and Manual Tuning" or "Direct Access Tuning" on page 57 and 58. 2 Press the TUNER EDIT button to activate the memory function. 3 Press the DTV MENU CLASS...
... to input your choice. The station is memorized automatically after 5 seconds. 5 Press the ENTER button to select a channel (0~9) within the respective class. See "Automatic and Manual Tuning" or "Direct Access Tuning" on page 57 and 58. 2 Press the TUNER EDIT button to activate the memory function. 3 Press the DTV MENU CLASS...

Owner's Manual
Page 66
... Control of Other Components Using Remote Control with the component. Button(s) Function SOURCE Press to control. • For more information on individual commands consult the manual that came with Other Components CD/MD/CD-R/VCR/DVD/LD/DVD recorder/Cassette Deck operations memo • The following tracks or chapter. ¢ Go...
... Control of Other Components Using Remote Control with the component. Button(s) Function SOURCE Press to control. • For more information on individual commands consult the manual that came with Other Components CD/MD/CD-R/VCR/DVD/LD/DVD recorder/Cassette Deck operations memo • The following tracks or chapter. ¢ Go...

Owner's Manual
Page 67
... four TV controls will always be able operate some buttons that may operate it to control. • For more information on individual commands consult the manual that system. Select channels. If you want to the TV CONT button. If you connect your TV to input source then use TV CONT for...
... four TV controls will always be able operate some buttons that may operate it to control. • For more information on individual commands consult the manual that system. Select channels. If you want to the TV CONT button. If you connect your TV to input source then use TV CONT for...

Owner's Manual
Page 70
... bi-amping the speakers or you need more information on how to do this case can connect both the A and B speaker terminals to your speaker manual for more details on the receiver. Bi-amping the front speakers For bi-amp playback you want. Bi-amping delivers more power to the front...
... bi-amping the speakers or you need more information on how to do this case can connect both the A and B speaker terminals to your speaker manual for more details on the receiver. Bi-amping the front speakers For bi-amp playback you want. Bi-amping delivers more power to the front...


