
Owner's Manual
Page 4
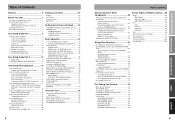
...2) The Source Material 9 3) The Listening Modes 9 Conclusion 9 1 Hooking Up Your DVD Player & TV 10 Digital Connections 10 2 Speaker Connections 11 3 Setting up the Main Unit 12 4 Assigning the Digital Inputs 12 Easy Setup Guide Part 2 13 1 QUICK Setup 13 2 Playing a DVD with Surround Sound 14...69 SYSTEM OFF 70 Using SYSTEM OFF 71 The PIONEER SR System: Operating other PIONEER components 71 Resetting the Remote Control 72 Erasing Multi Operations 72 Erasing Learned Remote Control Commands ... 72 Erasing All Remote Control settings 72 Resetting the Main Unit 73 Techno Tidbits &...
...2) The Source Material 9 3) The Listening Modes 9 Conclusion 9 1 Hooking Up Your DVD Player & TV 10 Digital Connections 10 2 Speaker Connections 11 3 Setting up the Main Unit 12 4 Assigning the Digital Inputs 12 Easy Setup Guide Part 2 13 1 QUICK Setup 13 2 Playing a DVD with Surround Sound 14...69 SYSTEM OFF 70 Using SYSTEM OFF 71 The PIONEER SR System: Operating other PIONEER components 71 Resetting the Remote Control 72 Erasing Multi Operations 72 Erasing Learned Remote Control Commands ... 72 Erasing All Remote Control settings 72 Resetting the Main Unit 73 Techno Tidbits &...

Owner's Manual
Page 5
...2) The Source Material 9 3) The Listening Modes 9 Conclusion 9 1 Hooking Up Your DVD Player & TV 10 Digital Connections 10 2 Speaker Connections 11 3 Setting up the Main Unit 12 4 Assigning the Digital Inputs 12 Easy Setup Guide Part 2 13 1 QUICK Setup 13 2 Playing a DVD with Surround Sound 14...69 SYSTEM OFF 70 Using SYSTEM OFF 71 The PIONEER SR System: Operating other PIONEER components 71 Resetting the Remote Control 72 Erasing Multi Operations 72 Erasing Learned Remote Control Commands ... 72 Erasing All Remote Control settings 72 Resetting the Main Unit 73 Techno Tidbits &...
...2) The Source Material 9 3) The Listening Modes 9 Conclusion 9 1 Hooking Up Your DVD Player & TV 10 Digital Connections 10 2 Speaker Connections 11 3 Setting up the Main Unit 12 4 Assigning the Digital Inputs 12 Easy Setup Guide Part 2 13 1 QUICK Setup 13 2 Playing a DVD with Surround Sound 14...69 SYSTEM OFF 70 Using SYSTEM OFF 71 The PIONEER SR System: Operating other PIONEER components 71 Resetting the Remote Control 72 Erasing Multi Operations 72 Erasing Learned Remote Control Commands ... 72 Erasing All Remote Control settings 72 Resetting the Main Unit 73 Techno Tidbits &...

Owner's Manual
Page 6
... uses a revolutionary 3-D Frame Construction technique and a Symmetrical Power Train Design, with Pioneer's industry-leading advanced and well balanced multichannel concept. On the video side, the ... allowing for finer audio reproduction. Features High Quality, Balanced Multichannel Design The VSX-43TX receiver is equipped with Dolby Digital EX decoding, the very latest Dolby Digital ...technology and is able to each speaker is a trademark of the equipment. The resulting settings finely attune the overall surround sound for 7 independent channels. Its high compatibility offers ...
... uses a revolutionary 3-D Frame Construction technique and a Symmetrical Power Train Design, with Pioneer's industry-leading advanced and well balanced multichannel concept. On the video side, the ... allowing for finer audio reproduction. Features High Quality, Balanced Multichannel Design The VSX-43TX receiver is equipped with Dolby Digital EX decoding, the very latest Dolby Digital ...technology and is able to each speaker is a trademark of the equipment. The resulting settings finely attune the overall surround sound for 7 independent channels. Its high compatibility offers ...
Owner's Manual
Page 9
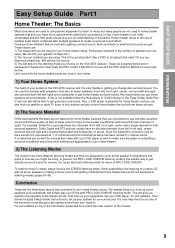
...follow the Easy Setup Guide instructions to set up seven speakers and a subwoofer and simply play your home theater. 3) The Listening Modes This receiver has many more than two channels of audio. Each contribute to what kind of your system is the VSX-43TX receiver and it is expressed as well...you choose on any of the information presented here check the main section of the surround sound setups to get a more details on the VSX-43TX receiver. Particularly important is the listening mode you consult the manual that came with PRO LOGIC II MOVIE listening mode. We call this ...
...follow the Easy Setup Guide instructions to set up seven speakers and a subwoofer and simply play your home theater. 3) The Listening Modes This receiver has many more than two channels of audio. Each contribute to what kind of your system is the VSX-43TX receiver and it is expressed as well...you choose on any of the information presented here check the main section of the surround sound setups to get a more details on the VSX-43TX receiver. Particularly important is the listening mode you consult the manual that came with PRO LOGIC II MOVIE listening mode. We call this ...

Owner's Manual
Page 10
... order to use Dolby Digital/DTS soundtracks, which are of higher quality than RCA video cords and may also be able to follow the default settings of this receiver and won't need to assign the digital input (which means tell the receiver which input you need to connect both coaxial and...
... order to use Dolby Digital/DTS soundtracks, which are of higher quality than RCA video cords and may also be able to follow the default settings of this receiver and won't need to assign the digital input (which means tell the receiver which input you need to connect both coaxial and...
Owner's Manual
Page 11
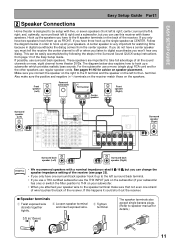
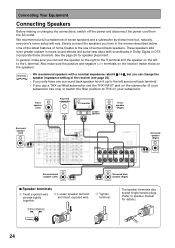
surround left & right) and a subwoofer, but you can change the speaker impedance setting of the receiver (see page 25). • If you attached your speaker wire to the speaker terminal make sure the positive and negative (+/-) terminals on ...
surround left & right) and a subwoofer, but you can change the speaker impedance setting of the receiver (see page 25). • If you attached your speaker wire to the speaker terminal make sure the positive and negative (+/-) terminals on ...

Owner's Manual
Page 12
... a coaxial cable but rather connected it . Conversely, you can use the 5∞ buttons to select INPUT ASSIGN. Press the ENTER button. Easy Setup Guide Part1 3 Setting up the Main Unit 1 Plug the AC power cord into a wall outlet. 2 Press the STANDBY/ON button to switch the receiver ON. 4 Assigning the Digital...
... a coaxial cable but rather connected it . Conversely, you can use the 5∞ buttons to select INPUT ASSIGN. Press the ENTER button. Easy Setup Guide Part1 3 Setting up the Main Unit 1 Plug the AC power cord into a wall outlet. 2 Press the STANDBY/ON button to switch the receiver ON. 4 Assigning the Digital...

Owner's Manual
Page 13
... get enjoyable surround sound with minimum effort. Press the ENTER button. 4 Use the 5∞ buttons to navigate through the QUICK setup menus. SUBWOOFER setting: If you connected a subwoofer select YES, if you didn't select NO. CENTER: your current speaker system or add new speakers, etc.). 2,8... speakers. REAR: your listening position is closer to the surround speakers. 6 In a menu use the 5∞ buttons to do these settings when you can equalize the speakers properly. SIGNAL PRO LOGIC Neo :6 LOUDNESS AUTO DIGITAL MIDNIGHT TONE DNR ATT STEREO MONO TUNED RF ATT ...
... get enjoyable surround sound with minimum effort. Press the ENTER button. 4 Use the 5∞ buttons to navigate through the QUICK setup menus. SUBWOOFER setting: If you connected a subwoofer select YES, if you didn't select NO. CENTER: your current speaker system or add new speakers, etc.). 2,8... speakers. REAR: your listening position is closer to the surround speakers. 6 In a menu use the 5∞ buttons to do these settings when you can equalize the speakers properly. SIGNAL PRO LOGIC Neo :6 LOUDNESS AUTO DIGITAL MIDNIGHT TONE DNR ATT STEREO MONO TUNED RF ATT ...
Owner's Manual
Page 14
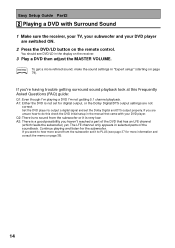
... though I'm playing a DVD I'm not getting surround sound playback look at this check the DVD initial setup in "Expert setup" (starting on page 38). 14 Set the DVD player to PLUS (see DVD/LD in selected parts of the DVD that came with Surround Sound 1 Make sure the receiver, your TV...If you 're having trouble getting 5.1 channel playback. Q2: There is very low. You should see page 37 for more refined sound, make the sound settings in the manual that has an LFE channel (which feeds the subwoofer) yet. memo To get a more information and consult the memo on page 79...
... though I'm playing a DVD I'm not getting surround sound playback look at this check the DVD initial setup in "Expert setup" (starting on page 38). 14 Set the DVD player to PLUS (see DVD/LD in selected parts of the DVD that came with Surround Sound 1 Make sure the receiver, your TV...If you 're having trouble getting 5.1 channel playback. Q2: There is very low. You should see page 37 for more refined sound, make the sound settings in the manual that has an LFE channel (which feeds the subwoofer) yet. memo To get a more information and consult the memo on page 79...

Owner's Manual
Page 15
...common. *The arrows indicate the direction of video cords to hook up your video source (for the luminance and the color. The default settings are the most common or standard video cord but you used with the "Assigning the Component Video Inputs" procedure. Composite video cords, which... composite video cords (the quality descends in this will affect the picture quality. Remember you use component video cords to do so following the default settings, which have only one cable are : COMPONENT VIDEO IN 1: DVD/LD COMPONENT VIDEO IN 2: TV/SAT 15 It is important to do this...
...common. *The arrows indicate the direction of video cords to hook up your video source (for the luminance and the color. The default settings are the most common or standard video cord but you used with the "Assigning the Component Video Inputs" procedure. Composite video cords, which... composite video cords (the quality descends in this will affect the picture quality. Remember you use component video cords to do so following the default settings, which have only one cable are : COMPONENT VIDEO IN 1: DVD/LD COMPONENT VIDEO IN 2: TV/SAT 15 It is important to do this...
Owner's Manual
Page 16
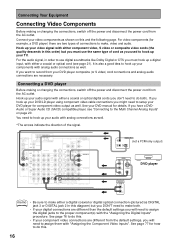
... . • If your component video connections are different from your DVD player for example, a DVD player) there are different than the default settings you might need to use the same type of the signal. Hook up your video components as well. Connect your components with either a coaxial or...in this order) but you will need to the proper component(s) with "Assigning the Component Video Inputs". If you want to record from the default settings, you DON'T need to assign the digital jacks to make , video and audio. ASSIGNABLE PCM/ 2DIGITAL / DTS FM UNBAL 75Ω OUT1 ...
... . • If your component video connections are different from your DVD player for example, a DVD player) there are different than the default settings you might need to use the same type of the signal. Hook up your video components as well. Connect your components with either a coaxial or...in this order) but you will need to the proper component(s) with "Assigning the Component Video Inputs". If you want to record from the default settings, you DON'T need to assign the digital jacks to make , video and audio. ASSIGNABLE PCM/ 2DIGITAL / DTS FM UNBAL 75Ω OUT1 ...

Owner's Manual
Page 17
... CLASS STATION TUNING SELECT TUNER EDIT MULTI JOG/ENTER S-VIDEO VIDEO L AUDIO R VIDEO INPUT Be careful! For portable DVD players you will need to connect a set of the signal. PREPARATION PREPARATION Connecting Your Equipment Connecting VCRs or DVRs Before making or changing the connections, switch off the power and disconnect the...
... CLASS STATION TUNING SELECT TUNER EDIT MULTI JOG/ENTER S-VIDEO VIDEO L AUDIO R VIDEO INPUT Be careful! For portable DVD players you will need to connect a set of the signal. PREPARATION PREPARATION Connecting Your Equipment Connecting VCRs or DVRs Before making or changing the connections, switch off the power and disconnect the...

Owner's Manual
Page 18
... either component video, S video, or composite video cords, depending on how you must hook up your component video connections are different than the default settings you will need to assign them with analog cables as well (see page 21). We recommend hooking up a digital input. See page 76 to do... Connecting Satellite TV (SAT) Components Before making or changing the connections, switch off the power and disconnect the power cord from the default settings, you will need to assign the digital jacks to the proper component(s) with the "Assigning the Digital Inputs" procedure.
... either component video, S video, or composite video cords, depending on how you must hook up your component video connections are different than the default settings you will need to assign them with analog cables as well (see page 21). We recommend hooking up a digital input. See page 76 to do... Connecting Satellite TV (SAT) Components Before making or changing the connections, switch off the power and disconnect the power cord from the default settings, you will need to assign the digital jacks to the proper component(s) with the "Assigning the Digital Inputs" procedure.

Owner's Manual
Page 19
...; Depending on where the cassette deck is placed, noise may occur during playback of your digital equipment with this LINE IN jack only connect one set of the audio signal. Turntable (etc) If you must hook up one with you need to hook up four plugs... (a set of stereo ins and a set of stereo outs), but for components that only play (like a CD-R) to hook up your cassette deck which is caused by leakage flux from analog ...
...; Depending on where the cassette deck is placed, noise may occur during playback of your digital equipment with this LINE IN jack only connect one set of the audio signal. Turntable (etc) If you must hook up one with you need to hook up four plugs... (a set of stereo ins and a set of stereo outs), but for components that only play (like a CD-R) to hook up your cassette deck which is caused by leakage flux from analog ...

Owner's Manual
Page 21
... connection (you want to, or need to analog audio jacks (see page 19) in the case of digital terminal, it can do this receiver's default settings (see "Assigning the Digital Inputs" on a digital recorder (currently these include MD, DAT and CD-R) you need to , change them. TER R L AUDIO DVD/ LD IN... on the receiver). Hook up your digital equipment in the diagram below . We also recommend hooking up your digital components to do this receiver. The VSX-43TX has two coaxial, two optical inputs for example, the coaxial out from the AC outlet.
... connection (you want to, or need to analog audio jacks (see page 19) in the case of digital terminal, it can do this receiver's default settings (see "Assigning the Digital Inputs" on a digital recorder (currently these include MD, DAT and CD-R) you need to , change them. TER R L AUDIO DVD/ LD IN... on the receiver). Hook up your digital equipment in the diagram below . We also recommend hooking up your digital components to do this receiver. The VSX-43TX has two coaxial, two optical inputs for example, the coaxial out from the AC outlet.

Owner's Manual
Page 22
...names on page 76 if the way you must tell the receiver what digital component is different from the default settings listed above. 22 The default settings are not dedicated to one type of component, they can hook up your equipment is connected to assign the digital... inputs you can be in accordance with the receiver's default settings. Connecting Your Equipment Digital Input Default Settings Unlike analog connections, the jacks for digital connections are : DIGITAL IN 1 (optical): TV/SAT DIGITAL IN 2 (optical): CD...
...names on page 76 if the way you must tell the receiver what digital component is different from the default settings listed above. 22 The default settings are not dedicated to one type of component, they can hook up your equipment is connected to assign the digital... inputs you can be in accordance with the receiver's default settings. Connecting Your Equipment Digital Input Default Settings Unlike analog connections, the jacks for digital connections are : DIGITAL IN 1 (optical): TV/SAT DIGITAL IN 2 (optical): CD...
Owner's Manual
Page 24
... Simply connect the speakers you use a THX certified subwoofer use of seven speakers and a subwoofer as shown here but you can change the speaker impedance setting of the receiver (see page 25). • If you only have in Dolby Digital or DTS incorporate these channels. Front speaker (Left) Powered subwoofer INPUT...
... Simply connect the speakers you use a THX certified subwoofer use of seven speakers and a subwoofer as shown here but you can change the speaker impedance setting of the receiver (see page 25). • If you only have in Dolby Digital or DTS incorporate these channels. Front speaker (Left) Powered subwoofer INPUT...

Owner's Manual
Page 25
...8486;-16 Ω (the default setting). Make sure you need to change the speaker impedance for 2-3 seconds. Don't connect different speakers from the same terminal in STANDBY mode, then press the power button while holding down the SPEAKERS button for VSX-43TX but difficult method of speaker cords... to do this method you can change the impedance setting. In order to each speaker terminal on the receiver. SIGNAL PRO LOGIC Neo :6 AUTO...
...8486;-16 Ω (the default setting). Make sure you need to change the speaker impedance for 2-3 seconds. Don't connect different speakers from the same terminal in STANDBY mode, then press the power button while holding down the SPEAKERS button for VSX-43TX but difficult method of speaker cords... to do this method you can change the impedance setting. In order to each speaker terminal on the receiver. SIGNAL PRO LOGIC Neo :6 AUTO...
Owner's Manual
Page 26
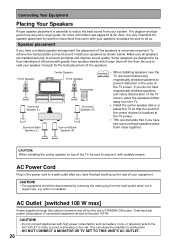
... the color of the speakers is localized at the TV screen. • THX recommends that come with your speakers as heaters, irons, or television sets to the AC OUTLET in regular use, e.g. CAUTION! • Do not connect appliances with suitable means. To achieve the best possible surround sound,... be sure to read the instructions that if you do so. Some speakers are designed to malfunction. • DO NOT CONNECT A MONITOR OR TV SET TO THIS UNIT'S AC OUTLET. 26 AC Outlet [switched 100 W max] Power supplied through this unit's STANDBY/ON button. CAUTION: When installing the...
... the color of the speakers is localized at the TV screen. • THX recommends that come with your speakers as heaters, irons, or television sets to the AC OUTLET in regular use, e.g. CAUTION! • Do not connect appliances with suitable means. To achieve the best possible surround sound,... be sure to read the instructions that if you do so. Some speakers are designed to malfunction. • DO NOT CONNECT A MONITOR OR TV SET TO THIS UNIT'S AC OUTLET. 26 AC Outlet [switched 100 W max] Power supplied through this unit's STANDBY/ON button. CAUTION: When installing the...

Owner's Manual
Page 27
... with a box around it. Left surround channel. Right surround channel. AUTO - Lights when the SB CH MODE or VIRTUAL SURROUND BACK mode is set to select the audio input signal automatically. STEREO: Lights during Dolby Pro Logic, Dolby Pro Logic II processing. TUNED: Lights when a broadcast is ... LS - Surround channel or Surround back channel. Low Frequency Effects channel. ‡ - Lights when the SB CH MODE or VIRTUAL SURROUND BACK mode is set to AUTO. Left front channel. L - When all three LS (left surround), S (surround) and RS (right surround) light at the same time ...
... with a box around it. Left surround channel. Right surround channel. AUTO - Lights when the SB CH MODE or VIRTUAL SURROUND BACK mode is set to select the audio input signal automatically. STEREO: Lights during Dolby Pro Logic, Dolby Pro Logic II processing. TUNED: Lights when a broadcast is ... LS - Surround channel or Surround back channel. Low Frequency Effects channel. ‡ - Lights when the SB CH MODE or VIRTUAL SURROUND BACK mode is set to AUTO. Left front channel. L - When all three LS (left surround), S (surround) and RS (right surround) light at the same time ...


