Owner's Manual
Page 10
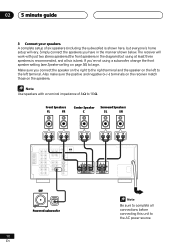
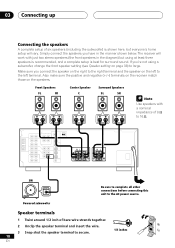
...;. Use speakers with just two stereo speakers (the front speakers in the manner shown below. A complete setup of 8 Ω to the AC power source. Make sure you have in the diagram) but everyone's home setup will vary. The receiver will work with a nominal impedance of six speakers... is best. 02 5 minute guide 3 Connect your speakers. Front Speakers FL FR Center Speaker C Surround Speakers SL SR RL RL SW INPUT Powered subwoofer 10 En Be sure to complete all six is shown here, but using a subwoofer, change the front speaker setting (see Speaker setting on...
...;. Use speakers with just two stereo speakers (the front speakers in the manner shown below. A complete setup of 8 Ω to the AC power source. Make sure you have in the diagram) but everyone's home setup will vary. The receiver will work with a nominal impedance of six speakers... is best. 02 5 minute guide 3 Connect your speakers. Front Speakers FL FR Center Speaker C Surround Speakers SL SR RL RL SW INPUT Powered subwoofer 10 En Be sure to complete all six is shown here, but using a subwoofer, change the front speaker setting (see Speaker setting on...

Owner's Manual
Page 12
... speaker setup and room size. T LOUDNESS TONE QUICK SETUP MULTI JOG MULTI JOG ENTER INPUT SELECTOR MASTER VOLUME DOWN UP R 1 Press RECEIVER to turn the power on pages 35 to find the speaker setup that you want to make more specific settings, refer to Choosing your receiver setup on . Front Center...
... speaker setup and room size. T LOUDNESS TONE QUICK SETUP MULTI JOG MULTI JOG ENTER INPUT SELECTOR MASTER VOLUME DOWN UP R 1 Press RECEIVER to turn the power on pages 35 to find the speaker setup that you want to make more specific settings, refer to Choosing your receiver setup on . Front Center...
Owner's Manual
Page 13
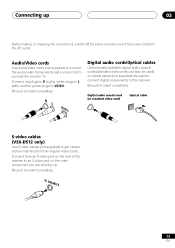
...cords can also be used to connect digital components to this receiver. Digital audio coaxial cord (or standard video cord) Optical cable S-video cables (VSX-D512 only) Use S-video cables (not supplied) to insert completely. Be sure to insert completely. Be sure to insert completely. Connect from ...the AC outlet. Connecting up 03 Before making or changing the connections, switch off the power and disconnect the power cord from an S-video jack on the rear of the receiver to an S-video jack on the video component you are used )...
...cords can also be used to connect digital components to this receiver. Digital audio coaxial cord (or standard video cord) Optical cable S-video cables (VSX-D512 only) Use S-video cables (not supplied) to insert completely. Be sure to insert completely. Be sure to insert completely. Connect from ...the AC outlet. Connecting up 03 Before making or changing the connections, switch off the power and disconnect the power cord from an S-video jack on the rear of the receiver to an S-video jack on the video component you are used )...
Owner's Manual
Page 14
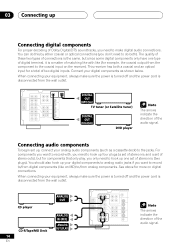
..., it is the same, but for components that only play, you want to record to make digital audio connections. CD player CD-R/Tape/MD Deck 14 En ANALOG OUT ANALOG IN (REC) ANALOG OUT (PLAY) The arrows indicate the direction of the audio signal. DIGITAL OUT (OPTICAL) TV tuner (or ... has both ). Connect your digital components as a cassette deck) to the coaxial input on digital connections. When connecting your equipment, always make sure the power is turned off and the power cord is disconnected from the component to the jacks. When connecting your equipment, always make sure the...
..., it is the same, but for components that only play, you want to record to make digital audio connections. CD player CD-R/Tape/MD Deck 14 En ANALOG OUT ANALOG IN (REC) ANALOG OUT (PLAY) The arrows indicate the direction of the audio signal. DIGITAL OUT (OPTICAL) TV tuner (or ... has both ). Connect your digital components as a cassette deck) to the coaxial input on digital connections. When connecting your equipment, always make sure the power is turned off and the power cord is disconnected from the component to the jacks. When connecting your equipment, always make sure the...
Owner's Manual
Page 15
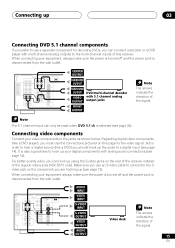
...on the component you should hook up (see page 14). When connecting your video components to use the connections pictured on this receiver. Connecting video components Connect your equipment, always make sure the power is turned off and the power cord is disconnected from the wall outlet. Regarding ...indicate the direction of the signal. Connecting up using the S-video jacks on the rear of the receiver instead of the regular video jacks (VSX-D512 only). The 5.1 channel input can connect a decoder or a DVD player with multi-channel analog outputs to the multi-channel inputs ...
...on the component you should hook up (see page 14). When connecting your video components to use the connections pictured on this receiver. Connecting video components Connect your equipment, always make sure the power is turned off and the power cord is disconnected from the wall outlet. Regarding ...indicate the direction of the signal. Connecting up using the S-video jacks on the rear of the receiver instead of the regular video jacks (VSX-D512 only). The 5.1 channel input can connect a decoder or a DVD player with multi-channel analog outputs to the multi-channel inputs ...
Owner's Manual
Page 18
...speakers. RL RL SW INPUT Be sure to complete all other connections before connecting this unit to the left to the AC power source. Front Speakers FL FR Center Speaker C Surround Speakers SL SR Use speakers with just two stereo speakers (the front ... of 8 Ω to large. 03 Connecting up Connecting the speakers A complete setup of six speakers (including the subwoofer) is best for surround sound. Powered subwoofer Speaker terminals 1 Twist around 1/2 inch of bare wire strands together. ª 2 Unclip the speaker terminal and insert the wire. 1/2 inches ·...
...speakers. RL RL SW INPUT Be sure to complete all other connections before connecting this unit to the left to the AC power source. Front Speakers FL FR Center Speaker C Surround Speakers SL SR Use speakers with just two stereo speakers (the front ... of 8 Ω to large. 03 Connecting up Connecting the speakers A complete setup of six speakers (including the subwoofer) is best for surround sound. Powered subwoofer Speaker terminals 1 Twist around 1/2 inch of bare wire strands together. ª 2 Unclip the speaker terminal and insert the wire. 1/2 inches ·...
Owner's Manual
Page 19
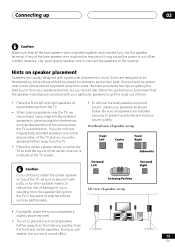
... of speaker set up Front Left Center Front Right Surround Left Subwoofer Surround Right If you should be sure to secure it may cause the power to cut off as a safety measure. Doing so can weaken the surround sound effect. 19 En Hints on placement that all speakers are usually designed...
... of speaker set up Front Left Center Front Right Surround Left Subwoofer Surround Right If you should be sure to secure it may cause the power to cut off as a safety measure. Doing so can weaken the surround sound effect. 19 En Hints on placement that all speakers are usually designed...
Owner's Manual
Page 20
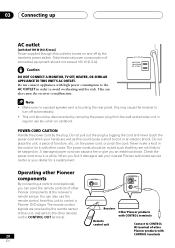
... and off automatically. • This unit should be routed such that they are not likely to control a Pioneer DVD player. Check the power cord once in order to turn off by the receiver's power switch. The remote control signals are wet as this could cause a short circuit or an electric shock. Do...the plug by the plug. Never make a knot in the cord or tie it damaged, ask your nearest Pioneer authorized service center or your hands are received by removing the power plug from the wall socket when not in regular use the remote control from this unit to be stepped on...
... and off automatically. • This unit should be routed such that they are not likely to control a Pioneer DVD player. Check the power cord once in order to turn off by the receiver's power switch. The remote control signals are wet as this could cause a short circuit or an electric shock. Do...the plug by the plug. Never make a knot in the cord or tie it damaged, ask your nearest Pioneer authorized service center or your hands are received by removing the power plug from the wall socket when not in regular use the remote control from this unit to be stepped on...
Owner's Manual
Page 22
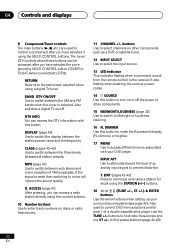
... or off . RETURN Returns to switch the display between the three banks (classes) of an analog input signal to enter track numbers on /off the power of a double cassette deck player. ACCESS (page 41) After pressing, you can access the DTV information with your surround sound system (see page 35). INPUT... can access a radio station directly using the number buttons. 10 Number buttons Use to prevent distortion. D. It also flashes when teaching the receiver preset codes. 14 SOURCE Use this button.
... or off . RETURN Returns to switch the display between the three banks (classes) of an analog input signal to enter track numbers on /off the power of a double cassette deck player. ACCESS (page 41) After pressing, you can access the DTV information with your surround sound system (see page 35). INPUT... can access a radio station directly using the number buttons. 10 Number buttons Use to prevent distortion. D. It also flashes when teaching the receiver preset codes. 14 SOURCE Use this button.
Owner's Manual
Page 25
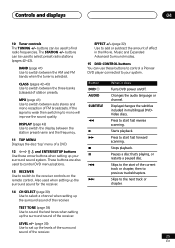
.... 13 RECEIVER Use to switch to start fast forward scanning. Skips to the next track or chapter. 14 CH SELECT (page 39) Use to sound the test tones when setting up the surround sound of a... DVD. 12 } ] ' ' and ENTER/SETUP buttons Use these buttons to control a Pioneer DVD player connected to mono will improve the sound quality. TEST TONE (page 39) Use to select a ... the receiver. Button DVD AUDIO SUBTITLE 1 3 ¡ 7 8 4 ¢ What it does Turns DVD power on the remote control. Pauses a disc that's playing, or restarts a paused disc. Press to the receiver controls...
.... 13 RECEIVER Use to switch to start fast forward scanning. Skips to the next track or chapter. 14 CH SELECT (page 39) Use to sound the test tones when setting up the surround sound of a... DVD. 12 } ] ' ' and ENTER/SETUP buttons Use these buttons to control a Pioneer DVD player connected to mono will improve the sound quality. TEST TONE (page 39) Use to select a ... the receiver. Button DVD AUDIO SUBTITLE 1 3 ¡ 7 8 4 ¢ What it does Turns DVD power on the remote control. Pauses a disc that's playing, or restarts a paused disc. Press to the receiver controls...
Owner's Manual
Page 33
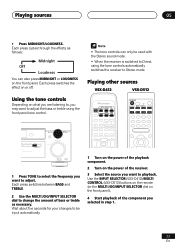
...Depending on what you are listening to, you want to playback. Each press switches the effect on the power of the component you want to Stereo mode. Use the INPUT SELECTOR (VSX-D412)/MULTI CONTROL (VSX-D512) buttons on the remote (or the MULTI JOG/INPUT SELECTOR dial on the front panel. Wait... about five seconds for your changes to change the amount of bass or treble as follows: Midnight Off Loudness You can only be input automatically. 1 Turn on the power of...
...Depending on what you are listening to, you want to playback. Each press switches the effect on the power of the component you want to Stereo mode. Use the INPUT SELECTOR (VSX-D412)/MULTI CONTROL (VSX-D512) buttons on the remote (or the MULTI JOG/INPUT SELECTOR dial on the front panel. Wait... about five seconds for your changes to change the amount of bass or treble as follows: Midnight Off Loudness You can only be input automatically. 1 Turn on the power of...
Owner's Manual
Page 35
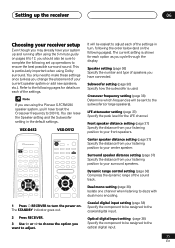
... system up operations to ensure the best possible surround sound. If you are using the Pioneer S-FCRW230 speaker system, you'll have connected. Speaker setting (page 36) Specify the ... digital input. 35 En You can leave the Speaker setting and the Subwoofer setting in turn the power on each of your surround speakers. ENTER Dual mono setting (page 38) Isolate one channel when listening... to discs with dual mono encoding. 1 Press RECEIVER to the coaxial digital input. VSX-D412 VSX-D512 It will be assigned to turn , following the order below (and on the following...
... system up operations to ensure the best possible surround sound. If you are using the Pioneer S-FCRW230 speaker system, you'll have connected. Speaker setting (page 36) Specify the ... digital input. 35 En You can leave the Speaker setting and the Subwoofer setting in turn the power on each of your surround speakers. ENTER Dual mono setting (page 38) Isolate one channel when listening... to discs with dual mono encoding. 1 Press RECEIVER to the coaxial digital input. VSX-D412 VSX-D512 It will be assigned to turn , following the order below (and on the following...
Owner's Manual
Page 43
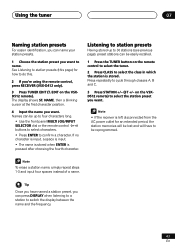
... easier identification, you can name your station presets. 1 Choose the station preset you want . • If the receiver is left disconnected from the AC power outlet for how to cycle through classes A, B and C. 3 Press STATION +/- (ST +/- Names can be reprogrammed. Press repeatedly to do this. 2...frequency. 43 En NAME, then a blinking cursor at the first character position. 4 Input the name you 're using the remote control, press RECEIVER (VSX-D412 only). 3 Press TUNER EDIT (T. To erase a station name, simply repeat steps 1-3 and input four spaces instead of a name. The display ...
... easier identification, you can name your station presets. 1 Choose the station preset you want . • If the receiver is left disconnected from the AC power outlet for how to cycle through classes A, B and C. 3 Press STATION +/- (ST +/- Names can be reprogrammed. Press repeatedly to do this. 2...frequency. 43 En NAME, then a blinking cursor at the first character position. 4 Input the name you 're using the remote control, press RECEIVER (VSX-D412 only). 3 Press TUNER EDIT (T. To erase a station name, simply repeat steps 1-3 and input four spaces instead of a name. The display ...
Owner's Manual
Page 46
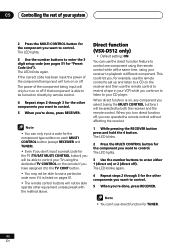
...to playback a different component. The LED blinks. 2 Press the MULTI CONTROL button for "Preset Code List"). If the correct code has been input the power of the component being input will be able to control your receiver to control. 09 Controlling the rest of your CD player. Direct function... (VSX-D512 only) • Default setting: ON You can only input a code for the component type written on each MULTI CONTROL button (except RECEIVER and ...
...to playback a different component. The LED blinks. 2 Press the MULTI CONTROL button for "Preset Code List"). If the correct code has been input the power of the component being input will be able to control your receiver to control. 09 Controlling the rest of your CD player. Direct function... (VSX-D512 only) • Default setting: ON You can only input a code for the component type written on each MULTI CONTROL button (except RECEIVER and ...
Owner's Manual
Page 53
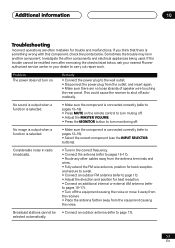
... Tune in another component. If you think that there is something wrong with this component, check the points below , ask your nearest Pioneer authorized service center or your dealer to pages 16-17). • Route any other components and electrical appliances being used. Sometimes the trouble... may lie in the correct frequency. • Connect the antenna (refer to carry out repair work. Remedy • Connect the power plug to page 17). Additional information 10 Troubleshooting Incorrect operations are no loose strands of speaker wire touching the rear panel. If the...
... Tune in another component. If you think that there is something wrong with this component, check the points below , ask your nearest Pioneer authorized service center or your dealer to pages 16-17). • Route any other components and electrical appliances being used. Sometimes the trouble... may lie in the correct frequency. • Connect the antenna (refer to carry out repair work. Remedy • Connect the power plug to page 17). Additional information 10 Troubleshooting Incorrect operations are no loose strands of speaker wire touching the rear panel. If the...
Owner's Manual
Page 54
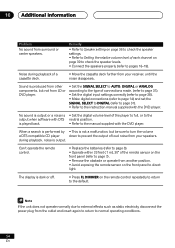
... the output when software with DTS neutral position. If the unit does not operate normally due to external effects such as static electricity disconnect the power plug from your receiver, until the noise disappears. Sound is output. during playback of loud noise from the outlet and insert again to return to... of connections made. (refer to page 31). • Set the digital input settings correctly (refer to page 38). • Make digital connections (refer to page 14) and set the SIGNAL SELECT to DIGITAL (refer to page 31). • Refer to pages 18-19).
... the output when software with DTS neutral position. If the unit does not operate normally due to external effects such as static electricity disconnect the power plug from your receiver, until the noise disappears. Sound is output. during playback of loud noise from the outlet and insert again to return to... of connections made. (refer to page 31). • Set the digital input settings correctly (refer to page 38). • Make digital connections (refer to page 14) and set the SIGNAL SELECT to DIGITAL (refer to page 31). • Refer to pages 18-19).
Owner's Manual
Page 55
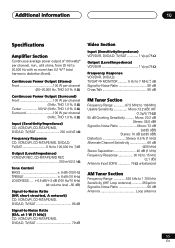
... (Stereo) Front 100 W per channel (20-20,000 Hz, THD 0.2 %, 8 Ω) Continuous Power Output (Surround) Front 100 W per channel (1kHz, THD 1.0 %, 8 Ω) Center 100 W (1kHz, THD 1.0 %, 8 Ω) Surround 100 W per channel, min., at 85 dBf) Distortion Stereo: 0.5 %... (at 8 ohms, from 20 Hz to 20,000 Hz with no more than 0.2 %** total harmonic distortion (front). Additional information 10 Specifications Amplifier Section Continuous average power output of 100 watts* per channel (1kHz, THD 1.0 %, 8 Ω) Input (Sensitivity/Impedance) CD, VCR/DVR, CD-R/TAPE/MD, DVD/LD, TV/SAT...
... (Stereo) Front 100 W per channel (20-20,000 Hz, THD 0.2 %, 8 Ω) Continuous Power Output (Surround) Front 100 W per channel (1kHz, THD 1.0 %, 8 Ω) Center 100 W (1kHz, THD 1.0 %, 8 Ω) Surround 100 W per channel, min., at 85 dBf) Distortion Stereo: 0.5 %... (at 8 ohms, from 20 Hz to 20,000 Hz with no more than 0.2 %** total harmonic distortion (front). Additional information 10 Specifications Amplifier Section Continuous average power output of 100 watts* per channel (1kHz, THD 1.0 %, 8 Ω) Input (Sensitivity/Impedance) CD, VCR/DVR, CD-R/TAPE/MD, DVD/LD, TV/SAT...
Owner's Manual
Page 56
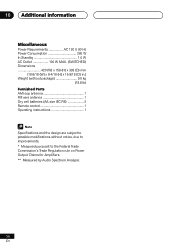
10 Additional information Miscellaneous Power Requirements AC 120 V, 60 Hz Power Consumption 260 W In Standby 1.0 W AC Outlet 100 W MAX. (SWITCHED) Dimensions 420 (W) x 158 (H) x 393 (D) mm (16-9/16 (W) x 6-4/16 (H) x 15-8/16 (D) in.) Weight (without package 9.0 kg (19.8 ... 1 Specifications and the design are subject to possible modifications without notice, due to improvements. * Measured pursuant to the Federal Trade Commission's Trade Regulation rule on Power Output Claims for Amplifiers. ** Measured by Audio Spectrum Analyzer. 56 En
10 Additional information Miscellaneous Power Requirements AC 120 V, 60 Hz Power Consumption 260 W In Standby 1.0 W AC Outlet 100 W MAX. (SWITCHED) Dimensions 420 (W) x 158 (H) x 393 (D) mm (16-9/16 (W) x 6-4/16 (H) x 15-8/16 (D) in.) Weight (without package 9.0 kg (19.8 ... 1 Specifications and the design are subject to possible modifications without notice, due to improvements. * Measured pursuant to the Federal Trade Commission's Trade Regulation rule on Power Output Claims for Amplifiers. ** Measured by Audio Spectrum Analyzer. 56 En


