Owner's Manual
Page 4
... the Home Menu 46 Manual speaker setup 46 Speaker Setting 46 X.Over 47 Channel Level 48 Speaker Distance 48 The Input Assign menu 49 Analog Input 49 Component Input (VSX-1022 only 49 The Speaker System setting (VSX-1022 only 49 The Video Parameter setting (VSX-1022 only 49 Video Converter 49 ...28 Playing back photo files stored on iPod touch, iPhone, iPad, and iTunes . . 38 About the DHCP server function 38 Authorizing this Pioneer product. Please read through these operating instructions so you start 6 Checking what's in the box 6 Installing the receiver 6 Flow of settings on...
... the Home Menu 46 Manual speaker setup 46 Speaker Setting 46 X.Over 47 Channel Level 48 Speaker Distance 48 The Input Assign menu 49 Analog Input 49 Component Input (VSX-1022 only 49 The Speaker System setting (VSX-1022 only 49 The Video Parameter setting (VSX-1022 only 49 Video Converter 49 ...28 Playing back photo files stored on iPod touch, iPhone, iPad, and iTunes . . 38 About the DHCP server function 38 Authorizing this Pioneer product. Please read through these operating instructions so you start 6 Checking what's in the box 6 Installing the receiver 6 Flow of settings on...
Owner's Manual
Page 6
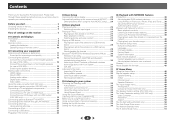
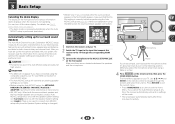
... do this. 4 The Speaker System setting (VSX-1022 only) (page 49) (Specify either using the surround back or front height speaker.) The Pre Out Setting (VSX-822 only) (page 50) (When connecting the front height speakers.) The Input Assign menu (page 49) (When using connections other than the recommended connections.) HDMI Setup (page 52) (When the...
... do this. 4 The Speaker System setting (VSX-1022 only) (page 49) (Specify either using the surround back or front height speaker.) The Pre Out Setting (VSX-822 only) (page 50) (When connecting the front height speakers.) The Input Assign menu (page 49) (When using connections other than the recommended connections.) HDMI Setup (page 52) (When the...
Owner's Manual
Page 7
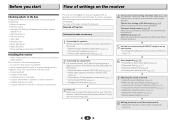
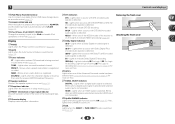
...16 5 Tuner control buttons BAND - DIMMER - The listening mode, sound volume, Speaker System (VSX-1022)/Pre Out (VSX-822) setting or input name can be checked by selecting an input source. • The Speaker System/Pre Out setting may or may not be displayed, depending on the input...between the various surround modes (page 34). 13 MCACC SETUP MIC jack Use to connect a microphone when performing Auto MCACC setup (page 23). 7 Switches the display of remote control on after the Auto MCACC setup (page 23)). 3 Receiver control buttons SPEAKERS - Chapter 1 Controls and displays Front panel 1 ...
...16 5 Tuner control buttons BAND - DIMMER - The listening mode, sound volume, Speaker System (VSX-1022)/Pre Out (VSX-822) setting or input name can be checked by selecting an input source. • The Speaker System/Pre Out setting may or may not be displayed, depending on the input...between the various surround modes (page 34). 13 MCACC SETUP MIC jack Use to connect a microphone when performing Auto MCACC setup (page 23). 7 Switches the display of remote control on after the Auto MCACC setup (page 23)). 3 Receiver control buttons SPEAKERS - Chapter 1 Controls and displays Front panel 1 ...
Owner's Manual
Page 8
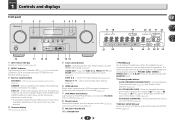
...Shows when a preset radio station is detected. 2 D+ - Lights when the character display is showing the currently received AM/FM broadcast frequency. 20 Speaker indicators Shows if the speaker system is on (page 33). 19 Tuner indicators ST - Lights when a source with DTS 96/24 encoded audio signals is detected. Lights to... Logic IIz decoding (see Using the Advanced surround on page 34 for more on this). 26 ADV.S. Removing the front cover MCACC SETUP MIC VIDEO Attaching the front cover 2 MCACC SETUP MIC VIDEO 5 V 2.1 A iPod iPhone USB iPad 1 5 V 2.1 A iPod iPhone USB iPad 8
...Shows when a preset radio station is detected. 2 D+ - Lights when the character display is showing the currently received AM/FM broadcast frequency. 20 Speaker indicators Shows if the speaker system is on (page 33). 19 Tuner indicators ST - Lights when a source with DTS 96/24 encoded audio signals is detected. Lights to... Logic IIz decoding (see Using the Advanced surround on page 34 for more on this). 26 ADV.S. Removing the front cover MCACC SETUP MIC VIDEO Attaching the front cover 2 MCACC SETUP MIC VIDEO 5 V 2.1 A iPod iPhone USB iPad 1 5 V 2.1 A iPod iPhone USB iPad 8
Owner's Manual
Page 9
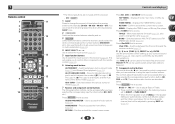
You can check the remaining sleep time at SMALL in the Speaker Setting (or automatically via the Auto MCACC setup) and the X.Over is set up your surround sound system (page 46). ALC/STANDARD SURR - ADV SURR - HOME MENU - Press RECEIVER first to access the ... the various surround modes (page 34). 7 Receiver and component control buttons The following buttons are used to DIRECT or PURE DIRECT. • When the front speaker is set at any time by pressing BASS +/- (page 47). 9 Use TUNE / can be used to find radio frequencies and PRESET /...
You can check the remaining sleep time at SMALL in the Speaker Setting (or automatically via the Auto MCACC setup) and the X.Over is set up your surround sound system (page 46). ALC/STANDARD SURR - ADV SURR - HOME MENU - Press RECEIVER first to access the ... the various surround modes (page 34). 7 Receiver and component control buttons The following buttons are used to DIRECT or PURE DIRECT. • When the front speaker is set at any time by pressing BASS +/- (page 47). 9 Use TUNE / can be used to find radio frequencies and PRESET /...
Owner's Manual
Page 11
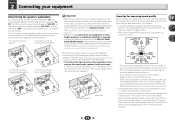
...formed by turning off the Up Mix function (see The Speaker System setting (VSX-1022 only) on the quality of speakers you 're using a center speaker, place the front speakers at 120º from the surround back speaker.) R L Speaker B Main zone Some tips for placement of the sound... your equipment Determining the speakers' application By connecting the left and right front speakers (L/R), the center speaker (C), the left and right surround speakers (SL/ SR), the left and right surround back speakers (SBL/SBR) (or the left and right speakers. 11 In this setup. • You will...
...formed by turning off the Up Mix function (see The Speaker System setting (VSX-1022 only) on the quality of speakers you 're using a center speaker, place the front speakers at 120º from the surround back speaker.) R L Speaker B Main zone Some tips for placement of the sound... your equipment Determining the speakers' application By connecting the left and right front speakers (L/R), the center speaker (C), the left and right surround speakers (SL/ SR), the left and right surround back speakers (SBL/SBR) (or the left and right speakers. 11 In this setup. • You will...
Owner's Manual
Page 12
...TV. • The subwoofer can be placed on the floor. Ideally, the other . Connecting the speakers The receiver will work with just two stereo speakers (the front speakers in the event of VSX-1022) The Speaker System setting must be positioned 60 cm to add a surround back or front height...) on page 49). • When using at least three speakers is recommended, and a complete setup is best for home theater playback. • Try not to place the surround speakers farther away from the front speakers, so the speakers could be damaged.) • After connecting, be more directly ...
...TV. • The subwoofer can be placed on the floor. Ideally, the other . Connecting the speakers The receiver will work with just two stereo speakers (the front speakers in the event of VSX-1022) The Speaker System setting must be positioned 60 cm to add a surround back or front height...) on page 49). • When using at least three speakers is recommended, and a complete setup is best for home theater playback. • Try not to place the surround speakers farther away from the front speakers, so the speakers could be damaged.) • After connecting, be more directly ...
Owner's Manual
Page 17
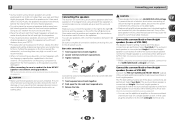
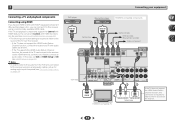
... this receiver using an analog audio cables, set ARC at HDMI Setup to ON (see HDMI Setup on page 49). DVD player Connecting your equipment Blu-ray Disc ...PRE OUT SUB WOOFER ADAPTER PORT COAXIAL ASSIGNABLE OPTICAL IN1 (TV) OPTICAL ASSIGNABLE IN 1 (CD) IN 1 (TV) VSX-1022 (OUTPUT 5 V 0.1 A MAX) VIDEO AUDIO MONITOR SAT/CBL DVD OUT IN IN ANTENNA A R FRONT L AM...IN R DVD SAT/CBL ANALOG IN 1 (CD) ASSIGNABLE FM UNBAL 75 ANALOG IN1 (CD) CAUTION: ATTENTION: SPEAKER IMPEDANCE ENCEINTE D'IMPEDANCE DE 6 -16 . 6 -16 . If the TV and playback components support the Control...
... this receiver using an analog audio cables, set ARC at HDMI Setup to ON (see HDMI Setup on page 49). DVD player Connecting your equipment Blu-ray Disc ...PRE OUT SUB WOOFER ADAPTER PORT COAXIAL ASSIGNABLE OPTICAL IN1 (TV) OPTICAL ASSIGNABLE IN 1 (CD) IN 1 (TV) VSX-1022 (OUTPUT 5 V 0.1 A MAX) VIDEO AUDIO MONITOR SAT/CBL DVD OUT IN IN ANTENNA A R FRONT L AM...IN R DVD SAT/CBL ANALOG IN 1 (CD) ASSIGNABLE FM UNBAL 75 ANALOG IN1 (CD) CAUTION: ATTENTION: SPEAKER IMPEDANCE ENCEINTE D'IMPEDANCE DE 6 -16 . 6 -16 . If the TV and playback components support the Control...
Owner's Manual
Page 19
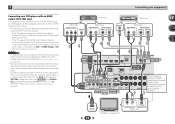
...that is connected to this case, set -up for analog audio input is no HDMI output (VSX-1022 only) This diagram shows connections of a TV (with HDMI input) and DVD player (or other...(DVD) ASSIGNABLE Y PB PR COMPONENT VIDEO DVD SAT/CBL ANALOG IN 1 (CD) ASSIGNABLE FM UNBAL 75 CAUTION: ATTENTION: SPEAKER IMPEDANCE ENCEINTE D'IMPEDANCE DE 6 -16 . 6 -16 . In order to listen to the audio from the TV that is...can be input to the receiver via the HDMI terminal, so there is required (see HDMI Setup on page 52). Connecting your DVD player with no need to connect an audio cable. ...
...that is connected to this case, set -up for analog audio input is no HDMI output (VSX-1022 only) This diagram shows connections of a TV (with HDMI input) and DVD player (or other...(DVD) ASSIGNABLE Y PB PR COMPONENT VIDEO DVD SAT/CBL ANALOG IN 1 (CD) ASSIGNABLE FM UNBAL 75 CAUTION: ATTENTION: SPEAKER IMPEDANCE ENCEINTE D'IMPEDANCE DE 6 -16 . 6 -16 . In order to listen to the audio from the TV that is...can be input to the receiver via the HDMI terminal, so there is required (see HDMI Setup on page 52). Connecting your DVD player with no need to connect an audio cable. ...
Owner's Manual
Page 20
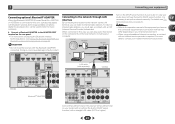
...DVD SAT/CBL ANALOG IN 1 (CD) ASSIGNABLE FM UNBAL 75 AUDIO Class 2 Wiring VSX-822 SPEAKERS Bluetooth® ADAPTER Connecting to the ADAPTER PORT terminal on the rear panel. •...Network Setup menu on the local network, including your router. Internet Modem Router WAN LAN PC 1 to LAN port 2 3 LAN cable (sold separately) IN LAN (10/100) VSX-822...). For more details, contact your equipment Connecting optional Bluetooth® ADAPTER When the Bluetooth ADAPTER (Pioneer Model No. Turn on your Internet environment. • When using a broadband Internet connection, a...
...DVD SAT/CBL ANALOG IN 1 (CD) ASSIGNABLE FM UNBAL 75 AUDIO Class 2 Wiring VSX-822 SPEAKERS Bluetooth® ADAPTER Connecting to the ADAPTER PORT terminal on the rear panel. •...Network Setup menu on the local network, including your router. Internet Modem Router WAN LAN PC 1 to LAN port 2 3 LAN cable (sold separately) IN LAN (10/100) VSX-822...). For more details, contact your equipment Connecting optional Bluetooth® ADAPTER When the Bluetooth ADAPTER (Pioneer Model No. Turn on your Internet environment. • When using a broadband Internet connection, a...
Owner's Manual
Page 22
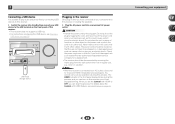
... power cord or pinch the cord in the cord or tie it with HDMI feature, see HDMI Setup on . A damaged power cord can turn on vacation. Connecting your nearest Pioneer authorized independent service company for a replacement. • The receiver should be disconnected by removing the ...iPod iPhone USB iPad MASTER VOLUME USB mass storage device Plugging in the receiver Only plug in regular use, e.g., when on this receiver, including the speakers. Plug the AC power cord into standby then connect your USB device to OFF, you an electric shock. The HDMI indicator in a ...
... power cord or pinch the cord in the cord or tie it with HDMI feature, see HDMI Setup on . A damaged power cord can turn on vacation. Connecting your nearest Pioneer authorized independent service company for a replacement. • The receiver should be disconnected by removing the ...iPod iPhone USB iPad MASTER VOLUME USB mass storage device Plugging in the receiver Only plug in regular use, e.g., when on this receiver, including the speakers. Plug the AC power cord into standby then connect your USB device to OFF, you an electric shock. The HDMI indicator in a ...
Owner's Manual
Page 23
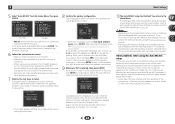
... the Auto MCACC setup, the NETRADIO, PANDORA, M.SERVER, FAVORITE, iPod/USB or ADAPTER input should not be made. • The screensaver automatically starts after three minutes of your TV. Make sure there are no settings will be selected as an input source. • VSX-1022 only: When both... channel delay and channel level. The Home Menu appears on your listening area, taking into account ambient noise, speaker size and distance, and tests for Auto MCACC setup. • The Auto MCACC setup will not appear if you 've made....
... the Auto MCACC setup, the NETRADIO, PANDORA, M.SERVER, FAVORITE, iPod/USB or ADAPTER input should not be made. • The screensaver automatically starts after three minutes of your TV. Make sure there are no settings will be selected as an input source. • VSX-1022 only: When both... channel delay and channel level. The Home Menu appears on your listening area, taking into account ambient noise, speaker size and distance, and tests for Auto MCACC setup. • The Auto MCACC setup will not appear if you 've made....
Owner's Manual
Page 24
... Power Down 8 . When you have. 1 . You return to change the setting. This setting should reflect the actual speakers you 're finished, go to MCACC SETUP MIC jack. Input Assign 4 . Speaker System 5 . FL Demo Mode Home Menu 1 . Network Standby 8 . The system outputs a series of test tones ...inches) will start automatically as possible while this is also possible to be as quiet as shown. 1 . HDMI Setup 7 . Input Assign 4 . HDMI Setup 6 . FL Demo Mode VSX-1022 VSX-822 • Mic In! Try to be as quiet as possible while it is happening. Auto MCACC Check! It...
... Power Down 8 . When you have. 1 . You return to change the setting. This setting should reflect the actual speakers you 're finished, go to MCACC SETUP MIC jack. Input Assign 4 . Speaker System 5 . FL Demo Mode Home Menu 1 . Network Standby 8 . The system outputs a series of test tones ...inches) will start automatically as possible while this is also possible to be as quiet as shown. 1 . HDMI Setup 7 . Input Assign 4 . HDMI Setup 6 . FL Demo Mode VSX-1022 VSX-822 • Mic In! Try to be as quiet as possible while it is happening. Auto MCACC Check! It...
Owner's Manual
Page 25
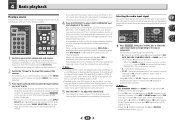
... back speaker, 2D+PLIIx is displayed when playing Dolby Digital 5.1-channel signals, and DTS+NEO:6 is selected for O1. When the HDMI option in the default listening mode. Selects the digital input. It cannot be selected for each input source. However, if the ARC at HDMI Setup is... remote control, then press the appropriate button to operate other inputs, H cannot be applied whenever you select the input source using a surround back speaker, 2D is automatically selected. The coaxial 1 input is selected for C1, and the optical 1 audio input is displayed when playing DTS 5.1channel ...
... back speaker, 2D+PLIIx is displayed when playing Dolby Digital 5.1-channel signals, and DTS+NEO:6 is selected for O1. When the HDMI option in the default listening mode. Selects the digital input. It cannot be selected for each input source. However, if the ARC at HDMI Setup is... remote control, then press the appropriate button to operate other inputs, H cannot be applied whenever you select the input source using a surround back speaker, 2D is automatically selected. The coaxial 1 input is selected for C1, and the optical 1 audio input is displayed when playing DTS 5.1channel ...

Owner's Manual
Page 33
However, the options available will depend on your speaker setup and the type of source you will hear the source through just the front left and right speakers (and possibly your subwoofer depending on your speaker settings). Dolby Digital and DTS multichannel sources are connected / -: Whether connected... MUSICb DOLBY DIGITAL EX DTS-ES DTS NEO:6 DOLBY PLIIz HEIGHT Straight Decodee STEREOf See above . - - Surround back speaker(s) Front height speakers 33 With this section may not be selected and shows in the display. The following modes provide basic surround sound for ...
However, the options available will depend on your speaker setup and the type of source you will hear the source through just the front left and right speakers (and possibly your subwoofer depending on your speaker settings). Dolby Digital and DTS multichannel sources are connected / -: Whether connected... MUSICb DOLBY DIGITAL EX DTS-ES DTS NEO:6 DOLBY PLIIz HEIGHT Straight Decodee STEREOf See above . - - Surround back speaker(s) Front height speakers 33 With this section may not be selected and shows in the display. The following modes provide basic surround sound for ...
Owner's Manual
Page 34
...Suitable for musical sources. Note • The Sound Retriever is bypassed. You can also adjust the C.IMG effect (see The Speaker System setting (VSX-1022 only) on the front panel lights when Acoustic Calibration EQ is set to 2-channel sources. You can also adjust the H....EXT.STEREO Gives multichannel sound to hear the truest possible reproduction of channels in the Manual SP Setup (speaker setting, channel level, speaker distance), as well as with lots of VSX-1022: Cannot be selected when the Pre Out is heard with your system b. When listening through headphones...
...Suitable for musical sources. Note • The Sound Retriever is bypassed. You can also adjust the C.IMG effect (see The Speaker System setting (VSX-1022 only) on the front panel lights when Acoustic Calibration EQ is set to 2-channel sources. You can also adjust the H....EXT.STEREO Gives multichannel sound to hear the truest possible reproduction of channels in the Manual SP Setup (speaker setting, channel level, speaker distance), as well as with lots of VSX-1022: Cannot be selected when the Pre Out is heard with your system b. When listening through headphones...
Owner's Manual
Page 46
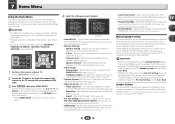
... is selected. 1 Switch on page 50). • HDMI Setup - Use and ENTER on the Pre Out Setting, there will not appear if you have connected using the speaker terminals (page 49). • Video Parameter (VSX-1022 only) - Speaker System 5 . Auto MCACC 2 . Input Assign 4 . Network Standby 8 . FL Demo Mode VSX-1022 VSX-822 • Auto MCACC - Analog Input - Specifies...
... is selected. 1 Switch on page 50). • HDMI Setup - Use and ENTER on the Pre Out Setting, there will not appear if you have connected using the speaker terminals (page 49). • Video Parameter (VSX-1022 only) - Speaker System 5 . Auto MCACC 2 . Input Assign 4 . Network Standby 8 . FL Demo Mode VSX-1022 VSX-822 • Auto MCACC - Analog Input - Specifies...
Owner's Manual
Page 47
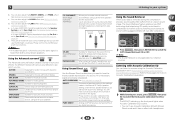
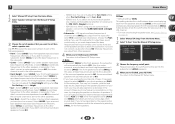
... setting when Pre Out Setting is sent to the other speakers). • Surr. VSX-1022 only: When using only one surround back speaker only, make sure that would normally come out the front and center speakers are output from the subwoofer when YES is set to ...If you want to the SURROUND BACK L (Single) terminals. • Subwoofer - Depending on page 46. 1 Select 'Manual SP Setup' from the Home Menu. 2 Select 'X.Over' from other speakers or subwoofer. X.Over c . Channel Level d . X.Over Frequency 100Hz Return Return 3 Choose the frequency cutoff point. Select LARGE...
... setting when Pre Out Setting is sent to the other speakers). • Surr. VSX-1022 only: When using only one surround back speaker only, make sure that would normally come out the front and center speakers are output from the subwoofer when YES is set to ...If you want to the SURROUND BACK L (Single) terminals. • Subwoofer - Depending on page 46. 1 Select 'Manual SP Setup' from the Home Menu. 2 Select 'X.Over' from other speakers or subwoofer. X.Over c . Channel Level d . X.Over Frequency 100Hz Return Return 3 Choose the frequency cutoff point. Select LARGE...
Owner's Manual
Page 48
... your system, you 're finished, press RETURN. Channel Level Front L Center Front R Surround R Surr. Speaker Distance For good sound depth and separation from your speakers from speaker to the Manual SP Setup menu. Speaker Setting b . Manual SP Setup a . You return to switch speakers. CAUTION • The test tones used in the Channel Level settings are using ...
... your system, you 're finished, press RETURN. Channel Level Front L Center Front R Surround R Surr. Speaker Distance For good sound depth and separation from your speakers from speaker to the Manual SP Setup menu. Speaker Setting b . Manual SP Setup a . You return to switch speakers. CAUTION • The test tones used in the Channel Level settings are using ...
Owner's Manual
Page 49
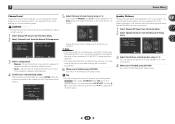
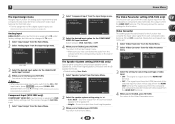
... Parameter menu. 49 You return to the HDMI OUT terminal. • OFF - Component Input 3a . Component Input 3b . The Speaker System setting (VSX-1022 only) Specify either using Surr. Manual SP Setup 3 . The Video Parameter setting (VSX-1022 only) This receiver can not be set. 1 Select 'Video Parameter' from the Home Menu. 2 Select 'Video Converter' from...
... Parameter menu. 49 You return to the HDMI OUT terminal. • OFF - Component Input 3a . Component Input 3b . The Speaker System setting (VSX-1022 only) Specify either using Surr. Manual SP Setup 3 . The Video Parameter setting (VSX-1022 only) This receiver can not be set. 1 Select 'Video Parameter' from the Home Menu. 2 Select 'Video Converter' from...


