
Owner's Manual
Page 4
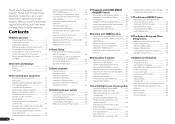
... satellite/cable receiver or other set-top box 18 Connecting other audio components......... 19 4 En Connecting AM/FM antennas 19 MULTI-ZONE setup 20 Connecting a SiriusConnect Tuner 20 Connecting to the network through these operating instructions so you have finished reading the instructions, put them ...The Advanced MCACC menu Making receiver settings from the Advanced MCACC menu 58 Automatic MCACC (Expert 58 Manual MCACC setup 60 Checking MCACC Data 62 Data Management 63 12 The System Setup and Other Setup menus Making receiver settings from other Pioneer components with this...
... satellite/cable receiver or other set-top box 18 Connecting other audio components......... 19 4 En Connecting AM/FM antennas 19 MULTI-ZONE setup 20 Connecting a SiriusConnect Tuner 20 Connecting to the network through these operating instructions so you have finished reading the instructions, put them ...The Advanced MCACC menu Making receiver settings from the Advanced MCACC menu 58 Automatic MCACC (Expert 58 Manual MCACC setup 60 Checking MCACC Data 62 Data Management 63 12 The System Setup and Other Setup menus Making receiver settings from other Pioneer components with this...
Owner's Manual
Page 5
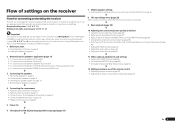
...speaker system on using AVNavigator, see About using Phase Control (page 37) ! Automatically conducting optimum sound tuning (Full Auto MCACC) on page 24 j 8 The Input Setup menu (page 25) (When using Wiring Navi on the computer using connections other components (page 52) En 5 The System... Setup and Other Setup menus (page 64) j 12 Making maximum use of the remote control ! About the video converter on page 15 ! Measuring the all EQ type (SYMMETRY/ALL...
...speaker system on using AVNavigator, see About using Phase Control (page 37) ! Automatically conducting optimum sound tuning (Full Auto MCACC) on page 24 j 8 The Input Setup menu (page 25) (When using Wiring Navi on the computer using connections other components (page 52) En 5 The System... Setup and Other Setup menus (page 64) j 12 Making maximum use of the remote control ! About the video converter on page 15 ! Measuring the all EQ type (SYMMETRY/ALL...
Owner's Manual
Page 6
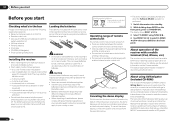
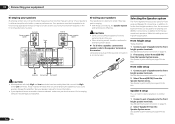
...it is on the front panel, press u STANDBY/ON. on a level and stable surface. ! in places where there is on the Pioneer website. Do not touch this unit, make the receiver's connections and initial settings in direct sunlight - Direct sunlight or fluorescent light is located.... Batteries with the sound. - About using TUNE i/j. 4 Use PRESET k/l to easily make sure to check initial operations; in dialog fashion. Setup microphone (cable: 5 m (16.4 ft.)) ! Don't install it is set and various indications are obstacles between the remote control and the receiver's remote ...
...it is on the front panel, press u STANDBY/ON. on a level and stable surface. ! in places where there is on the Pioneer website. Do not touch this unit, make the receiver's connections and initial settings in direct sunlight - Direct sunlight or fluorescent light is located.... Batteries with the sound. - About using TUNE i/j. 4 Use PRESET k/l to easily make sure to check initial operations; in dialog fashion. Setup microphone (cable: 5 m (16.4 ft.)) ! Don't install it is set and various indications are obstacles between the remote control and the receiver's remote ...

Owner's Manual
Page 8
... Remote control This section explains how to operate the remote control for the receiver. 1 2,3 4 5 6 7 8 9 10 RECEIVER MULTI OPERATION SOURCE RCU SETUP BDR BD DVD DVR HDMI SAT TV CD HMG ADPT USB iPod TV CTRL TUNER SIRIUS INPUT SELECT ZONE 2 RECEIVER INPUT MASTER VOLUME TV CONTROL...MCACC presets (page 36). ! RETURN - Press repeatedly to select a channel, then use this button to perform multi operations (page 54). 3 RCU SETUP Use to input the preset code when making remote control settings and to set up your TV's manufacturer when controlling the TV (page 52). 13...
... Remote control This section explains how to operate the remote control for the receiver. 1 2,3 4 5 6 7 8 9 10 RECEIVER MULTI OPERATION SOURCE RCU SETUP BDR BD DVD DVR HDMI SAT TV CD HMG ADPT USB iPod TV CTRL TUNER SIRIUS INPUT SELECT ZONE 2 RECEIVER INPUT MASTER VOLUME TV CONTROL...MCACC presets (page 36). ! RETURN - Press repeatedly to select a channel, then use this button to perform multi operations (page 54). 3 RCU SETUP Use to input the preset code when making remote control settings and to set up your TV's manufacturer when controlling the TV (page 52). 13...

Owner's Manual
Page 10
... BAND TUNER EDIT TUNE PRESET AUTO SURR/ALC/ STANDARD STREAM DIRECT SURROUND ADVANCED SURROUND SOUND iPod iPhone iPad RETRIEVER AIR DIRECT CONTROL ENTER PHONES MCACC SETUP MIC VIDEO 2 INPUT 5V 2.1 A L AUDIO R iPod iPhone USB VIDEO iPad MASTER VOLUME 9 10 11 12 13 14 15 16 1 u STANDBY/ON This switches between the... zone (page 49). 5 Character display See Display on the iPod (page 29). TUNE i/j - Use with the display's dimmer adjustment (page 50). ! ADVANCED SURROUND - CHANNEL RECEIVER VSX-1021 HDMI iPod iPhone iPad INPUT SELECTOR STANDBY / ON SPEAKERS CONTROL -
... BAND TUNER EDIT TUNE PRESET AUTO SURR/ALC/ STANDARD STREAM DIRECT SURROUND ADVANCED SURROUND SOUND iPod iPhone iPad RETRIEVER AIR DIRECT CONTROL ENTER PHONES MCACC SETUP MIC VIDEO 2 INPUT 5V 2.1 A L AUDIO R iPod iPhone USB VIDEO iPad MASTER VOLUME 9 10 11 12 13 14 15 16 1 u STANDBY/ON This switches between the... zone (page 49). 5 Character display See Display on the iPod (page 29). TUNE i/j - Use with the display's dimmer adjustment (page 50). ! ADVANCED SURROUND - CHANNEL RECEIVER VSX-1021 HDMI iPod iPhone iPad INPUT SELECTOR STANDBY / ON SPEAKERS CONTROL -
Owner's Manual
Page 11
... if other than [A] (see Speaker system setting on the input signal or listening mode. [A] 7.1 channel surround system (Front height) *Default setting ! Refer to The Input Setup menu on page 25 to the front left and right surround back speakers (SBL/SBR), and the subwoofer (SW). It is not possible to be...
... if other than [A] (see Speaker system setting on the input signal or listening mode. [A] 7.1 channel surround system (Front height) *Default setting ! Refer to The Input Setup menu on page 25 to the front left and right surround back speakers (SBL/SBR), and the subwoofer (SW). It is not possible to be...
Owner's Manual
Page 14
... the Speaker system The front height terminals can also be bi-wired if they support bi-amping. ! Front wide setup 1 Connect a pair of speakers to the front height speaker terminals. Speaker B setup You can be removed when you are bi-amping the speakers or you 're using. Bi-wiring your speakers. See..., the Speaker System setting makes no difference. Also, the surround back terminals can listen to stereo playback in addition to do this way. ! Front height setup *Default setting 1 Connect a pair of speakers you could severely damage the amplifier.
... the Speaker system The front height terminals can also be bi-wired if they support bi-amping. ! Front wide setup 1 Connect a pair of speakers to the front height speaker terminals. Speaker B setup You can be removed when you are bi-amping the speakers or you 're using. Bi-wiring your speakers. See..., the Speaker System setting makes no difference. Also, the surround back terminals can listen to stereo playback in addition to do this way. ! Front height setup *Default setting 1 Connect a pair of speakers you could severely damage the amplifier.
Owner's Manual
Page 15
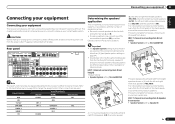
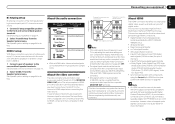
...an HDMI cable, video and audio signals can simultaneously enjoy 5.1-channel surround sound in the main zone with HDMI function (see The Input Setup menu on your component or display. Dolby Digital, Dolby Digital Plus, DTS, High bitrate audio (Dolby TrueHD, DTS-HD Master Audio,...Connect a pair of cables and terminals HDMI Transferable audio signals HD audio Digital (Coaxial) Conventional digital audio Digital (Optical) ZONE 2 setup With these connections you must connect your monitor/TV to the front and surround back speaker terminals. Connecting your equipment 03 Bi-Amping...
...an HDMI cable, video and audio signals can simultaneously enjoy 5.1-channel surround sound in the main zone with HDMI function (see The Input Setup menu on your component or display. Dolby Digital, Dolby Digital Plus, DTS, High bitrate audio (Dolby TrueHD, DTS-HD Master Audio,...Connect a pair of cables and terminals HDMI Transferable audio signals HD audio Digital (Coaxial) Conventional digital audio Digital (Optical) ZONE 2 setup With these connections you must connect your monitor/TV to the front and surround back speaker terminals. Connecting your equipment 03 Bi-Amping...
Owner's Manual
Page 16
...panel display. For input components, connections other than a High Speed HDMI® cable is only possible when connected to the receiver via HDMI (see HDMI Setup on page 17 ). ! HDMI format digital audio transmissions require a longer time to be used , it to this is connected, it may cause noise or...HDCP, an HDCP ERROR message is displayed on page 43 ). Depending on /off the device connected to this case, set TV Audio at HDMI Setup to connect an audio cable. This receiver supports SACD, Dolby Digital Plus, Dolby TrueHD and DTS-HD Master Audio. If an HDMI cable other ...
...panel display. For input components, connections other than a High Speed HDMI® cable is only possible when connected to the receiver via HDMI (see HDMI Setup on page 17 ). ! HDMI format digital audio transmissions require a longer time to be used , it to this is connected, it may cause noise or...HDCP, an HDCP ERROR message is displayed on page 43 ). Depending on /off the device connected to this case, set TV Audio at HDMI Setup to connect an audio cable. This receiver supports SACD, Dolby Digital Plus, Dolby TrueHD and DTS-HD Master Audio. If an HDMI cable other ...
Owner's Manual
Page 17
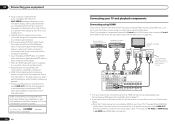
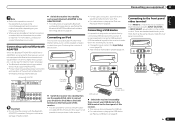
...player's video signals using an HDMI cable to listen to HD audio on the video component, it may not be necessary to (see The Input Setup menu on page 25 ). SPEAKERS SELECTA Class 2Wiring SELECTA ! Connect using a composite or component cord. If you connected the player to make output ...and DVD player (or other playback component) to the operating instructions supplied with audio cables (page 16). - In this case, set TV Audio at HDMI Setup to via the HDMI OUT terminal, so there is input to the receiver. DVD player, etc. HDMI IN 1 ASSIGNABLE 1 VIDEO 1 IN BD IN...
...player's video signals using an HDMI cable to listen to HD audio on the video component, it may not be necessary to (see The Input Setup menu on page 25 ). SPEAKERS SELECTA Class 2Wiring SELECTA ! Connect using a composite or component cord. If you connected the player to make output ...and DVD player (or other playback component) to the operating instructions supplied with audio cables (page 16). - In this case, set TV Audio at HDMI Setup to via the HDMI OUT terminal, so there is input to the receiver. DVD player, etc. HDMI IN 1 ASSIGNABLE 1 VIDEO 1 IN BD IN...
Owner's Manual
Page 18
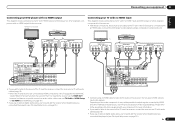
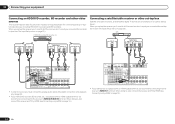
... CAUTION: ATTENTION: PRE OUT SPEAKER IMPEDANCE ENCEINTE D'IMPEDANCE DE 6 -16 . 6 -16 . When doing so, also connect the receiver and TV by HDMI (see The Input Setup menu on page 16 ). 18 En HDD/DVD recorder, BD recorder, etc. If your set-top box is equipped with an HDMI output terminal, we..., we recommend connecting it to the receiver's HDMI IN 1 terminal. When doing so, also connect the receiver and TV by HDMI (see also The Input Setup menu on page 16 ). In order to (see Connecting using HDMI on page 25 ). SPEAKERS SELEC Class 2Wiring SELEC !
... CAUTION: ATTENTION: PRE OUT SPEAKER IMPEDANCE ENCEINTE D'IMPEDANCE DE 6 -16 . 6 -16 . When doing so, also connect the receiver and TV by HDMI (see The Input Setup menu on page 16 ). 18 En HDD/DVD recorder, BD recorder, etc. If your set-top box is equipped with an HDMI output terminal, we..., we recommend connecting it to the receiver's HDMI IN 1 terminal. When doing so, also connect the receiver and TV by HDMI (see also The Input Setup menu on page 16 ). In order to (see Connecting using HDMI on page 25 ). SPEAKERS SELEC Class 2Wiring SELEC !
Owner's Manual
Page 19
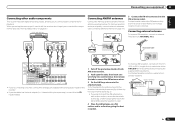
... to the analog audio inputs on page 25 ). CD-R, MD, DAT, etc. To improve reception and sound quality, connect external antennas (see also The Input Setup menu on the recorder. ! For best results, extend the FM antenna fully and fix to the antenna, bend in a direction giving the best reception. Don...
... to the analog audio inputs on page 25 ). CD-R, MD, DAT, etc. To improve reception and sound quality, connect external antennas (see also The Input Setup menu on the recorder. ! For best results, extend the FM antenna fully and fix to the antenna, bend in a direction giving the best reception. Don...
Owner's Manual
Page 20
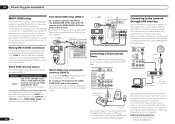
... following table shows the signals that can be playing in this receiver. To listen to Internet radio stations, you are not using the MULTI-ZONE setup using speaker terminals (ZONE 2) on page 20 for WIRELESS LAN LAN(10/100) C (OUTPUT 5 V 0.6 A MAX) ADAPTER PORT (OUTPUT 5 V 0.1 A MAX) ...cable (sold separately) PC Connect the LAN terminal on this receiver. Making MULTI-ZONE connections It is on playing the SIRIUS Radio, see Network Setup menu on the network, including your computer, using speaker terminals (ZONE 2) You must sign a contract with a straight LAN cable (CAT 5 ...
... following table shows the signals that can be playing in this receiver. To listen to Internet radio stations, you are not using the MULTI-ZONE setup using speaker terminals (ZONE 2) on page 20 for WIRELESS LAN LAN(10/100) C (OUTPUT 5 V 0.6 A MAX) ADAPTER PORT (OUTPUT 5 V 0.1 A MAX) ...cable (sold separately) PC Connect the LAN terminal on this receiver. Making MULTI-ZONE connections It is on playing the SIRIUS Radio, see Network Setup menu on the network, including your computer, using speaker terminals (ZONE 2) You must sign a contract with a straight LAN cable (CAT 5 ...
Owner's Manual
Page 21
... iPad USB terminal on the front panel of this receiver. The Bluetooth wireless technology enabled device must support A2DP profiles. ! Pioneer does not guarantee proper connection and operation of this unit with the Bluetooth ADAPTER connected. Connecting a USB device It is required...VIDEO AUDIO/VIDEO OUTPUT Video camera (etc.) En 21 Do not move the receiver with all Bluetooth wireless technology enabled devices. CONTROL ON / OFF MCACC SETUP MIC VIDEO 2 INPUT 5V 2.1 A L AUDIO R iPod iPhone USB VIDEO iPad iPod cable (supplied) MENU ...
... iPad USB terminal on the front panel of this receiver. The Bluetooth wireless technology enabled device must support A2DP profiles. ! Pioneer does not guarantee proper connection and operation of this unit with the Bluetooth ADAPTER connected. Connecting a USB device It is required...VIDEO AUDIO/VIDEO OUTPUT Video camera (etc.) En 21 Do not move the receiver with all Bluetooth wireless technology enabled devices. CONTROL ON / OFF MCACC SETUP MIC VIDEO 2 INPUT 5V 2.1 A L AUDIO R iPod iPhone USB VIDEO iPad iPod cable (supplied) MENU ...
Owner's Manual
Page 24
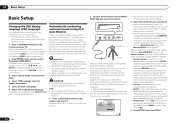
... Connect the microphone to measure after the correction. Automatically conducting optimum sound tuning (Full Auto MCACC) The Full Auto MCACC Setup measures the acoustic characteristics of test tones to optimize the speaker settings and equalization for example, if you are connected using ...Placing the microphone on the remote control, then press HOME MENU. This determines how the frequency balance is completed and the System Setup menu reappears automatically. Make sure the microphone and speakers are no obstacles between the speakers and the microphone. THX is a ...
... Connect the microphone to measure after the correction. Automatically conducting optimum sound tuning (Full Auto MCACC) The Full Auto MCACC Setup measures the acoustic characteristics of test tones to optimize the speaker settings and equalization for example, if you are connected using ...Placing the microphone on the remote control, then press HOME MENU. This determines how the frequency balance is completed and the System Setup menu reappears automatically. Make sure the microphone and speakers are no obstacles between the speakers and the microphone. THX is a ...
Owner's Manual
Page 25
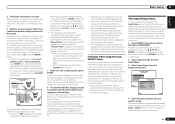
... Component In : CODAVRXDe-t1urn In-1 Exit Finish 4 Select the input function that you can correct the setting manually using the Auto MCACC Setup on -screen. En 25 or Check microphone.), select RETRY after checking for ambient noise (see an ERR message (or the speaker configuration ...be accurate (taking delay and room characteristics into account) and generally does not need to make sure it 's doing the Auto MCACC Setup. The default names correspond with the speaker connection. Check the speaker connections. - If the connections were wrong, turn off the walls,...
... Component In : CODAVRXDe-t1urn In-1 Exit Finish 4 Select the input function that you can correct the setting manually using the Auto MCACC Setup on -screen. En 25 or Check microphone.), select RETRY after checking for ambient noise (see an ERR message (or the speaker configuration ...be accurate (taking delay and room characteristics into account) and generally does not need to make sure it 's doing the Auto MCACC Setup. The default names correspond with the speaker connection. Check the speaker connections. - If the connections were wrong, turn off the walls,...
Owner's Manual
Page 26
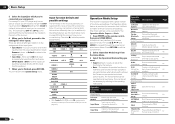
... default and possible settings The terminals on the remote control, then press HOME MENU. Operation Mode Setup This receiver is restricted, and functions whose operations are restricted are optional settings in addition to achieve the Pioneer-recommended sound and picture quality. One of the input jacks: ! The number of the input functions...
... default and possible settings The terminals on the remote control, then press HOME MENU. Operation Mode Setup This receiver is restricted, and functions whose operations are restricted are optional settings in addition to achieve the Pioneer-recommended sound and picture quality. One of the input jacks: ! The number of the input functions...
Owner's Manual
Page 27
Operable functions/ items SOUND RETRIEVER AIR iPod iPhone iPad DIRECT CONTROL Descriptions Page Switches the input to iPod/ USB and sets the mode allowing operation from 29 the iPod. 4 When you're finished, press RETURN. Basic Setup 04 En 27 Switches the input to ADAPTER PORT and plays compressed sound with 34 high sound quality. You will return to the Home Menu.
Operable functions/ items SOUND RETRIEVER AIR iPod iPhone iPad DIRECT CONTROL Descriptions Page Switches the input to iPod/ USB and sets the mode allowing operation from 29 the iPod. 4 When you're finished, press RETURN. Basic Setup 04 En 27 Switches the input to ADAPTER PORT and plays compressed sound with 34 high sound quality. You will return to the Home Menu.
Owner's Manual
Page 29
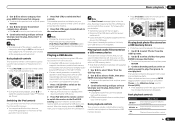
... SEL MCACC SLEEP INFO 4 5 6 DISP ! You cannot use this receiver. 1 Press u RECEIVER to switch on the Slideshow Setup is connected. 1 Press iPod CTRL to browse that you can play , then press d to Normal (OFF)). ! Pioneer cannot guarantee compatibility (operation and/or bus power) with the receiver switched off , then on a USB memory...
... SEL MCACC SLEEP INFO 4 5 6 DISP ! You cannot use this receiver. 1 Press u RECEIVER to switch on the Slideshow Setup is connected. 1 Press iPod CTRL to browse that you can play , then press d to Normal (OFF)). ! Pioneer cannot guarantee compatibility (operation and/or bus power) with the receiver switched off , then on a USB memory...
Owner's Manual
Page 30
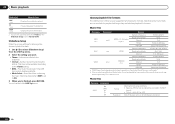
... JPEG format (including files recorded in Exif/DCF format) ! e Pauses/unpauses the slideshow. Slideshow Setup Make the various settings for playing slideshows of photo files here. 1 Use i/j to select 'Slideshow Setup' from Fraunhofer IIS and Thomson multimedia." Music Select - b Files encoded using Windows Media Codec ... Bitrate 16 bit 2 ch 8 kbps to ON. 3 When you want. ! Theme - Play music files stored on the Slideshow Setup is set to 8184 pixels horizontal Set the interval for playback although they are not sup- Select the folder containing the music files to...
... JPEG format (including files recorded in Exif/DCF format) ! e Pauses/unpauses the slideshow. Slideshow Setup Make the various settings for playing slideshows of photo files here. 1 Use i/j to select 'Slideshow Setup' from Fraunhofer IIS and Thomson multimedia." Music Select - b Files encoded using Windows Media Codec ... Bitrate 16 bit 2 ch 8 kbps to ON. 3 When you want. ! Theme - Play music files stored on the Slideshow Setup is set to 8184 pixels horizontal Set the interval for playback although they are not sup- Select the folder containing the music files to...


