
Operating Instructions
Page 1
Operating Instructions Downloaded from www.Manualslib.com manuals search engine A9 SX-A9-J Stereo Receiver Register your product at: www.pioneerelectronics.com (US) www.pioneerelectronics.ca (Canada) • Protect your new investment The details of your purchase will be on ...file for reference in the event of an insurance claim such as loss or theft. • Receive free tips, updates and service bulletins on your new product • Improve product development Your input helps us continue to design products that meet your...
Operating Instructions Downloaded from www.Manualslib.com manuals search engine A9 SX-A9-J Stereo Receiver Register your product at: www.pioneerelectronics.com (US) www.pioneerelectronics.ca (Canada) • Protect your new investment The details of your purchase will be on ...file for reference in the event of an insurance claim such as loss or theft. • Receive free tips, updates and service bulletins on your new product • Improve product development Your input helps us continue to design products that meet your...

Operating Instructions
Page 2
... Canadian ICES-003. Disposal of the FCC Rules. NO USER-SERVICEABLE PARTS INSIDE. D1-4-2-3_En IMPORTANT NOTICE - Reorient or relocate the receiving antenna. - D1-4-2-1_En WARNING: Handling the cord on proposition 65 known to the State of important operating and maintenance (servicing) instructions...SERIAL NUMBER FOR THIS EQUIPMENT IS LOCATED IN THE REAR. THIS IS FOR YOUR SECURITY. Increase the separation between the equipment and receiver. - D8-10-2_En This Class B digital apparatus complies with the product will not occur in the literature accompanying the appliance. ...
... Canadian ICES-003. Disposal of the FCC Rules. NO USER-SERVICEABLE PARTS INSIDE. D1-4-2-3_En IMPORTANT NOTICE - Reorient or relocate the receiving antenna. - D1-4-2-1_En WARNING: Handling the cord on proposition 65 known to the State of important operating and maintenance (servicing) instructions...SERIAL NUMBER FOR THIS EQUIPMENT IS LOCATED IN THE REAR. THIS IS FOR YOUR SECURITY. Increase the separation between the equipment and receiver. - D8-10-2_En This Class B digital apparatus complies with the product will not occur in the literature accompanying the appliance. ...
Operating Instructions
Page 5
... 20 Using the USB interface 21 Connecting an additional amplifier 22 Connecting an IR receiver 23 Operating other Pioneer components with this Pioneer product. After you start Features 6 What's in the box 6 Inserting the battery 7 Installing the receiver 7 02 Connecting up Making cable connections 8 Connecting audio components 8 Connecting antennas ... 27 Downloaded from www.Manualslib.com manuals search engine Thank you will know how to operate your XM Radio receiver 19 Listening to station presets 17 06 Other connections Using XM Radio 19 Connecting your model properly.
... 20 Using the USB interface 21 Connecting an additional amplifier 22 Connecting an IR receiver 23 Operating other Pioneer components with this Pioneer product. After you start Features 6 What's in the box 6 Inserting the battery 7 Installing the receiver 7 02 Connecting up Making cable connections 8 Connecting audio components 8 Connecting antennas ... 27 Downloaded from www.Manualslib.com manuals search engine Thank you will know how to operate your XM Radio receiver 19 Listening to station presets 17 06 Other connections Using XM Radio 19 Connecting your model properly.
Operating Instructions
Page 6
..., toriodal transformers and low impedence parallel main capacitors characteristicly used in professional audio monitoring. • Twin-mono symmetrical construction This receiver offers a new advancement in stereo imaging with the completely independent construction of left/right power amplification units and twin transformers. •...wider sound stage. • USB interface The USB interface allows you to listen to twochannel audio from a PC connected to this receiver. • XM Radio ready The XM Radio terminal on this service. • Fine-tuned to world-class standards With the ...
..., toriodal transformers and low impedence parallel main capacitors characteristicly used in professional audio monitoring. • Twin-mono symmetrical construction This receiver offers a new advancement in stereo imaging with the completely independent construction of left/right power amplification units and twin transformers. •...wider sound stage. • USB interface The USB interface allows you to listen to twochannel audio from a PC connected to this receiver. • XM Radio ready The XM Radio terminal on this service. • Fine-tuned to world-class standards With the ...

Operating Instructions
Page 7
... place it on the following : • There is danger of used battery cells immediately after replacement. Make sure the side of batteries. Installing the receiver • When installing this unit is facing up when you notice a decrease in the operating range, replace the battery in the space provided. in extremely...
... place it on the following : • There is danger of used battery cells immediately after replacement. Make sure the side of batteries. Installing the receiver • When installing this unit is facing up when you notice a decrease in the operating range, replace the battery in the space provided. in extremely...

Operating Instructions
Page 8
... IN IN IR CONTROL OUT IN OUT SIGNAL GND L L 12V PRE TRIGGER OUT REC PLAY OUT IN TAPE AUX1 AUX2 R R MM/MC CD PHONO This receiver L 2 R IN OUT REC PLAY AUDIO IN/OUT 1 OUT R L AUDIO OUT 8 En Downloaded from the AC outlet. Connecting audio components The number and kind ...of connections depends on this unit may cause a humming noise from the speakers. Use a stereo RCA phono cable as shown in this receiver. Follow the steps below to the CD inputs on the kind of this unit (as shown. CD player, etc. 1 Connect the analog audio ...
... IN IN IR CONTROL OUT IN OUT SIGNAL GND L L 12V PRE TRIGGER OUT REC PLAY OUT IN TAPE AUX1 AUX2 R R MM/MC CD PHONO This receiver L 2 R IN OUT REC PLAY AUDIO IN/OUT 1 OUT R L AUDIO OUT 8 En Downloaded from the AC outlet. Connecting audio components The number and kind ...of connections depends on this unit may cause a humming noise from the speakers. Use a stereo RCA phono cable as shown in this receiver. Follow the steps below to the CD inputs on the kind of this unit (as shown. CD player, etc. 1 Connect the analog audio ...

Operating Instructions
Page 9
... indicated by the arrow then clip the loop onto the stand (fig. fig. a). • If you to the TAPE inputs (IN) on this receiver. To improve reception and sound quality, connect external antennas (see Using external antennas below . To fix the stand to the stand. Connecting up 02 ... and other surface, secure the stand with screws (fig. Then connect the audio inputs on the tape deck to the TAPE outputs (OUT) on this receiver. b 3 FM UNBAL 75 AM LOOP ANTENNA 5 4 1 2 1 Pull off the protective shields of your turntable has a grounding wire, secure it to the AUX ...
... indicated by the arrow then clip the loop onto the stand (fig. fig. a). • If you to the TAPE inputs (IN) on this receiver. To improve reception and sound quality, connect external antennas (see Using external antennas below . To fix the stand to the stand. Connecting up 02 ... and other surface, secure the stand with screws (fig. Then connect the audio inputs on the tape deck to the TAPE outputs (OUT) on this receiver. b 3 FM UNBAL 75 AM LOOP ANTENNA 5 4 1 2 1 Pull off the protective shields of your turntable has a grounding wire, secure it to the AUX ...

Operating Instructions
Page 10
... source. Outdoor antenna FM UNBAL 75 5 m to connect an external FM antenna. to 6 m (15 ft. Also make sure the positive and negative (+/-) terminals on the receiver match those on a flat surface and in a direction giving the best reception. 5 Connect the FM wire antenna in the same way. You can use speakers...
... source. Outdoor antenna FM UNBAL 75 5 m to connect an external FM antenna. to 6 m (15 ft. Also make sure the positive and negative (+/-) terminals on the receiver match those on a flat surface and in a direction giving the best reception. 5 Connect the FM wire antenna in the same way. You can use speakers...

Operating Instructions
Page 11
... to complete all connections before touching any uninsulated parts. • Make sure no exposed speaker wire is touching the rear panel, this may cause the receiver to the manual that came with your speakers. fig. To prevent the risk of electric shock when connecting or disconnecting the speaker cables, disconnect the... is firmly clamped (fig. Once the wire is in position, tighten the terminal until there is enough space to connect the other end of the receiver, then plug into a power outlet. 11 En Downloaded from www.Manualslib.com manuals search engine
... to complete all connections before touching any uninsulated parts. • Make sure no exposed speaker wire is touching the rear panel, this may cause the receiver to the manual that came with your speakers. fig. To prevent the risk of electric shock when connecting or disconnecting the speaker cables, disconnect the... is firmly clamped (fig. Once the wire is in position, tighten the terminal until there is enough space to connect the other end of the receiver, then plug into a power outlet. 11 En Downloaded from www.Manualslib.com manuals search engine
Operating Instructions
Page 12
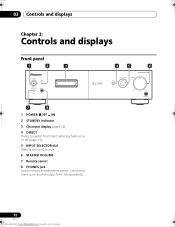
03 Controls and displays Chapter 3: Controls and displays Front panel 1 2 3 POWER STANDBY OFF ON PHONES 4 5 6 DIRECT INPUT SELECTOR STEREO RECEIVER A9 VOLUME MIN MAX 7 8 1 POWER OFF ON 2 STANDBY indicator 3 Character display (page 14) 4 DIRECT Press to switch the Direct listening feature on or off (page 15). 5 INPUT SELECTOR dial Selects an input source. 6 MASTER VOLUME 7 Remote sensor 8 PHONES jack Use to connect headphones (when connected, there is no sound output from the speakers). 12 En Downloaded from www.Manualslib.com manuals search engine
03 Controls and displays Chapter 3: Controls and displays Front panel 1 2 3 POWER STANDBY OFF ON PHONES 4 5 6 DIRECT INPUT SELECTOR STEREO RECEIVER A9 VOLUME MIN MAX 7 8 1 POWER OFF ON 2 STANDBY indicator 3 Character display (page 14) 4 DIRECT Press to switch the Direct listening feature on or off (page 15). 5 INPUT SELECTOR dial Selects an input source. 6 MASTER VOLUME 7 Remote sensor 8 PHONES jack Use to connect headphones (when connected, there is no sound output from the speakers). 12 En Downloaded from www.Manualslib.com manuals search engine

Operating Instructions
Page 13
.../BAL L / 12 AUX2 R / 3 XM DIRECT VOL 4 5 6 MUTE 7 DISPLAY BAND ST 8 TUNE ENTER TUNE 90 CATEGORY D.ACCESS MPX ST T.EDIT RETURN CLASS STEREO RECEIVER 7 8 9 10 11 1 Switches the receiver between stereo and mono reception of FM broadcasts (page 17). RETURN (XM Radio only) - Switches between standby and on /off ). 8 DIRECT Press to...
.../BAL L / 12 AUX2 R / 3 XM DIRECT VOL 4 5 6 MUTE 7 DISPLAY BAND ST 8 TUNE ENTER TUNE 90 CATEGORY D.ACCESS MPX ST T.EDIT RETURN CLASS STEREO RECEIVER 7 8 9 10 11 1 Switches the receiver between stereo and mono reception of FM broadcasts (page 17). RETURN (XM Radio only) - Switches between standby and on /off ). 8 DIRECT Press to...

Operating Instructions
Page 14
...each other equipment located close to select mono mode. 2 Tone control indicators TREBLE - KHz - Lights when a stereo FM broadcast is being received. AM - 03 Controls and displays • Remote controllers for other . Lights when an FM frequency is displayed. 1 2 34 TUNED ...STEREO MONO XM FM AM TREBLE BASS dB MHz KHz 56 7 8 1 Tuner Indicators TUNED - Lights when AM broadcasts are received. 7 Character display Displays various system information. 8 MHz - Lights when an AM frequency is displayed. Lights when low-range tone adjustment is applied....
...each other equipment located close to select mono mode. 2 Tone control indicators TREBLE - KHz - Lights when a stereo FM broadcast is being received. AM - 03 Controls and displays • Remote controllers for other . Lights when an FM frequency is displayed. 1 2 34 TUNED ...STEREO MONO XM FM AM TREBLE BASS dB MHz KHz 56 7 8 1 Tuner Indicators TUNED - Lights when AM broadcasts are received. 7 Character display Displays various system information. 8 MHz - Lights when an AM frequency is displayed. Lights when low-range tone adjustment is applied....

Operating Instructions
Page 15
...; BAL - Adjust the amount of bass from -10 to +10. • TRE - Use the input select buttons (or INPUT SELECTOR dial). 4 Start playback of the receiver. 3 Select the source you want to indicate the Sound Retriever is bypassed, and you're left with the pure sound source. • While listening to...
...; BAL - Adjust the amount of bass from -10 to +10. • TRE - Use the input select buttons (or INPUT SELECTOR dial). 4 Start playback of the receiver. 3 Select the source you want to indicate the Sound Retriever is bypassed, and you're left with the pure sound source. • While listening to...

Operating Instructions
Page 16
... playback of the source component. Insert a blank tape, MD, etc. into the recording device and set up the turntable, etc. 3 Prepare the recorder. Note 1 The receiver's volume, balance and tone controls have no effect on the recorded signal. 16 En Downloaded from any audio source connected to the... receiver. 1 Select the source you want to record. 04 Listening to your system Making an audio recording You can make an audio recording from www.Manualslib....
... playback of the source component. Insert a blank tape, MD, etc. into the recording device and set up the turntable, etc. 3 Prepare the recorder. Note 1 The receiver's volume, balance and tone controls have no effect on the recorded signal. 16 En Downloaded from any audio source connected to the... receiver. 1 Select the source you want to record. 04 Listening to your system Making an audio recording You can make an audio recording from www.Manualslib....
Operating Instructions
Page 17
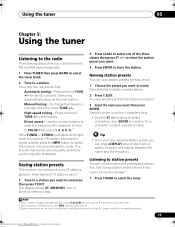
...this already.3 1 Press TUNER to select the tuner. Tip • Once you have some presets stored to do this . Manual tuning - Saving station presets This receiver can press DISPLAY when listening to a station to switch the display between the name and the frequency. The display shows ST. to select the station...input, a space is weak, press the MPX button to four characters long. • Use the ST +/- Naming station presets You can be lost if the receiver is also stored. 3 Station memories will need to have named a station preset, you can memorize up to switch the...
...this already.3 1 Press TUNER to select the tuner. Tip • Once you have some presets stored to do this . Manual tuning - Saving station presets This receiver can press DISPLAY when listening to a station to switch the display between the name and the frequency. The display shows ST. to select the station...input, a space is weak, press the MPX button to four characters long. • Use the ST +/- Naming station presets You can be lost if the receiver is also stored. 3 Station memories will need to have named a station preset, you can memorize up to switch the...

Operating Instructions
Page 19
...antenna AC IN L SPEAKER 1 Connect an XM Radio Connect-and-Play™ antenna to the XM Radio jack on the rear of this receiver to use this receiver. Other connections 06 Chapter 6: Other connections Using XM Radio XM is the leading provider of satellite radio in the display for about 1 ...categories using the front panel display. Only available in the 48 contiguous United States. 2 After unplugging the receiver, LOADING shows in the United States. Visit www.xmradio.com for XM radio receivers by genre You can browse XM Radio channels in the order that they appear, or you can narrow...
...antenna AC IN L SPEAKER 1 Connect an XM Radio Connect-and-Play™ antenna to the XM Radio jack on the rear of this receiver to use this receiver. Other connections 06 Chapter 6: Other connections Using XM Radio XM is the leading provider of satellite radio in the display for about 1 ...categories using the front panel display. Only available in the 48 contiguous United States. 2 After unplugging the receiver, LOADING shows in the United States. Visit www.xmradio.com for XM radio receivers by genre You can browse XM Radio channels in the order that they appear, or you can narrow...

Operating Instructions
Page 20
... buttons to select a preset. • The default for all presets is stored. After pressing ENTER, the preset class and number stop blinking and the receiver stores the XM channel. Note 1 Select CH000 (RADIO ID) from the front panel display to memorize. Press repeatedly to cycle through classes A, B and...channel preset you want to check the Radio ID of XM Satellite Radio Inc. ©2005 XM Satellite Radio Inc. Saving channel presets This receiver can press DISPLAY to change XM Radio information in the front panel display. 1 Press CLASS to select the class in three banks, or ...
... buttons to select a preset. • The default for all presets is stored. After pressing ENTER, the preset class and number stop blinking and the receiver stores the XM channel. Note 1 Select CH000 (RADIO ID) from the front panel display to memorize. Press repeatedly to cycle through classes A, B and...channel preset you want to check the Radio ID of XM Satellite Radio Inc. ©2005 XM Satellite Radio Inc. Saving channel presets This receiver can press DISPLAY to change XM Radio information in the front panel display. 1 Press CLASS to select the class in three banks, or ...
Operating Instructions
Page 21
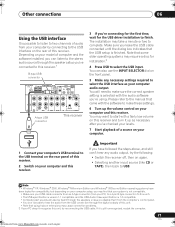
...interface as necessary after you 're using hubs or extensions may cause connection problems. 2 If your PC) to a 4-pin B-type connector (to this receiver. Note that some older operating systems may take a minute or two to complete. Note 1 • Windows® XP, Windows® 2000, Windows&#...from your computer audio output. If it up the volume control on your computer and this unit, try the following: • Switch the receiver off, then on your computer and this unit). • The USB specification is version 1.1 compatible, and the USB Audio Class specification is...
...interface as necessary after you 're using hubs or extensions may cause connection problems. 2 If your PC) to a 4-pin B-type connector (to this receiver. Note that some older operating systems may take a minute or two to complete. Note 1 • Windows® XP, Windows® 2000, Windows&#...from your computer audio output. If it up the volume control on your computer and this unit, try the following: • Switch the receiver off, then on your computer and this unit). • The USB specification is version 1.1 compatible, and the USB Audio Class specification is...

Operating Instructions
Page 22
...shown below to add an amplifier to power your computer during playback. • Pioneer is not responsible for any other possible computer problems due to this configuration. Connecting an additional amplifier This receiver has more than enough power for computer system damage, software crashes or failures, ...CONTROL OUT IN OUT SIGNAL GND L L 12V PRE TRIGGER OUT REC PLAY OUT IN TAPE AUX1 AUX2 R R MM/MC CD PHONO This receiver Stereo amplifier INPUT R L ANALOG 22 En Downloaded from the AC outlet. 06 Other connections Caution • Make sure you don't switch off...
...shown below to add an amplifier to power your computer during playback. • Pioneer is not responsible for any other possible computer problems due to this configuration. Connecting an additional amplifier This receiver has more than enough power for computer system damage, software crashes or failures, ...CONTROL OUT IN OUT SIGNAL GND L L 12V PRE TRIGGER OUT REC PLAY OUT IN TAPE AUX1 AUX2 R R MM/MC CD PHONO This receiver Stereo amplifier INPUT R L ANALOG 22 En Downloaded from the AC outlet. 06 Other connections Caution • Make sure you don't switch off...
Operating Instructions
Page 23
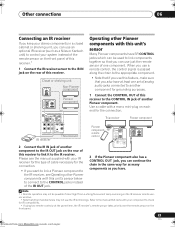
... a cable with this unit's sensor Many Pioneer components have SR CONTROL jacks which can use this receiver to link it to the IR receiver. USB XM AUDIO IN IN IR CONTROL OUT IN OUT This receiver Pioneer component SIGNAL GND R R AUX1 AUX2 IR receiver L MM/MC CD L PHONO This receiver Pioneer component remote control IR CONTROL OUT OUT...
... a cable with this unit's sensor Many Pioneer components have SR CONTROL jacks which can use this receiver to link it to the IR receiver. USB XM AUDIO IN IN IR CONTROL OUT IN OUT This receiver Pioneer component SIGNAL GND R R AUX1 AUX2 IR receiver L MM/MC CD L PHONO This receiver Pioneer component remote control IR CONTROL OUT OUT...


