
Owner's Manual
Page 3
... D3-4-2-1-7c_A_En D8-10-3a_En IMPORTANT NOTICE - No operation can be determined by turning the equipment off and on, the user is off all power from the AC...into the power outlet. Product Name: Plasma Display System Model Number: PRO-150FD/PRO-110FD Product Category: Class B Personal Computers & Peripherals Responsible Party Name: PIONEER ELECTRONICS SERVICE, INC. These limits ...are used in a particular installation. Consult the dealer or an experienced radio/TV technician for the unit, you ...
... D3-4-2-1-7c_A_En D8-10-3a_En IMPORTANT NOTICE - No operation can be determined by turning the equipment off and on, the user is off all power from the AC...into the power outlet. Product Name: Plasma Display System Model Number: PRO-150FD/PRO-110FD Product Category: Class B Personal Computers & Peripherals Responsible Party Name: PIONEER ELECTRONICS SERVICE, INC. These limits ...are used in a particular installation. Consult the dealer or an experienced radio/TV technician for the unit, you ...

Owner's Manual
Page 4
...05 Preparation 17 Installing the plasma display 17 Moving the plasma display 17 Attaching the Pioneer stand 17 Installing the Pioneer speaker 19 Preventing the plasma display from that shown in a safe place for buying this manual are for skipping unwanted channels 42 Setting up TV channels 42 Using Auto ...the unit is the same. However the method of the remote control unit 31 06 Basic Operations 32 Turning on the power 32 Turning off the power 32 Watching TV channels 33 Selecting the antenna 33 Changing channels 33 Changing the volume and sound .........34 Changing the ...
...05 Preparation 17 Installing the plasma display 17 Moving the plasma display 17 Attaching the Pioneer stand 17 Installing the Pioneer speaker 19 Preventing the plasma display from that shown in a safe place for buying this manual are for skipping unwanted channels 42 Setting up TV channels 42 Using Auto ...the unit is the same. However the method of the remote control unit 31 06 Basic Operations 32 Turning on the power 32 Turning off the power 32 Watching TV channels 33 Selecting the antenna 33 Changing channels 33 Changing the volume and sound .........34 Changing the ...
Owner's Manual
Page 9
...increased efficiency. If you enjoy watching images displayed in copyright infringement. If the same image is automatically changed imperceptibly when watching plasma display. Minimizing damage from PC or TV game equipment, and/or fixed images such as time of a worry. The use one minute, after -image lag ... entire screen with very high peak luminance are displayed. Note • When a program menu, TV Guide screen or frozen image is displayed for 5 to 10 minutes, the system automatically turns the image off to "Mode 1" is less of day indicator or channel logo display). Do ...
...increased efficiency. If you enjoy watching images displayed in copyright infringement. If the same image is automatically changed imperceptibly when watching plasma display. Minimizing damage from PC or TV game equipment, and/or fixed images such as time of a worry. The use one minute, after -image lag ... entire screen with very high peak luminance are displayed. Note • When a program menu, TV Guide screen or frozen image is displayed for 5 to 10 minutes, the system automatically turns the image off to "Mode 1" is less of day indicator or channel logo display). Do ...
Owner's Manual
Page 14
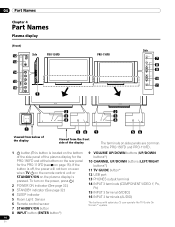
... (COMPONENT VIDEO: Y, PB, PR) 15 INPUT 3 terminal (VIDEO) 16 INPUT 3 terminals (AUDIO) The buttons with asterisks (*) can operate the TV Guide On Screen™ system. 14 En 04 Part Names Chapter 4 Part Names Plasma display (Front) 12 13 Side PRO-150FD 14 15 16 1 PRO-110FD Side 7 8 9 10 11 2 2 3 3 4 4 1 56 1 56 ...-150FD and at the bottom on the rear panel for the PRO-110FD (see 1 on page 15). To turn on even when TV a on the remote control unit or STANDBY/ON on the plasma display is located on the bottom of the side panel of the display The terminals on side panels are...
... (COMPONENT VIDEO: Y, PB, PR) 15 INPUT 3 terminal (VIDEO) 16 INPUT 3 terminals (AUDIO) The buttons with asterisks (*) can operate the TV Guide On Screen™ system. 14 En 04 Part Names Chapter 4 Part Names Plasma display (Front) 12 13 Side PRO-150FD 14 15 16 1 PRO-110FD Side 7 8 9 10 11 2 2 3 3 4 4 1 56 1 56 ...-150FD and at the bottom on the rear panel for the PRO-110FD (see 1 on page 15). To turn on even when TV a on the remote control unit or STANDBY/ON on the plasma display is located on the bottom of the side panel of the display The terminals on side panels are...
Owner's Manual
Page 16
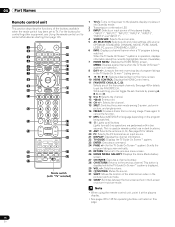
...6 22 7 23 8 24 9 25 10 26 11 12 13 27 28 14 29 30 15 31 16 32 17 Mode switch (with "TV" selected) 1 TV a: Turns on the power to cancel the function. 17 MTS: Selects MTS/SAP or language depending on the menu screen. 10 HDMI CONTROL: Displays the HDMI... by pressing A, B, C and D. 12 0 to the previous channel. For the buttons for details to TV. Press again to the plasma display or places it at the plasma display. • See pages 98 to the next or previous day of the plasma display. ("INPUT 1", "INPUT 2", "INPUT 3", "INPUT 4", "INPUT 5", "INPUT 6" and "INPUT ...
...6 22 7 23 8 24 9 25 10 26 11 12 13 27 28 14 29 30 15 31 16 32 17 Mode switch (with "TV" selected) 1 TV a: Turns on the power to cancel the function. 17 MTS: Selects MTS/SAP or language depending on the menu screen. 10 HDMI CONTROL: Displays the HDMI... by pressing A, B, C and D. 12 0 to the previous channel. For the buttons for details to TV. Press again to the plasma display or places it at the plasma display. • See pages 98 to the next or previous day of the plasma display. ("INPUT 1", "INPUT 2", "INPUT 3", "INPUT 4", "INPUT 5", "INPUT 6" and "INPUT ...
Owner's Manual
Page 17
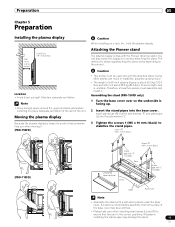
... and back parts when installing to stabilize the stand pipes. Assembling the stand (PRO-150FD only) 1 Turn the base cover over so the underside is facing up. 2 Insert the stand pipes into the side marked...ensure that they are in instability, possibly causing injury. • The weight of a 60 inch plasma display is about 55.5 kg (122.4 lbs.) and a 50 inch about 38.8 ... surface of the unit. You can also install the display on a rack, etc., hold the plasma display. Attaching the Pioneer stand The plasma display comes with a soft sheet placed under the base cover. Screws ➀ (M5 x 10...
... and back parts when installing to stabilize the stand pipes. Assembling the stand (PRO-150FD only) 1 Turn the base cover over so the underside is facing up. 2 Insert the stand pipes into the side marked...ensure that they are in instability, possibly causing injury. • The weight of a 60 inch plasma display is about 55.5 kg (122.4 lbs.) and a 50 inch about 38.8 ... surface of the unit. You can also install the display on a rack, etc., hold the plasma display. Attaching the Pioneer stand The plasma display comes with a soft sheet placed under the base cover. Screws ➀ (M5 x 10...

Owner's Manual
Page 19
...than the stand insertion slots. Doing so might damage the plasma display panel or its ports or result in warping of the stand into the plasma display so that an arrow with anything other than the plasma display. Installing the Pioneer speaker Insert the stand into any screws other than those ... Be extremely careful not to insert the support columns of the stand. Doing so may result in damage or fire. • Be sure to turn the connected devices off from the speaker. If this happens, distance the monitor from the main unit and fall over. • When installing the ...
...than the stand insertion slots. Doing so might damage the plasma display panel or its ports or result in warping of the stand into the plasma display so that an arrow with anything other than the plasma display. Installing the Pioneer speaker Insert the stand into any screws other than those ... Be extremely careful not to insert the support columns of the stand. Doing so may result in damage or fire. • Be sure to turn the connected devices off from the speaker. If this happens, distance the monitor from the main unit and fall over. • When installing the ...

Owner's Manual
Page 22
... noise. • If there is , cable (Gray) to terminals (Red) and cable (Black) to the polarity of the plasma display speaker terminals, that is a short in interrupted operation or malfunction. • Incorrect connections of the speaker cable to the polarity of the speaker terminals... of the cable. • When you release the lever, it clamps onto the speaker cable.· Caution Lever • Be sure to turn the connected devices off and remove the power cord from the wall outlet beforehand when changing the connection or installation method. • If you...
... noise. • If there is , cable (Gray) to terminals (Red) and cable (Black) to the polarity of the plasma display speaker terminals, that is a short in interrupted operation or malfunction. • Incorrect connections of the speaker cable to the polarity of the speaker terminals... of the cable. • When you release the lever, it clamps onto the speaker cable.· Caution Lever • Be sure to turn the connected devices off and remove the power cord from the wall outlet beforehand when changing the connection or installation method. • If you...

Owner's Manual
Page 25
...connections. Preparation 05 speaker cables Connecting the speaker cables to the terminals by an exposed lead wire, excessive load may be applied to the plasma display, resulting in sound dropouts or noise. • If there is touching the speaker terminal, you may result in insufficient stereo sound... the end of the speaker terminals, that is, cable (Gray) to terminals (Red) and cable (Black) to turn the connected devices off and remove the power cord from the wall outlet beforehand when changing the connection or installation method. • If you release...
...connections. Preparation 05 speaker cables Connecting the speaker cables to the terminals by an exposed lead wire, excessive load may be applied to the plasma display, resulting in sound dropouts or noise. • If there is touching the speaker terminal, you may result in insufficient stereo sound... the end of the speaker terminals, that is, cable (Gray) to terminals (Red) and cable (Black) to turn the connected devices off and remove the power cord from the wall outlet beforehand when changing the connection or installation method. • If you release...
Owner's Manual
Page 30
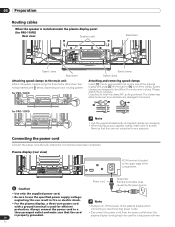
...• Use only the supplied power cord. • Be sure to a three-pronged outlet and make sure to bundle them carefully. Note • Always turn off the power of the plasma display when connecting or disconnecting power cords. • Disconnect the power cord from the power outlet when the... Speaker cable Bead band Speed clamp Bead band Attaching speed clamps to the main unit Attach the speed clamps using the three holes (60 inches: four holes) marked with a ground terminal is used for efficient protection. 05 Preparation Routing cables When the speaker is installed under the...
...• Use only the supplied power cord. • Be sure to a three-pronged outlet and make sure to bundle them carefully. Note • Always turn off the power of the plasma display when connecting or disconnecting power cords. • Disconnect the power cord from the power outlet when the... Speaker cable Bead band Speed clamp Bead band Attaching speed clamps to the main unit Attach the speed clamps using the three holes (60 inches: four holes) marked with a ground terminal is used for efficient protection. 05 Preparation Routing cables When the speaker is installed under the...
Owner's Manual
Page 32
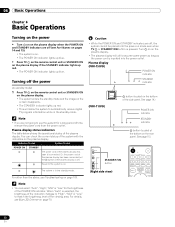
...the power (to standby mode) 1 Press TV a on the remote control unit or STANDBY/ON on the plasma display. • The system enters the standby mode and the image on the screen disappears. • The STANDBY indicator lights up blue. Turn a on on the rear panel. See page... 14.) POWER ON indicator STANDBY indicator a button (located at the bottom on the plasma display. • The plasma display will allow the system to automatically receive digital TV program information while in the standby mode....
...the power (to standby mode) 1 Press TV a on the remote control unit or STANDBY/ON on the plasma display. • The system enters the standby mode and the image on the screen disappears. • The STANDBY indicator lights up blue. Turn a on on the rear panel. See page... 14.) POWER ON indicator STANDBY indicator a button (located at the bottom on the plasma display. • The plasma display will allow the system to automatically receive digital TV program information while in the standby mode....
Owner's Manual
Page 50
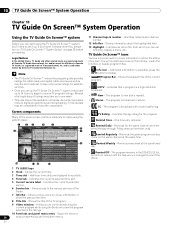
...Shows the current time. 3 Time slot - Indicates the currently selected time slot. 5 Current service label - Note • The TV Guide On Screen™ interactive program guide provides listings for the program. • Remind Once - Indicates an active file, from which... (manual reminder only). • Remind Regularly - Screen components Many of the TV program. 9 Video window - Additional information is broadcast with closed captioning. • TV Rating - En If you haven't already done this, please turn to make using the system easier. 1 23 4 5 6 9 7 11...
...Shows the current time. 3 Time slot - Indicates the currently selected time slot. 5 Current service label - Note • The TV Guide On Screen™ interactive program guide provides listings for the program. • Remind Once - Indicates an active file, from which... (manual reminder only). • Remind Regularly - Screen components Many of the TV program. 9 Video window - Additional information is broadcast with closed captioning. • TV Rating - En If you haven't already done this, please turn to make using the system easier. 1 23 4 5 6 9 7 11...

Owner's Manual
Page 60
... MENU. 2 Select "Picture" ( / then ENTER). 3 Select an item to be adjusted, by pressing / . 5 Press HOME MENU to exit the menu. 60 En A confirmation screen appears. This may experience a sudden change in the image position and screen brightness when you open the "Picture" menu. • When an... adjustment screen is displayed, you can also change as OPTIMUM, Room Light Sensor and Intelligent Mode, are temporarily turned off when the "Picture" menu is displayed. Press / to select "Yes", and then press ENTER. • Some functions, such as you open...
... MENU. 2 Select "Picture" ( / then ENTER). 3 Select an item to be adjusted, by pressing / . 5 Press HOME MENU to exit the menu. 60 En A confirmation screen appears. This may experience a sudden change in the image position and screen brightness when you open the "Picture" menu. • When an... adjustment screen is displayed, you can also change as OPTIMUM, Room Light Sensor and Intelligent Mode, are temporarily turned off when the "Picture" menu is displayed. Press / to select "Yes", and then press ENTER. • Some functions, such as you open...

Owner's Manual
Page 76
... then operate the connected equipment by sending commands from its remote control unit to the remote control sensor on the plasma display. This function is turned off when making connections. • Complete all component connections before making control cord connections with one or more information... came with mini plugs (no resistance). About SR+ The CONTROL OUT terminal on the connected equipment do not accept commands from other Pioneer equipment having the logo. Plasma display 4 5 Rear view a CONTROL IN OUT b CONTROL IN OUT c CONTROL IN OUT When SR+ is not used (a): ...
... then operate the connected equipment by sending commands from its remote control unit to the remote control sensor on the plasma display. This function is turned off when making connections. • Complete all component connections before making control cord connections with one or more information... came with mini plugs (no resistance). About SR+ The CONTROL OUT terminal on the connected equipment do not accept commands from other Pioneer equipment having the logo. Plasma display 4 5 Rear view a CONTROL IN OUT b CONTROL IN OUT c CONTROL IN OUT When SR+ is not used (a): ...
Owner's Manual
Page 77
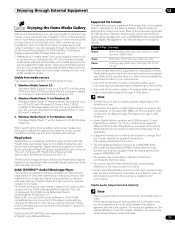
... table, some setting changes of use on one or more information. Visit the Pioneer website for Network Devices Version 1.21. This unit complies with PlaysForSure Requirements Specification...a marketing certification given by Microsoft. When a PC running on the menu screen turn white. Try muting the speakers on the conditions of software or other countries. After...Windows Media Connect 2.0 vary. Content can navigate through the digital content on the plasma display. Enjoying through External Equipment 12 Supported file formats The table below shows supported...
... table, some setting changes of use on one or more information. Visit the Pioneer website for Network Devices Version 1.21. This unit complies with PlaysForSure Requirements Specification...a marketing certification given by Microsoft. When a PC running on the menu screen turn white. Try muting the speakers on the conditions of software or other countries. After...Windows Media Connect 2.0 vary. Content can navigate through the digital content on the plasma display. Enjoying through External Equipment 12 Supported file formats The table below shows supported...

Owner's Manual
Page 78
... 3 Select "Network Setup" ( / then ENTER). 4 Select "Automatically acquire IP" ( / / / then ENTER). • The screen turns from the bottom of the plasma display Straight-through the panel's menu. Note • For information on memory cards by connecting a USB device to enter "Default Gateway" and "... "OK" ( / then ENTER). • The "Reset" dialog appears on screen with hub function) Viewed from "Select" mode to the plasma display using a twisted ("cross-over Cable Media Server 1 Confirming the IP Address After making the network connection, follow the instructions below . 4 ...
... 3 Select "Network Setup" ( / then ENTER). 4 Select "Automatically acquire IP" ( / / / then ENTER). • The screen turns from the bottom of the plasma display Straight-through the panel's menu. Note • For information on memory cards by connecting a USB device to enter "Default Gateway" and "... "OK" ( / then ENTER). • The "Reset" dialog appears on screen with hub function) Viewed from "Select" mode to the plasma display using a twisted ("cross-over Cable Media Server 1 Confirming the IP Address After making the network connection, follow the instructions below . 4 ...
Owner's Manual
Page 89
... (such as 192.168.201.***) Enter the same figures as used in the "Single Server/USB" box after the entry is complete. • The screen turns to setup selection mode. • Repeat steps 2 to 4 to complete the necessary setup. 6 Select "OK" ( / / / then ENTER). • A restart dialog ... Select "Automatically acquire IP" then press ENTER. 2 Select "No" ( / then ENTER). 3 Select the setup item's box ( / / / then ENTER). • The screen turns to entry mode for "IP Address" and "Subnet mask". • No need to enter "Default Gateway" and "DNS Server". 4 Enter the figures using buttons 0 to...
... (such as 192.168.201.***) Enter the same figures as used in the "Single Server/USB" box after the entry is complete. • The screen turns to setup selection mode. • Repeat steps 2 to 4 to complete the necessary setup. 6 Select "OK" ( / / / then ENTER). • A restart dialog ... Select "Automatically acquire IP" then press ENTER. 2 Select "No" ( / then ENTER). 3 Select the setup item's box ( / / / then ENTER). • The screen turns to entry mode for "IP Address" and "Subnet mask". • No need to enter "Default Gateway" and "DNS Server". 4 Enter the figures using buttons 0 to...

Owner's Manual
Page 91
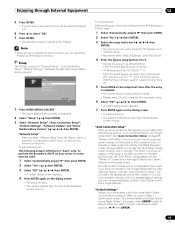
...USB device being connected, connecting operation resumes. Software update is available on the Pioneer website (http:// www.pioneerelectronics.com). First download the software according to the ... The next screen appears. Make sure that media server has been set up. Do not turn the system off until the procedure is complete. 1 Press HOME MEDIA GALLERY. • ... then ENTER). • A "Software Update" submenu appears. 4 Remove the USB flash drive from the plasma display. 91 En guidelines on the selected server. You can memorize previously connected servers. Ex.) software Version...
...USB device being connected, connecting operation resumes. Software update is available on the Pioneer website (http:// www.pioneerelectronics.com). First download the software according to the ... The next screen appears. Make sure that media server has been set up. Do not turn the system off until the procedure is complete. 1 Press HOME MEDIA GALLERY. • ... then ENTER). • A "Software Update" submenu appears. 4 Remove the USB flash drive from the plasma display. 91 En guidelines on the selected server. You can memorize previously connected servers. Ex.) software Version...
Owner's Manual
Page 92
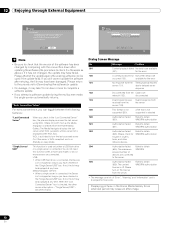
...Single Server/USB Next Cancel 1 OK Cancel 1 Note • Be sure to check that is in the "Last Connected Server" box, the plasma display accesses the last server using WOL ("Wake On LAN") first as above.). Dialog Screen Message No. supported is the same as the Media Navigator...300 This format is not A file that the version of the software has been changed , the update may have failed. WOL is activated to turn on the license from the Home Media Gallery. for the error 100 A communication error No further details are available (001). available for WMDRM ...
...Single Server/USB Next Cancel 1 OK Cancel 1 Note • Be sure to check that is in the "Last Connected Server" box, the plasma display accesses the last server using WOL ("Wake On LAN") first as above.). Dialog Screen Message No. supported is the same as the Media Navigator...300 This format is not A file that the version of the software has been changed , the update may have failed. WOL is activated to turn on the license from the Home Media Gallery. for the error 100 A communication error No further details are available (001). available for WMDRM ...
Owner's Manual
Page 94
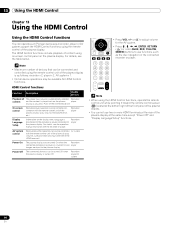
... display as the disc navigator on the plasma display. 13 Using the HDMI Control Chapter 13 Using the HDMI Control Using the HDMI Control functions You can operate such Pioneer devices as follows: recorder x 2, player x 2, AV system x 1. • Not all device operations may be available for ..., see the table below. • Press VOL +/- Power Off The connected device(s) can be turned Off when the plasma display is turned On and player images are input to the plasma display. Recorder/ player AV system control Receiver/amplifier operation can also be controlled AV system with the...
... display as the disc navigator on the plasma display. 13 Using the HDMI Control Chapter 13 Using the HDMI Control Using the HDMI Control functions You can operate such Pioneer devices as follows: recorder x 2, player x 2, AV system x 1. • Not all device operations may be available for ..., see the table below. • Press VOL +/- Power Off The connected device(s) can be turned Off when the plasma display is turned On and player images are input to the plasma display. Recorder/ player AV system control Receiver/amplifier operation can also be controlled AV system with the...


