
Owner's Manual
Page 15
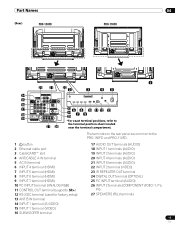
... 1 20 21 22 2 3 45 14 4 5 15 16 17 23 6 8 10 11 12 13 18 19 24 7 9 25 *For exact terminal positions, refer to the PRO-150FD and PRO-110FD. 1 a button 2 Ethernet cable port 3 CableCARD™ slot 4 ANT/CABLE A IN terminal 5 AC IN terminal 6 INPUT 4 terminal (HDMI) 7 INPUT 5 terminal (HDMI)... 8 INPUT 6 terminal (HDMI) 9 INPUT 7 terminal (HDMI) 10 PC INPUT terminal (ANALOG RGB) 11 CONTROL OUT terminal (supports SR+)...
... 1 20 21 22 2 3 45 14 4 5 15 16 17 23 6 8 10 11 12 13 18 19 24 7 9 25 *For exact terminal positions, refer to the PRO-150FD and PRO-110FD. 1 a button 2 Ethernet cable port 3 CableCARD™ slot 4 ANT/CABLE A IN terminal 5 AC IN terminal 6 INPUT 4 terminal (HDMI) 7 INPUT 5 terminal (HDMI)... 8 INPUT 6 terminal (HDMI) 9 INPUT 7 terminal (HDMI) 10 PC INPUT terminal (ANALOG RGB) 11 CONTROL OUT terminal (supports SR+)...

Owner's Manual
Page 19
... Installing the Pioneer speaker. Sheet (PRO-150FD) 2 Attach the stand at the bottom of the stand indicates downward. Note • Be sure to install the plasma display in a flat, stable location. • Insert the screws into the plasma display so that an arrow with "T" inscribed). 1 With the plasma display lying flat, fit the stand's support columns...
... Installing the Pioneer speaker. Sheet (PRO-150FD) 2 Attach the stand at the bottom of the stand indicates downward. Note • Be sure to install the plasma display in a flat, stable location. • Insert the screws into the plasma display so that an arrow with "T" inscribed). 1 With the plasma display lying flat, fit the stand's support columns...
Owner's Manual
Page 27
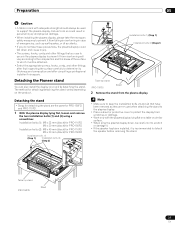
...display from the plasma display. Detaching the stand • Steps for attaching/detaching the stand varies depending on a rack by detaching the stand. Detaching the Pioneer stand You can...black) for PRO-110FD M6 x 20 mm (black) for PRO-150FD Installation bolts (2): M8 x 40 mm (black) for PRO-110FD M6 x 20 mm (black) for PRO-150FD and PRO-110FD. 1 With the plasma display lying ...plasma display, please take the necessary safety measures to prevent it from falling or overturning in case of emergencies, such as earthquakes, or of the surface to which it is recommended to support the plasma...
...display from the plasma display. Detaching the stand • Steps for attaching/detaching the stand varies depending on a rack by detaching the stand. Detaching the Pioneer stand You can...black) for PRO-110FD M6 x 20 mm (black) for PRO-150FD Installation bolts (2): M8 x 40 mm (black) for PRO-110FD M6 x 20 mm (black) for PRO-150FD and PRO-110FD. 1 With the plasma display lying ...plasma display, please take the necessary safety measures to prevent it from falling or overturning in case of emergencies, such as earthquakes, or of the surface to which it is recommended to support the plasma...

Owner's Manual
Page 28
... tighten the installation bolts (2) and (1) firmly using a screwdriver. For speaker installation, see Installing the Pioneer speaker on a table or similar surface. • When lying the plasma display down, be careful not to scratch or damage it. • If the speaker has been... damage. • Work only with "T" inscribed). 1 With the plasma display lying flat, fit the stand's support columns to stand upright. Plasma display Installation bolts (2): M8 x 40 mm (black) for PRO-110FD M6 x 20 mm (black) for PRO-150FD Installation bolts (1) (Step 2) Installation bolts (2) (Step 1) ...
... tighten the installation bolts (2) and (1) firmly using a screwdriver. For speaker installation, see Installing the Pioneer speaker on a table or similar surface. • When lying the plasma display down, be careful not to scratch or damage it. • If the speaker has been... damage. • Work only with "T" inscribed). 1 With the plasma display lying flat, fit the stand's support columns to stand upright. Plasma display Installation bolts (2): M8 x 40 mm (black) for PRO-110FD M6 x 20 mm (black) for PRO-150FD Installation bolts (1) (Step 2) Installation bolts (2) (Step 1) ...


