
Operating Instructions
Page 4
... Tuner Setup 36 Setting up TV channels 36 Using Auto Channel Preset 36 Setting for skipping unwanted channels 36 Setting up TV channels manually ........ 36 Checking signal strength 36 Checking the CableCARD™ ID 37 Parental Control 37 Changing the password 37 Clearing the password 38...13 Plasma display 13 Remote control unit 15 05 Preparation 16 Installing the plasma display 16 Moving the plasma display 16 Installing the Pioneer speaker (PRO-1150HD 16 Preventing the plasma display from that shown in a safe place for watching digital and/or conventional TV channels 23 ...
... Tuner Setup 36 Setting up TV channels 36 Using Auto Channel Preset 36 Setting for skipping unwanted channels 36 Setting up TV channels manually ........ 36 Checking signal strength 36 Checking the CableCARD™ ID 37 Parental Control 37 Changing the password 37 Clearing the password 38...13 Plasma display 13 Remote control unit 15 05 Preparation 16 Installing the plasma display 16 Moving the plasma display 16 Installing the Pioneer speaker (PRO-1150HD 16 Preventing the plasma display from that shown in a safe place for watching digital and/or conventional TV channels 23 ...

Operating Instructions
Page 5
... Management (PC source only 60 Sleep Timer 60 Image position adjustment (AV source only 61 Automatic image position and clock adjustments (PC source only 61 Manual image position and clock adjustments (PC source only 61 Reducing video noise 61 Selecting a game mode 62 Selecting a screen size... manually 62 Selecting a screen size automatically ..... 63 Detecting side masks 63 Changing the brightness at both sides of the screen (Side Mask 63 Room Light Sensor ...
... Management (PC source only 60 Sleep Timer 60 Image position adjustment (AV source only 61 Automatic image position and clock adjustments (PC source only 61 Manual image position and clock adjustments (PC source only 61 Reducing video noise 61 Selecting a game mode 62 Selecting a screen size... manually 62 Selecting a screen size automatically ..... 63 Detecting side masks 63 Changing the brightness at both sides of the screen (Side Mask 63 Room Light Sensor ...

Operating Instructions
Page 10
... as well as radiators, heaters, stoves and other openings in the cabinet are not sure of the type of power supply used in this manual in a safe place-These safety and operating instructions must be routed properly to be sure to install the product according to the method recommended ...objects from the AC outlet before the product is damaged. Sudden stops, excessive force and uneven floor surface can expose you are designed for the PRO-950HD (including the stand). Unplug the power cord from heat sources such as damage to the product. When the product has been exposed to high ...
... as well as radiators, heaters, stoves and other openings in the cabinet are not sure of the type of power supply used in this manual in a safe place-These safety and operating instructions must be routed properly to be sure to install the product according to the method recommended ...objects from the AC outlet before the product is damaged. Sudden stops, excessive force and uneven floor surface can expose you are designed for the PRO-950HD (including the stand). Unplug the power cord from heat sources such as damage to the product. When the product has been exposed to high ...

Operating Instructions
Page 11
... • Be sure to use the supplied bolts. • For details, see the instruction manual that results from the mounting surface of mounting items other items • Consult your dealer. &#... 18 mm (0.5 inches to 0.7 inches) in depth from the use the optional Pioneer mounting products. • Pioneer shall not be liable for any items such as the optional bracket. Safety Precautions ... item) M8 screw 12 mm to 18 mm (0.5 inches to 0.7 inches) Median line Rear view (PRO-950HD) Mounting hole Mounting hole Median line 4 5 Median line Caution • Be sure to use them ...
... • Be sure to use the supplied bolts. • For details, see the instruction manual that results from the mounting surface of mounting items other items • Consult your dealer. &#... 18 mm (0.5 inches to 0.7 inches) in depth from the use the optional Pioneer mounting products. • Pioneer shall not be liable for any items such as the optional bracket. Safety Precautions ... item) M8 screw 12 mm to 18 mm (0.5 inches to 0.7 inches) Median line Rear view (PRO-950HD) Mounting hole Mounting hole Median line 4 5 Median line Caution • Be sure to use them ...

Operating Instructions
Page 29
... TV Guide On Screen™ system is selected, the plasma display sound remains mono even if the system receives a stereo broadcast. In this manual designate TV channels that are received through the conventional VHF/UHF frequencies or conventional cable TV channels. • When stereo sound is difficult to ...hear, you may manually switch to the MONO mode to INPUT 7 or PC does not change the type of the MTS/SAP modes selected, the display changes depend...
... TV Guide On Screen™ system is selected, the plasma display sound remains mono even if the system receives a stereo broadcast. In this manual designate TV channels that are received through the conventional VHF/UHF frequencies or conventional cable TV channels. • When stereo sound is difficult to ...hear, you may manually switch to the MONO mode to INPUT 7 or PC does not change the type of the MTS/SAP modes selected, the display changes depend...

Operating Instructions
Page 32
... to digital programming and broadcasting, TV Guide data may differ from appearing upon power on. and/or one given in all eight days of this manual. and is a registered mark of Gemstar-TV Guide International, Inc. Welcome Screen Initial TV set up to one week (see the Reminder Screen when you...
... to digital programming and broadcasting, TV Guide data may differ from appearing upon power on. and/or one given in all eight days of this manual. and is a registered mark of Gemstar-TV Guide International, Inc. Welcome Screen Initial TV set up to one week (see the Reminder Screen when you...

Operating Instructions
Page 35
... source HOME MENU Picture Sound Power Control Sleep Timer Option Tuner Setup Home Media Gallery HDMI Control Item AV Selection Contrast Brightness Color Tint Sharpness Pro Adjust Reset Treble Bass Balance Reset Sound Effect Energy Save No Signal off No Operation off Position Auto Size Side Mask HDMI Input HDMI Control... Home Media Gallery HDMI Control Item AV Selection Contrast Brightness Red Green Blue Reset Same as the AV source Energy Save Power Management Auto Setup Manual Setup HDMI Input HDMI Control Setting Page 53 54 54 54 54 54 54 58 59 60 60 61 61 66 90 71 - 87 88...
... source HOME MENU Picture Sound Power Control Sleep Timer Option Tuner Setup Home Media Gallery HDMI Control Item AV Selection Contrast Brightness Color Tint Sharpness Pro Adjust Reset Treble Bass Balance Reset Sound Effect Energy Save No Signal off No Operation off Position Auto Size Side Mask HDMI Input HDMI Control... Home Media Gallery HDMI Control Item AV Selection Contrast Brightness Red Green Blue Reset Same as the AV source Energy Save Power Management Auto Setup Manual Setup HDMI Input HDMI Control Setting Page 53 54 54 54 54 54 54 58 59 60 60 61 61 66 90 71 - 87 88...

Operating Instructions
Page 36
...exit the menu. Checking signal strength When you have not been set up TV channels using Auto Channel Preset, you may need to manually add Cable Converter output channels. A" ( / then ENTER). 36 En Using Auto Channel Preset Auto Channel Preset automatically searches and sets..., press HOME MENU to tune in step 6. • When using the Cable Converter, you select a skipped channel in those channels. Note • Adding channels manually is functioning, you can execute Auto Channel Preset by Auto Channel Preset. 1 Press HOME MENU. 2 Select "Tuner Setup" ( / then ENTER). 3 Select "...
...exit the menu. Checking signal strength When you have not been set up TV channels using Auto Channel Preset, you may need to manually add Cable Converter output channels. A" ( / then ENTER). 36 En Using Auto Channel Preset Auto Channel Preset automatically searches and sets..., press HOME MENU to tune in step 6. • When using the Cable Converter, you select a skipped channel in those channels. Note • Adding channels manually is functioning, you can execute Auto Channel Preset by Auto Channel Preset. 1 Press HOME MENU. 2 Select "Tuner Setup" ( / then ENTER). 3 Select "...

Operating Instructions
Page 43
...If you select "Auto Set", select an antenna (A or B) and a channel number using / , / and ENTER. in this situation you select "Manual Set", manually set time is usually offered for your area ( / then ENTER). Clock Setting Note • The Primary Caption Service is usually offered for Service 1, ...or any other than "Auto", the selected parameters are available. if not specified by the provider are used regardless of the "Auto/Manual Set" setting. Clock Time Zone Time Zone Atlantic Eastern Central Mountain Current Time: 9:55 pm EDT Monday 05/17/04 xxxxxxxxxxxxxxxxxxxxx ...
...If you select "Auto Set", select an antenna (A or B) and a channel number using / , / and ENTER. in this situation you select "Manual Set", manually set time is usually offered for your area ( / then ENTER). Clock Setting Note • The Primary Caption Service is usually offered for Service 1, ...or any other than "Auto", the selected parameters are available. if not specified by the provider are used regardless of the "Auto/Manual Set" setting. Clock Time Zone Time Zone Atlantic Eastern Central Mountain Current Time: 9:55 pm EDT Monday 05/17/04 xxxxxxxxxxxxxxxxxxxxx ...

Operating Instructions
Page 44
... Transcontinental, Inc. Note • The TV Guide On Screen™ interactive program guide provides listings for the same channel and time every Monday through Friday (manual reminder only). • Remind Regularly - Additional information is broadcast in the SCHEDULE list, but will locate these icons on the Info Bar, inside the Info...
... Transcontinental, Inc. Note • The TV Guide On Screen™ interactive program guide provides listings for the same channel and time every Monday through Friday (manual reminder only). • Remind Regularly - Additional information is broadcast in the SCHEDULE list, but will locate these icons on the Info Bar, inside the Info...

Operating Instructions
Page 49
... up to 9:15 for the same channel and time every Monday through the options. • Press ENTER on either side, press / to cycle through Friday (manual reminder only) • Regularly - For example, up to the midway point of the original schedule. closes the panel menu and returns to the Service bar...
... up to 9:15 for the same channel and time every Monday through the options. • Press ENTER on either side, press / to cycle through Friday (manual reminder only) • Regularly - For example, up to the midway point of the original schedule. closes the panel menu and returns to the Service bar...

Operating Instructions
Page 50
...by pressing MENU when either "SCHEDULE" is highlighted in the service bar: • go to channel" for the program listings. • new manual reminder - For reminder: • delete reminder - From the To Do screen you can review, edit, or delete reminder events that isn't... is "tune to Service Bar - start watching the selected program (this option is highlighted. Changing setup options You can also schedule a manual reminder. Setup options are divided into three categories: system settings, channel display, default options, and display setup progress. 1 Select "SETUP"...
...by pressing MENU when either "SCHEDULE" is highlighted in the service bar: • go to channel" for the program listings. • new manual reminder - For reminder: • delete reminder - From the To Do screen you can review, edit, or delete reminder events that isn't... is "tune to Service Bar - start watching the selected program (this option is highlighted. Changing setup options You can also schedule a manual reminder. Setup options are divided into three categories: system settings, channel display, default options, and display setup progress. 1 Select "SETUP"...
Operating Instructions
Page 53
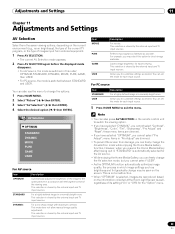
... in this option to customize settings as brightness and tint gradually change may select this order; For example, you cannot select "Pro Adjust"; This selection is shared by the external input and TV input sources. Item MOVIE PURE GAME USER Description For movies....the mode is switched in accordance with maximum contrast. This selection is switched between STANDARD and USER. This mode does not allow manual image quality adjustment. Adjustments and Settings 11 Chapter 11 Adjustments and Settings AV Selection Select from the seven viewing options, depending on...
... in this option to customize settings as brightness and tint gradually change may select this order; For example, you cannot select "Pro Adjust"; This selection is shared by the external input and TV input sources. Item MOVIE PURE GAME USER Description For movies....the mode is switched in accordance with maximum contrast. This selection is switched between STANDARD and USER. This mode does not allow manual image quality adjustment. Adjustments and Settings 11 Chapter 11 Adjustments and Settings AV Selection Select from the seven viewing options, depending on...

Operating Instructions
Page 56
... Activates CTI Color Space Changes color reproduction space Selections 1 Optimized for more than three seconds. To do this, select "Manual" first and then press and hold ENTER for vivid, vibrant color reproduction 2 Standard color reproduction 7 Press HOME MENU to... be adjusted ( / then ENTER). 8 Select the desired level ( / ). The manual adjustment screen appears. Using Color Management 1 Press HOME MENU. 2 Select "Picture" ( / then ENTER). 3 Select "Pro Adjust" ( / then ENTER). 4 Select "Color Detail" ( / then ENTER). 5 Select "Color Management" ...
... Activates CTI Color Space Changes color reproduction space Selections 1 Optimized for more than three seconds. To do this, select "Manual" first and then press and hold ENTER for vivid, vibrant color reproduction 2 Standard color reproduction 7 Press HOME MENU to... be adjusted ( / then ENTER). 8 Select the desired level ( / ). The manual adjustment screen appears. Using Color Management 1 Press HOME MENU. 2 Select "Picture" ( / then ENTER). 3 Select "Pro Adjust" ( / then ENTER). 4 Select "Color Detail" ( / then ENTER). 5 Select "Color Management" ...

Operating Instructions
Page 61
... ( / then ENTER). 3 Select "Auto Setup" ( / then ENTER). appears, Auto Setup may fail with a PC image composed of similar patterns or monochrome. Option Auto Setup Manual Setup 1 Press HOME MENU. 2 Select "Option" ( / then ENTER). 3 Select "Tuner NR Setting" ( / then ENTER). 4 Select "Channel Map" ( / ). &#...11 Image position adjustment (AV source only) Adjusts the horizontal and vertical positions of images on the levels of broadcasting signals. Manual image position and clock adjustments (PC source only) Usually you can easily adjust the positions and clock of images using / ...
... ( / then ENTER). 3 Select "Auto Setup" ( / then ENTER). appears, Auto Setup may fail with a PC image composed of similar patterns or monochrome. Option Auto Setup Manual Setup 1 Press HOME MENU. 2 Select "Option" ( / then ENTER). 3 Select "Tuner NR Setting" ( / then ENTER). 4 Select "Channel Map" ( / ). &#...11 Image position adjustment (AV source only) Adjusts the horizontal and vertical positions of images on the levels of broadcasting signals. Manual image position and clock adjustments (PC source only) Usually you can easily adjust the positions and clock of images using / ...

Operating Instructions
Page 62
Selecting a screen size manually In single-screen mode, press SCREEN SIZE to exit the menu. Bars may differ depending on the screen). • The "On" setting is for image ... (except a PC source) and "GAME" is selected in "Channel Map" is the case, select FULL. • Some HD broadcasts may cause uneven wear. For the PRO-950HD, the number of the screen (e.g., images, graphic interface) may cause temporary or permanent image retention depending on the conditions of the screen For 16:9 squeezed...
Selecting a screen size manually In single-screen mode, press SCREEN SIZE to exit the menu. Bars may differ depending on the screen). • The "On" setting is for image ... (except a PC source) and "GAME" is selected in "Channel Map" is the case, select FULL. • Some HD broadcasts may cause uneven wear. For the PRO-950HD, the number of the screen (e.g., images, graphic interface) may cause temporary or permanent image retention depending on the conditions of the screen For 16:9 squeezed...

Operating Instructions
Page 63
... reduce the possibility of the screen. 1 Repeat steps 1 to 3 in full and wide screen 5 Press HOME MENU to exit the menu. 63 En Note • Manually select an appropriate screen size if an image does not automatically switch to exit the menu. In case a detection error occurs..., manually change the brightness of the gray side masks that contain no aspect ratio information, the function will appear on the channel display when this function, ...
... reduce the possibility of the screen. 1 Repeat steps 1 to 3 in full and wide screen 5 Press HOME MENU to exit the menu. 63 En Note • Manually select an appropriate screen size if an image does not automatically switch to exit the menu. In case a detection error occurs..., manually change the brightness of the gray side masks that contain no aspect ratio information, the function will appear on the channel display when this function, ...
Operating Instructions
Page 65
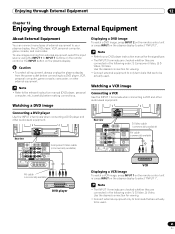
Note • Refer to the relevant instruction manual (DVD player, personal computer, etc.) carefully before connecting to a DVD player, VCR, personal computer, game console, camcorder, or other external equipment. Use the desired connection ... External Equipment 12 Chapter 12 Enjoying through External Equipment About External Equipment You can connect many types of external equipment to your DVD player instruction manual for the signal type. • The INPUT 2 terminals are checked whether they are to be used . Use the desired connection for viewing. • Connect external...
Note • Refer to the relevant instruction manual (DVD player, personal computer, etc.) carefully before connecting to a DVD player, VCR, personal computer, game console, camcorder, or other external equipment. Use the desired connection ... External Equipment 12 Chapter 12 Enjoying through External Equipment About External Equipment You can connect many types of external equipment to your DVD player instruction manual for the signal type. • The INPUT 2 terminals are checked whether they are to be used . Use the desired connection for viewing. • Connect external...
Operating Instructions
Page 66
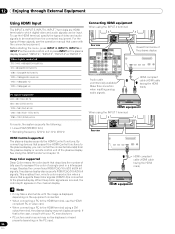
..., depending on the equipment connected. • When connecting a PC to select "INPUT 4", "INPUT 5", "INPUT 6" or "INPUT 7". For the types of these signals, see the operation manual that support the HDMI Control functions to represent the color of a single pixel in a bitmapped image. See Using the HDMI Control on the plasma display...
..., depending on the equipment connected. • When connecting a PC to select "INPUT 4", "INPUT 5", "INPUT 6" or "INPUT 7". For the types of these signals, see the operation manual that support the HDMI Control functions to represent the color of a single pixel in a bitmapped image. See Using the HDMI Control on the plasma display...

Operating Instructions
Page 67
... another audio signal type. • For the audio signal types to be specified, check the operation manual that came with the connected equipment. • Depending on the equipment to be specified, check the operation manual that results in full size for the desired input source, then perform the following procedure to the...
... another audio signal type. • For the audio signal types to be specified, check the operation manual that came with the connected equipment. • Depending on the equipment to be specified, check the operation manual that results in full size for the desired input source, then perform the following procedure to the...


